当前位置:网站首页>tensorRT教程——使用tensorRT OP 搭建自己的网络
tensorRT教程——使用tensorRT OP 搭建自己的网络
2022-08-04 05:29:00 【TigerZ*】
如下提供一个可以运行的使用tensorRT的OP来搭建自己定义的层或者直接重写自己网络,使用OP的场景:
1、自己的网络无法通过paser来直接转换为TRT的网络。如果自己写cuda实现,那么量化的操作也得自己实现,这样难度其实很高,建议还是使用TRT的OP搭建,搭建完支持量化等操作。
2、学习测试TRT的OP。
关于OP的一些我遇到的疑惑解读见我的另一篇博客:tensorRT教程——tensor RT OP理解(实现自定义层,搭建网络)_u012863603的博客-CSDN博客
import tensorrt as trt
import numpy
import pycuda.driver as cuda
import pycuda.autoinit


TRT_LOGGER = trt.Logger(trt.Logger.WARNING)


def generate_net(network, weights):
    input_tensor = network.add_input(name="input", dtype=trt.float32, shape=(4, 5, 5))
    print(input_tensor.shape)

#    scale_1 = network.add_scale(input=input_tensor, mode=trt.tensorrt.ScaleMode.UNIFORM, shift=np.zeros((1), dtype=np.float32), scale=np.array([4], dtype=np.float32), power=np.ones((1), dtype=np.float32))

#    unary_1 = network.add_unary(input=input_tensor, op=trt.tensorrt.UnaryOperation.EXP)
#    print(unary_1.get_output(0).shape)

    elemnet_1 = network.add_elementwise(input1=input_tensor, input2=input_tensor, op=trt.tensorrt.ElementWiseOperation.DIV)
    print(elemnet_1.get_output(0).shape)
#    reduce_1 = network.add_reduce(input=input_tensor, op=trt.tensorrt.ReduceOperation.MAX, axes=1, keep_dims=True)
#    print(reduce_1.get_output(0).shape)
#    network.mark_output(reduce_1.get_output(0))

#    div_1 = network.add_elementwise(input1=input_tensor, input2=reduce_1.get_output(0), op=trt.tensorrt.ElementWiseOperation.DIV)
#    network.mark_output(div_1.get_output(0))

#    const_1 = network.add_constant(shape=[], weights=numpy.zeros((2,), dtype=numpy.int32))
#    gather_1 = network.add_gather(input=input_tensor, indices=const_1.get_output(0), axis=2)
#    print(const_1.get_output(0).shape)
#    network.mark_output(gather_1.get_output(0))

#    shuffle_1 = network.add_shuffle(input=gather_1.get_output(0))
#    shuffle_1.reshape_dims=[1, 5, 5]
#    print(shuffle_1.get_output(0).shape)

#    concat_1 = network.add_concatenation(inputs=[input_tensor, gather_1.get_output(0)])
#    print(concat_1.get_output(0).shape)

    network.mark_output(elemnet_1.get_output(0))


def build_engine(weights):
    # For more information on TRT basics, refer to the introductory samples.
    with trt.Builder(TRT_LOGGER) as builder, builder.create_network() as network:
        builder.max_workspace_size = 1 << 30
        builder.max_batch_size = 8
        # Populate the network using weights from the PyTorch model.
        generate_net(network, weights)
        # Build and return an engine.
        return builder.build_cuda_engine(network)


def allocate_buffers(engine):
    # Determine dimensions and create page-locked memory buffers (i.e. won't be swapped to disk) to hold host inputs/outputs.
    h_input = cuda.pagelocked_empty(trt.volume(engine.get_binding_shape(0)) * engine.max_batch_size, dtype=trt.nptype(trt.float32))
    h_output = cuda.pagelocked_empty(trt.volume(engine.get_binding_shape(1)) * engine.max_batch_size, dtype=trt.nptype(trt.float32))

    # Allocate:device memory for inputs and outputs.
    d_input = cuda.mem_alloc(h_input.nbytes)
    d_output = cuda.mem_alloc(h_output.nbytes)

    # Create a stream in which to copy inputs/outputs and run inference.
    stream = cuda.Stream()

    return h_input, d_input, h_output, d_output, stream


def inference(batch_size_inference, h_input, d_input, h_output, d_output, stream, context):
    cuda.memcpy_htod_async(d_input, h_input, stream)

    context.execute_async(batch_size=batch_size_inference, bindings=[int(d_input), int(d_output)], stream_handle=stream.handle)

    cuda.memcpy_dtoh_async(h_output, d_output, stream)

    stream.synchronize()

    return h_output
    #result_trt = numpy.reshape(h_output, (8, -1))[:batch_size_inference, ]

    #return result_trt

def main():
    input_array = numpy.array(range(300), dtype=numpy.float32).reshape(3,4,5,5)
    weights = None
    with build_engine(weights) as engine:
        h_input, d_input, h_output, d_output, stream = allocate_buffers(engine)
        with engine.create_execution_context() as context:
            h_input = input_array
            result = inference(3,h_input, d_input, h_output, d_output, stream, context)
            print(result)
if __name__ == '__main__':
main()边栏推荐
- Pytorch问题总结
- PostgreSQL schema (Schema)
- 【深度学习21天学习挑战赛】2、复杂样本分类识别——卷积神经网络(CNN)服装图像分类
- postgresql 游标(cursor)的使用
- 读研碎碎念
- The difference between oracle temporary table and pg temporary table
- MAE 论文《Masked Autoencoders Are Scalable Vision Learners》
- 0, deep learning 21 days learning challenge 】 【 set up learning environment
- 两个APP进行AIDL通信
- 【CV-Learning】线性分类器(SVM基础)
猜你喜欢

![[CV-Learning] Semantic Segmentation](/img/ad/ff5076495fa68e4bbf3be78f5ac6f2.png)
随机推荐
postgresql 游标(cursor)的使用
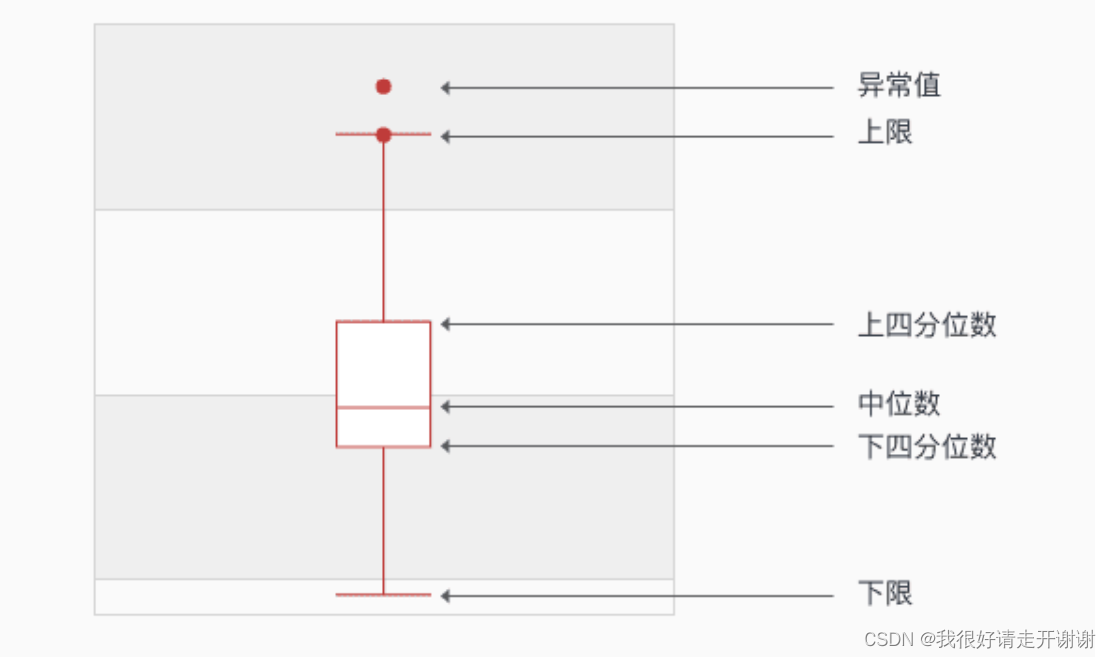
Thoroughly understand box plot analysis
yolov3 data reading (2)
MFC 打开与保存点云PCD文件
TensorFlow2 study notes: 4. The first neural network model, iris classification
with recursive用法
SQL的性能分析、优化
[Deep Learning 21-Day Learning Challenge] 3. Use a self-made dataset - Convolutional Neural Network (CNN) Weather Recognition
Th in thymeleaf: href use notes
动手学深度学习__张量
TensorFlow2学习笔记:6、过拟合和欠拟合,及其缓解方案
图像resize
【深度学习21天学习挑战赛】备忘篇:我们的神经网模型到底长啥样?——model.summary()详解
TensorFlow:tf.ConfigProto()与Session
TensorFlow2 study notes: 7. Optimizer
yolov3中数据读入(一)
thymeleaf中 th:href使用笔记
视图、存储过程、触发器
TensorFlow2 study notes: 5. Common activation functions
动手学深度学习__数据操作