当前位置:网站首页>NVIDIA Jetson test installation yolox process record
NVIDIA Jetson test installation yolox process record
2022-07-08 00:46:00 【submarineas】
introduction
This article wants to summarize about nvidia jetson Some use processes of edge box , The main idea is to connect the box ssh Environment to Runtong yolox Make a record of the process , If there are related businesses in the future, you can refer to .
jetson Content introduction
The main test environment in this article is not on the host , It's a choice nvidia in the light of jetson Out of image , There are many reasons , The first is environmental isolation , Host computer because I'm not alone , The second is that there are many problems encountered on the host bug, For the bag I want to use , There are too many environments that need to be modified , The pre installed host is based on arm Architecturally python3 There are too many environments in it , And most of them rely on , such as shapely About geography libgeos_c.so Dynamic libraries are basically missing , So I chose the official docker Mirror image . As for the host , I just started pretending arm Of conda When I met the pit, I turned docker, So there are not many stepping holes .
Preinstallation environment
The pre installed environment here is generally available after the edge box is obtained , Just the two I got so far jetson xavier nx That's true , That is to say jtop And some corresponding basic dependencies ,vim You need to install it yourself , The others are basically gone , Mainly jtop This performance monitoring tool needs to be installed , Like on the host server rtx Graphics card monitoring tool nvtop, These two are excellent plug-ins .
If there is no , I also based on some information on the Internet , from python3 Service to jtop Install notes , The fastest installation method is as follows :
"""1.  The foundation depends on """
sudo apt-get install git cmake
sudo apt-get install python3-dev
sudo apt-get install libhdf5-serial-dev hdf5-tools
sudo apt-get install libatlas-base-dev gfortran

"""2. pip3 install """
sudo apt-get update
sudo apt-get upgrade
sudo apt-get install python3-pip

"""3. pip install """
pip3 install jetson-stats

"""4.  Source code compilation jtop( If 3 Failure )"""
git clone https://github.com/rbonghi/jetson_stats.git
cd jetson_stats/
sudo python3 ./setup.py install
The above process is the whole process of installing plug-ins , Of course, if all can be used apt perhaps pip It's certainly good to get through , But some people like source code compilation and installation , So from python Start to jetson, You can also compile all the source code , The process depends apt Which is faster than the compilation speed . After installed , Input... At the terminal jtop You can go to the page :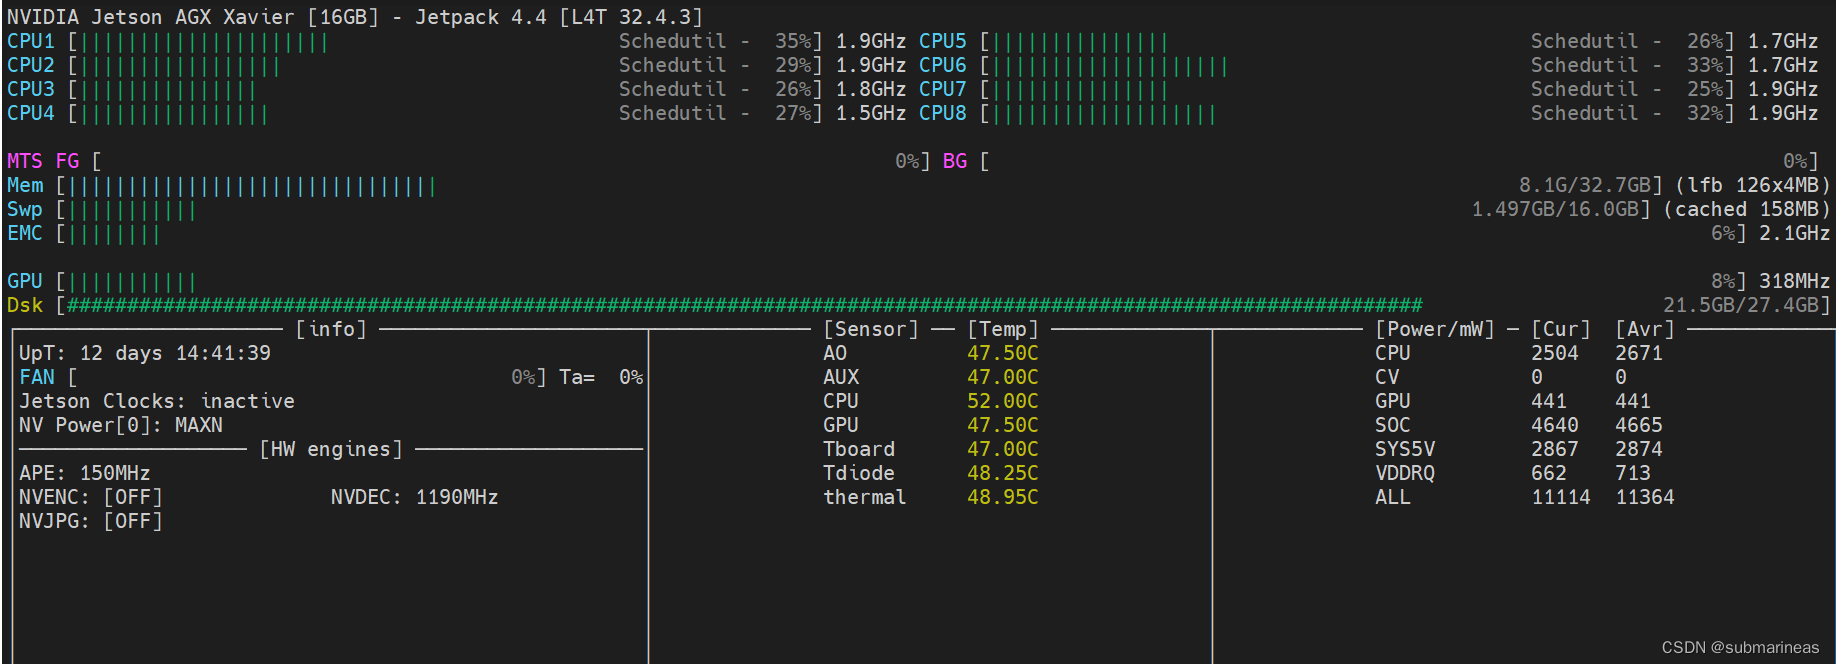
The page you just entered is a number key 1 According to the all page , The corresponding number keys 2 GPU Visualization page , Number keys 3 CPU Visualization page , Number keys 4 Memory management page , Number keys 5 Control the setting pages of fan, power and speed , final 6 It is a page that displays the information of the edge box :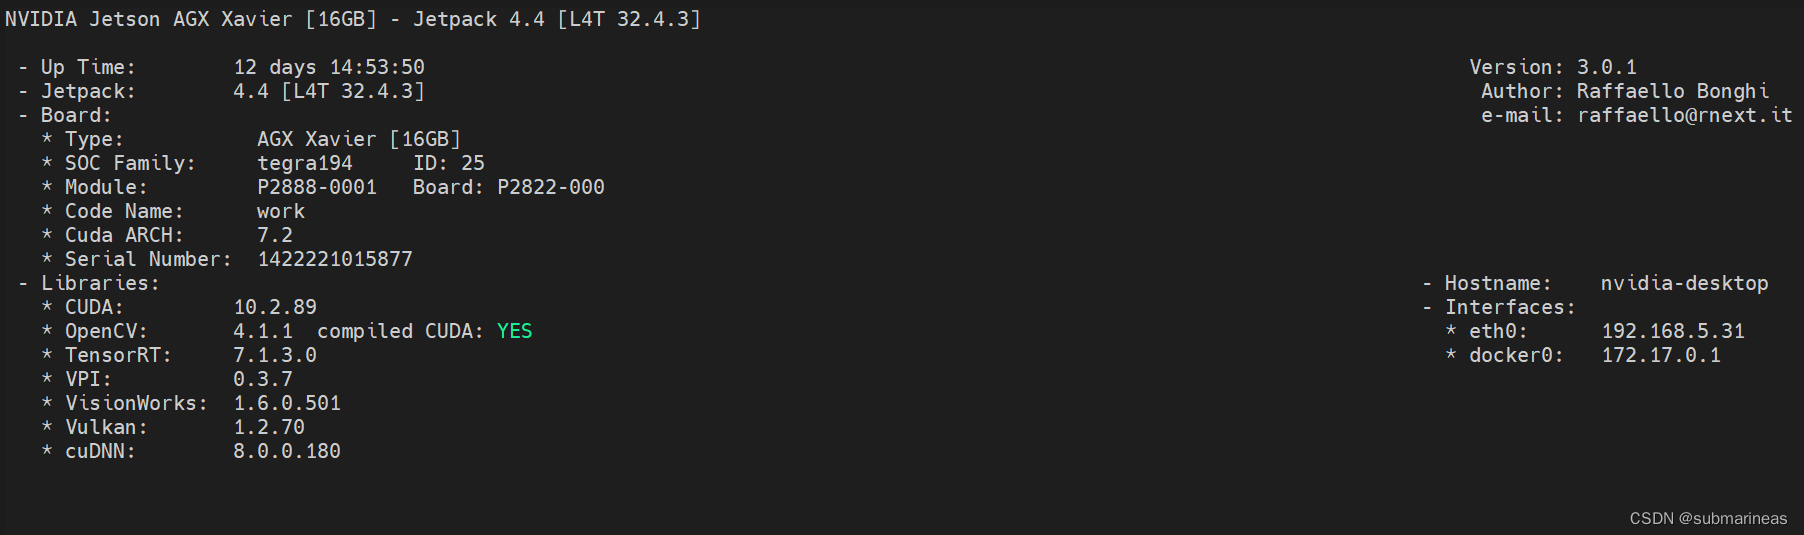
jetson Environmental installation
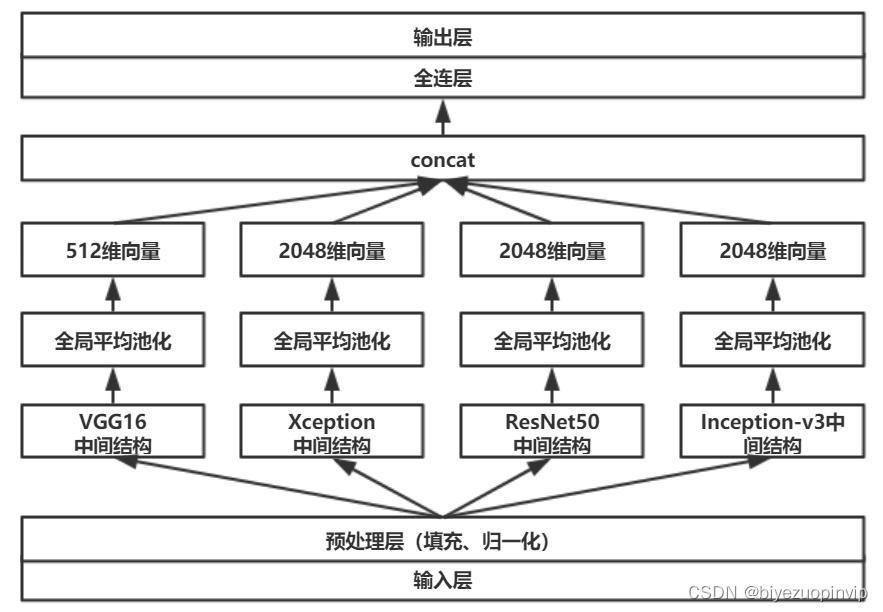
There will be three parts , The first is to enter from the host docker The mirroring process , The second is in the container pytorch and torchvision Update of these two environments , Because there is basically no version matching the current code inside the container , The last one is to run directly yolox.
docker Mirror image
Generally, the edge box will also be pre installed docker Of , But it could be 19.03 The following version , If you encounter library function problems during use , It can also be reinstalled , Because in docker Under the official website ,arm The architecture and x86 The installation method of is basically the same , That is to say, according to the order of the official website, it can be based on the current ubuntu The system selects the appropriate architecture for installation .
At present, I am deepin System installation docker There have been cases where the server architecture cannot be recognized , You need to do it yourself ,nvidia jetson After my update, there is basically no problem . The installation process can be seen from my previous docker Use notes (1):docker Introduction and installation After successful installation , You can view version information and info, If docker --version No problem , Display version correctly , So long can go nvidia The official website chose to mirror :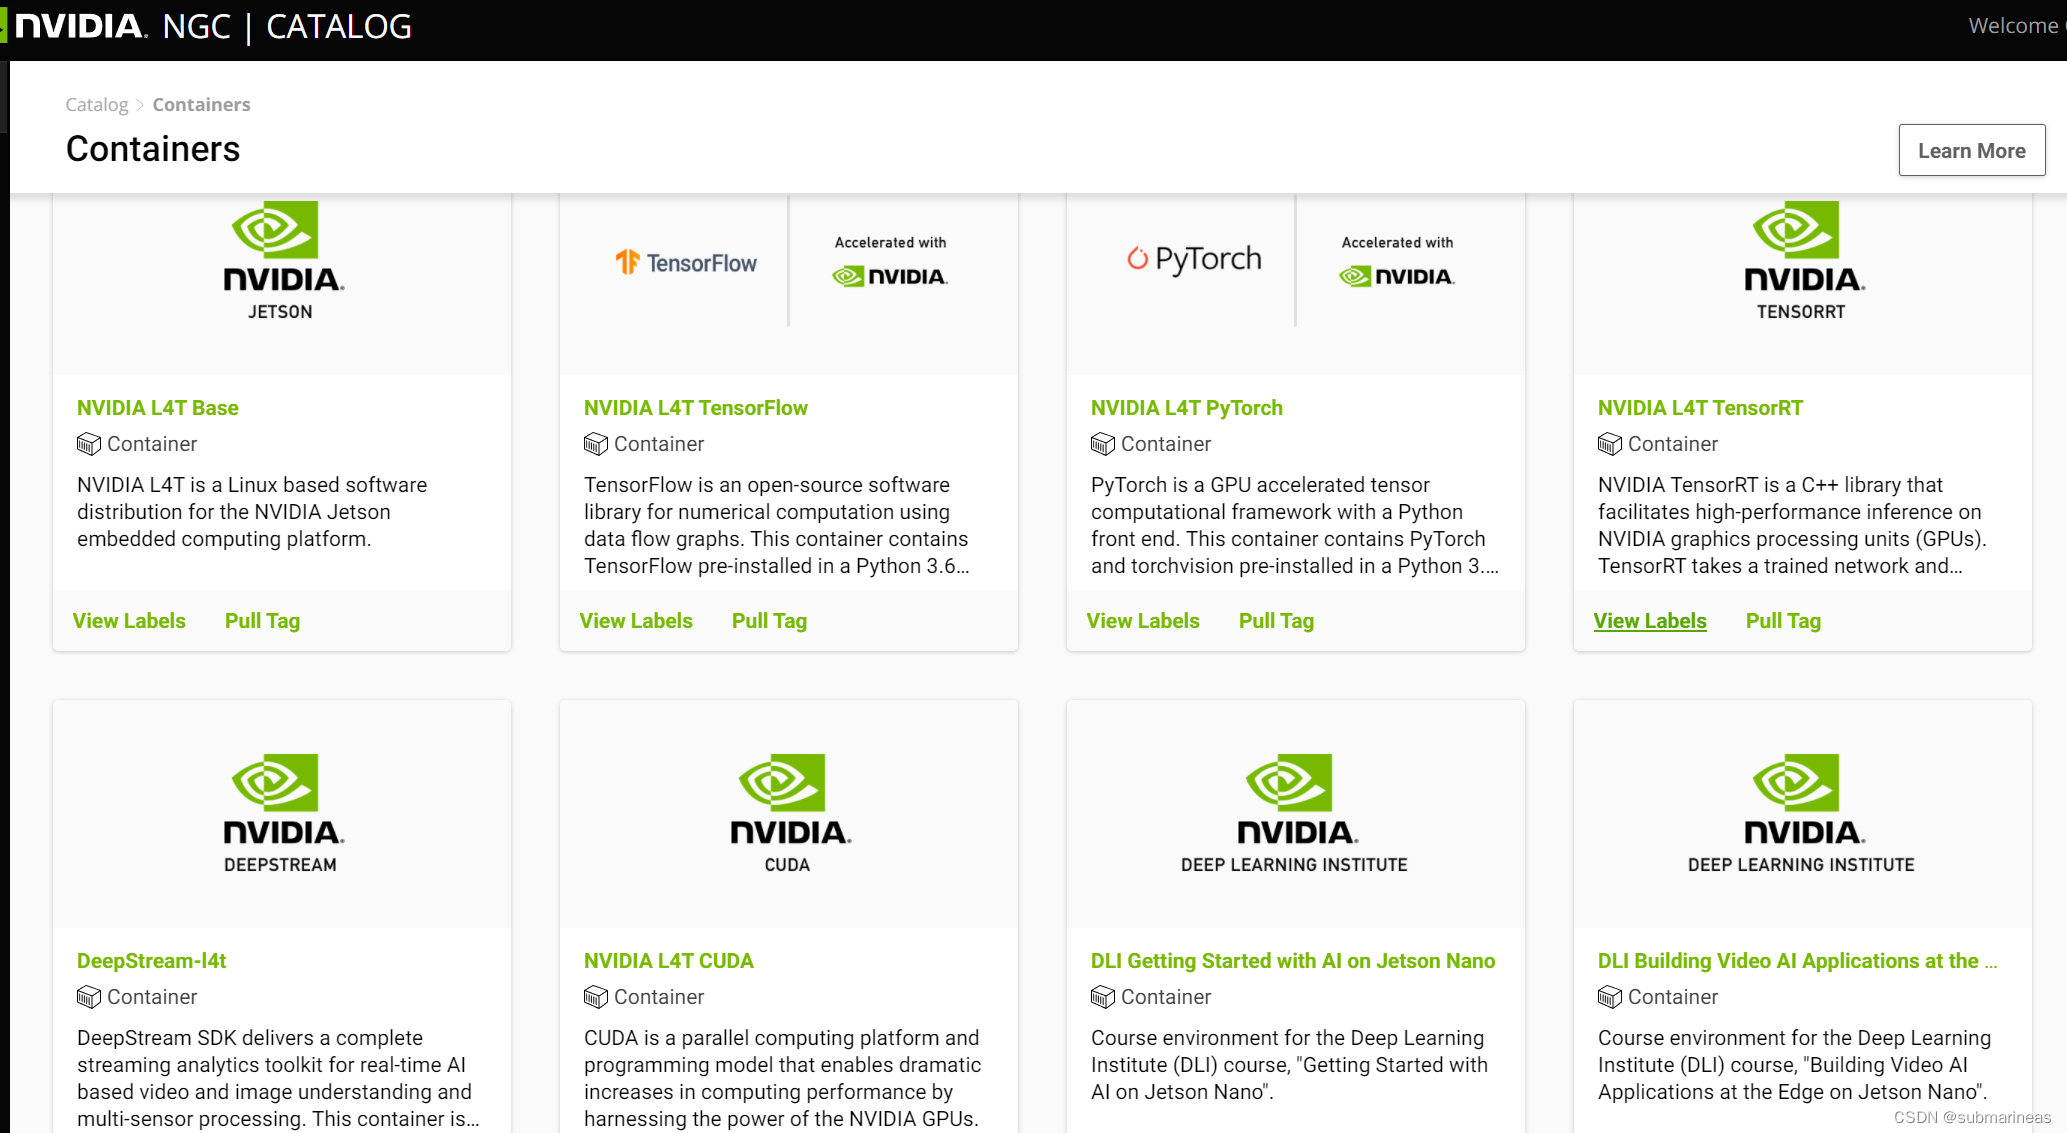
Enter under the official website nvidia Of container Catalog , Search for jetson, There will be many based on L4T Mirror image , These can be directly used in jetson Of , The page link is :
https://catalog.ngc.nvidia.com/containers?filters=&orderBy=dateModifiedDESC&query=jetson%20
I chose it here NVIDIA L4T ML, Because after loading docker after , I updated it docker The path to save ,nvidia jetson The disk of the box is relatively small , Add a mechanical disk , Then I lost all the storage paths , therefore L4T ML This image seems to be close to me 10 individual G, But the larger the size, the more complete the environment , The harder it is to get out bug, Different people have different opinions ,pull tag The order is :
docker pull nvcr.io/nvidia/l4t-ml:r34.1.1-py3
After pulling it down , Follow x86 The startup command of the architecture is the same , I just have to add -e Parameter will gpu Just join in , See what I wrote before for details docker Learning notes (9):nvidia-docker install 、 Deployment and use :
My orders are :
docker run -it --net=host --name jetson --runtime nvidia --restart always --privileged=true -e LD_LIBRARY_PATH=/usr/local/ffmpeg/lib/ --entrypoint="./home//program/xxx/start.sh" submarineas/nvidia:v5.0 /bin/bash

There may be another cuda Version of the problem , however jetson The default host and image are based on cuda 10.2 Of , I didn't think of it until I finished loading it , The results are completely consistent , You can check the image and host drive environment after installation :
nvcc -V

cat /usr/include/cudnn_version.h | grep CUDNN_MAJOR -A 2
pytorch as well as torchvision install
Get into docker, Because the container I selected above basically contains all dependencies and ml Relevant pip package , Here I went in and saw torch Version is 0.6.0, and torchvision Higher than it 0.1, This is adaptive , however yolox Needed torch Version must be 0.9.0 Here it is , I remember , Then you need to uninstall and reload , The order here is to install first pytorch, Put it on again torchvision, Because if you change the order ,torchvision The installation is still based on CPU Version of ,pip By default pypi, I made a mistake . because pypi There are compiled on the webpage arm Architecturally pytorch Installation package , I didn't see it at that time. I pulled it down and installed it directly :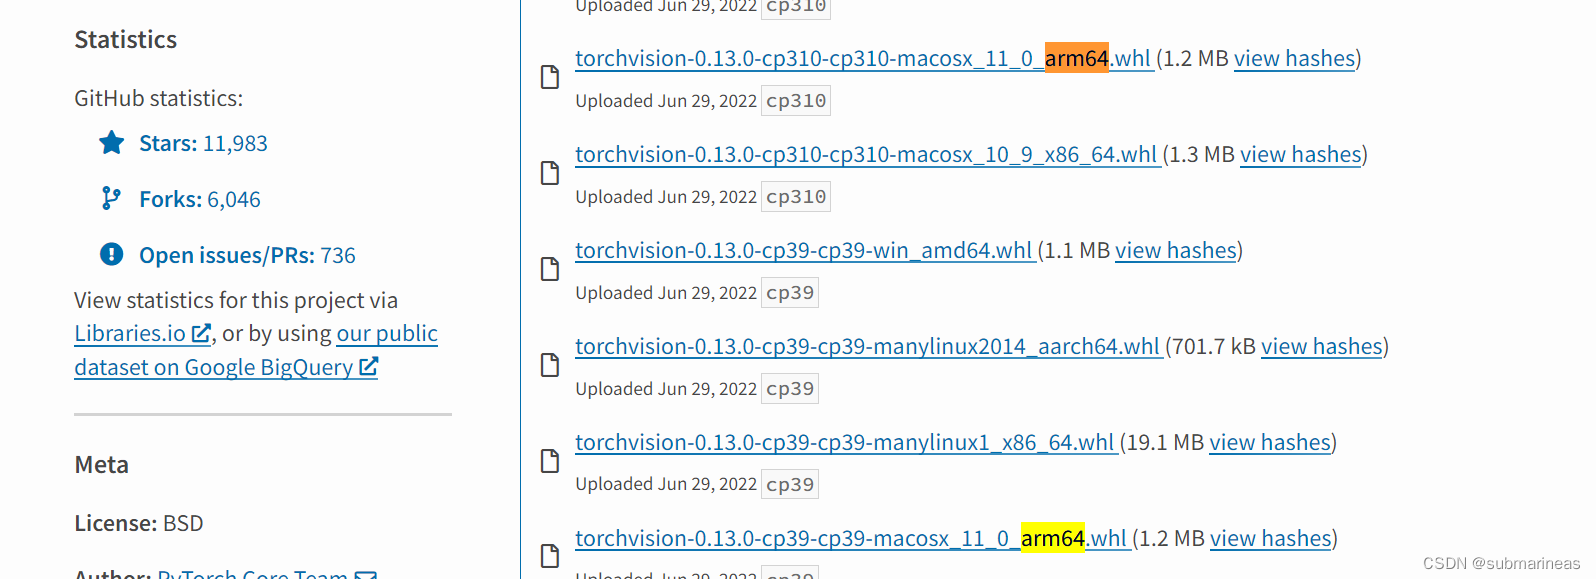
The right way is still nvidia Official website , It provides everything pytorch edition , Link to :
https://forums.developer.nvidia.com/t/pytorch-for-jetson-version-1-11-now-available/72048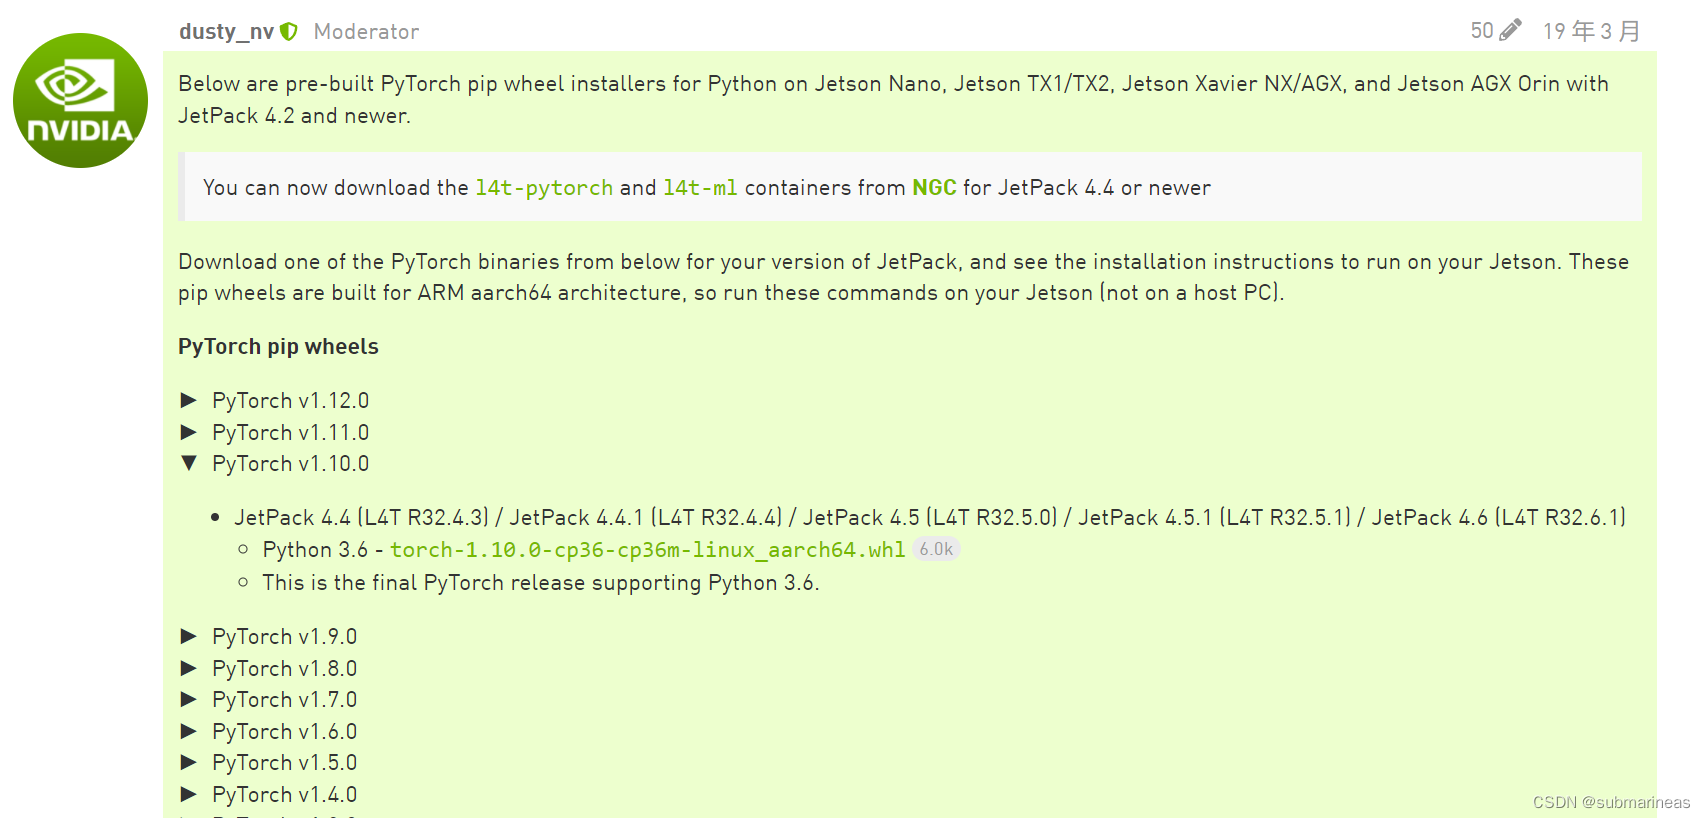
to pull down pytorch Of whl Install the offline version , Then install further torchvision, The steps here come from torchvision Of GitHub, Source code compilation and installation , Otherwise, it will be the same as above me , direct pip install Can be installed , but torch.cuda.is_available() by false.
$ sudo apt-get install libjpeg-dev zlib1g-dev libpython3-dev libavcodec-dev libavformat-dev libswscale-dev
$ git clone --branch <version> https://github.com/pytorch/vision torchvision   # see below for version of torchvision to download
$ cd torchvision
$ export BUILD_VERSION=0.x.0  # where 0.x.0 is the torchvision version
$ python3 setup.py install --user
$ cd ../  # attempting to load torchvision from build dir will result in import error
$ pip install 'pillow<7' # always needed for Python 2.7, not needed torchvision v0.5.0+ with Python 3.6
yolox Environmental installation
Installed torch And torchvision after , The rest of the package basically won't have any problems . Same as GitHub in :
git clone [email protected].com:Megvii-BaseDetection/YOLOX.git
cd YOLOX
pip3 install -v -e .  # or python3 setup.py develop
thus , The image environment is installed .
边栏推荐
- 手写一个模拟的ReentrantLock
- fabulous! How does idea open multiple projects in a single window?
- Stock account opening is free of charge. Is it safe to open an account on your mobile phone
- 51与蓝牙模块通讯,51驱动蓝牙APP点灯
- How to insert highlighted code blocks in WPS and word
- The standby database has been delayed. Check that the MRP is wait_ for_ Log, apply after restarting MRP_ Log but wait again later_ for_ log
- SDNU_ACM_ICPC_2022_Summer_Practice(1~2)
- If an exception is thrown in the constructor, the best way is to prevent memory leakage?
- 基于微信小程序开发的我最在行的小游戏
- Is it safe to open an account on the official website of Huatai Securities?
猜你喜欢
Development of a horse tourism website (optimization of servlet)
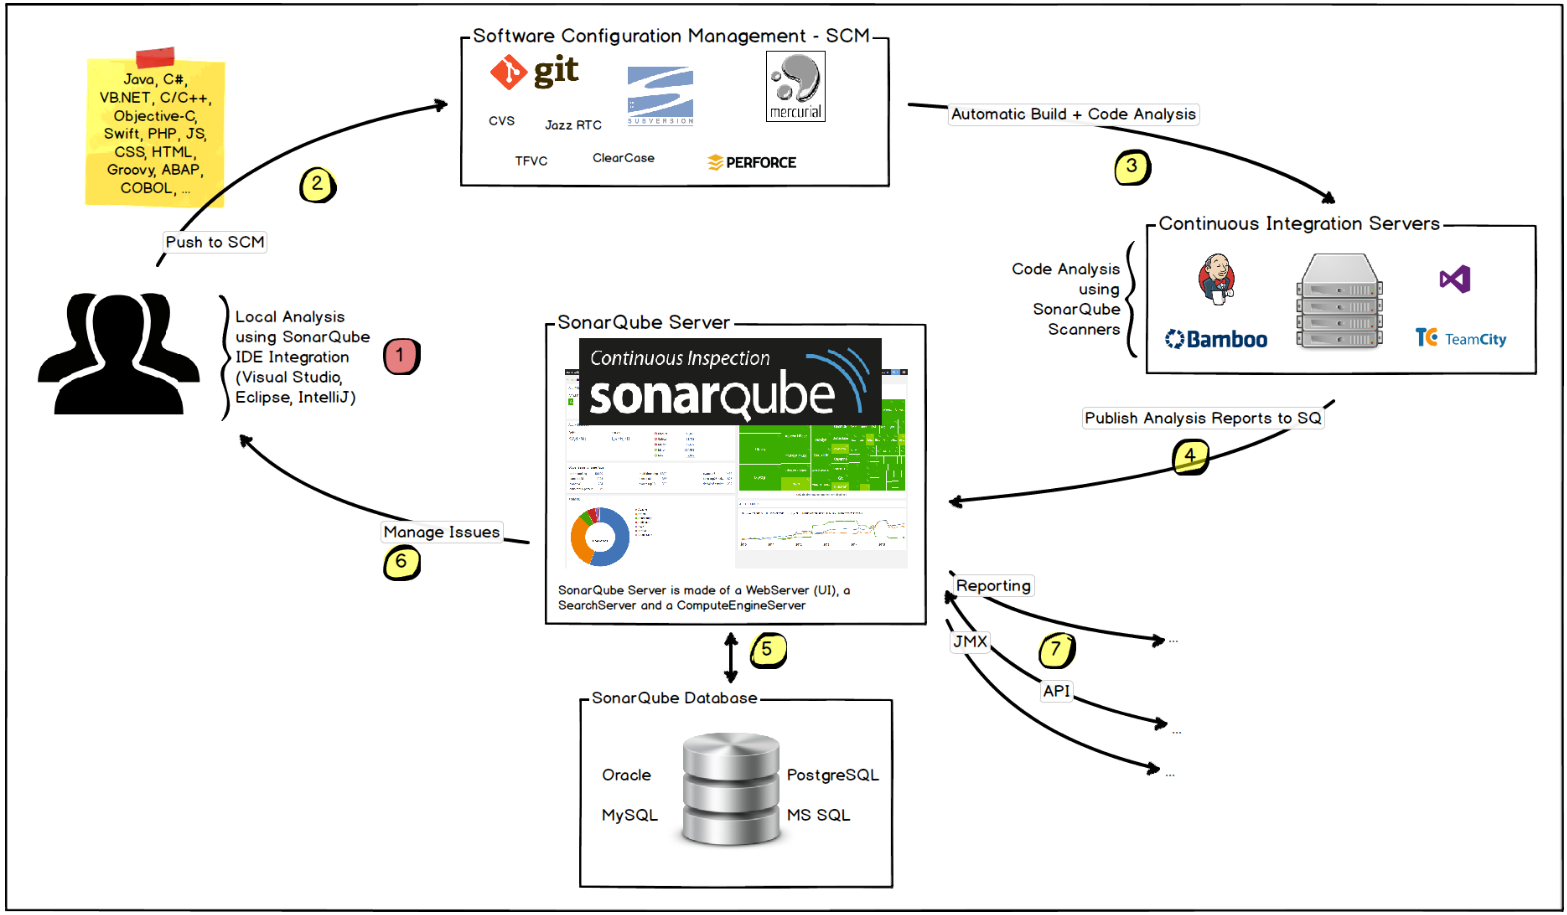
玩轉Sonar
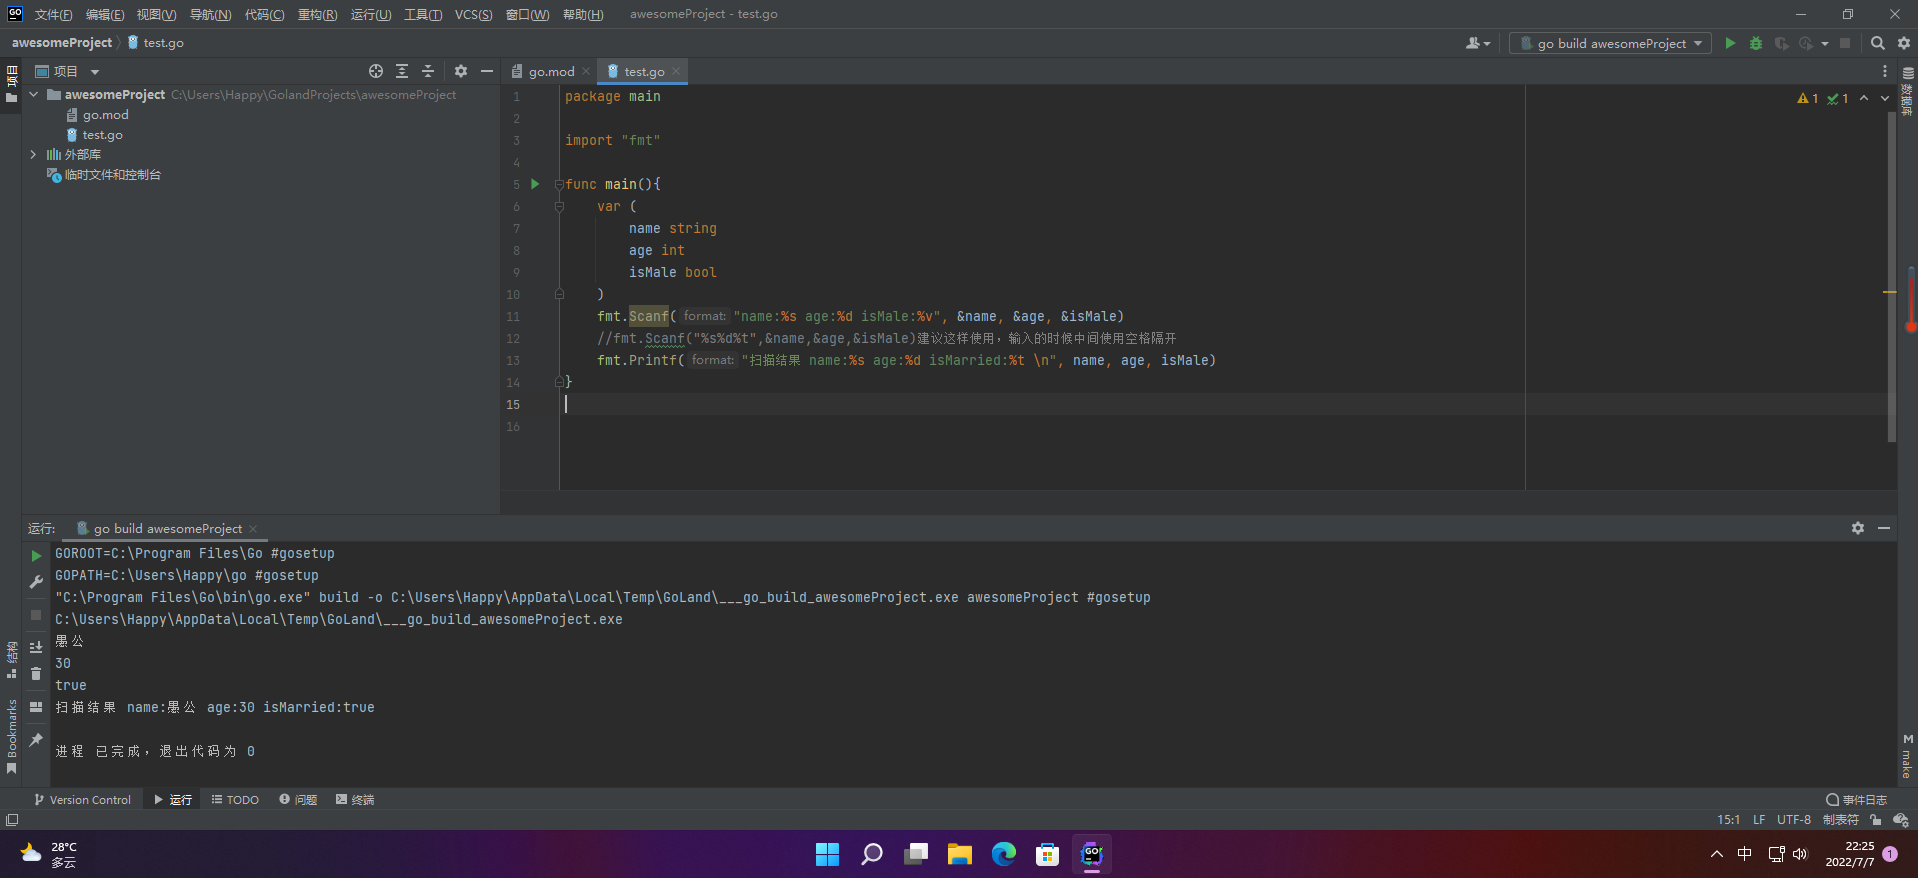
【愚公系列】2022年7月 Go教学课程 006-自动推导类型和输入输出
Malware detection method based on convolutional neural network

新库上线 | CnOpenData中华老字号企业名录
第一讲:链表中环的入口结点
Password recovery vulnerability of foreign public testing
![Cause analysis and solution of too laggy page of [test interview questions]](/img/8d/3ca92ce5f9cdc85d52dbcd826e477d.jpg)
Cause analysis and solution of too laggy page of [test interview questions]
![[研发人员必备]paddle 如何制作自己的数据集,并显示。](/img/50/3d826186b563069fd8d433e8feefc4.png)
[研发人员必备]paddle 如何制作自己的数据集,并显示。
What has happened from server to cloud hosting?
随机推荐
赞!idea 如何单窗口打开多个项目?
My best game based on wechat applet development
Installation and configuration of sublime Text3
测试流程不完善,又遇到不积极的开发怎么办?
基于卷积神经网络的恶意软件检测方法
手写一个模拟的ReentrantLock
Basic principle and usage of dynamic library, -fpic option context
How to learn a new technology (programming language)
Summary of weidongshan phase II course content
【愚公系列】2022年7月 Go教学课程 006-自动推导类型和输入输出
SDNU_ ACM_ ICPC_ 2022_ Summer_ Practice(1~2)
2022-07-07:原本数组中都是大于0、小于等于k的数字,是一个单调不减的数组, 其中可能有相等的数字,总体趋势是递增的。 但是其中有些位置的数被替换成了0,我们需要求出所有的把0替换的方案数量:
SQL knowledge summary 004: Postgres terminal command summary
Flask learning record 000: error summary
paddle入门-使用LeNet在MNIST实现图像分类方法二
Is it safe to open an account on the official website of Huatai Securities?
Which securities company has a low, safe and reliable account opening commission
5g NR system messages
The method of server defense against DDoS, Hangzhou advanced anti DDoS IP section 103.219.39 x
应用实践 | 数仓体系效率全面提升!同程数科基于 Apache Doris 的数据仓库建设