当前位置:网站首页>SVO2系列之深度濾波DepthFilter
SVO2系列之深度濾波DepthFilter
2022-07-02 11:54:00 【sunshine_guoqiang】

1. 前言
在svo2.0即rpg_svo_pro_open中,深度濾波模塊有一些變化,提供了不只是George Vogiatzis作者提出的Gaussian+ Uniform組合模型,還實現Gaussian模型來供選擇更新深度濾波狀態,另外代碼函數名稱等也有變化,本篇著重詳細解析svo2.0中的深度濾波算法思路和推導。下面分幾個部分來講解:
- DepthFilter濾波器對象創建
- 關鍵幀與普通幀處理差异
- svo2.0中的深度濾波核心算法流程、推導及解析(著重講解)
- 更新地圖點
2. DepthFilter對象創建
在frame_handler_base.cpp的構造函數中創建depth_filter_深度濾波器
FrameHandlerBase::FrameHandlerBase(
    const BaseOptions &base_options,
    const ReprojectorOptions &reprojector_options,
    const DepthFilterOptions &depthfilter_options,
    const DetectorOptions &detector_options,
    const InitializationOptions &init_options,
    const FeatureTrackerOptions &tracker_options,
    const CameraBundle::Ptr &cameras)
    : options_(base_options), cams_(cameras), stage_(Stage::kPaused),
      set_reset_(false), set_start_(false), map_(new Map),
      acc_frame_timings_(10), acc_num_obs_(10), num_obs_last_(0),
      tracking_quality_(TrackingQuality::kInsufficient),
      relocalization_n_trials_(0) {


..........
  depth_filter_.reset(
      new DepthFilter(depthfilter_options, detector_options2, cams_));

  initializer_ = initialization_utils::makeInitializer(
      init_options, tracker_options, detector_options, cams_);
  overlap_kfs_.resize(cams_->getNumCameras());

  VLOG(1) << "SVO initialized";
}
在DepthFilter內部構造函數中,如果配置文件中設置多線程深度濾波則會開啟一個線程來計算updateSeedsLoop(),以下的內容都以多線程的設置模式為例進行講解。
void DepthFilter::startThread()
{

  if(thread_)
  {

    SVO_ERROR_STREAM("DepthFilter: Thread already started!");
    return;
  }
  SVO_INFO_STREAM("DepthFilter: Start thread.");
  thread_.reset(new std::thread(&DepthFilter::updateSeedsLoop, this));
}
3. 關鍵幀與普通幀處理差异
在updateSeedsLoop()中是深度濾波計算兩種過程(SEED_INIT和UPDATE),其不斷從DepthFilter::JobQueue隊列中取當前圖像幀數據來完成計算。不管是關鍵幀還是普通幀,都會使用當前幀深度更新與其有共視關系的曆史關鍵幀overlap_kfs上種子點seeds的概率,只不過關鍵幀進入隊列時會清空隊列內所有數據來保證該關鍵幀處理。隊列中關鍵幀和普通幀這兩種圖像幀數據,處理差异具體如下:
void DepthFilter::updateSeedsLoop()
{

  while(true)
  {

    // wait for new jobs
    Job job;
    {

      ulock_t lock(jobs_mut_);
      while(jobs_.empty() && !quit_thread_)
        jobs_condvar_.wait(lock);

      if(quit_thread_)
        return;

      job = jobs_.front();
      jobs_.pop();
    } // release lock

    // process jobs
    if(job.type == Job::SEED_INIT)
    {

      ulock_t lock(feature_detector_mut_);
      depth_filter_utils::initializeSeeds(
            job.cur_frame, feature_detector_,
            options_.max_n_seeds_per_frame,
            job.min_depth, job.max_depth, job.mean_depth);
      if (options_.extra_map_points)
      {

        for (size_t idx = 0; idx < job.cur_frame->numFeatures(); idx++)
        {

          const FeatureType& type = job.cur_frame->type_vec_[idx];
          if (!isMapPoint(type) && type != FeatureType::kOutlier)
          {

            sec_feature_detector_->closeness_check_grid_.fillWithKeypoints(
                  job.cur_frame->px_vec_.col(static_cast<int>(idx)));
          }
        }
        depth_filter_utils::initializeSeeds(
              job.cur_frame, sec_feature_detector_,
              options_.max_n_seeds_per_frame + options_.max_map_seeds_per_frame,
              job.min_depth, job.max_depth, job.mean_depth);
      }
    }
    else if(job.type == Job::UPDATE)
    {

      // We get higher precision (10x in the synthetic blender dataset)
      // when we keep updating seeds even though they are converged until
      // the frame handler selects a new keyframe.
      depth_filter_utils::updateSeed(
            *job.cur_frame, *job.ref_frame, job.ref_frame_seed_index, *matcher_,
            options_.seed_convergence_sigma2_thresh, true, false);
    }
  }
}
3.1 關鍵幀:
- 會通過addKeyframe()先清空JobQueue隊列,進而往JobQueue隊列中塞入當前幀進行後續深度濾波計算(保證實時性)
- 塞入Job屬性為Job::SEED_INIT,初始化其所有特征為Seed類別屬性如:kCorner -> kCornerSeed ,kEdgelet -> kEdgeletSeed,kMapPoint -> kMapPointSeed;並且初始化其種子點seeds的深度值seed_mu_range_、地圖點逆深度平均值及方差信息(invmu_sigma2_a_b_vec_中)等均在initializeSeeds()函數中實現
3.2 普通幀:
會僅調用updateSeeds()來塞入JobQueue隊列進行後續深度濾波計算,塞入的Job屬性為Job::UPDATE,這裏不初始化新的seed種子點個人認為主要是起到加速作用
processFrame接口代碼:
UpdateResult FrameHandlerStereo::processFrame() {

  // ---------------------------------------------------------------------------
  // tracking
  std::cout << "STEP 1: Sparse Image Align !" << std::endl;
  // STEP 1: Sparse Image Align
  size_t n_tracked_features = 0;
  sparseImageAlignment();

  // STEP 2: Map Reprojection & Feature Align
  n_tracked_features = projectMapInFrame();
  if (n_tracked_features < options_.quality_min_fts) {

    return makeKeyframe(); // force stereo triangulation to recover
  }

  // STEP 3: Pose & Structure Optimization
  if (bundle_adjustment_type_ != BundleAdjustmentType::kCeres) {

    n_tracked_features = optimizePose();
    if (n_tracked_features < options_.quality_min_fts) {

      return makeKeyframe(); // force stereo triangulation to recover
    }
    optimizeStructure(new_frames_, options_.structure_optimization_max_pts, 5);
  }
  // return if tracking bad
  setTrackingQuality(n_tracked_features);
  if (tracking_quality_ == TrackingQuality::kInsufficient) {

    return makeKeyframe(); // force stereo triangulation to recover
  }

  // ---------------------------------------------------------------------------
  // select keyframe
  frame_utils::getSceneDepth(new_frames_->at(0), depth_median_, depth_min_,depth_max_);
  if (!need_new_kf_(new_frames_->at(0)->T_f_w_)) {

    for (size_t i = 0; i < new_frames_->size(); ++i)
      **depth_filter_->updateSeeds(overlap_kfs_.at(i), new_frames_->at(i));**
    return UpdateResult::kDefault;
  }
  SVO_DEBUG_STREAM("New keyframe selected.");
  return makeKeyframe();
}
其中,關鍵幀插入JobQueue隊列,相關代碼如下:
//Init新特征點,塞入JobQueue隊列且屬性為Job::SEED_INIT
depth_filter_->addKeyframe(new_frames_->at(0), depth_median_, 0.5*depth_min_, depth_median_*1.5);

//使用當前關鍵幀深度濾波更新共視關系的曆史關鍵幀上seeds概率,塞入JobQueue隊列且屬性為Job::UPDATE
depth_filter_->updateSeeds(overlap_kfs_.at(0), new_frames_->at(0));
//使用new_frames_->at(0)來更新overlap_kfs_.at(0)種子點seed(種子點只在關鍵幀時才初始提取出的,
//則這裏只更新了關鍵幀上的種子點概率)
depth_filter_->updateSeeds(overlap_kfs_.at(1), new_frames_->at(1));
//使用new_frames_->at(1)來更新
非關鍵幀(普通幀)插入JobQueue隊列,相關代碼如下: 這個操作在processFrame接口中如上,因此所有的幀,都要經過這個步驟的處理
//使用當前普通幀DepthFilter更新共視關系的曆史關鍵幀seeds概率,塞入JobQueue隊列且屬性為Job::UPDATE
depth_filter_->updateSeeds(overlap_kfs_.at(i), new_frames_->at(i));
對於關鍵幀和普通幀的處理流程相同之處就是在Job::UPDATE模式下進行種子點seeds更新,具體在updateSeed()中實現。
4. 深度濾波核心算法流程、推導及解析
4.1 算法流程
svo論文中的關於深度濾波的一個示意圖,如圖所示
深度濾波處理前已知:
- ref_frames以及cur_frame在world下比特姿T
- 其特征點對應的world系下3d點(深度信息depth)
在svo計算過程中有維護一個子地圖Map(所有關鍵幀上特征點對應的世界系下3D點集)。從上面幾個模塊分析可得種子點都是從關鍵幀init出來的,如kCornerSeed,普通幀只用其特征點(如kCorner)來更新具有共視關系的關鍵幀上的種子點(seeds)的深度概率分布,每個種子點都各有一個深度概率分布去維護和計算,核心的深度濾波算法流程主要是以下幾個過程及其對應的核心接口實現:
- 加載關鍵幀信息到Job隊列,並提取新的seeds。初始化所有種子點seed初始深度信息depth、深度分布平均值mu、深度值分布方差sigma2、Beta分布計算中的a和b值,這裏注意只針對關鍵幀。(在initializeSeeds()函數中實現)
- 循環遍曆所有與cur_frame有共視關系的各個overlap_kfs_的seeds,進行深度濾波算法計算,這裏注意已經收斂的Converaged點不進入概率更新計算。進入 depth_filter_utils::updateSeed接口中
- 每個ref_frame上的seed會創建FeatureWrapper,與cur_frame進行極線匹配搜索算法計算findEpipolarMatchDirect(),得到px_cur_、f_cur_和ref_frame上該種子點depth
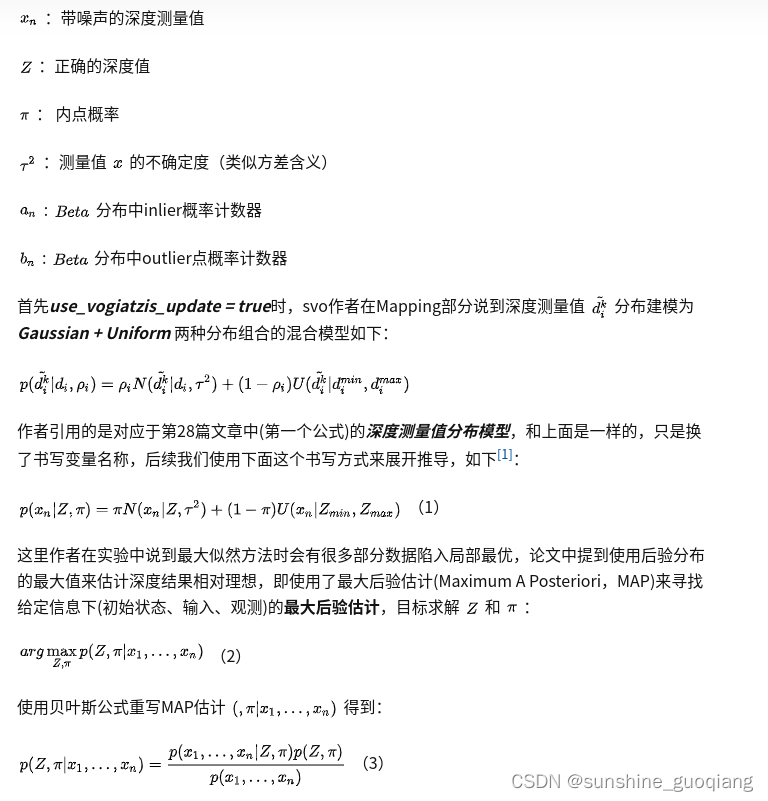
- 計算不確定度 pi ,**代碼實現是在computeTau()**中,svo2.0中不確定度計算基本和高博<<視覺十四講第2版>>中p312頁完全一致,這裏不再詳細解釋
- 使用vogiatzis方法時,更新深度概率分布的平均值 mu和方差sigma^2,以及更新Beta 分布中的 a和b(在updateFilterVogiatzis()函數中實現)
- 如果不使用vogiatzis方法時,僅更新深度概率分布的平均值 mu 和方差 sigma2 (在updateFilterGaussian()函數中實現)
- 最後用最新計算的 depth 更新地圖點 (在upgradeSeedsToFeatures()函數中實現)
注意:上面步驟2中會判斷是否為種子點,只有是種子點才進行深度濾波概率更新,深度濾波本質上是一個匹配的過程,類似與基於特征點法的描述子的功能,目的是實現不同圖像幀率上的特征關聯。可以簡單的理解為一種特征關聯的方法。
在深度濾波過程中還要注意作者用如下操作完成引用,並通過後面深度濾波算法更新state從而更新invmu_sigma2_a_b_vec_信息,具體實現如下,基於eigen的左值引用實現
Eigen::Ref<SeedState> state = ref_frame.invmu_sigma2_a_b_vec_.col(seed_index);
另外注意上面步驟5和步驟6,區別於svo1.0,作者使用兩種模型來供選擇:
- 一種使用vogiatzis提出的Gaussian+ Uniform混合模型
- 第二種可以選擇使用單獨Gaussian模型
接口集體實現在 depth_filter_utils::updateSeed 接口中, 模型選擇對應的代碼如下:
 // update the estimate
  if(use_vogiatzis_update)
  {

    if(!updateFilterVogiatzis(
         seed::getMeanFromDepth(depth),
         seed::getSigma2FromDepthSigma(depth, depth_sigma),
         ref_frame.seed_mu_range_,
         state))
    {

      ref_ftr.type = FeatureType::kOutlier;
      return false;
    }
  }
  else
  {

    if(!updateFilterGaussian(
         seed::getMeanFromDepth(depth),
         seed::getSigma2FromDepthSigma(depth, depth_sigma),
         state))
    {

      ref_ftr.type = FeatureType::kOutlier;
      return false;
    }
  }
4.2 算法流程
關於推導,結合svo論文、George Vogiatzis的《Video-based, Real-Time Multi View Stereo》論文、以及賀博的博客SVO原理解析,這裏據說還有一個大佬在stackoverflows 上面的精彩解答,不過這篇作者整理出來的已經够用。白話解析推導:


bool updateFilterVogiatzis(
const FloatType z, // Measurement
const FloatType tau2,
const FloatType mu_range,
Eigen::Ref<SeedState>& mu_sigma2_a_b)//svo1.0 的DepthFilter::updateSeed(const float x, const float tau2, Seed* seed)
{
FloatType& mu = mu_sigma2_a_b(0);
FloatType& sigma2 = mu_sigma2_a_b(1);
FloatType& a = mu_sigma2_a_b(2);
FloatType& b = mu_sigma2_a_b(3);
const FloatType norm_scale = std::sqrt(sigma2 + tau2);
if(std::isnan(norm_scale))
{
LOG(WARNING) << "Update Seed: Sigma2+Tau2 is NaN";
return false;
}
const FloatType oldsigma2 = sigma2;
const FloatType s2 = 1.0/(1.0/sigma2 + 1.0/tau2);//舊的s ( | , 2) 舊的的方差s2 對應公式14中的s2 tau2為不確定度 (不確定性 )
const FloatType m = s2*(mu/sigma2 + z/tau2);//舊的m ( | , 2) 對應公式14中的m
const FloatType uniform_x = 1.0/mu_range;//U(x| z_min,z_max)
FloatType C1 = a/(a+b) * vk::normPdf<FloatType>(z, mu, norm_scale);// c1 = ( / + ) ( | , 2+ 2)
FloatType C2 = b/(a+b) * uniform_x;
const FloatType normalization_constant = C1 + C2;
C1 /= normalization_constant;
C2 /= normalization_constant;
const FloatType f = C1*(a+1.0)/(a+b+1.0) + C2*a/(a+b+1.0);
const FloatType e = C1*(a+1.0)*(a+2.0)/((a+b+1.0)*(a+b+2.0))
+ C2*a*(a+1.0)/((a+b+1.0)*(a+b+2.0));
// update parameters
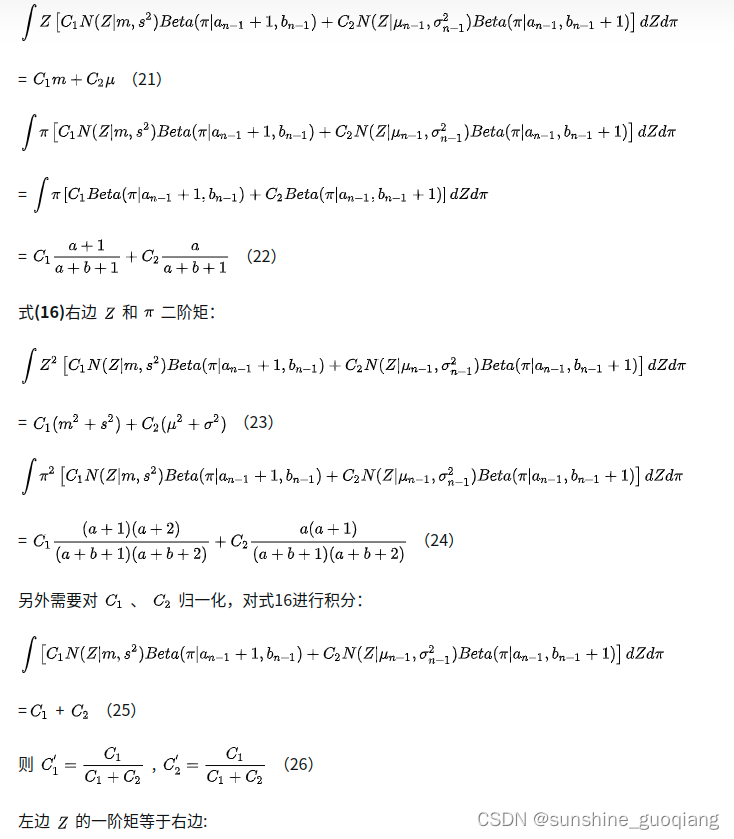
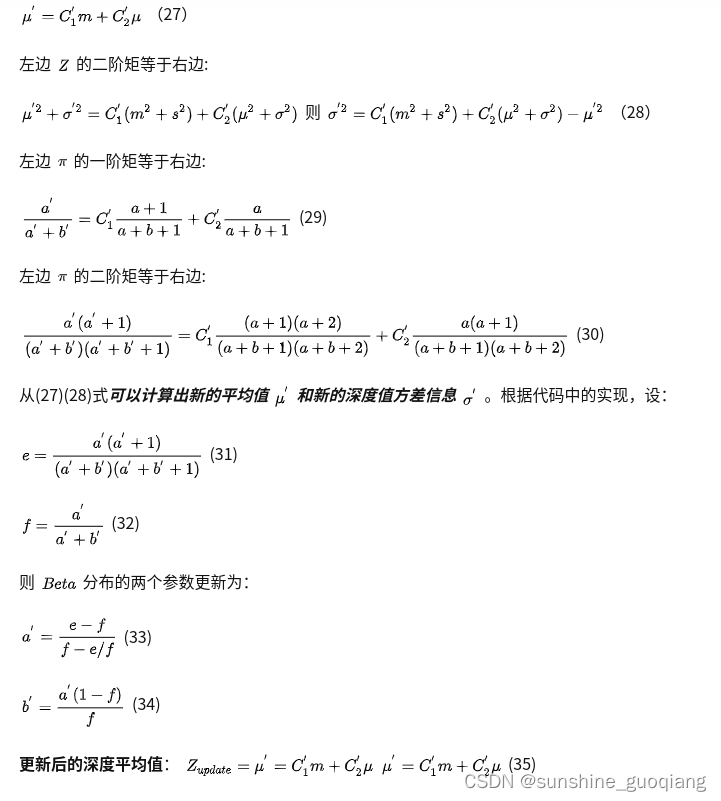
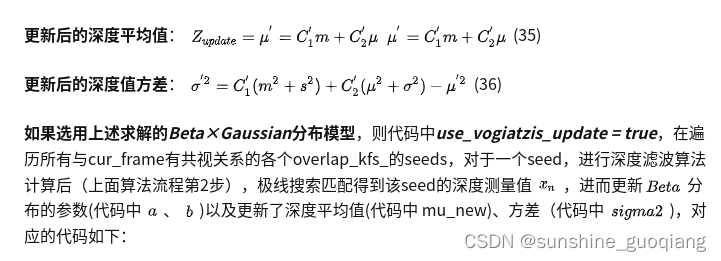
const FloatType mu_new = C1*m+C2*mu;//新的平均值 對應公式35
sigma2 = C1*(s2 + m*m) + C2*(sigma2 + mu*mu) - mu_new*mu_new;//對應公式36
mu = mu_new;//
a = (e - f) / (f - e / f);//對應公式33
b = a * (1.0 - f) / f;//對應公式34
// TODO: This happens sometimes.
if(sigma2 < 0.0) {
LOG(WARNING) << "Seed sigma2 is negative!";
sigma2 = oldsigma2;
}
if(mu < 0.0) {
LOG(WARNING) << "Seed diverged! mu is negative!!";
mu = 1.0;
return false;
}
return true;
}
另外,如果use_vogiatzis_update = false時,通過代碼中的實現,推測出svo2.0作者這裏只使用高斯模型分布更新來計算,我們重寫式(10),去掉Beta分布、平均分布相關: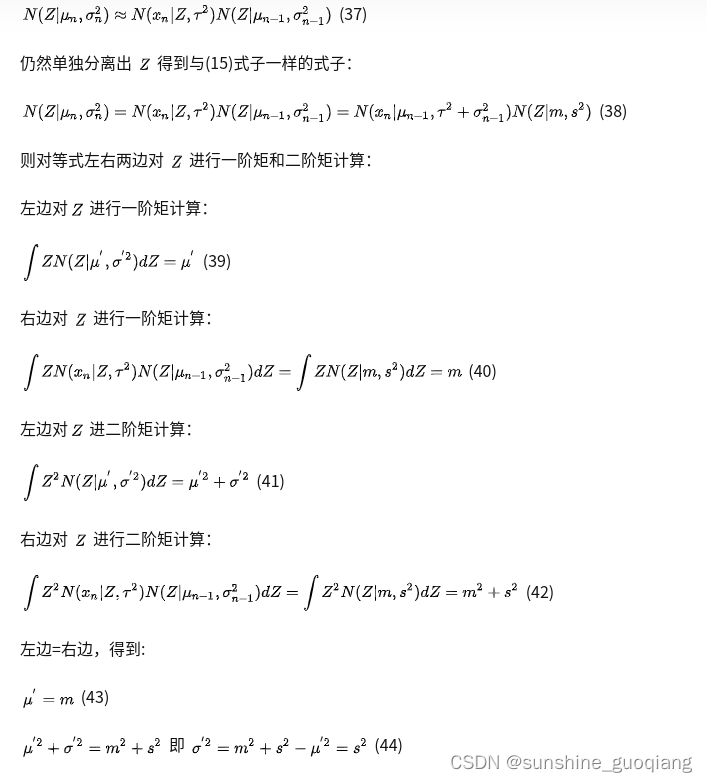
對應的看下svo2.0中關於更新深度濾波算法高斯模型中的平均值 [公式] 、方差 [公式] 。代碼如下:
bool updateFilterGaussian(
    const FloatType z, // Measurement
    const FloatType tau2,
    Eigen::Ref<SeedState>& mu_sigma2_a_b) {

  FloatType& mu = mu_sigma2_a_b(0);//平均值
  FloatType& sigma2 = mu_sigma2_a_b(1);//深度方差
  FloatType& a = mu_sigma2_a_b(2);//Beta分布的a
  FloatType& b = mu_sigma2_a_b(3);

  const FloatType norm_scale = std::sqrt(sigma2 + tau2);
  if(std::isnan(norm_scale)) {

    LOG(WARNING) << "Update Seed: Sigma2+Tau2 is NaN";
    return false;
  }
  const FloatType denom = (sigma2 + tau2);
  mu = (sigma2 * z + tau2 * mu) / denom;//新的均值mu 對應公式43,以及14中的m
  sigma2 = sigma2 * tau2 / denom;//對應公式44,以及14中的s2

  CHECK_GE(sigma2, 0.0);
  CHECK_GE(mu, 0.0);
  return true;
}
最後會判斷該種子點是否收斂,這部分也值得推敲哦,先看下代碼:
 if(seed::isConverged(state,
                       ref_frame.seed_mu_range_,
                       sigma2_convergence_threshold))//如果協方差小於閾值,就認為收斂了,它就不再是種子點,而是candidate點,使用回調函數,加入到候選點隊列中
  {

    if(ref_ftr.type == FeatureType::kCornerSeed)//這裏通過改變其屬性類別來 代替删除seed效果,不再進行updateseeds分析
      ref_ftr.type = FeatureType::kCornerSeedConverged;
    else if(ref_ftr.type == FeatureType::kEdgeletSeed)
      ref_ftr.type = FeatureType::kEdgeletSeedConverged;
    else if(ref_ftr.type == FeatureType::kMapPointSeed)
      ref_ftr.type = FeatureType::kMapPointSeedConverged;
  }
其中:
ref_frame.seed_mu_range_ = 1/depth_init_min 即逆深度最大值,
另外sigma2_convergence_threshold是配置值,
thresh = mu_range / sigma2_convergence_threshold,

5 更新地圖點
前面利用cur_frame更新了ref_frame的深度濾波分布狀態、參數。最後需要利用最新深度計算結果來更新地圖點,主要 upgradeSeedsToFeatures()函數中實現。上面已經敲了一萬三千字了,上面算法推導確實也是重點,但是這裏更新地圖點的過程才是深入理解作者使用深度濾波的入口!
上面是離子老師畫得簡單的示意圖,關於upgradeSeedsToFeatures的借鑒下,關於這個函數的邏輯,在當前幀計算深度濾波更新概率,得到新的方差、平均值後:
void FrameHandlerBase::upgradeSeedsToFeatures(const FramePtr &frame) {

  VLOG(40) << "Upgrade seeds to features";
  size_t update_count = 0;
  size_t unconverged_cnt = 0;
  for (size_t i = 0; i < frame->num_features_; ++i) {

    if (frame->landmark_vec_[i]) {

      const FeatureType &type = frame->type_vec_[i];
      if (type == FeatureType::kCorner || type == FeatureType::kEdgelet ||
          type == FeatureType::kMapPoint) {

        frame->landmark_vec_[i]->addObservation(frame, i);
      } else {

        CHECK(isFixedLandmark(type));
        frame->landmark_vec_[i]->addObservation(frame, i);
      }
    } else if (frame->seed_ref_vec_[i].keyframe) {

      if (isUnconvergedSeed(frame->type_vec_[i])) {

        unconverged_cnt++;
      }
      SeedRef &ref = frame->seed_ref_vec_[i];

      // In multi-camera case, it might be that we already created a 3d-point
      // for this seed previously when processing another frame from the bundle.
      PointPtr point = ref.keyframe->landmark_vec_[ref.seed_id];
      if (point == nullptr) {

        // That's not the case. Therefore, create a new 3d point.
        Position xyz_world = ref.keyframe->T_world_cam() *
                             ref.keyframe->getSeedPosInFrame(ref.seed_id);
        point = std::make_shared<Point>(xyz_world);
        ref.keyframe->landmark_vec_[ref.seed_id] = point;
        ref.keyframe->track_id_vec_[ref.seed_id] = point->id();
        point->addObservation(ref.keyframe, ref.seed_id);
      }

      // add reference to current frame.
      frame->landmark_vec_[i] = point;
      frame->track_id_vec_[i] = point->id();
      point->addObservation(frame, i);
      if (isCorner(ref.keyframe->type_vec_[ref.seed_id])) {

        ref.keyframe->type_vec_[ref.seed_id] = FeatureType::kCorner;
        frame->type_vec_[i] = FeatureType::kCorner;
      } else if (isMapPoint(ref.keyframe->type_vec_[ref.seed_id])) {

        ref.keyframe->type_vec_[ref.seed_id] = FeatureType::kMapPoint;
        frame->type_vec_[i] = FeatureType::kMapPoint;
      } else if (isEdgelet(ref.keyframe->type_vec_[ref.seed_id])) {

        ref.keyframe->type_vec_[ref.seed_id] = FeatureType::kEdgelet;
        frame->type_vec_[i] = FeatureType::kEdgelet;

        // Update the edgelet direction.
        double angle = feature_detection_utils::getAngleAtPixelUsingHistogram(
            frame->img_pyr_[frame->level_vec_[i]],
            (frame->px_vec_.col(i) / (1 << frame->level_vec_[i])).cast<int>(),
            4u);
        frame->grad_vec_.col(i) =
            GradientVector(std::cos(angle), std::sin(angle));
      } else {

        CHECK(false) << "Seed-Type not known";
      }
      ++update_count;
    }

    // when using the feature-wrapper, we might copy some old references?
    frame->seed_ref_vec_[i].keyframe.reset();
    frame->seed_ref_vec_[i].seed_id = -1;
  }
  VLOG(5) << "NEW KEYFRAME: Updated " << update_count
          << " seeds to features in reference frame, "
          << "including " << unconverged_cnt << " unconverged points.\n";
  const double ratio = (1.0 * unconverged_cnt) / update_count;
  if (ratio > 0.2) {

    LOG(WARNING) << ratio * 100 << "% updated seeds are unconverged.";
  }
}
- 遍曆當前幀所有特征點,判斷是否存在對應的3d地圖點,如果存在則為該landmark添加上該cur_frame下該特征的的observation關系
- 如果不存在對應的3d地圖點,但是該特征的共視曆史seed所在的幀為關鍵幀時,不管當前seed所在的濾波結果是否成熟,都為這些ref和cur圖像幀利用深度計算一個3d點(利用深度濾波過程計算的更新後的深度mu),並將這些kCorner、kCornerSeed、kCornerCovergedSeed、kEdgelet、kEdgeletSeed、kEdgeletCovergedSeed等轉為kCorner、kEdgelet,則曆史共視幀上的這些共視seed不再是種子點(如圖二中的a、b、c三個seed點),有3d信息後是地圖點了(如圖二中cur_frame中共視seeds變為unseeds)。後面會在重投影reprojector中計算這些地圖點,點數不够時會從uncovergedseed中選一些點來用。此時,當前幀一部分成熟seed點轉為kCorner等有3d信息的點,一部分可能沒有共視關系的seed會在之後計算用到。
6. 參考資料:
https://guoqiang.blog.csdn.net/article/details/121485389
栗子:白話SVO2.0之深度濾波
边栏推荐
- HOW TO ADD P-VALUES TO GGPLOT FACETS
- easyExcel和lombok注解以及swagger常用注解
- xss-labs-master靶场环境搭建与1-6关解题思路
- [visual studio 2019] create MFC desktop program (install MFC development components | create MFC application | edit MFC application window | add click event for button | Modify button text | open appl
- Precautions for scalable contract solution based on openzeppelin
- 行业的分析
- Esp32 audio frame esp-adf add key peripheral process code tracking
- GGHIGHLIGHT: EASY WAY TO HIGHLIGHT A GGPLOT IN R
- Seriation in R: How to Optimally Order Objects in a Data Matrice
- R HISTOGRAM EXAMPLE QUICK REFERENCE
猜你喜欢
YYGH-9-预约下单

Digital transformation takes the lead to resume production and work, and online and offline full integration rebuilds business logic
揭露数据不一致的利器 —— 实时核对系统
How to Create a Nice Box and Whisker Plot in R

可昇級合約的原理-DelegateCall
Esp32 audio frame esp-adf add key peripheral process code tracking
Cluster Analysis in R Simplified and Enhanced

Esp32 stores the distribution network information +led displays the distribution network status + press the key to clear the distribution network information (source code attached)
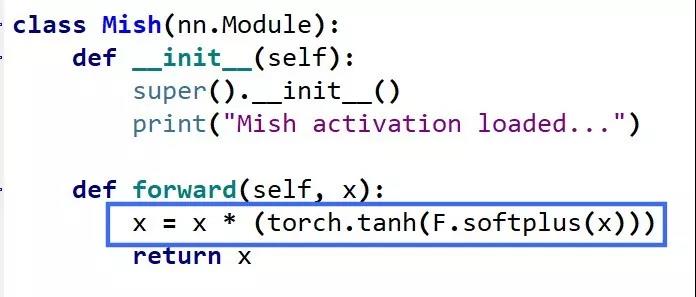
Mish-撼动深度学习ReLU激活函数的新继任者
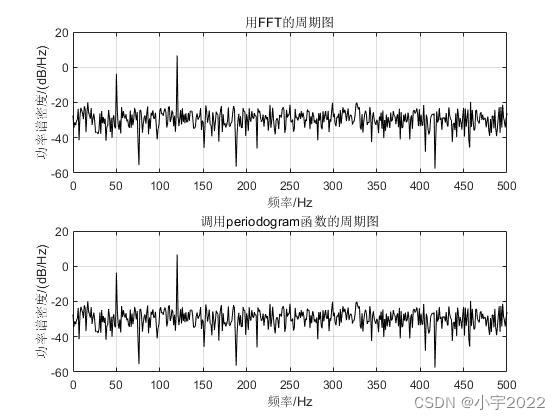
Power Spectral Density Estimates Using FFT---MATLAB
随机推荐
Mmrotate rotation target detection framework usage record
GGPUBR: HOW TO ADD ADJUSTED P-VALUES TO A MULTI-PANEL GGPLOT
MySQL comparison operator in problem solving
Order by injection
What is the relationship between digital transformation of manufacturing industry and lean production
excel表格中选中单元格出现十字带阴影的选中效果
小程序链接生成
Fabric.js 3个api设置画布宽高
基于Hardhat和Openzeppelin开发可升级合约(二)
6. Introduce you to LED soft film screen. LED soft film screen size | price | installation | application
File operation (detailed!)
Homer forecast motif
Attribute acquisition method and operation notes of C # multidimensional array
Yygh-10-wechat payment
to_ Bytes and from_ Bytes simple example
b格高且好看的代码片段分享图片生成
Power Spectral Density Estimates Using FFT---MATLAB
YYGH-9-预约下单
CMake交叉编译
GGPLOT: HOW TO DISPLAY THE LAST VALUE OF EACH LINE AS LABEL