当前位置:网站首页>STM32LL库使用——SPI通信
STM32LL库使用——SPI通信
2022-08-02 14:09:00 【天山没有长寿茶】
STM32使用前的准备
对于要使用的每个STM32芯片,首先我们手上必备的两本手册(ST官网有pdf版):
- 参考手册(Reference manual)
- 数据手册(Datasheet)
其中参考手册包括各个功能模块的具体信息、原理、各种工作模式介绍、配置方法以及寄存器相关信息;数据手册包括芯片的基本参数、引脚数量与各自功能、电气特性、封装信息等内容。一般在选型与硬件设计阶段,参考数据手册多一些,而到了程序设计阶段,参考手册就是必须的了。
以下是STM32G4系列的参考手册的“自我介绍”:
This reference manual targets application developers. It provides complete information on how to use the STM32G4 Series microcontroller memory and peripherals.
本参考手册的目标是应用程序开发人员。 它提供了关于的完整信息如何使用STM32G4系列单片机的内存和外设。
SPI相关设置
我们以STM32G系列为例,直接翻到SPI章节,SPI结构示意图如下:
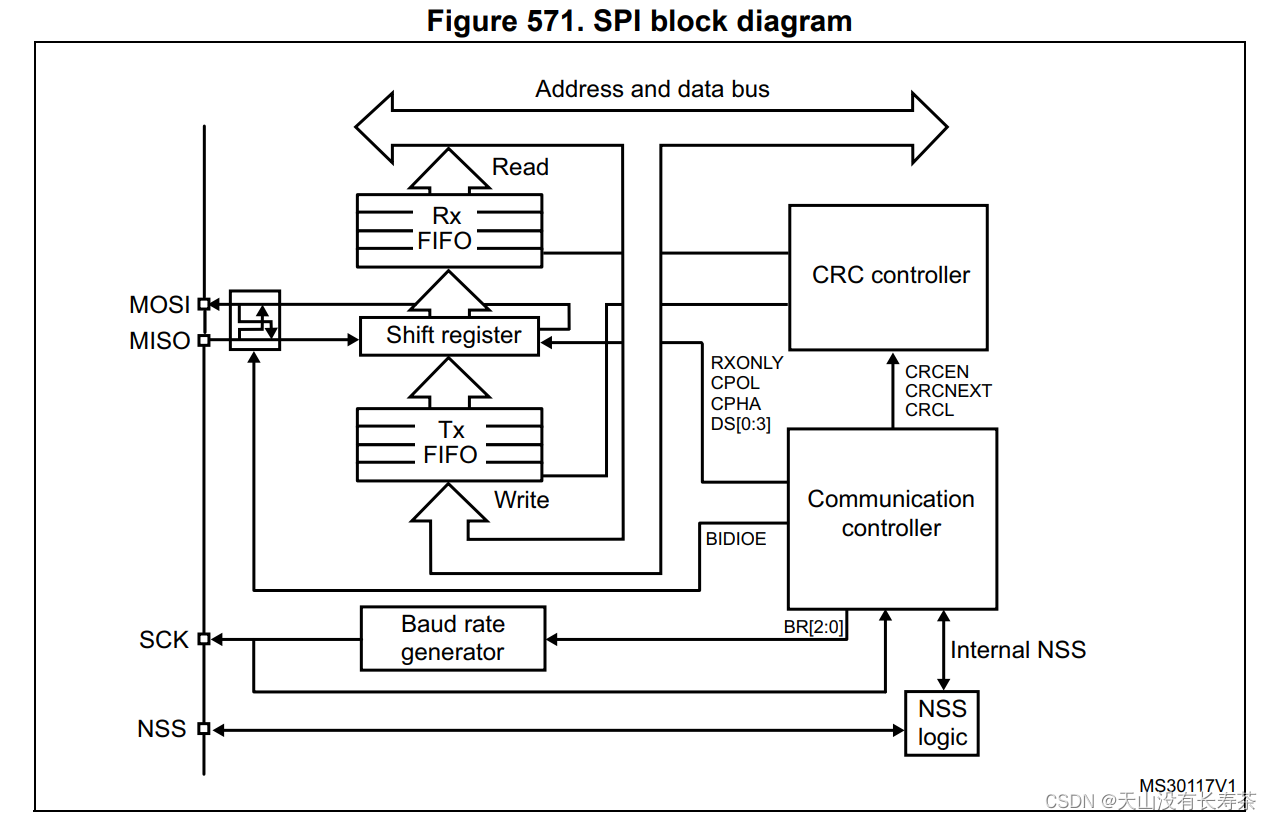
一共4个引脚可与外设连接:
- MISO(Master In / Slave Out data):该引脚在从模式下发送数据,在主模式下接收数据
- MOSI(Master Out / Slave In data):该引脚在主模式下发送数据,在从模式下接收数据
- SCK(Serial Clock):主设备往从设备传输的时钟信号
- NSS(Slave select):用于主设备选择从设备
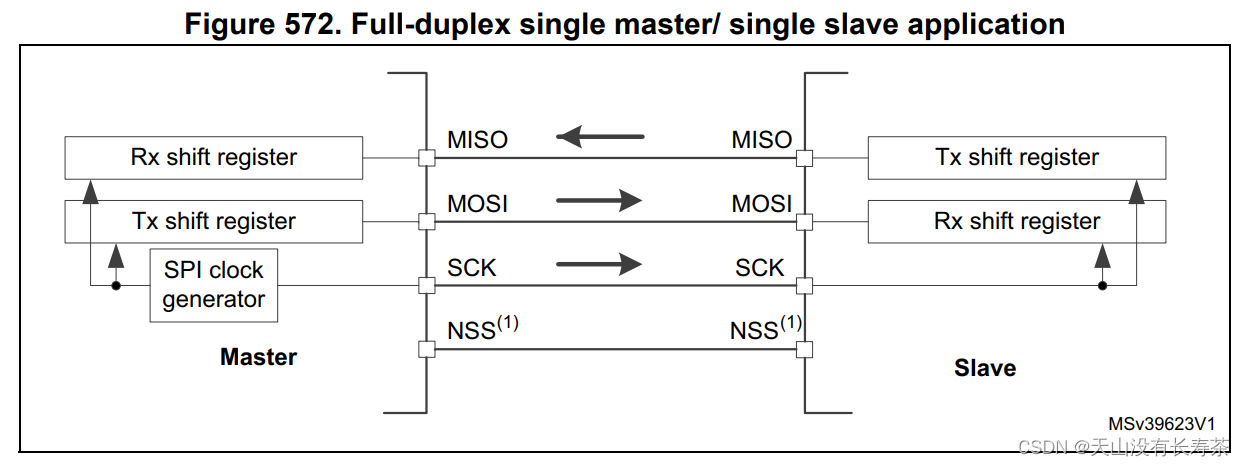
单个主设备与单个从设备全双工通信模式示意图如下:
我们采用STM32CubeMX可以方便的完成基础配置,实际只需要编写如下实际通讯需要的代码
基础通讯代码
Tx:发送缓冲区;Rx:接收缓冲区;DR:数据寄存器
状态指示标志:
- Tx buffer empty flag (TXE):发送缓冲区为空
- Rx buffer not empty (RXNE):接收缓冲区非空
- Busy flag (BSY):SPI数据正在传输中
基本工作原理:主机向从机发送一个值(指令),然后从机依据接收到的指令返回一个值
常见情况我们用STM32作为主机
- 等待TXE标志置1(Tx空),表明此时发送缓冲区Tx中无待发送的值
- 将数据写入SPIx_DR寄存器,对DR的写操作将把数据写入Tx末尾
- 等待BSY标志置0(即busy,置1表明Tx中的数据正在传输中)。期间数据通过MOSI发送给从机,从机返回的信息通过MISO回到主机接收缓冲区Rx
- 等待RXNE标志置1(Rx非空),表明此时Rx存在接收到的值
- 读取SPIx_DR寄存器,对DR的读操作将返回Rx中最早的值
// data_in:待发送的值
// data_out:接收到的值
static int spi_transmit_receive(uint16_t data_in, uint16_t *data_out){
	int state = 0;
	*data_out = 0;
	uint32_t timeout_cnt;
	static const uint32_t timeout_cnt_num = 10000;

	// Wait until TXE flag is set to send data
	timeout_cnt = 0;
	while(!LL_SPI_IsActiveFlag_TXE(SPI1)){
		timeout_cnt ++;
		if(timeout_cnt > timeout_cnt_num){
			state = -1;
			break;
		}
	}

	// Transmit data in 16 Bit mode
	LL_SPI_TransmitData16(SPI1, data_in);

	// Check BSY flag
	timeout_cnt = 0;
	while(LL_SPI_IsActiveFlag_BSY(SPI1)){
		timeout_cnt ++;
		if(timeout_cnt > timeout_cnt_num){
			state = -1;
			break;
		}
	}

	// Check RXNE flag
	timeout_cnt = 0;
	while(!LL_SPI_IsActiveFlag_RXNE(SPI1)){
		timeout_cnt ++;
		if(timeout_cnt > timeout_cnt_num){
			state = -1;
			break;
		}
	}

	// Read 16-Bits in the data register
	*data_out = LL_SPI_ReceiveData16(SPI1);

	return state;
}
所涉及的LL库相关函数:
/**
  * @brief  Write 16-Bits in the data register
  * @rmtoll DR           DR            LL_SPI_TransmitData16
  * @param  SPIx SPI Instance
  * @param  TxData Value between Min_Data=0x00 and Max_Data=0xFFFF
  * @retval None
  */
__STATIC_INLINE void LL_SPI_TransmitData16(SPI_TypeDef *SPIx, uint16_t TxData)
{
#if defined (__GNUC__)
  __IO uint16_t *spidr = ((__IO uint16_t *)&SPIx->DR);
  *spidr = TxData;
#else
  SPIx->DR = TxData;
#endif /* __GNUC__ */
}

/**
  * @brief  Read 16-Bits in the data register
  * @rmtoll DR           DR            LL_SPI_ReceiveData16
  * @param  SPIx SPI Instance
  * @retval RxData Value between Min_Data=0x00 and Max_Data=0xFFFF
  */
__STATIC_INLINE uint16_t LL_SPI_ReceiveData16(SPI_TypeDef *SPIx)
{
  return (uint16_t)(READ_REG(SPIx->DR));
}

/**
  * @brief  Check if Tx buffer is empty
  * @rmtoll SR           TXE           LL_SPI_IsActiveFlag_TXE
  * @param  SPIx SPI Instance
  * @retval State of bit (1 or 0).
  */
__STATIC_INLINE uint32_t LL_SPI_IsActiveFlag_TXE(SPI_TypeDef *SPIx)
{
  return ((READ_BIT(SPIx->SR, SPI_SR_TXE) == (SPI_SR_TXE)) ? 1UL : 0UL);
}

/**
  * @brief  Get busy flag
  * @note   The BSY flag is cleared under any one of the following conditions:
  * -When the SPI is correctly disabled
  * -When a fault is detected in Master mode (MODF bit set to 1)
  * -In Master mode, when it finishes a data transmission and no new data is ready to be
  * sent
  * -In Slave mode, when the BSY flag is set to '0' for at least one SPI clock cycle between
  * each data transfer.
  * @rmtoll SR           BSY           LL_SPI_IsActiveFlag_BSY
  * @param  SPIx SPI Instance
  * @retval State of bit (1 or 0).
  */
__STATIC_INLINE uint32_t LL_SPI_IsActiveFlag_BSY(SPI_TypeDef *SPIx)
{
  return ((READ_BIT(SPIx->SR, SPI_SR_BSY) == (SPI_SR_BSY)) ? 1UL : 0UL);
}

/**
  * @brief  Check if Rx buffer is not empty
  * @rmtoll SR           RXNE          LL_SPI_IsActiveFlag_RXNE
  * @param  SPIx SPI Instance
  * @retval State of bit (1 or 0).
  */
__STATIC_INLINE uint32_t LL_SPI_IsActiveFlag_RXNE(SPI_TypeDef *SPIx)
{
  return ((READ_BIT(SPIx->SR, SPI_SR_RXNE) == (SPI_SR_RXNE)) ? 1UL : 0UL);
}
实际使用spi_transmit_receive函数时,一般需要在函数前后设置以下片选NSS输出,通讯前选中当前从机,通讯后再关闭,防止多主机或者多从机模式时的冲突。
	// NSS片选引脚置0,开启当前主从关系
	LL_GPIO_ResetOutputPin(GPIOx, LL_GPIO_PIN_x);

	spi_transmit_receive(controlword, &recbuff);

	// NSS置1,关闭当前主从关系
LL_GPIO_SetOutputPin(GPIOx, LL_GPIO_PIN_x);边栏推荐
猜你喜欢


随机推荐
Tensorflow常用函数
机器学习和深度学习中的梯度下降及其类型
Binder机制(中篇)
boost库智能指针
Use tencent cloud builds a personal blog
【深度学习中的损失函数整理与总结】
使用预训练语言模型进行文本生成的常用微调策略
How to set the win10 taskbar does not merge icons
单端K总线收发器DP9637兼容L9637
FP7126降压恒流65536级高辉无频闪调光共阳极舞台灯RGB驱动方案
PyTorch(15)---模型保存和加载
Win10 can't start WampServer icon is orange solution
cmake配置libtorch报错Failed to compute shorthash for libnvrtc.so
tensorflow实战之手写体识别
ARMv8虚拟化
ASR6601牛羊定位器芯片GPS国内首颗支持LoRa的LPWAN SoC
A clean start Windows 7?How to load only the basic service start Windows 7 system
Mapreduce环境详细搭建和案例实现
Publish module to NPM should be how to operate?Solutions to problems and mistake
基于51单片机和物联网的智能家居系统(ESP8266物联网模块)