当前位置:网站首页>物联网智能家居基本方法实现之经典
物联网智能家居基本方法实现之经典
2022-07-05 20:16:00 【ST小智】
今天主要和大家聊一聊,智能家居物联网的实现,今天主要使用Qt开发智能家居的一个物联应用。可以利用云服务远程控制设备并与设备通信。本文将实现远程点亮开发板的LED作为一个实例。
在生活中,我们可以使用WIFI智能插座,来远程控制家电设备。例如,远程开热水器,远程打开空调,窗帘等。其实这些设备的原理就是将WIFI插座注册到云服务器上,然后通过手机的APP来访问云服务,来控制WIFI插座。
第一:基本硬件介绍
需要一个ESP8266串口转WIFI模块以及需要加上一个USB-TTL模块。USB线可以接入电脑,使用串口调试此模块。
注意:如果使用其他wifi模块,需要刷接入云的固件才能接入服务器。
第二:测试WIFI模块功能
要实现物联网的功能,需要使用ESP8266 WIFI模块。先测试WIFI模块是否能够正常使用, 是否能够正常连接服务器。
在云端对设备先进行设计,取好名字和设备号。

使用WIFI模块串口通信的波特率为115200,在Ubuntu上设置WIFI模块时,一般串口名称为“ttyUSB0”,默认是没有 权限访问这个/dev/ttyUSB0 设备的。所以我们需要使用下面的指令修改权限。
sudo chmod 777 /dev/ttyUSB0第三:代码实现的具体方法
#include "esp8266.h"#include <unistd.h>#include <QDebug>Esp82266::Esp82266(QWidget *parent){Q_UNUSED(parent)/* 串口对象,用于与 Esp8266 模块通信 */serialPort = new QSerialPort(this);/* 定时器对象,用于定时发送设备在线的心跳包 */timer = new QTimer();/* led 对象,用于串口接收到云发过来的数据,然后控制板子的 LED */led = new Led(this);/* 设置串口名 */#if __arm__serialPort->setPortName("ttymxc2");#elseserialPort->setPortName("ttyUSB0");#endif/* 设置波特率 */serialPort->setBaudRate(115200);/* 设置数据位数 */serialPort->setDataBits(QSerialPort::Data8);/* 设置奇偶校验 */serialPort->setParity(QSerialPort::NoParity);/* 设置停止位 */serialPort->setStopBits(QSerialPort::OneStop);/* 设置流控制 */serialPort->setFlowControl(QSerialPort::NoFlowControl);if (!serialPort->open(QIODevice::ReadWrite))qDebug()<<"串口无法打开!可能正在被使用!"<<endl;else {qDebug()<<"串口打开成功!"<<endl;}/* 开始连接云 */connectToClound();connect(serialPort, SIGNAL(readyRead()),this, SLOT(serialPortReadyRead()));connect(timer, SIGNAL(timeout()), this, SLOT(onTimerTimeOut()));}void Esp82266::serialPortReadyRead(){/* 接收缓冲区中读取数据 */QByteArray buf = serialPort->readAll();QString temp = QString(buf);readData.append(temp);qDebug()<<temp<<endl;if (readData.contains("ready")) {/* 如果复位成功 */sendCmdToEsp8266("AT+CWMODE=1");readData.clear();}if (readData.contains("OK") && readData.contains("AT+CWMODE")) {qDebug()<<"设置 STA 模式成功"<<endl;sendCmdToEsp8266("AT+CWJAP=\"ALIENTEK-YF\",\"15902020353\"");qDebug()<<"开始连接 WIFI"<<endl;readData.clear();}if (temp.contains("WIFI GOT IP")) {qDebug()<<"连接 WIFI 成功"<<endl;sleep(2);/* 原子云的设备号及密码 */sendCmdToEsp8266("AT+ATKCLDSTA=\"02314701717851074890\",\"12345678\"");qDebug()<<"开始连接云请等待"<<endl;}if (temp.contains("CLOUD CONNECTED")) {qDebug()<<"连接云成功"<<endl;sleep(2);/* 15s 就发送一次心跳包 */timer->start(15000);}if (temp == "开")led->setLedState(true);else if (temp == "关")led->setLedState(false);}Esp82266::~Esp82266(){serialPort->close();delete timer;timer = nullptr;}void Esp82266::sendCmdToEsp8266(QString cmd){cmd = cmd + "\r\n";QByteArray data = cmd.toUtf8();serialPort->write(data);}void Esp82266::connectToClound(){/* 重启模块,注意若已经连接上原子云,* 需要重新上电或者短接 RST 脚来复位模块 */sendCmdToEsp8266("AT+RST");}void Esp82266::sleep(int second){usleep(second * 1000000);}void Esp82266::sendTextMessage(QString message){serialPort->write(message.toLatin1());}void Esp82266::onTimerTimeOut(){sendTextMessage("online");qDebug()<<"发送设备在线心跳包"<<endl;}
分析:添加路由器的WiFi热点以及密码,以及云端的设备编号和密码
第四:云端API接口与实现
在与云端进行通信的时候,必须先熟悉云端的API接口。网络端的常见的云端API通信流程图。

在编写QT应用实现的时候,应该把重点放在HTTP与WEBSocket方向上。一些账号信息与设备信息是通过HTTPS协议接口获取的,通信用WebSocket协议接口。
#include "webapi.h"#include <QUuid>#include <QRegularExpression>Webapi::Webapi(QObject *parent){this->setParent(parent);/* 数组清空 */groupID.clear();deviceID.clear();deviceNumber.clear();timer = new QTimer();connect(timer, SIGNAL(timeout()), this, SLOT(onTimerTimeOut()));networkAccessManager = new QNetworkAccessManager(this);orgURL = "https://cloud.alientek.com/api/orgs";/* 请填写自己的 token 信息!!! */api_token = "bf591984c8fa417584d18f6328e0ef73";/* 获取账号机构列表 */getOrgURL();QUuid uuid = QUuid::createUuid();random_token = uuid.toString();webSocket = new QWebSocket();/* 需要加一些安全配置才能访问 https */QSslConfiguration config;config.setPeerVerifyMode(QSslSocket::VerifyNone);config.setProtocol(QSsl::TlsV1SslV3);webSocket->setSslConfiguration(config);connect(webSocket, SIGNAL(connected()), this, SLOT(webSocketConnected()));connect(webSocket, SIGNAL(binaryMessageReceived(QByteArray)),this, SLOT(onBinaryMessageReceived(QByteArray)));}Webapi::~Webapi(){delete timer;delete webSocket;webSocket = nullptr;}void Webapi::getOrgURL(){getDataFromWeb(QUrl(orgURL));}/* 获取设备分组列表 */void Webapi::getGroupListUrl(){getDataFromWeb(QUrl(groupListUrl));}/* 获取设备的信息 */void Webapi::getDevOfGroupUrl(){getDataFromWeb(QUrl(devOfGroupUrl));}/* 获取设备连接状态 */void Webapi::getConStateUrl(){getDataFromWeb(QUrl(conStateUrl));}/* 从云服务器获取数据 */void Webapi::getDataFromWeb(QUrl url){/* 网络请求 */QNetworkRequest networkRequest;/* 需要加一些安全配置才能访问 https */QSslConfiguration config;config.setPeerVerifyMode(QSslSocket::VerifyNone);config.setProtocol(QSsl::TlsV1SslV3);networkRequest.setSslConfiguration(config);/* 设置访问的地址 */networkRequest.setUrl(url);/* 网络响应 */networkRequest.setHeader(QNetworkRequest::ContentTypeHeader,"application/json;charset=UTF-8");/* 参数二为原子云帐号的 token 信息,填写自己的 */networkRequest.setRawHeader("token", api_token.toLatin1());QNetworkReply *newReply =networkAccessManager->get(networkRequest);connect(newReply, SIGNAL(finished()), this, SLOT(replyFinished()));connect(newReply, SIGNAL(readyRead()), this, SLOT(readyReadData()));}
项目代码可参考如下连接:
https://download.csdn.net/download/weixin_41114301/8587538101_smarthome 项目下:
1、 webapi 文件夹为云平台的应用程序,主要用来与原子云通信。
2、Headers 文件夹为界面设计的头文件。
3、Sources 文件夹为界面设计的源文件。 esp8266 项目下:
4、led 文件夹为 I.MX6U 开发板控制 LED 的接口程序。
5、Headers 文件夹为 esp8266 通信的头文件。
6、Sources 文件夹为 esp8266 通信的源文件(使用串口通信)。
第五:运行结果

边栏推荐
- BZOJ 3747 POI2015 Kinoman 段树
- 处理文件和目录名
- C langue OJ obtenir PE, ACM démarrer OJ
- Interviewer: what is the internal implementation of set data types in redis?
- 2020 CCPC 威海 - A. Golden Spirit(思维),D. ABC Conjecture(大数分解 / 思维)
- 2022年7月4日-2022年7月10日(ue4视频教程mysql)
- Leetcode brush question: binary tree 14 (sum of left leaves)
- Scala基础【HelloWorld代码解析,变量和标识符】
- How to select the Block Editor? Impression notes verse, notation, flowus
- 【数字IC验证快速入门】7、验证岗位中必备的数字电路基础知识(含常见面试题)
猜你喜欢
.Net分布式事务及落地解决方案
【数字IC验证快速入门】2、通过一个SoC项目实例,了解SoC的架构,初探数字系统设计流程

Leetcode brush questions: binary tree 11 (balanced binary tree)
A way to calculate LNX
基础篇——配置文件解析

Go language | 01 wsl+vscode environment construction pit avoidance Guide

Leetcode: binary tree 15 (find the value in the lower left corner of the tree)
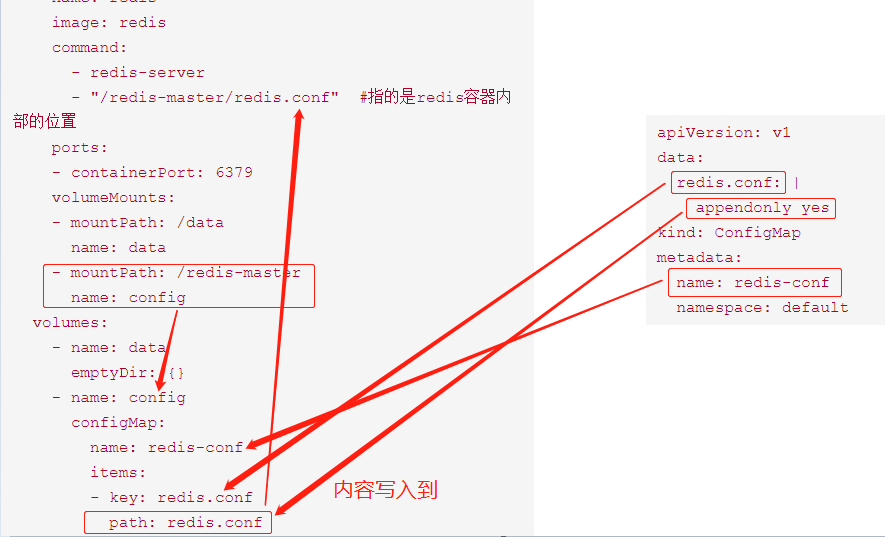
kubernetes资源对象介绍及常用命令(五)-(ConfigMap&Secret)
![[quick start of Digital IC Verification] 3. Introduction to the whole process of Digital IC Design](/img/92/7af0db21b3d7892bdc5dce50ca332e.png)
[quick start of Digital IC Verification] 3. Introduction to the whole process of Digital IC Design

Guidelines for application of Shenzhen green and low carbon industry support plan in 2023
随机推荐
Zero cloud new UI design
y57.第三章 Kubernetes从入门到精通 -- 业务镜像版本升级及回滚(三十)
淺淺的談一下ThreadLocalInsecureRandom
Let's talk about threadlocalinsecurerandom
sort和投影
Station B up builds the world's first pure red stone neural network, pornographic detection based on deep learning action recognition, Chen Tianqi's course progress of machine science compilation MLC,
Is the education of caiqiantang reliable and safe?
USACO3.4 “破锣摇滚”乐队 Raucous Rockers - DP
2022年7月4日-2022年7月10日(ue4视频教程mysql)
计算lnx的一种方式
Leetcode brush questions: binary tree 18 (largest binary tree)
July 4, 2022 - July 10, 2022 (UE4 video tutorial MySQL)
Bzoj 3747 poi2015 kinoman segment tree
Leetcode brush question: binary tree 13 (the same tree)
[quick start of Digital IC Verification] 3. Introduction to the whole process of Digital IC Design
Debezium series: record the messages parsed by debezium and the solutions after the MariaDB database deletes multiple temporary tables
ROS2专题【01】:win10上安装ROS2
字节跳动Dev Better技术沙龙成功举办,携手华泰分享Web研发效能提升经验
model方法
Is it safe for CICC fortune to open an account online?