当前位置:网站首页>Basic concepts of Nacos and single machine deployment
Basic concepts of Nacos and single machine deployment
2022-07-27 19:10:00 【Hua Weiyun】
Basic concepts
stay Spring Cloud Alibaba In the ecological , from Nacos Middleware undertakes the responsibilities of registration center and configuration center at the same time , Independent deployment required . Official address: :https://nacos.io/zh-cn/index.html It's an Alibaba open source project , The official definition is : A dynamic service discovery that is easier to build cloud native applications 、 Configuration management and service management platform .
function
Dynamic configuration services
Dynamic configuration services allow you to centralize 、 Managing the configuration of all environments in an externalized and dynamic way . Dynamic configuration eliminates the need to redeploy applications and services when configuration changes . Centralized configuration management makes it easier to implement stateless services , It also makes it easier to expand services on demand .
Service discovery and management
Dynamic service discovery for service centric ( For example, microservices and cloud native ) Application architecture is critical .Nacos Support DNS-Based and RPC-Based(Dubbo、gRPC) Pattern service discovery .Nacos It also provides real-time health checks , To prevent requests from being sent to unhealthy hosts or service instances . With the help of Nacos, You can more easily implement circuit breakers for your services .
dynamic DNS service
By supporting weight routing , dynamic DNS Services make it easy for you to achieve load balancing in the middle layer 、 More flexible routing strategy 、 Flow control and simple data center Intranet DNS Resolution service . dynamic DNS Services also make it easier for you to implement DNS Protocol based service discovery , To eliminate coupling to vendor private service discovery API Risk on .
See more features and function descriptions Official documents .
Single deployment
nacos rely on java Environmental Science , Installation is required first jdk And configure the environment variables
- install jdk
yum -y install java-1.8.0-openjdk-devel.x86_64 # Verify after successful installation Java edition java -version - Configure environment variables
OpenJDK Default installed in /usr/lib/jvm/ Under the path , Then edit profile Set up JAVA_HOME environment variable .
[[email protected] ~]# vim /etc/profile export JAVA_HOME=/usr/lib/jvm/java-1.8.0-openjdk-1.8.0.272.b10-1.el7_9.x86_64 export JRE_HOME=$JAVA_HOME/jre export CLASSPATH=$JAVA_HOME/lib:$JRE_HOME/lib:$CLASSPATH export PATH=$JAVA_HOME/bin:$JRE_HOME/bin:$PATH [[email protected] ~]# source /etc/profile confirm JAVA_HOME Whether the environment variables are configured correctly .
[[email protected] ~]# echo $JAVA_HOME /usr/lib/jvm/java-1.8.0-openjdk-1.8.0.272.b10-1.el7_9.x86_64 JDK After installation , Formally enter the Nacos Installation process .
window install
- Download the corresponding version of nacos, And initialize the database :https://github.com/alibaba/nacos/releases


- modify application.properties The configuration file
### Default web context path:server.servlet.contextPath=/nacos### Default web server port:server.port=8848### If use MySQL as datasource:spring.datasource.platform=mysql### Count of DB:db.num=1### Connect URL of DB:db.url.0=jdbc:mysql://127.0.0.1:3306/nacos_config?characterEncoding=utf8&connectTimeout=1000&socketTimeout=3000&autoReconnect=true&useUnicode=true&useSSL=false&serverTimezone=UTCdb.user=rootdb.password=root- Get into bin Directory start nacos
# Single node startup startup.cmd -m standalonevisit :http://localhost:8848/nacos/#/login Account and password :nacos/nacos
linux install
- Download the corresponding version of the compressed package file and upload it to the corresponding server :https://github.com/alibaba/nacos/releases
- Unzip the corresponding zip file
tar -zxvf nacos-server-2.0.2.tar.gzAfter decompressing nacos Directory structure description :
- bin: Save enable / close Nacos Server Script ;
- conf:Nacos Server The configuration directory ;
- data:Nacos Data directory ;
- logs: Store log directory ;
- target:Nacos Jar Package storage directory ;
- Get into bin Catalog , Start in single node mode Nacos
sh startup.sh -m standaloneThe startup log is as follows :
nacos is starting with standalone nacos is starting, you can check the /data/software/nacos/logs/start.out see nacos start log
You can see it nacos The default port number is 8848
tail -300f /data/software/nacos/logs/start.out2021-11-06 21:03:18,759 INFO Tomcat started on port(s): 8848 (http) with context path '/nacos' 2021-11-06 21:03:18,766 INFO Nacos Log files: /data/software/nacos/logs 2021-11-06 21:03:18,766 INFO Nacos Log files: /data/software/nacos/conf 2021-11-06 21:03:18,766 INFO Nacos Log files: /data/software/nacos/data 2021-11-06 21:03:18,767 INFO Nacos started successfully in stand alone mode. use embedded storageIf centos System firewall (firewall-cmd --state View firewall status ) Is open , Need to be open 8848 and 7848 port (8848 The port is Nacos The port that serves the client ,7848 yes Nacos Cluster communication port , be used for Nacos Elections are held among clusters , Detection, etc. .)
# Open ports 8848[[email protected] bin]# firewall-cmd --zone=public --add-port=8848/tcp --permanent # Open ports 7848[[email protected] bin]# firewall-cmd --zone=public --add-port=7848/tcp --permanent # Refresh firewall [[email protected] bin]# firewall-cmd --reload - Get into Nacos Management interface , Open the browser , Address field input :
http://ip:8848/nacos
Enter the account and password :nacos/nacos Enter the management page
docker install
- Pull the mirror image :docker pull nacos/nacos-server:2.0.2
- Download the corresponding version of SQL File and initialize :https://github.com/alibaba/nacos/releases
- Build the container and start the service
docker run -d --privileged=true \-e TZ="Asia/Shanghai" \-e MODE=standalone \-p 8848:8848 \--name nacos-zjq-mysql \--restart=always \nacos/nacos-server:2.0.2- Check the log
docker logs -f -t --tail 300 nacos-zjq-mysql- Into the container
docker exec -it nacos-zjq-mysql bash- Modify the configuration file and set the data source to MySQL
cd /home/nacos/confvim application.properties# springserver.servlet.contextPath=${SERVER_SERVLET_CONTEXTPATH:/nacos}server.contextPath=/nacosserver.port=${NACOS_APPLICATION_PORT:8848}spring.datasource.platform=${SPRING_DATASOURCE_PLATFORM:mysql}nacos.cmdb.dumpTaskInterval=3600nacos.cmdb.eventTaskInterval=10nacos.cmdb.labelTaskInterval=300nacos.cmdb.loadDataAtStart=falsedb.num=${MYSQL_DATABASE_NUM:1}db.url.0=jdbc:mysql://${MYSQL_SERVICE_HOST:127.0.0.1}:${MYSQL_SERVICE_PORT:3306}/${MYSQL_SERVICE_DB_NAME:nacos_config}?${MYSQL_SERVICE_DB_PARAM:characterEncoding=utf8&connectTimeout=1000&socketTimeout=3000&autoReconnect=true}db.url.1=jdbc:mysql://${MYSQL_SERVICE_HOST}:${MYSQL_SERVICE_PORT:3306}/${MYSQL_SERVICE_DB_NAME}?${MYSQL_SERVICE_DB_PARAM:characterEncoding=utf8&connectTimeout=1000&socketTimeout=3000&autoReconnect=true}db.user=${MYSQL_SERVICE_USER:root}db.password=${MYSQL_SERVICE_PASSWORD:root}### The auth system to use, currently only 'nacos' is supported:nacos.core.auth.system.type=${NACOS_AUTH_SYSTEM_TYPE:nacos}- Copy the configuration file in the container to the host , Avoid modifying the configuration file when the container is rebuilt
docker cp Container name : Container file ( Absolute path ) Host directory
docker cp nacos-sa-mysql:/home/nacos/conf/application.properties /data/docker/nacos/nacos-soms/conf- Restart the container and mount the directory
# Stop container docker stop nacos-zjq-mysql# Delete container docker rm nacos-zjq-mysql# Start the container docker run -d --privileged=true \-e TZ="Asia/Shanghai" \-e MODE=standalone \-v /data/docker/nacos/nacos-zjq/conf/application.properties:/home/nacos/conf/application.properties \-p 8848:8848 \--name nacos-zjq-mysql \--restart=always \nacos/nacos-server:2.0.2- nacos Specify the database configuration directly when the image is started
docker run -d \-v /data/nacos/logs:/home/nacos/logs \-e TZ="Asia/Shanghai" \-e PREFER_HOST_MODE=ip \-e MODE=standalone \-e SPRING_DATASOURCE_PLATFORM=mysql \-e MYSQL_SERVICE_HOST= database IP Address \-e MYSQL_SERVICE_PORT= Database port \-e MYSQL_SERVICE_USER= Database accounts \-e MYSQL_SERVICE_PASSWORD= Database password \-e MYSQL_SERVICE_DB_NAME=nacos_config \-e MYSQL_SERVICE_DB_PARAM= \-e NACOS_APPLICATION_PORT=8848 \-p 8848:8848 \--name nacos-zjq-mysql \--restart=always \nacos/nacos-server:2.0.2Production advice nacos The registry service deploys multiple nodes , Forming clusters , Improve availability , Prevent the service from being unavailable when the stand-alone node goes down .
边栏推荐
- ES6-新增方法
- 怎样产生标准分布或高斯分布的随机数
- Self control principle learning notes - system stability analysis (1) - BIBO stability and Routh criterion
- asp.net 的经验
- Micaz+tinyos learning notes (1)
- npm的身份证和依赖
- Electromagnetic field learning notes - vector analysis and field theory foundation
- Useful resources for ns2
- Nacos基本概念和单机部署
- Extension of regular expression
猜你喜欢

There is a problem with the time zone when the idea connects to the database. The server returns invalid timezone is red Need to set ‘serverTimezone‘ property.
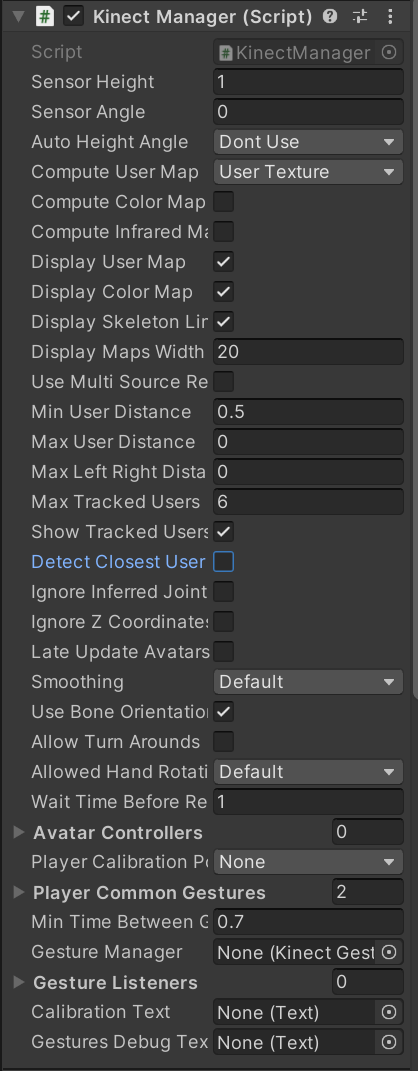
Kinect for Unity3d----KinectManager

Docker - docker installation, MySQL installation on docker, and project deployment on docker

The understanding of string in C.

I'm afraid I won't use the JMeter interface testing tool if I accept this practical case
npm 基本使用

Nodejs 模板引擎ejs

如何用自动化测试搞垮团队
C#与Mysql数据库交互-Mysql配置及增删查改操作

MongoDB
随机推荐
Product recommendation and classified product recommendation
Nacos集群部署-高可用保证
怎样产生标准分布或高斯分布的随机数
Unity学习笔记——物体移动六种常见函数
MySQL 05 stored procedure
【云图说】 第250期 初识华为云微服务引擎CSE
Role authorization --- complete the addition and deletion of secondary menus by adding and deleting primary menus
Redis annotation
Kinect for unity3d - backgroundremovaldemo learning
normal distribution, lognormal distribution,正态随机数的生成
An article allows you to master threads and thread pools, and also solves thread safety problems. Are you sure you want to take a look?
连续时间系统的性能分析(2)-二阶系统性能改善方式PID,PR
The understanding of string in C.
win10小技巧(1)——转移桌面位置
Unity学习笔记(刚体-物理-碰撞器-触发器)
一个经验
Greedy method, matroid and submodular function (refer)
微机原理学习笔记-通用整数指令及应用
Kinect2 for Unity3D——AvatarDemo学习
用Matlab生成适用于期刊及会议的图形- plot