当前位置:网站首页>Nodemcu-esp8266 development (vscode+platformio+arduino framework): Part 4 --blinker_ DHT_ WiFi (lighting technology app control + temperature and humidity data app display)
Nodemcu-esp8266 development (vscode+platformio+arduino framework): Part 4 --blinker_ DHT_ WiFi (lighting technology app control + temperature and humidity data app display)
2022-07-03 09:35:00 【Taodream】
First, build the development environment :https://blog.csdn.net/felix_tao/article/details/113092886
Second, finish Blinker_Hello_WiFi( Lighting technology - mobile phone APP Control routine ):https://blog.csdn.net/felix_tao/article/details/113359707
First step : download DHT11/22 Temperature and humidity sensor Library -DHT-sensor-library-master.
Download address :https://www.arduino.cn/thread-81585-1-1.html
The second step : After downloading , take DHT-sensor-library-master.zip unpack , Put it under this path C:\Users\felix\.platformio\packages\framework-arduinoespressif8266\libraries.

The third step : A copy of Blinker_Hello_WiFi engineering , And rename to Blinker_DHT_WiF.
Step four : open VSCODE-> file -> Add folder to workspace -> Select the project folder Blinker_DHT_WiF-> Add to VSCODE in .
In the open VSCODE In the process , It will load automatically PIO plug-in unit , as well as .vscode->c_cpp_properties.json Will automatically load DHT-sensor-library-master Inclusion path .
Step five : Copy the following code to VSCODE Medium src->main.cpp Inside .
/* *****************************************************************
 * @author  TaoDream
 * @version V1.0
 * @date    2021.01.31
 *  Program function :
 * 1. Use the development board :nodemcu-ESP8266( modular ESP-12E)
 * 2. Using sensors :DHT11 modular ( Data pins DAT Received from the development board D7,VCC Received from the development board 3V3,GND Received from the development board GND)
 * 3. Program function : Use Blinker  mobile phone APP Add devices and bind , adopt APP Remote control the light on the development board , And read DHTXX The temperature and humidity value of the sensor is APP Displayed on the
 * 4. Routine documentation :https://www.diandeng.tech/doc/arduino-course, choice “2. Data feedback ”
 * *****************************************************************/

//#define LED_BUILTIN 2   //ESP-12E The module itself LED, Corresponding GPIO2, Low level light
//#define LED_BUILTIN 16  //nodemcu-esp8266 The development board extends LED, Corresponding GPIO16, Low level light

#define BLINKER_WIFI
#define BLINKER_WITHOUT_SSL  //blinker By default, encryption is used for remote communication , But communication encryption will consume a lot of RAM, If you have no requirements for communication security ,
							 // You can add macros BLINKER_WITHOUT_SSL To get more available RAM,BLINKER_WITHOUT_SSL At present, it can only be used for ESP8266, Other devices RAM Enough for encrypted communication

#include <Blinker.h>         // Using third party libraries
#include <DHT.h>             // Using third party libraries

char auth[] = "aabfdfc3b167";//Blinker APP Obtained in Secret Key( secret key )
char ssid[] = "Xiaomi_123";  //wifi name
char pswd[] = "felix1234";   //wifi password

//  New component object
BlinkerButton Button1("btn-key");// Component object , Want to be with APP In the component “ Data key name ” Agreement

/// Read DHTXX Sensor related definitions and variables //
BlinkerNumber HUMI("humi");
BlinkerNumber TEMP("temp");

#define DHTPIN D7   // Define the data pins transmitted by the single bus protocol

// Sensor type selection
#define DHTTYPE DHT11   // DHT 11
//#define DHTTYPE DHT22   // DHT 22  (AM2302), AM2321
//#define DHTTYPE DHT21   // DHT 21 (AM2301)

DHT dht(DHTPIN, DHTTYPE);
float humi_read = 0, temp_read = 0;
///

//  Heartbeat package function
void heartbeat()
{
    // The temperature and humidity data collected at the device end , Synchronize data through heartbeat packets , According to the APP On
    HUMI.print(humi_read);
    TEMP.print(temp_read);
}

//  Press the key to execute the function
void button1_callback(const String & state)
{
    BLINKER_LOG("get button state: ", state);//APP Medium Monitor Control print information
    if (state=="on")
    {
        digitalWrite(LED_BUILTIN, LOW);// open LED The lamp
        //  Feedback switch status
        Button1.print("on");
    } else if(state=="off"){
        digitalWrite(LED_BUILTIN, HIGH);// close LED The lamp
        //  Feedback switch status
        Button1.print("off");
    }
}

void setup()
{
    //  Initialize serial port
    Serial.begin(115200);
    BLINKER_DEBUG.stream(Serial);
    BLINKER_DEBUG.debugAll();

    //  Initialization has LED Of IO
    pinMode(LED_BUILTIN, OUTPUT);
    digitalWrite(LED_BUILTIN, LOW);// Default on LED

    //  initialization blinker
    Blinker.begin(auth, ssid, pswd);
    Button1.attach(button1_callback);// Bind key callback
    // Register a heartbeat package
    Blinker.attachHeartbeat(heartbeat);
    dht.begin();//DTHXX Sensor initialization
}

void loop()
{
    Blinker.run();

    float h = dht.readHumidity();// Read the humidity value
    float t = dht.readTemperature();// Read temperature value

    // If there is no DHTXX sensor , Then use the following data to debug
    // h = 60.1;// Debugging with , Simulated humidity value
    // t = 25.2;// Debugging with , Analog temperature value

    if (isnan(h) || isnan(t))
    {
        BLINKER_LOG("Failed to read from DHT sensor!");
    }
    else
    {
        BLINKER_LOG("Humidity: ", h, " %");
        BLINKER_LOG("Temperature: ", t, " *C");
        humi_read = h;
        temp_read = t;
    }

    // It should be noted that :blinker All delay operations under , You need to use Blinker.delay(val); replace , Otherwise, the device will be disconnected
    Blinker.delay(2000);
}
Step six : Modify the following code .
Modify the key 、wifi name 、wifi The password is your own .
char auth[] = "Your Device Secret Key";//Blinker APP Obtained in Secret Key( secret key )
char ssid[] = "Your WiFi network SSID or name";//wifi name
char pswd[] = "Your WiFi network WPA password or WEP key";//wifi password
Step seven : take DHT11 Module and ESP8266 Connect to the development board .
DHT11     ---      ESP8266

DAT       ---       D7

VCC       ---       3V3

GND       ---       GND
Step eight : Compile 、 download , During the compilation process, we found that “ Yellow warning ”, Don't mind , The final compilation is “SUCCESS” Just OK.
After downloading successfully , You can see the LED It lights up , open VSCODE The serial monitor can see and print some information , When you see “MQTT Connected!” Then prove the connection wifi Was a success , When you see "state":"online" The device is online .
If there is a connection DHT11 or DHT22 modular , You can see the print humidity 、 temperature .
VSCODE Information printed by the serial monitor :
......
[11393129] Humidity: 93.00 %
[11393130] Temperature: 19.50 *C
[11395181] Humidity: 93.00 %
[11395181] Temperature: 19.50 *C
[11397230] Humidity: 93.00 %
If there's no answer , It will say that the connection of the sensor failed , It doesn't matter if you don't answer , Just give a fixed value , Because our main purpose is to debug data in APP Displayed on the .
[18161] Failed to read from DHT sensor!
[20260] Failed to read from DHT sensor!
[22370] Failed to read from DHT sensor!
[24475] Failed to read from DHT sensor!
Step nine :APP Add components to the interface , Perform key on control and display humidity 、 Temperature value .
1) add to “ Switch button ” Components .
Click on the “ Edit icon ”, Enter editing status , Delete all the original APP Components in , Click on “ Key icon ”, Then go to edit .

2) Add humidity 、 Temperature component .
Click on “ Data icon ”, Then go to edit .


3) Add debug components .
Click on “ Debug Icon ”, Then go to edit .

4) The final interface is shown in the figure below , Press... In the upper right corner “ Lock icon ” Preservation .

5) The saved interface is shown in the following figure , Press the open key to control the switch board LED The light is on and off , At the same time, humidity 、 The temperature component displays data normally .
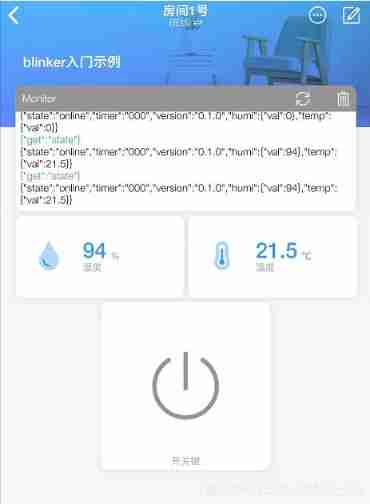
thus , All operations complete .
Complete engineering documents :https://download.csdn.net/download/felix_tao/14978839
Reference documents :
Lighting technology :https://www.arduino.cn/thread-83176-1-1.html
边栏推荐
- Spark 结构化流写入Hudi 实践
- Equality judgment of long type
- LeetCode每日一题(2090. K Radius Subarray Averages)
- Powerdesign reverse wizard such as SQL and generates name and comment
- ERROR: certificate common name “www.mysql.com” doesn’t match requested host name “137.254.60.11”.
- Hudi 数据管理和存储概述
- 307. Range Sum Query - Mutable
- Idea uses the MVN command to package and report an error, which is not available
- Spark 概述
- Common formulas of probability theory
猜你喜欢

Hudi data management and storage overview
Flink学习笔记(八)多流转换

Overview of image restoration methods -- paper notes
Principles of computer composition - cache, connection mapping, learning experience

Flink-CDC实践(含实操步骤与截图)
图像修复方法研究综述----论文笔记

Django operates Excel files through openpyxl to import data into the database in batches.
Flink学习笔记(九)状态编程

Alibaba cloud notes for the first time

Win10 quick screenshot
随机推荐
Hudi学习笔记(三) 核心概念剖析
[set theory] order relation (chain | anti chain | chain and anti chain example | chain and anti chain theorem | chain and anti chain inference | good order relation)
Vscode编辑器右键没有Open In Default Browser选项
Common software open source protocols
Principles of computer composition - cache, connection mapping, learning experience
LeetCode每日一题(2232. Minimize Result by Adding Parentheses to Expression)
[kotlin puzzle] what happens if you overload an arithmetic operator in the kotlin class and declare the operator as an extension function?
Global KYC service provider advance AI in vivo detection products have passed ISO international safety certification, and the product capability has reached a new level
Explanation of the answers to the three questions
Leetcode daily question (1362. closest divisors)
Apply for domain name binding IP to open port 80 record
【Kotlin疑惑】在Kotlin类中重载一个算术运算符,并把该运算符声明为扩展函数会发生什么?
全球KYC服务商ADVANCE.AI 活体检测产品通过ISO国际安全认证 产品能力再上一新台阶
Overview of database system
Run flash demo on ECS
Usage of pandas to obtain MySQL data
Crawler career from scratch (I): crawl the photos of my little sister ① (the website has been disabled)
Crawler career from scratch (V): detailed explanation of re regular expression
LeetCode每日一题(2109. Adding Spaces to a String)
Serializer rewrite: update and create methods