当前位置:网站首页>滴滴的分布式ID生成器(Tinyid),好用的一批
滴滴的分布式ID生成器(Tinyid),好用的一批
2020-11-07 16:59:00 【osc_kl6fknqf】
不了解分布式ID生成器的同学,先复习一下之前的 《9种分布式ID生成方式》
Tinyid是滴滴开发的一款分布式ID系统,Tinyid是在美团(Leaf)的leaf-segment算法基础上升级而来,不仅支持了数据库多主节点模式,还提供了tinyid-client客户端的接入方式,使用起来更加方便。但和美团(Leaf)不同的是,Tinyid只支持号段一种模式不支持雪花模式。
Tinyid的特性
- 全局唯一的long型ID
- 趋势递增的id
- 提供 http 和 java-client 方式接入
- 支持批量获取ID
- 支持生成1,3,5,7,9...序列的ID
- 支持多个db的配置
适用场景:只关心ID是数字,趋势递增的系统,可以容忍ID不连续,可以容忍ID的浪费
不适用场景:像类似于订单ID的业务,因生成的ID大部分是连续的,容易被扫库、或者推算出订单量等信息
Tinyid原理
Tinyid是基于号段模式实现,再简单啰嗦一下号段模式的原理:就是从数据库批量的获取自增ID,每次从数据库取出一个号段范围,例如 (1,1000] 代表1000个ID,业务服务将号段在本地生成1~1000的自增ID并加载到内存.。
Tinyid会将可用号段加载到内存中,并在内存中生成ID,可用号段在首次获取ID时加载,如当前号段使用达到一定比例时,系统会异步的去加载下一个可用号段,以此保证内存中始终有可用号段,以便在发号服务宕机后一段时间内还有可用ID。
原理图大致如下图:
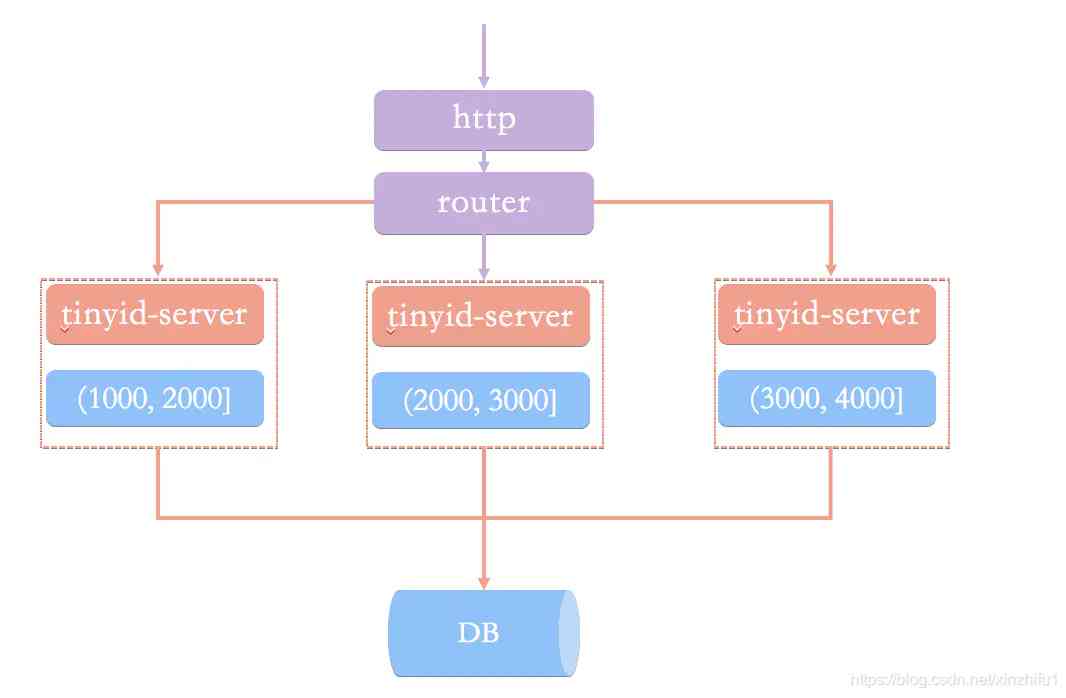 Tinyid原理图
Tinyid实现
Tinyid的GitHub地址 : https://github.com/didi/tinyid.git
Tinyid提供了两种调用方式,一种基于Tinyid-server提供的http方式,另一种Tinyid-client客户端方式。 不管使用哪种方式调用,搭建Tinyid都必须提前建表tiny_id_info、tiny_id_token。
CREATE TABLE `tiny_id_info` (
  `id` bigint(20) unsigned NOT NULL AUTO_INCREMENT COMMENT '自增主键',
  `biz_type` varchar(63) NOT NULL DEFAULT '' COMMENT '业务类型,唯一',
  `begin_id` bigint(20) NOT NULL DEFAULT '0' COMMENT '开始id,仅记录初始值,无其他含义。初始化时begin_id和max_id应相同',
  `max_id` bigint(20) NOT NULL DEFAULT '0' COMMENT '当前最大id',
  `step` int(11) DEFAULT '0' COMMENT '步长',
  `delta` int(11) NOT NULL DEFAULT '1' COMMENT '每次id增量',
  `remainder` int(11) NOT NULL DEFAULT '0' COMMENT '余数',
  `create_time` timestamp NOT NULL DEFAULT '2010-01-01 00:00:00' COMMENT '创建时间',
  `update_time` timestamp NOT NULL DEFAULT '2010-01-01 00:00:00' COMMENT '更新时间',
  `version` bigint(20) NOT NULL DEFAULT '0' COMMENT '版本号',
  PRIMARY KEY (`id`),
  UNIQUE KEY `uniq_biz_type` (`biz_type`)
) ENGINE=InnoDB AUTO_INCREMENT=1 DEFAULT CHARSET=utf8 COMMENT 'id信息表';

CREATE TABLE `tiny_id_token` (
  `id` int(11) unsigned NOT NULL AUTO_INCREMENT COMMENT '自增id',
  `token` varchar(255) NOT NULL DEFAULT '' COMMENT 'token',
  `biz_type` varchar(63) NOT NULL DEFAULT '' COMMENT '此token可访问的业务类型标识',
  `remark` varchar(255) NOT NULL DEFAULT '' COMMENT '备注',
  `create_time` timestamp NOT NULL DEFAULT '2010-01-01 00:00:00' COMMENT '创建时间',
  `update_time` timestamp NOT NULL DEFAULT '2010-01-01 00:00:00' COMMENT '更新时间',
  PRIMARY KEY (`id`)
) ENGINE=InnoDB AUTO_INCREMENT=1 DEFAULT CHARSET=utf8 COMMENT 'token信息表';

INSERT INTO `tiny_id_info` (`id`, `biz_type`, `begin_id`, `max_id`, `step`, `delta`, `remainder`, `create_time`, `update_time`, `version`)
VALUES
 (1, 'test', 1, 1, 100000, 1, 0, '2018-07-21 23:52:58', '2018-07-22 23:19:27', 1);

INSERT INTO `tiny_id_info` (`id`, `biz_type`, `begin_id`, `max_id`, `step`, `delta`, `remainder`, `create_time`, `update_time`, `version`)
VALUES
 (2, 'test_odd', 1, 1, 100000, 2, 1, '2018-07-21 23:52:58', '2018-07-23 00:39:24', 3);


INSERT INTO `tiny_id_token` (`id`, `token`, `biz_type`, `remark`, `create_time`, `update_time`)
VALUES
 (1, '0f673adf80504e2eaa552f5d791b644c', 'test', '1', '2017-12-14 16:36:46', '2017-12-14 16:36:48');

INSERT INTO `tiny_id_token` (`id`, `token`, `biz_type`, `remark`, `create_time`, `update_time`)
VALUES
 (2, '0f673adf80504e2eaa552f5d791b644c', 'test_odd', '1', '2017-12-14 16:36:46', '2017-12-14 16:36:48');
tiny_id_info表是具体业务方号段信息数据表
max_id :号段的最大值
step:步长,即为号段的长度
biz_type:业务类型
号段获取对max_id字段做一次update操作,update max_id= max_id + step,更新成功则说明新号段获取成功,新的号段范围是(max_id ,max_id +step]。
tiny_id_token是一个权限表,表示当前token可以操作哪些业务的号段信息。
修改tinyid-server中 \offline\application.properties 文件配置数据库,由于tinyid支持数据库多master模式,可以配置多个数据库信息。启动 TinyIdServerApplication 测试一下。
datasource.tinyid.primary.driver-class-name=com.mysql.jdbc.Driver
datasource.tinyid.primary.url=jdbc:mysql://127.0.0.1:3306/xin-master?autoReconnect=true&useUnicode=true&characterEncoding=UTF-8
datasource.tinyid.primary.username=junkang
datasource.tinyid.primary.password=junkang
datasource.tinyid.primary.testOnBorrow=false
datasource.tinyid.primary.maxActive=10

datasource.tinyid.secondary.driver-class-name=com.mysql.jdbc.Driver
datasource.tinyid.secondary.url=jdbc:mysql://localhost:3306/db2?autoReconnect=true&useUnicode=true&characterEncoding=UTF-8
datasource.tinyid.secondary.username=root
datasource.tinyid.secondary.password=123456
datasource.tinyid.secondary.testOnBorrow=false
datasource.tinyid.secondary.maxActive=10
1、Http方式
tinyid内部一共提供了四个http接口来获取ID和号段。
package com.xiaoju.uemc.tinyid.server.controller;

/**
 * @author du_imba
 */


@RestController
@RequestMapping("/id/")
public class IdContronller {

    private static final Logger logger = LoggerFactory.getLogger(IdContronller.class);
    @Autowired
    private IdGeneratorFactoryServer idGeneratorFactoryServer;
    @Autowired
    private SegmentIdService segmentIdService;
    @Autowired
    private TinyIdTokenService tinyIdTokenService;
    @Value("${batch.size.max}")
    private Integer batchSizeMax;

    @RequestMapping("nextId")
    public Response<List<Long>> nextId(String bizType, Integer batchSize, String token) {
        Response<List<Long>> response = new Response<>();
        try {
            IdGenerator idGenerator = idGeneratorFactoryServer.getIdGenerator(bizType);
            List<Long> ids = idGenerator.nextId(newBatchSize);
            response.setData(ids);
        } catch (Exception e) {
            response.setCode(ErrorCode.SYS_ERR.getCode());
            response.setMessage(e.getMessage());
            logger.error("nextId error", e);
        }
        return response;
    }


    @RequestMapping("nextIdSimple")
    public String nextIdSimple(String bizType, Integer batchSize, String token) {
        String response = "";
        try {
            IdGenerator idGenerator = idGeneratorFactoryServer.getIdGenerator(bizType);
            if (newBatchSize == 1) {
                Long id = idGenerator.nextId();
                response = id + "";
            } else {
                List<Long> idList = idGenerator.nextId(newBatchSize);
                StringBuilder sb = new StringBuilder();
                for (Long id : idList) {
                    sb.append(id).append(",");
                }
                response = sb.deleteCharAt(sb.length() - 1).toString();
            }
        } catch (Exception e) {
            logger.error("nextIdSimple error", e);
        }
        return response;
    }

    @RequestMapping("nextSegmentId")
    public Response<SegmentId> nextSegmentId(String bizType, String token) {
        try {
            SegmentId segmentId = segmentIdService.getNextSegmentId(bizType);
            response.setData(segmentId);
        } catch (Exception e) {
            response.setCode(ErrorCode.SYS_ERR.getCode());
            response.setMessage(e.getMessage());
            logger.error("nextSegmentId error", e);
        }
        return response;
    }

    @RequestMapping("nextSegmentIdSimple")
    public String nextSegmentIdSimple(String bizType, String token) {
        String response = "";
        try {
            SegmentId segmentId = segmentIdService.getNextSegmentId(bizType);
            response = segmentId.getCurrentId() + "," + segmentId.getLoadingId() + "," + segmentId.getMaxId()
                    + "," + segmentId.getDelta() + "," + segmentId.getRemainder();
        } catch (Exception e) {
            logger.error("nextSegmentIdSimple error", e);
        }
        return response;
    }

}
nextId、nextIdSimple都是获取下一个ID,nextSegmentIdSimple、getNextSegmentId是获取下一个可用号段。区别在于接口是否有返回状态。
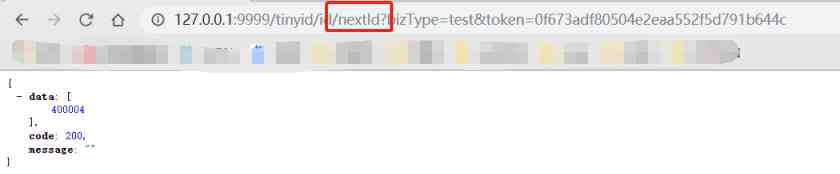
nextId:
'http://localhost:9999/tinyid/id/nextId?bizType=test&token=0f673adf80504e2eaa552f5d791b644c'
response :
{
 "data": [2],
 "code": 200,
 "message": ""
}

nextId Simple:
'http://localhost:9999/tinyid/id/nextIdSimple?bizType=test&token=0f673adf80504e2eaa552f5d791b644c'
response: 3

2、Tinyid-client客户端
如果不想通过http方式,Tinyid-client客户端也是一种不错的选择。
引用 tinyid-server包
<dependency>
    <groupId>com.xiaoju.uemc.tinyid</groupId>
    <artifactId>tinyid-client</artifactId>
    <version>${tinyid.version}</version>
</dependency>
启动 tinyid-server项目打包后得到 tinyid-server-0.1.0-SNAPSHOT.jar ,设置版本${tinyid.version}为0.1.0-SNAPSHOT。
在我们的项目 application.properties 中配置 tinyid-server服务的请求地址 和 用户身份token
tinyid.server=127.0.0.1:9999
tinyid.token=0f673adf80504e2eaa552f5d791b644c```
在Java代码调用TinyId也很简单,只需要一行代码。
// 根据业务类型 获取单个ID
Long id = TinyId.nextId("test");

// 根据业务类型 批量获取10个ID
List<Long> ids = TinyId.nextId("test", 10);
Tinyid整个项目的源码实现也是比较简单,像与数据库交互更直接用jdbcTemplate实现
@Override
public TinyIdInfo queryByBizType(String bizType) {
    String sql = "select id, biz_type, begin_id, max_id," +
            " step, delta, remainder, create_time, update_time, version" +
            " from tiny_id_info where biz_type = ?";
    List<TinyIdInfo> list = jdbcTemplate.query(sql, new Object[]{bizType}, new TinyIdInfoRowMapper());
    if(list == null || list.isEmpty()) {
        return null;
    }
    return list.get(0);
}
总结
两种方式推荐使用Tinyid-client,这种方式ID为本地生成,号段长度(step)越长,支持的qps就越大,如果将号段设置足够大,则qps可达1000w+。而且tinyid-client 对tinyid-server 访问变的低频,减轻了server端的压力。
版权声明
本文为[osc_kl6fknqf]所创,转载请带上原文链接,感谢
https://my.oschina.net/u/4399347/blog/4707582
边栏推荐
- 汽车维修app开发的好处与功能
- 课堂练习
- 三步轻松理解Kerberos协议
- How does varhart xgantt represent working days on a calendar
- 9.集群之间服务通信 RoutingMesh
- [graffiti Internet of things footprints] panoramic introduction of graffiti cloud platform
- Shanghai Pudong Development Bank, which frequently receives penalty tickets, has been cheated by hundreds of millions of yuan in loans, and lacks of internal control?
- 廬山真面目之二微服務架構NGINX版本實現
- About Devops seven misunderstandings, 99% of people have been hit!
- Git submission specification
猜你喜欢

August 18, 2020: introduce Mr process?
“非洲用户的付费意愿并不低”——专访四达时代研发总监张亮
Detailed software engineering -- the necessary graphs in each stage
Talk about sharing before paying
Dynamsoft barcode reader v7.5!
小程序商城系统插件代码该如何写?怎么用代码检查添加插件是否成功?
Exclusive interview with alicloud database of | 2020 PostgreSQL Asia Conference: Wang Xu
一种超参数优化技术-Hyperopt
Yum [errno 256] no more mirrors to try solution
如何利用PopupWindow实现弹出菜单并解决焦点获取以及与软键盘冲突问题
随机推荐
C# 枚举权限 |和||,&和&&的区别
Web API interface design: swaggerui document / unified response format / unified exception handling / unified authority verification
微服務 - 如何進行服務限流和熔斷
如何解决谷歌Chrome浏览器空白页的问题
傲視Kubernetes(一):Kubernetes簡介
失眠一个整晚上
JS string - string string object method
Git SSH bad permissions
Dynamsoft barcode reader v7.5!
Bluetooth broadcast chip for Shanghai giant micro
How to add modules to nginx image?
20个XR项目路演,近20个资本机构出席!诚邀您参加2020 Qualcomm XR生态合作伙伴大会
8. Swarm creates maintenance and horizontal extension service
JS array the usage of array is all here (array method reconstruction, array traversal, array de duplication, array judgment and conversion)
聊聊先享後付
11. Service update
【笔记】Error while loading PyV8 binary: exit code 1解决方法
WebAPI接口设计:SwaggerUI文档 / 统一响应格式 / 统一异常处理 / 统一权限验证
HMS Core推送服务,助力电商App开展精细化运营
Empty test suite appears in JUnit test