当前位置:网站首页>Sa-Token 单点登录 SSO模式二 URL重定向传播会话示例
Sa-Token 单点登录 SSO模式二 URL重定向传播会话示例
2022-06-11 17:54:00 【_萧_】
简介
登录认证鉴权在日常开发中经常遇到,So-Token简介中号称轻量级 Java 权限认证框架,那本篇文章来常常鲜,写一个简单的登录认证
示例说明
本文中基于登录任务服务单独作为一个服务应用,业务服务作为一个服务应用的场景
登录认证服务
Maven配置
<?xml version="1.0" encoding="UTF-8"?>
<project xmlns="http://maven.apache.org/POM/4.0.0" xmlns:xsi="http://www.w3.org/2001/XMLSchema-instance" xsi:schemaLocation="http://maven.apache.org/POM/4.0.0 http://maven.apache.org/xsd/maven-4.0.0.xsd">
    <parent>
        <groupId>org.springframework.boot</groupId>
        <artifactId>spring-boot-starter-parent</artifactId>
        <version>2.7.0</version>
        <relativePath/> <!-- lookup parent from repository -->
    </parent>

    <modelVersion>4.0.0</modelVersion>

    <properties>
        <maven.compiler.source>17</maven.compiler.source>
        <maven.compiler.target>17</maven.compiler.target>
    </properties>

    <dependencies>
        <dependency>
            <groupId>org.springframework.boot</groupId>
            <artifactId>spring-boot-starter-web</artifactId>
        </dependency>

        <dependency>
            <groupId>org.projectlombok</groupId>
            <artifactId>lombok</artifactId>
            <optional>true</optional>
        </dependency>
        <dependency>
            <groupId>org.springframework.boot</groupId>
            <artifactId>spring-boot-starter-test</artifactId>
            <scope>test</scope>
        </dependency>

        <!-- Sa-Token 权限认证, 在线文档:http://sa-token.dev33.cn/ -->
        <dependency>
            <groupId>cn.dev33</groupId>
            <artifactId>sa-token-spring-boot-starter</artifactId>
            <version>1.30.0</version>
        </dependency>

        <!-- Sa-Token 插件:整合SSO -->
        <dependency>
            <groupId>cn.dev33</groupId>
            <artifactId>sa-token-sso</artifactId>
            <version>1.30.0</version>
        </dependency>

        <!-- Sa-Token 整合 Redis (使用 jackson 序列化方式) -->
        <dependency>
            <groupId>cn.dev33</groupId>
            <artifactId>sa-token-dao-redis-jackson</artifactId>
            <version>1.30.0</version>
        </dependency>
        <dependency>
            <groupId>org.apache.commons</groupId>
            <artifactId>commons-pool2</artifactId>
        </dependency>

        <!-- Sa-Token插件:权限缓存与业务缓存分离 -->
        <dependency>
            <groupId>cn.dev33</groupId>
            <artifactId>sa-token-alone-redis</artifactId>
            <version>1.30.0</version>
        </dependency>
    </dependencies>

</project>
application.yml配置
# 端口
server:
  port: 9000

# sa-token配置
sa-token:
  # SSO-相关配置
  sso:
    # SSO-Server端 统一认证地址
    auth-url: http://localhost:9000/sso/auth
    # 是否打开单点注销接口
    is-slo: true

  # 配置Sa-Token单独使用的Redis连接 (此处需要和SSO-Server端连接同一个Redis)
  alone-redis:
    # Redis数据库索引 (默认为0)
    database: 1
    # Redis服务器地址
    host: 127.0.0.1
    # Redis服务器连接端口
    port: 6379
    # Redis服务器连接密码(默认为空)
    password: password
统一返回对象结构
定义好统一的返回返回对象,如下:
import lombok.AllArgsConstructor;
import lombok.Builder;
import lombok.Data;
import lombok.NoArgsConstructor;

@Data
@Builder
@AllArgsConstructor
@NoArgsConstructor
public class ResResult<T> {


    private T data;
    private int code;
    private String msg;

    public static<T> ResResult<T> success(final T data, final String msg) {

        return ResResult.<T>builder()
                .code(200)
                .data(data)
                .msg(msg)
                .build();
    }

    public static ResResult<Void> err(final int code, final String msg) {

        return ResResult.<Void>builder()
                .code(code)
                .msg(msg)
                .build();
    }
}
业务异常定义和统一异常处理
我们先定义一个业务的异常类
提供常用两个错误异常,badRequest参数错误和unauthorized用户未登陆异常
package com.self.growth.oauth.exception;

import lombok.Getter;
import org.springframework.http.HttpStatus;

@Getter
public class BusinessException extends RuntimeException {


    private int code;

    public BusinessException(final String msg, final int code) {

        super(msg);
        this.code = code;
    }

    public static BusinessException badRequest(final String msg) {

        return new BusinessException(msg, HttpStatus.BAD_REQUEST.value());
    }

    public static BusinessException unauthorized(final String msg) {

        return new BusinessException(msg, HttpStatus.UNAUTHORIZED.value());
    }
}
在全局统一异常拦截中进行处理
使用ResponseEntity,让返回的Status Code跟随我们的业务异常code
import com.self.growth.oauth.vo.ResResult;
import org.springframework.http.HttpStatus;
import org.springframework.http.ResponseEntity;
import org.springframework.web.bind.annotation.ExceptionHandler;
import org.springframework.web.bind.annotation.ResponseStatus;
import org.springframework.web.bind.annotation.RestControllerAdvice;

@RestControllerAdvice
public class GlobalExceptionHandler {


    // 全局异常拦截
    @ExceptionHandler(Exception.class)
    @ResponseStatus(HttpStatus.INTERNAL_SERVER_ERROR)
    public ResResult<?> handlerException(final Exception e) {

        e.printStackTrace();
        return ResResult.err(HttpStatus.INTERNAL_SERVER_ERROR.value(), e.getMessage());
    }

    @ExceptionHandler(BusinessException.class)
    public ResponseEntity<ResResult<?>> handlerException(final BusinessException e) {

        return ResponseEntity.status(e.getCode()).body(ResResult.err(e.getCode(), e.getMessage()));
    }
}
Controller与Service
先简单的定义一个用户实体类
import com.baomidou.mybatisplus.annotation.TableName;
import lombok.Builder;
import lombok.Data;

import java.util.Date;

@Data
@Builder
public class UserEntity {


    private Long id;
    private String username;
    private String password;
    private Date createTime;
    private Date updateTime;
    private Boolean isDelete;
}
定义用户逻辑处理的相关Service
如下,我们简单点,不涉及数据库,直接模拟构建一个用户
import cn.dev33.satoken.stp.StpUtil;
import com.baomidou.mybatisplus.core.toolkit.Wrappers;
import com.self.growth.oauth.entity.UserEntity;
import com.self.growth.oauth.exception.BusinessException;
import com.self.growth.oauth.mapper.UserMapper;
import org.springframework.stereotype.Service;

@Service
public class UserService {


    public void login(final String username, final String password) {

        final UserEntity user = UserEntity.builder()
                .id(1L)
                .username("testUser")
                .password("password")
                .build();
        if (!user.getUsername().equals(username)) {

            throw BusinessException.badRequest("用户不存在");
        }

        if (!user.getPassword().equals(password)) {

            throw BusinessException.badRequest("用户密码错误");
        }
        StpUtil.login(user.getId());
    }
}
Controller如下:
package com.self.growth.oauth.controller;

import cn.dev33.satoken.config.SaSsoConfig;
import cn.dev33.satoken.sso.SaSsoHandle;
import com.self.growth.oauth.exception.BusinessException;
import com.self.growth.oauth.service.UserService;
import com.self.growth.oauth.vo.ResResult;
import org.springframework.beans.factory.annotation.Autowired;
import org.springframework.web.bind.annotation.RequestMapping;
import org.springframework.web.bind.annotation.RestController;

/** * Sa-Token-SSO Server端 Controller */
@RestController
public class UserController {


    private final UserService userService;

    public UserController(UserService userService) {

        this.userService = userService;
    }

    /* * SSO-Server端:处理所有SSO相关请求 */
    @RequestMapping("/sso/*")
    public Object ssoRequest() {

        return SaSsoHandle.serverRequest();
    }

    /** * 配置SSO相关参数 */
    @Autowired
    private void configSso(SaSsoConfig sso) {

        // 配置:未登录时返回的View
        sso.setNotLoginView(() -> {

            throw BusinessException.unauthorized("用户未登录");
        });

        // 配置:登录处理函数
        sso.setDoLoginHandle((name, pwd) -> {

            userService.login(name, pwd);
            return ResResult.success("登录成功");
        });
    }
}
这样就基本完成了
业务客户端服务
maven配置
比登录服务多一个客户端的相关依赖
<?xml version="1.0" encoding="UTF-8"?>
<project xmlns="http://maven.apache.org/POM/4.0.0" xmlns:xsi="http://www.w3.org/2001/XMLSchema-instance" xsi:schemaLocation="http://maven.apache.org/POM/4.0.0 http://maven.apache.org/xsd/maven-4.0.0.xsd">
    <parent>
        <groupId>org.springframework.boot</groupId>
        <artifactId>spring-boot-starter-parent</artifactId>
        <version>2.7.0</version>
        <relativePath/> <!-- lookup parent from repository -->
    </parent>

    <modelVersion>4.0.0</modelVersion>

    <properties>
        <maven.compiler.source>17</maven.compiler.source>
        <maven.compiler.target>17</maven.compiler.target>
    </properties>

    <dependencies>
        <dependency>
            <groupId>org.springframework.boot</groupId>
            <artifactId>spring-boot-starter-web</artifactId>
        </dependency>

        <dependency>
            <groupId>org.projectlombok</groupId>
            <artifactId>lombok</artifactId>
            <optional>true</optional>
        </dependency>
        <dependency>
            <groupId>org.springframework.boot</groupId>
            <artifactId>spring-boot-starter-test</artifactId>
            <scope>test</scope>
        </dependency>

        <!-- Sa-Token 权限认证, 在线文档:http://sa-token.dev33.cn/ -->
        <dependency>
            <groupId>cn.dev33</groupId>
            <artifactId>sa-token-spring-boot-starter</artifactId>
            <version>1.30.0</version>
        </dependency>

        <!-- Sa-Token 插件:整合SSO -->
        <dependency>
            <groupId>cn.dev33</groupId>
            <artifactId>sa-token-sso</artifactId>
            <version>1.30.0</version>
        </dependency>

        <!-- Sa-Token 整合 Redis (使用 jackson 序列化方式) -->
        <dependency>
            <groupId>cn.dev33</groupId>
            <artifactId>sa-token-dao-redis-jackson</artifactId>
            <version>1.30.0</version>
        </dependency>
        <dependency>
            <groupId>org.apache.commons</groupId>
            <artifactId>commons-pool2</artifactId>
        </dependency>
    </dependencies>

</project>
application.yml配置
# 端口
server:
  port: 9000

# sa-token配置
sa-token:
  # SSO-相关配置
  sso:
    # SSO-Server端 统一认证地址
    auth-url: http://localhost:9000/sso/auth
    # 是否打开单点注销接口
    is-slo: true

  # 配置Sa-Token单独使用的Redis连接 (此处需要和SSO-Server端连接同一个Redis)
  alone-redis:
    # Redis数据库索引 (默认为0)
    database: 1
    # Redis服务器地址
    host: 127.0.0.1
    # Redis服务器连接端口
    port: 6379
    # Redis服务器连接密码(默认为空)
    password: password
SaToken配置
我们采用路由拦截的方式,拦截统一处理,使用注解的方式可能造成分散,后期不好管理
客户端的所有请求都进行拦截
import cn.dev33.satoken.interceptor.SaRouteInterceptor;
import org.springframework.context.annotation.Configuration;
import org.springframework.web.servlet.config.annotation.InterceptorRegistry;
import org.springframework.web.servlet.config.annotation.WebMvcConfigurer;

@Configuration
public class SaTokenConfigure implements WebMvcConfigurer {


    // 注册拦截器
    @Override
    public void addInterceptors(InterceptorRegistry registry) {

        // 注册Sa-Token的路由拦截器
        registry.addInterceptor(new SaRouteInterceptor())
                .addPathPatterns("/**");
    }
}
Controller和全局异常处理
我们写一个简单的Controller
package com.self.growth.record.controller;

import org.springframework.web.bind.annotation.GetMapping;
import org.springframework.web.bind.annotation.RestController;

@RestController
public class HelloController {


    @GetMapping("/hello")
    private ResResult<String> hello() {

        return ResResult.success("hello");
    }
}
对SaToken抛出的异常进行处理,这里对用户未登陆的异常进行封装,返回401给请求方,让其能进行判断,进行登录跳转
import cn.dev33.satoken.exception.NotLoginException;
import com.self.growth.record.vo.ResResult;
import org.springframework.http.HttpStatus;
import org.springframework.http.ResponseEntity;
import org.springframework.web.bind.annotation.ExceptionHandler;
import org.springframework.web.bind.annotation.ResponseStatus;
import org.springframework.web.bind.annotation.RestControllerAdvice;

@RestControllerAdvice
public class GlobalExceptionHandler {


    @ExceptionHandler(NotLoginException.class)
    public ResponseEntity<ResResult<?>> handlerException(NotLoginException ignoredE) {

         return ResponseEntity.status(HttpStatus.UNAUTHORIZED).body(ResResult.err(HttpStatus.UNAUTHORIZED.value(), "用户未登录"));
    }
}
ResResult和登录服务基本一样(通用的,可以抽到一个公共模块内)
package com.self.growth.record.vo;

import lombok.AllArgsConstructor;
import lombok.Builder;
import lombok.Data;
import lombok.NoArgsConstructor;

@Data
@Builder
@AllArgsConstructor
@NoArgsConstructor
public class ResResult<T> {


    private T data;
    private int code;
    private String msg;

    public static<T> ResResult<T> success(final T data) {

        return ResResult.<T>builder()
                .code(200)
                .data(data)
                .build();
    }

    public static ResResult<Void> err(final int code, final String msg) {

        return ResResult.<Void>builder()
                .code(code)
                .msg(msg)
                .build();
    }
}
测试验证
我们先在为登录的情况下访问业务客户端服务:localhost:8080/hello
和我们预期一样,得到下面的返回:
{

    "data": null,
    "code": 401,
    "msg": "用户未登录"
}
然后我们去登录服务进行登录
先用一个错误的用户名:localhost:9000/sso/doLogin?name=sa&pwd=password
{

    "data": null,
    "code": 400,
    "msg": "用户不存在"
}
然后用正常的用户和错误的密码:localhost:9000/sso/doLogin?name=testUser&pwd=password3
{

    "data": null,
    "code": 400,
    "msg": "用户密码错误"
}
最后用正确的用户名和密码:localhost:9000/sso/doLogin?name=testUser&pwd=password
{

    "data": null,
    "code": 200,
    "msg": "登录成功"
}
然后我们访问业务客户端服务试试:localhost:8080/hello
{

    "data": "hello",
    "code": 200,
    "msg": null
}
完美,登录服务成功后,能访问业务客户端服务接口
总结
从上面的代码可以看出,SaToken的代码不是太多,而且也比较简单
从理解难度上来说,个人感觉比Spring Security要好上手,SaToken看文档加写一个简单的Demo也就半天左右
总体来说,有点意思
参考链接
边栏推荐
- [collect first and use it sooner or later] 49 Flink high-frequency interview questions series (I)
- 6-3 batch sum (*)
- Codeworks round 479 (Div. 3) [done]
- LeetCode_ Prefix tree_ Medium_ 208. implement trie (prefix tree)
- Global and Chinese markets of solid polymer aluminum capacitors 2022-2028: Research Report on technology, participants, trends, market size and share
- Tle6288r is a 6-channel (150 MOhm) intelligent multi-channel switch using intelligent power technology - keshijin mall
- Experiment 3: design and verify all operations represented by linear table sequence on the computer
- 6-1 how many words are needed to form a sentence?
- Talking about telework | community essay solicitation
- Tidb GC related problems
猜你喜欢
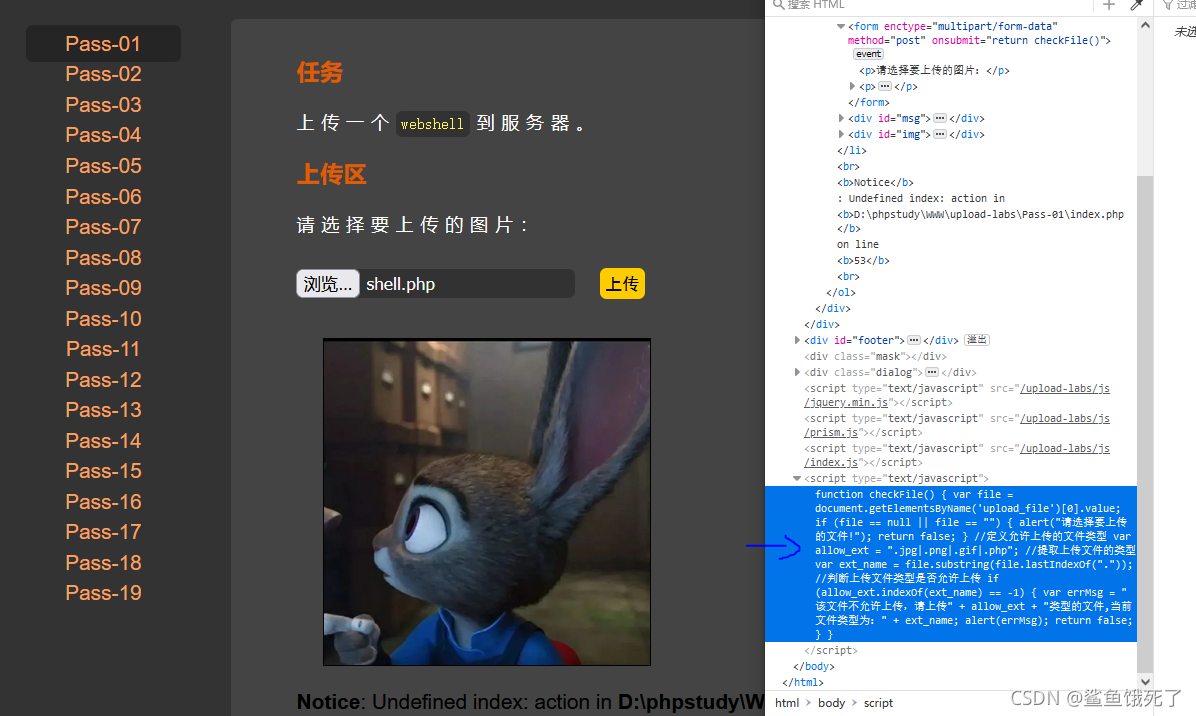
Upload labs failed to pass the customs halfway and the middle road collapsed

Retrofit source code analysis

Install MariaDB 10.5.7 (tar package installation)

Expérience initiale du moteur de segmentation de l'araignée mariadb
![Codeworks round 481 (Div. 3) [done]](/img/60/01ed6180ccc4c99fe361d493525018.jpg)
Codeworks round 481 (Div. 3) [done]
![[not forgetting the original intention and forging ahead] 2021 Zhongchuang Suanli new year conference and anniversary celebration](/img/ae/9a0c300f2dcb03b05d737f14b0955f.jpg)
[not forgetting the original intention and forging ahead] 2021 Zhongchuang Suanli new year conference and anniversary celebration

Valid parentheses ---2022/02/23
Ffmpeg hard codec inter QSV

Ctfhub SQL Boolean blind annotation

【先收藏,早晚用得到】49个Flink高频面试题系列(二)
随机推荐
SISO Decoder for SPC (补充章节1)
Rtsp/onvif protocol easynvr video platform arm version cross compilation process and common error handling
Simple understanding of events
【先收藏,早晚用得到】100个Flink高频面试题系列(一)
Getting started with CTF
如何学习和自学
Class question: how to ensure that line table storage can be inserted at any time?
Several ways to recover tidb data from accidental deletion
vulhub
Dynamic: capturing network dynamics using dynamic graph representation learning
ArrayList collection, object array
Network Security Threat Intelligence System
“LSTM之父”新作:一种新方法,迈向自我修正的神经网络
NR LDPC 打孔-punctured
mariadb spider分片引擎初體驗
[practical Script] obtain the line number of a file, and then delete the file content.
Codeworks round 479 (Div. 3) [done]
upload-labs通关未半而中道崩殂
SISO Decoder for Repetition(补充章节4)
[solution] codeforces round 798 (Div. 2)