当前位置:网站首页>Keras深度学习实战——基于VGG19模型实现性别分类
Keras深度学习实战——基于VGG19模型实现性别分类
2022-07-02 15:50:00 【盼小辉丶】
Keras深度学习实战——基于VGG19模型实现性别分类
0. 前言
在《迁移学习》中,我们了解了利用迁移学习,只需要少量样本即可训练得到性能较好的模型;并基于迁移学习利用预训练的 VGG16 模型进行了性别分类的实战,进一步加深对迁移学习工作原理的理解。
1. VGG19 架构简介
本文,我们将介绍另一种常用的网络模型架构——VGG19,并使用预训练的 VGG19 模型进行性别分类实战。VGG19是 VGG16 的改进版本,具有更多的卷积和池化操作,VGG19 模型的体系结构如下:
Model: "vgg19"
_________________________________________________________________
Layer (type)                 Output Shape              Param #
=================================================================
input_1 (InputLayer)         [(None, 256, 256, 3)]     0
_________________________________________________________________
block1_conv1 (Conv2D)        (None, 256, 256, 64)      1792
_________________________________________________________________
block1_conv2 (Conv2D)        (None, 256, 256, 64)      36928
_________________________________________________________________
block1_pool (MaxPooling2D)   (None, 128, 128, 64)      0
_________________________________________________________________
block2_conv1 (Conv2D)        (None, 128, 128, 128)     73856
_________________________________________________________________
block2_conv2 (Conv2D)        (None, 128, 128, 128)     147584
_________________________________________________________________
block2_pool (MaxPooling2D)   (None, 64, 64, 128)       0
_________________________________________________________________
block3_conv1 (Conv2D)        (None, 64, 64, 256)       295168
_________________________________________________________________
block3_conv2 (Conv2D)        (None, 64, 64, 256)       590080
_________________________________________________________________
block3_conv3 (Conv2D)        (None, 64, 64, 256)       590080
_________________________________________________________________
block3_conv4 (Conv2D)        (None, 64, 64, 256)       590080
_________________________________________________________________
block3_pool (MaxPooling2D)   (None, 32, 32, 256)       0
_________________________________________________________________
block4_conv1 (Conv2D)        (None, 32, 32, 512)       1180160
_________________________________________________________________
block4_conv2 (Conv2D)        (None, 32, 32, 512)       2359808
_________________________________________________________________
block4_conv3 (Conv2D)        (None, 32, 32, 512)       2359808
_________________________________________________________________
block4_conv4 (Conv2D)        (None, 32, 32, 512)       2359808
_________________________________________________________________
block4_pool (MaxPooling2D)   (None, 16, 16, 512)       0
_________________________________________________________________
block5_conv1 (Conv2D)        (None, 16, 16, 512)       2359808
_________________________________________________________________
block5_conv2 (Conv2D)        (None, 16, 16, 512)       2359808
_________________________________________________________________
block5_conv3 (Conv2D)        (None, 16, 16, 512)       2359808
_________________________________________________________________
block5_conv4 (Conv2D)        (None, 16, 16, 512)       2359808
_________________________________________________________________
block5_pool (MaxPooling2D)   (None, 8, 8, 512)         0
=================================================================
Total params: 20,024,384
Trainable params: 20,024,384
Non-trainable params: 0
_________________________________________________________________
可以看到,上示的体系结构中具有更多的网络层以及更多的参数量。需要注意的是,VGG16 和 VGG19 体系结构中的 16 和 19 代表这些网络中的网络层数。

将每个图像通过 VGG19 网络后,提取到 8 x 8 x 512 输出后,该输出将成为微调模型的输入。接下来,创建输入和输出数据集,然后构建、编译和拟合模型的过程与使用基于预训练的 VGG16 模型进行性别分类的过程相同。
2. 使用预训练 VGG19 模型进行性别分类
在本节中,我们基于迁移学习使用预训练的 VGG19 模型进行性别分类。
2.1 构建输入与输出数据
首先,准备输入和输出数据,我们重用在《卷积神经网络进行性别分类》中使用的数据集以及数据加载代码:
from keras.applications import VGG19
from keras.applications.vgg19 import preprocess_input
from glob import glob
from skimage import io
import cv2
import numpy as np

model = VGG19(include_top=False, weights='imagenet', input_shape=(256, 256, 3))

x = []
y = []
for i in glob('man_woman/a_resized/*.jpg')[:800]:
    try:
        image = io.imread(i)
        x.append(image)
        y.append(0)
    except:
        continue

for i in glob('man_woman/b_resized/*.jpg')[:800]:
    try:
        image = io.imread(i)
        x.append(image)
        y.append(1)
    except:
        continue

x_vgg19 = []
for i in range(len(x)):
    img = x[i]
    img = preprocess_input(img.reshape((1, 256, 256, 3)))
    img_feature = model.predict(img)
    x_vgg19.append(img_feature)
将输入和输出转换为其相应的数组,并创建训练和测试数据集:
x_vgg19 = np.array(x_vgg19)
x_vgg19 = x_vgg19.reshape(x_vgg19.shape[0], x_vgg19.shape[2], x_vgg19.shape[3], x_vgg19.shape[4])
y = np.array(y)

from sklearn.model_selection import train_test_split
x_train, x_test, y_train, y_test = train_test_split(x_vgg19, y, test_size=0.2)
2.2 模型构建与训练
构建微调模型:
from keras.models import Sequential
from keras.layers import Conv2D, MaxPooling2D, Flatten, Dropout, Dense
model_fine_tuning = Sequential()
model_fine_tuning.add(Conv2D(512,
                        kernel_size=(3, 3),
                        activation='relu',
                        input_shape=(x_train.shape[1], x_train.shape[2], x_train.shape[3])))
model_fine_tuning.add(MaxPooling2D(pool_size=(2, 2)))
model_fine_tuning.add(Flatten())
model_fine_tuning.add(Dense(1024, activation='relu'))
model_fine_tuning.add(Dropout(0.6))
model_fine_tuning.add(Dense(1, activation='sigmoid'))
model_fine_tuning.summary()
该模型架构的简要信息输入如下:
Model: "sequential"
_________________________________________________________________
Layer (type)                 Output Shape              Param #
=================================================================
conv2d (Conv2D)              (None, 6, 6, 512)         2359808
_________________________________________________________________
max_pooling2d (MaxPooling2D) (None, 3, 3, 512)         0
_________________________________________________________________
flatten (Flatten)            (None, 4608)              0
_________________________________________________________________
dense (Dense)                (None, 1024)              4719616
_________________________________________________________________
dropout (Dropout)            (None, 1024)              0
_________________________________________________________________
dense_1 (Dense)              (None, 1)                 1025
=================================================================
Total params: 7,080,449
Trainable params: 7,080,449
Non-trainable params: 0
_________________________________________________________________
接下来,编译并拟合模型:
model_fine_tuning.compile(loss='binary_crossentropy',optimizer='adam',metrics=['acc'])

history = model_fine_tuning.fit(x_train, y_train,
                                    batch_size=32,
                                    epochs=20,
                                    verbose=1,
                                    validation_data = (x_test, y_test))
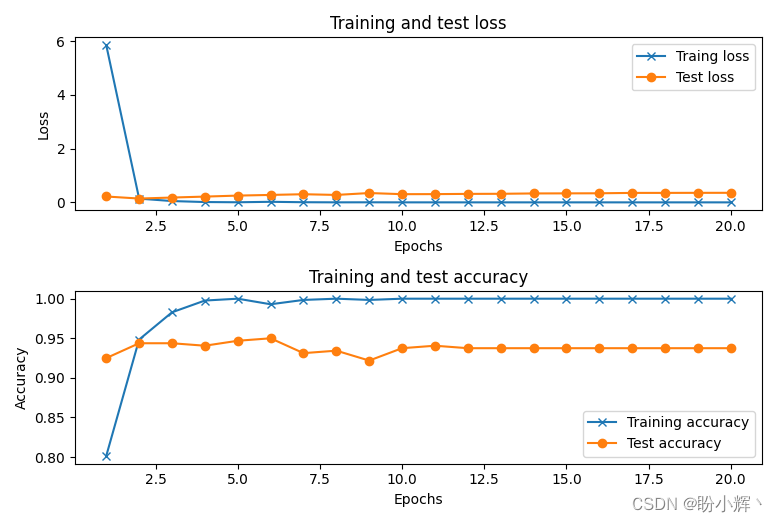
最后,我们绘制在训练期间,模型在训练和测试数据集的损失和准确率的变化。可以看到,当我们使用 VGG19 架构时,能够在测试数据集上达到约 95% 的准确率,结果与使用 VGG16 架构时的性能相似:
2.3 模型错误分类示例
一些错误分类的图像示例如下:
x = np.array(x)
from sklearn.model_selection import train_test_split
x_train, x_test, y_train, y_test = train_test_split(x, y, test_size=0.2)

x_test_vgg19 = []
for i in range(len(x_test)):
    img = x_test[i]
    img = preprocess_input(img.reshape((1, 256, 256, 3)))
    img_feature = model.predict(img)
    x_test_vgg19.append(img_feature)

x_test_vgg19 = np.array(x_test_vgg19)
x_test_vgg19 = x_test_vgg19.reshape(x_test_vgg19.shape[0], x_test_vgg19.shape[2], x_test_vgg19.shape[3], x_test_vgg19.shape[4])
y_pred = model_fine_tuning.predict(x_test_vgg19)
wrong = np.argsort(np.abs(y_pred.flatten()-y_test))
print(wrong)

y_test_char = np.where(y_test==0,'M','F')
y_pred_char = np.where(y_pred>0.5,'F','M')

plt.subplot(221)
plt.imshow(x_test[wrong[-1]])
plt.title('Actual: '+str(y_test_char[wrong[-1]])+', '+'Predicted: '+str((y_pred_char[wrong[-1]][0])))
plt.subplot(222)
plt.imshow(x_test[wrong[-2]])
plt.title('Actual: '+str(y_test_char[wrong[-2]])+', '+'Predicted: '+str((y_pred_char[wrong[-2]][0])))
plt.subplot(223)
plt.imshow(x_test[wrong[-3]])
plt.title('Actual: '+str(y_test_char[wrong[-3]])+', '+'Predicted: '+str((y_pred_char[wrong[-3]][0])))
plt.subplot(224)
plt.imshow(x_test[wrong[-4]])
plt.title('Actual: '+str(y_test_char[wrong[-4]])+', '+'Predicted: '+str((y_pred_char[wrong[-4]][0])))
plt.show()

从图中,可以看出,VGG19 类似于 VGG16 除了由于人物在图像中占据的空间较小造成错误分类外,倾向于根据头发来判断人物究竟是男性还是女性。
相关链接
Keras深度学习实战(7)——卷积神经网络详解与实现
Keras深度学习实战(9)——卷积神经网络的局限性
Keras深度学习实战(10)——迁移学习
Keras深度学习实战——使用卷积神经网络实现性别分类
边栏推荐
- easyAI笔记——深度学习
- What is agile development process
- [how to connect the network] Chapter 5 explore the server
- chrome瀏覽器快速訪問stackoverflow
- executescalar mysql_ExecuteScalar()
- Ocio V2 reverse LUT
- Making tutorial of chicken feet with pickled peppers
- Chmod command principle and usage details [easy to understand]
- 嵌入式开发板 ~ 说明
- em120.gige.h
猜你喜欢

Solution to the problem that the easycvr kernel of intelligent video analysis platform cannot be started as a service

【网络是怎样连接的】第六章 请求到达服务器以及响应给客户端(完结)

阿里云子账户 - 权限策略 - 授权给某个账户某个 OSS Bucket 的完全控制权限

【历史上的今天】7 月 2 日:BitTorrent 问世;商业系统 Linspire 被收购;索尼部署 PlayStation Now

Daily question - inverted string
Modbus协议通信异常

Microservice architecture practice: Construction of highly available distributed file system fastdfs architecture
[comment le réseau se connecte] chapitre 6: demande d'accès au serveur et réponse au client (terminé)
Virtual lab basic experiment tutorial -7 Polarization (2)

关于我
随机推荐
【網絡是怎樣連接的】第六章 請求到達服務器以及響應給客戶端(完結)
Niuke js3 separator
ROS knowledge point - message_filters
关于我
HBuilderX运行到手机或模拟器提示没有找到设备
What is agile development process
CEPH principle
easyAI笔记——深度学习
Platform management background and business menu resource management: business permissions and menu resource management design
微信小程序 —— 上下浮动的箭头
Daily question - xiaolele changes the number
executescalar mysql_ExecuteScalar()
freemarker+poi实现动态生成excel文件及解析excel文件
Easyswoole3.2 restart failed
Common SQL statements (complete example)
Are you holding back on the publicity of the salary system for it posts such as testing, development, operation and maintenance?
【网络是怎样连接的】第六章 请求到达服务器以及响应给客户端(完结)
POJ - 1458 common subsequence (longest common subsequence)
Navigateur Chrome pour un accès rapide au stackoverflow
The difference between class and getClass ()