当前位置:网站首页>Nodemcu-esp8266 development (vscode+platformio+arduino framework): Part 5 --blinker_ MIOT_ MULTI_ Outside (lighting technology app + Xiaoai classmate control socket multiple jacks)
Nodemcu-esp8266 development (vscode+platformio+arduino framework): Part 5 --blinker_ MIOT_ MULTI_ Outside (lighting technology app + Xiaoai classmate control socket multiple jacks)
2022-07-03 09:35:00 【Taodream】
First, build the development environment :https://blog.csdn.net/felix_tao/article/details/113092886
Second, finish Blinker_MIOT_LIGHT( Lighting technology mobile phone APP control + Xiaoai classmate control ):https://blog.csdn.net/felix_tao/article/details/113467782
First step : A copy of Blinker_MIOT_LIGHT engineering , And rename to Blinker_MIOT_MULTI_OUTLET.
The second step : open VSCODE-> file -> Add folder to workspace -> Select the project folder Blinker_MIOT_MULTI_OUTLET-> Add to VSCODE in .
The third step : Copy the following code to VSCODE Medium src->main.cpp Inside .
/* *****************************************************************
 * @author  TaoDream
 * @version V1.0
 * @date    2021.02.09
 * @brief    The main program
 *  Program function :blinker+ Xiao AI controls the socket and multiple jacks ( utilize LED Lamp simulation )
 * 1. Use the development board :nodemcu-ESP8266( modular ESP-12E)
 * 2. Program function : Use Blinker  mobile phone APP Add devices and bind , adopt APP Remote control the light on the development board 、 And Xiao AI controls the lights on and off on the development board
 * 4. Routine documentation :https://www.diandeng.tech/doc/xiaoai
 * 5. Procedure reference :blinker Library routines --blinker-library-master\examples\Blinker_MIOT\MIOT_MULTI_OUTLET
 * *****************************************************************/

//#define LED_BUILTIN 2   //ESP-12E The module itself LED, Corresponding GPIO2, Low level light
//#define LED_BUILTIN 16  //nodemcu-esp8266 The development board extends LED, Corresponding GPIO16, Low level light

#define BLINKER_WIFI               // Support wifi
#define BLINKER_MIOT_MULTI_OUTLET  // Support multiple sockets , most 4 Jack
#define BLINKER_WITHOUT_SSL        //blinker By default, encryption is used for remote communication , But communication encryption will consume a lot of RAM, If you have no requirements for communication security ,
							       // You can add macros BLINKER_WITHOUT_SSL To get more available RAM,BLINKER_WITHOUT_SSL At present, it can only be used for ESP8266, Other devices RAM Enough for encrypted communication

#include <Blinker.h>               // Using third party libraries

char auth[] = "aabfdfc3b167"; //Blinker APP Obtained in Secret Key( secret key )
char ssid[] = "Xiaomi_123";   //wifi name
char pswd[] = "felix1234";    //wifi password

//  New component object
BlinkerButton Button("btn-key");// Component object , Want to be with APP In the component “ Data key name ” Agreement
//  New component object
BlinkerButton Button1("btn-key1");// Component object , Want to be with APP In the component “ Data key name ” Agreement
//  New component object
BlinkerButton Button2("btn-key2");// Component object , Want to be with APP In the component “ Data key name ” Agreement

bool oState[5] = { false };
#define OUTLET_ALL   0  // All sockets
#define OUTLET_NO_1  1  // Socket socket 1
#define OUTLET_NO_2  2  // Socket socket 2

// Control socket multiple jacks ( use LED Lamp simulation debugging )
void ctrl_multi_outlet(uint8_t num, uint8_t io_level)
{
    switch (num)
        {
            case 0:  // All sockets
                digitalWrite(LED_BUILTIN, io_level);// control LED The lamp
                digitalWrite(LED_BUILTIN_AUX, io_level);// control LED The lamp
                break;
            case 1:  // Socket socket 1
                digitalWrite(LED_BUILTIN, io_level);// control LED The lamp
                break;
            case 2:  // Socket socket 2
                digitalWrite(LED_BUILTIN_AUX, io_level);// control LED The lamp
                break;
            default:
                break;
        }
}

// Little love power callback , for example :“ open 1 Socket No ”、“ open 1 Socket 1 ”、“ open 1 Socket 2 ”
void miotPowerState(const String & state, uint8_t num)
{
    BLINKER_LOG("need set outlet: ", num, ", power state: ", state);

    if (state == BLINKER_CMD_ON)
    {
        ctrl_multi_outlet(num, LOW);// open LED The lamp ,num It means how many routes
        BlinkerMIOT.powerState("on", num);
        BlinkerMIOT.print();

        oState[num] = true;
    }
    else if (state == BLINKER_CMD_OFF)
    {
        ctrl_multi_outlet(num, HIGH);// close LED The lamp ,num It means how many routes

        BlinkerMIOT.powerState("off", num);
        BlinkerMIOT.print();

        oState[num] = false;

        if (num == 0)
        {
            for (uint8_t o_num = 0; o_num < 5; o_num++)
            {
                oState[o_num] = false;
            }
        }
    }
}

//  Press the key to execute the function -- Main switch , stay APP control
void button_callback(const String & state)
{
    BLINKER_LOG("get button state: ", state);//APP Medium Monitor Control print information
    if (state=="on")
    {
        ctrl_multi_outlet(OUTLET_ALL, LOW);// open LED The lamp -- all
        //  Feedback switch status
        Button.print("on");
    } else if(state=="off")
    {
        ctrl_multi_outlet(OUTLET_ALL, HIGH);// close LED The lamp -- all
        //  Feedback switch status
        Button.print("off");
    }
}

//  Press the key to execute the function -- The first 1 Road switch , stay APP control
void button1_callback(const String & state)
{
    BLINKER_LOG("get button state: ", state);//APP Medium Monitor Control print information
    if (state=="on")
    {
        ctrl_multi_outlet(OUTLET_NO_1, LOW);// open LED The lamp -- The first 1 road
        //  Feedback switch status
        Button1.print("on");
    } else if(state=="off")
    {
        ctrl_multi_outlet(OUTLET_NO_1, HIGH);// close LED The lamp -- The first 1 road
        //  Feedback switch status
        Button1.print("off");
    }
}

//  Press the key to execute the function -- The first 2 Road switch , stay APP control
void button2_callback(const String & state)
{
    BLINKER_LOG("get button state: ", state);//APP Medium Monitor Control print information
    if (state=="on")
    {
        ctrl_multi_outlet(OUTLET_NO_2, LOW);// open LED The lamp -- The first 2 road
        //  Feedback switch status
        Button2.print("on");
    } else if(state=="off")
    {
        ctrl_multi_outlet(OUTLET_NO_2, HIGH);// close LED The lamp -- The first 2 road
        //  Feedback switch status
        Button2.print("off");
    }
}

void setup()
{
    //  Initialize serial port
    Serial.begin(115200);
    BLINKER_DEBUG.stream(Serial);
    BLINKER_DEBUG.debugAll();

    //  Initialization has LED Of IO
    pinMode(LED_BUILTIN, OUTPUT);
    pinMode(LED_BUILTIN_AUX, OUTPUT);
    digitalWrite(LED_BUILTIN, LOW);// Default on LED-- The first 1 road
    digitalWrite(LED_BUILTIN_AUX, LOW);// Default on LED-- The first 2 road

    //  initialization blinker
    Blinker.begin(auth, ssid, pswd);
    Button.attach(button_callback);// Bind key callback
    Button1.attach(button1_callback);// Bind key callback
    Button2.attach(button2_callback);// Bind key callback

    // Xiao AI, please register
    BlinkerMIOT.attachPowerState(miotPowerState);// Register for little love power callback
}

void loop()
{
    Blinker.run();
}
Step four : Modify the following code .
Modify the key 、wifi name 、wifi The password is your own .
Be careful : Xiao AI is connected to , You need to choose alicloud broker, Lighting broker Voice control is not supported .
char auth[] = "Your Device Secret Key";//Blinker APP Obtained in Secret Key( secret key )
char ssid[] = "Your WiFi network SSID or name";//wifi name
char pswd[] = "Your WiFi network WPA password or WEP key";//wifi password
Step five : After modification , Compile 、 download , During the compilation process, we found that “ Yellow warning ”, Don't mind , The final compilation is “SUCCESS” Just OK.
After downloading successfully , You can see two on the development board LED It lights up , open VSCODE The serial monitor can see and print some information , When you see “MQTT Connected!” Then prove the connection wifi Was a success , When you see "state":"online" The device is online .
VSCODE Information printed by the serial monitor :
......
[32881] MQTT Connected! // Connect wifi success
[32881] Freeheap: 39456
[48020] Got: {"deviceType":"DiyArduino","data":{"get":"state"},"fromDevice":"eeb71ff85f1d11eb81be5254","toDevice":"C133A71AZPR087CQTZ5FFRXR"}
[48022] data: {"get":"state"}
[48024] fromDevice: eeb71ff85f1d11eb81be5254
[48028] Authority uuid
[48051] available: 1
[48051] checkAvail: 1
[48051] parse data: {"get":"state"}
[48051] defined BLINKER_ARDUINOJSON
[48052] autoManager begin: 0 0
[48053] autoFormatData key: state, json: "state":"online" // Device online
Step six : Using mobile phone APP Carry out remote control in the development board LED The lamp .
1) open ” Lighting -blinker”APP.
2) In device management ->“ room 1 Number ”-> Original LED The icon of the lamp is changed to the icon of the socket , The device name is changed from “ room 1 Number ” Change it to “1 Socket No ”.

3) Return to the home page of the device , Enter the control editing interface , Add the following controls .

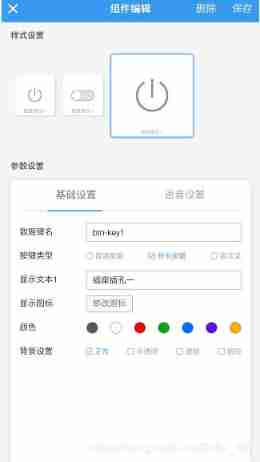
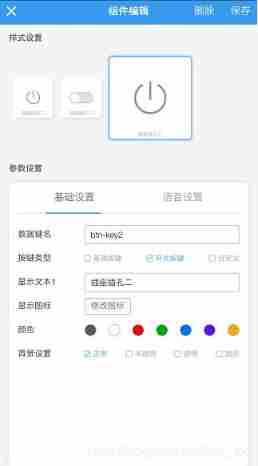

4) Click on “ Socket socket 1 ” Key , You can see LED Switch the light on and off , Click on “ Socket socket 2 ” Key , You can see LED Switch the light on and off , Click on “ Main switch ” Key , You can see two on the development board LED Switch the light on and off .
Step seven : Use Xiao AI classmate APP Voice control .
1) Use Mi Jia APP Synchronous devices . Mi AI APP-> my -> Other platform equipment -> Lighting technology -> Synchronous devices .
2) After synchronizing the device , You can see that it was LED Icon , Change to socket icon , common 4 Jack .

3) Open Xiaoai's mobile phone APP, Use with MI Jia APP Log in with the same account , stay “ Smart home ” You can see blinker Bound devices “1 Socket No ”.
4) Click in the middle below “ Voice icons ”, say :“ close 1 Socket 1 ”, You will see LE The light is off , And then say “ close 1 Socket 2 ”, You will see LED The light is off . And then say “ open 1 Socket No ”, You can see two on the development board LED The light came on at the same time .
Step eight : Use Xiaoai speaker voice control .
1) Say to Xiaoai's speaker :“ close 1 Socket 1 ”、“ close 1 Socket 2 ”、“ open 1 Socket 1 ”、“ open 1 Socket 2 ”、“ close 1 Socket No ”、“ open 1 Socket No ”.
2) You can see the LED Lamp control succeeded .
Complete engineering documents :https://download.csdn.net/download/felix_tao/15208768
边栏推荐
- Logstash+jdbc data synchronization +head display problems
- Make the most basic root file system of Jetson nano and mount NFS file system on the server
- Integrated use of interlij idea and sonarqube
- Leetcode daily question (968. binary tree cameras)
- CATIA automation object architecture - detailed explanation of application objects (III) systemservice
- Django operates Excel files through openpyxl to import data into the database in batches.
- [kotlin learning] operator overloading and other conventions -- overloading the conventions of arithmetic operators, comparison operators, sets and intervals
- LeetCode每日一题(2090. K Radius Subarray Averages)
- Jestson nano downloads updated kernel and DTB from TFTP server
- Banner - Summary of closed group meeting
猜你喜欢

Win10 install elk
PolyWorks script development learning notes (III) -treeview advanced operation

Alibaba cloud notes for the first time

CATIA automation object architecture - detailed explanation of application objects (I) document/settingcontrollers

Hudi 集成 Spark 数据分析示例(含代码流程与测试结果)
Spark cluster installation and deployment

Run flash demo on ECS
Spark structured stream writing Hudi practice
Windows安装Redis详细步骤
Flink学习笔记(九)状态编程
随机推荐
CATIA automation object architecture - detailed explanation of application objects (III) systemservice
[kotlin puzzle] what happens if you overload an arithmetic operator in the kotlin class and declare the operator as an extension function?
[kotlin learning] control flow of higher-order functions -- lambda return statements and anonymous functions
Flink学习笔记(九)状态编程
Call the contents of Excel cells opened at the same time - button line feed
Leetcode daily question (1856. maximum subarray min product)
Detailed steps of windows installation redis
[set theory] order relation (eight special elements in partial order relation | ① maximum element | ② minimum element | ③ maximum element | ④ minimum element | ⑤ upper bound | ⑥ lower bound | ⑦ minimu
LeetCode每日一题(2109. Adding Spaces to a String)
从0开始使用pnpm构建一个Monorepo方式管理的demo
Go language - Reflection
Spark 概述
Construction and test of TFTP server under unbuntu (Debian)
Vscode编辑器右键没有Open In Default Browser选项
Flink-CDC实践(含实操步骤与截图)
Common software open source protocols
基于opencv实现桌面图标识别
Overview of image restoration methods -- paper notes
Integrated use of interlij idea and sonarqube
Vscode Arduino installation Library