当前位置:网站首页>Nodemcu-esp8266 development (vscode+platformio+arduino framework): Part 2 --blinker_ Hello_ WiFi (lighting technology - Mobile App control routine)
Nodemcu-esp8266 development (vscode+platformio+arduino framework): Part 2 --blinker_ Hello_ WiFi (lighting technology - Mobile App control routine)
2022-07-03 09:29:00 【Taodream】
First, build the development environment :https://blog.csdn.net/felix_tao/article/details/113092886
Secondly, complete the establishment of the project template :https://blog.csdn.net/felix_tao/article/details/113282760
First step : A copy of template engineering , And rename to Blinker_Hello_WiFi.
The second step : open VSCODE-> file -> Add folder to workspace -> Select the project folder Blinker_Hello_WiFi-> Add to VSCODE in .
The third step : Download lighting technology blinker Arduino library , And copy it to platformio arduino esp8266 Under the Library Directory of .
1) Open the url https://www.diandeng.tech/doc/getting-start-8266, find “ Download and install blinker Arduino library ”, Click download .
2) decompression blinker-library-master.zip after , Copy blinker-library-master To directory C:\Users\felix\.platformio\packages\framework-arduinoespressif8266\libraries Next .
Step four : Copy Hello_WiFi The code in the routine goes to VSCODE Medium src->main.cpp Inside .
1) Open Directory C:\Users\felix\.platformio\packages\framework-arduinoespressif8266\libraries\blinker-library-master\examples\Blinker_Hello\Hello_WiFi.
2) use NotePad++ open Hello_WiFi.ino, Copy the code inside to src->main.cpp Inside ( All the original codes are deleted ).
3) Discovery tips #include <Blinker.h> Not included , close VSCODE, Open it again , I found that just now “ Prompt not included ” Vanished , This is because reopening VSCODE after , In the project .vscode->c_cpp_properties.json It automatically loads the header file containing , namely "C:/Users/felix/.platformio/packages/framework-arduinoespressif8266/libraries/blinker-library-master/src".
4) So you can adjust the order of the above steps , First copy the library file blinker-library-master, Reuse VSCODE Open the project , There is no need to close VSCODE Reopen , No matter what , remember :.vscode->c_cpp_properties.json There is no need to make any changes to the documents inside , The software will automatically help us complete the addition of header files .
5)Hello_WiFi The routine code is as follows :
#define BLINKER_WIFI

#include <Blinker.h>

char auth[] = "Your Device Secret Key";
char ssid[] = "Your WiFi network SSID or name";
char pswd[] = "Your WiFi network WPA password or WEP key";

//  New component object
BlinkerButton Button1("btn-abc");
BlinkerNumber Number1("num-abc");

int counter = 0;

//  Press the key to execute the function
void button1_callback(const String & state)
{
    BLINKER_LOG("get button state: ", state);
    digitalWrite(LED_BUILTIN, !digitalRead(LED_BUILTIN));
}

//  If unbound components are triggered , Then the content will be executed
void dataRead(const String & data)
{
    BLINKER_LOG("Blinker readString: ", data);
    counter++;
    Number1.print(counter);
}

void setup()
{
    //  Initialize serial port
    Serial.begin(115200);
    BLINKER_DEBUG.stream(Serial);
    BLINKER_DEBUG.debugAll();

    //  Initialization has LED Of IO
    pinMode(LED_BUILTIN, OUTPUT);
    digitalWrite(LED_BUILTIN, HIGH);
    //  initialization blinker
    Blinker.begin(auth, ssid, pswd);
    Blinker.attachData(dataRead);

    Button1.attach(button1_callback);
}

void loop() {
    Blinker.run();
}
Step five : stay app Add devices to , obtain Secret Key.
1) download APP And install , Open the url https://www.diandeng.tech/doc/getting-start-8266, find “ Download and install blinker APP“, According to different mobile platforms , Download the corresponding APP And install .
2) Get into App, Click on the “+” Number , And then choose Add equipment .
3) Click Select Arduino( Independent equipment )-> WiFi Access .
4) Select the service provider you want to access ( Alibaba cloud 、 Lighting technology 、 Tencent cloud 、OneNet), Choose here ” Alibaba cloud “, It's mainly to connect with Xiao AI in the future ,“ Lighting technology ” I don't support Xiao AI .
5) Copy the application to Secret Key Go to the key column in the code .
Step six : Modify the following code .
1) Modify the key 、wifi name 、wifi The password is your own .
char auth[] = "Your Device Secret Key";//Blinker APP Obtained in Secret Key( secret key )
char ssid[] = "Your WiFi network SSID or name";//wifi name
char pswd[] = "Your WiFi network WPA password or WEP key";//wifi password
2) Modifying initialization LED Default level .
//digitalWrite(LED_BUILTIN, HIGH);
digitalWrite(LED_BUILTIN, LOW);// Default on LED
3) The modified and sorted code is as follows :
/* *****************************************************************
 *  Program function :
 * 1. Use the development board :nodemcu-ESP8266( modular ESP-12E)
 * 2. Program function : Use Blinker  mobile phone APP Add devices and bind , adopt APP Remote control the light on the development board
 * 3. Routine documentation :https://www.diandeng.tech/doc/getting-start-8266
 * *****************************************************************/

//#define LED_BUILTIN 2   //ESP-12E The module itself LED, Corresponding GPIO2, Low level light
//#define LED_BUILTIN 16  //nodemcu-esp8266 The development board extends LED, Corresponding GPIO16, Low level light

#define BLINKER_WIFI
#define BLINKER_WITHOUT_SSL  //blinker By default, encryption is used for remote communication , But communication encryption will consume a lot of RAM, If you have no requirements for communication security ,
							 // You can add macros BLINKER_WITHOUT_SSL To get more available RAM,BLINKER_WITHOUT_SSL At present, it can only be used for ESP8266, Other devices RAM Enough for encrypted communication

#include <Blinker.h>         // Using third party libraries

char auth[] = "a3c936aa1b16";//Blinker APP Obtained in Secret Key( secret key )
char ssid[] = "Xiaomi_123";  //wifi name
char pswd[] = "felix1234";   //wifi password

//  New component object
BlinkerButton Button1("btn-abc");// Component object , Want to be with APP In the component “ Data key name ” Agreement
BlinkerNumber Number1("num-abc");

int counter = 0;// Counter

//  Press the key to execute the function
void button1_callback(const String & state)
{
    BLINKER_LOG("get button state: ", state);//APP Medium Monitor Control print information
    digitalWrite(LED_BUILTIN, !digitalRead(LED_BUILTIN));// control LED The light is on and off , Low level light , High level off
}

//  If unbound components are triggered , Then the content will be executed
void dataRead(const String & data)
{
    BLINKER_LOG("Blinker readString: ", data);
    counter++;
    Number1.print(counter);
}

void setup()
{
    //  Initialize serial port
    Serial.begin(115200);
    BLINKER_DEBUG.stream(Serial);
    BLINKER_DEBUG.debugAll();

    //  Initialization has LED Of IO
    pinMode(LED_BUILTIN, OUTPUT);
    //digitalWrite(LED_BUILTIN, HIGH);
    digitalWrite(LED_BUILTIN, LOW);// Default on LED

    //  initialization blinker
    Blinker.begin(auth, ssid, pswd);
    Blinker.attachData(dataRead);

    Button1.attach(button1_callback);// Bind key callback
}

void loop() {
    Blinker.run();
}
Step seven : After modification , Compile 、 download , During the compilation process, we found that “ Yellow warning ”, Don't mind , The final compilation is “SUCCESS” Just OK.
After downloading successfully , You can see the LED It lights up , open VSCODE The serial monitor can see and print some information .
Step eight : Using mobile phone APP Carry out remote control in the development board LED The lamp .
1) open APP, Due to unpaid , So I entered APP The interface is DIY Interface .
2) On the device list page , Click on the device icon , Enter the device control panel .
3) Enter the device control panel for the first time , The wizard page will pop up .
4) On the wizard page, click Load examples , You can load the sample assembly .
5) Make sure the device is online , And then click ” Light me on ” You can control LED Light on and off .
6) because “ Let me count ” Unbound in code , So it triggers dataRead() function .
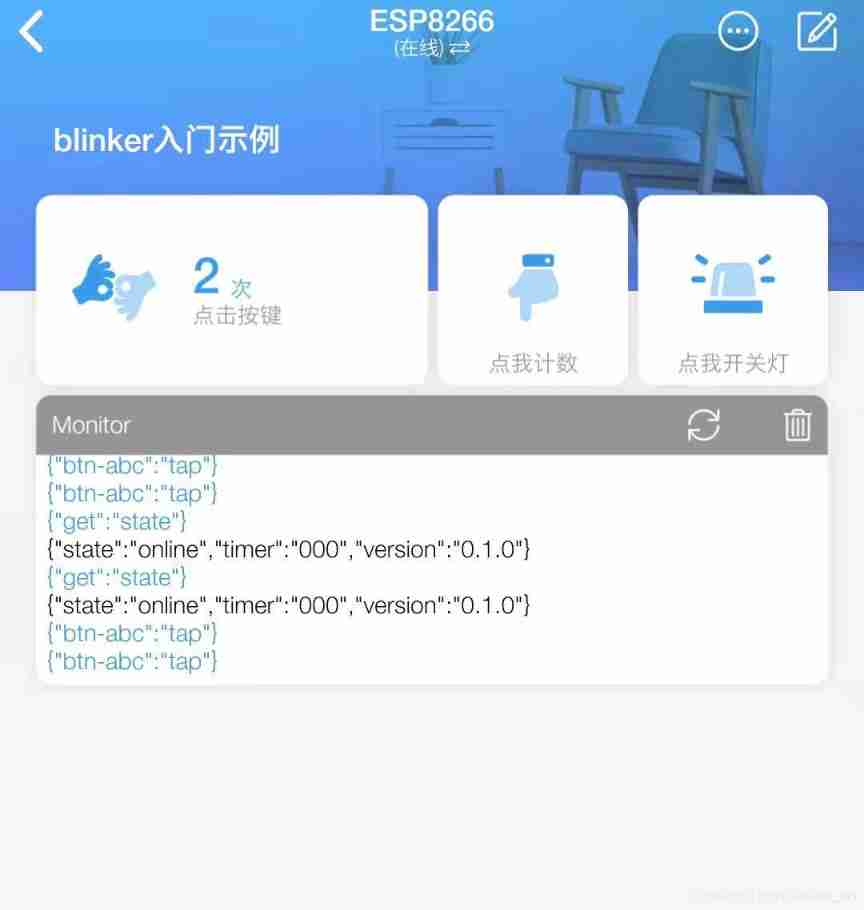
thus , All processes are completed , Have fun !
Complete engineering documents :https://download.csdn.net/download/felix_tao/14975814
Reference documents :
1. Lighting technology :https://www.diandeng.tech/doc/getting-start-8266
边栏推荐
- Build a solo blog from scratch
- Problems in the implementation of lenet
- C language programming specification
- [point cloud processing paper crazy reading classic version 11] - mining point cloud local structures by kernel correlation and graph pooling
- Hudi quick experience (including detailed operation steps and screenshots)
- [point cloud processing paper crazy reading classic version 13] - adaptive graph revolutionary neural networks
- LeetCode每日一题(1024. Video Stitching)
- 图像修复方法研究综述----论文笔记
- [point cloud processing paper crazy reading classic version 12] - foldingnet: point cloud auto encoder via deep grid deformation
- MySQL installation and configuration (command line version)
猜你喜欢

Jenkins learning (II) -- setting up Chinese

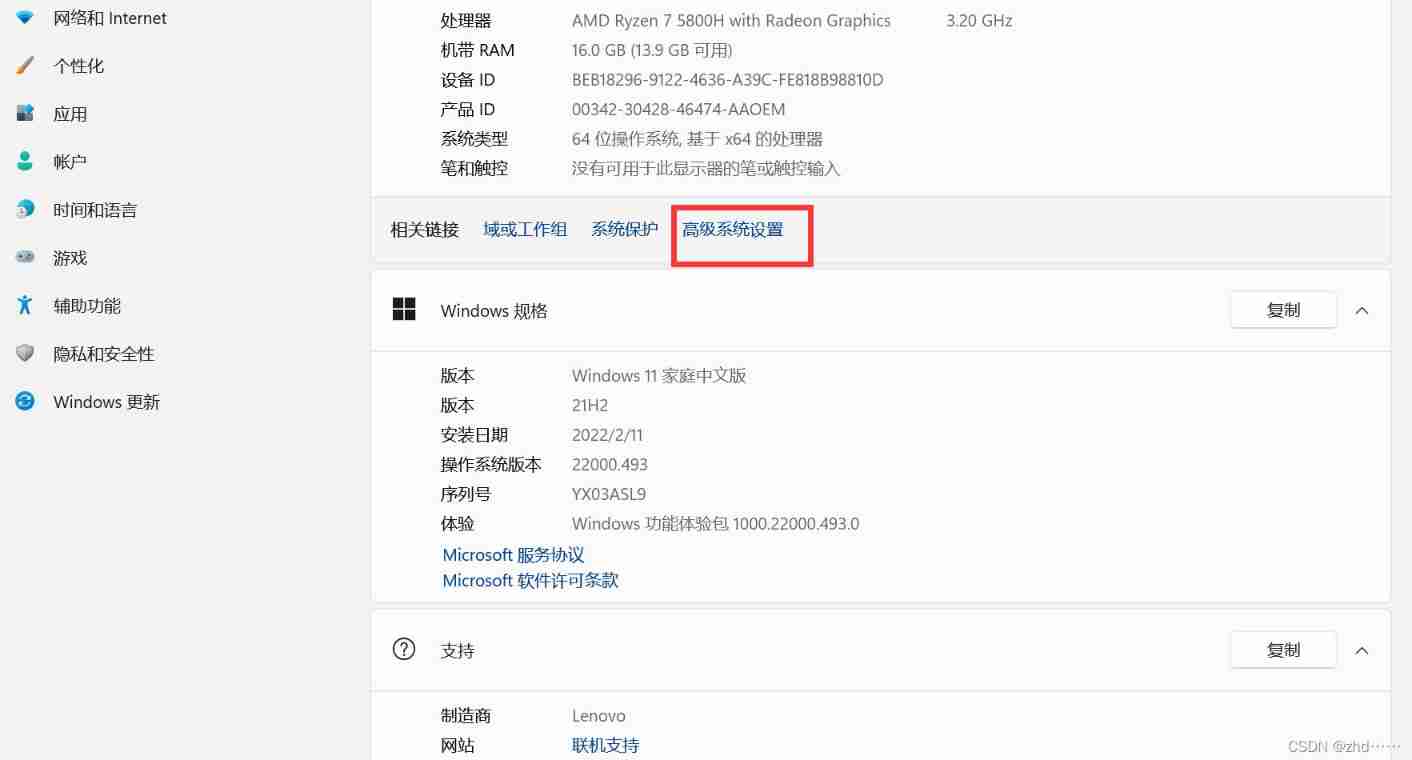
Win10 quick screenshot

Using Hudi in idea

Hudi learning notes (III) analysis of core concepts
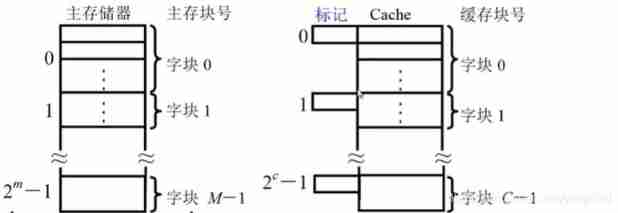
Principles of computer composition - cache, connection mapping, learning experience

LeetCode每日一题(1162. As Far from Land as Possible)

CATIA automation object architecture - detailed explanation of application objects (I) document/settingcontrollers
MySQL installation and configuration (command line version)
Solve POM in idea Comment top line problem in XML file
![[point cloud processing paper crazy reading frontier version 11] - unsupervised point cloud pre training via occlusion completion](/img/76/b92fe4549cacba15c113993a07abb8.png)
[point cloud processing paper crazy reading frontier version 11] - unsupervised point cloud pre training via occlusion completion
随机推荐
Filter comments to filter out uncommented and default values
Flink学习笔记(十)Flink容错机制
Bert install no package metadata was found for the 'sacraments' distribution
图像修复方法研究综述----论文笔记
2022-2-14 learning xiangniuke project - Session Management
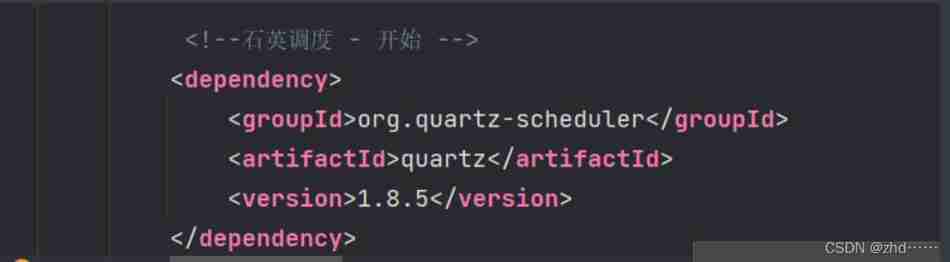
Jenkins learning (III) -- setting scheduled tasks
全球KYC服务商ADVANCE.AI 活体检测产品通过ISO国际安全认证 产品能力再上一新台阶
LeetCode每日一题(2109. Adding Spaces to a String)
LeetCode每日一题(931. Minimum Falling Path Sum)
从0开始使用pnpm构建一个Monorepo方式管理的demo
Linxu learning (4) -- Yum and apt commands
Win10安装ELK
C language programming specification
[point cloud processing paper crazy reading frontier version 10] - mvtn: multi view transformation network for 3D shape recognition
Install third-party libraries such as Jieba under Anaconda pytorch
Using Hudi in idea
Spark structured stream writing Hudi practice
基于opencv实现桌面图标识别
[point cloud processing paper crazy reading classic version 10] - pointcnn: revolution on x-transformed points
Solve POM in idea Comment top line problem in XML file