当前位置:网站首页>Pytorch installation (GPU) in Anaconda (step on pit + fill pit)
Pytorch installation (GPU) in Anaconda (step on pit + fill pit)
2022-06-12 07:51:00 【FishPotatoChen】
Catalog
- Computer hardware and software environment
- Start formal installation
Computer hardware and software environment
Installation time :2022 year 2 month 27 Japan
Hardware
GPU:NVIDIA GeForce RTX 2080Ti
Software version
operating system :Windows 10, My computer user name is Fishc, Readers can change to their own user name
Graphics card driver version :511.79
anaconda:4.9.2, The installation position is D:\anaconda3, This is a The first pit
python:3.8.5
Brief description
View version
How to view the version : Open the command line
Shortcut key Win + r Turn on run , Input cmd Then click OK
C:\Users\Fishc>nvidia-smi
Sun Feb 27 21:42:48 2022
+-----------------------------------------------------------------------------+
| NVIDIA-SMI 511.79       Driver Version: 511.79       CUDA Version: 11.6     |
|-------------------------------+----------------------+----------------------+
| GPU  Name            TCC/WDDM | Bus-Id        Disp.A | Volatile Uncorr. ECC |
| Fan  Temp  Perf  Pwr:Usage/Cap|         Memory-Usage | GPU-Util  Compute M. |
|                               |                      |               MIG M. |
|===============================+======================+======================|
|   0  NVIDIA GeForce ... WDDM  | 00000000:01:00.0  On |                  N/A |
| 29%   32C    P8     3W / 300W |    869MiB / 11264MiB |      3%      Default |
|                               |                      |                  N/A |
+-------------------------------+----------------------+----------------------+

+-----------------------------------------------------------------------------+
| Processes:                                                                  |
|  GPU   GI   CI        PID   Type   Process name                  GPU Memory |
|        ID   ID                                                   Usage      |
|=============================================================================|
|    0   N/A  N/A       952    C+G   ...2txyewy\TextInputHost.exe    N/A      |
|    0   N/A  N/A      1268    C+G                                   N/A      |
|    0   N/A  N/A      1408    C+G   ...kyb3d8bbwe\Calculator.exe    N/A      |
|    0   N/A  N/A      3848    C+G   ...in7x64\steamwebhelper.exe    N/A      |
|    0   N/A  N/A      4852    C+G   C:\Windows\explorer.exe         N/A      |
|    0   N/A  N/A      5632    C+G   ...4__8wekyb3d8bbwe\Time.exe    N/A      |
|    0   N/A  N/A      7756    C+G   ...me\Application\chrome.exe    N/A      |
|    0   N/A  N/A      9928    C+G   ...5n1h2txyewy\SearchApp.exe    N/A      |
|    0   N/A  N/A     11008    C+G   ...bbwe\Microsoft.Photos.exe    N/A      |
|    0   N/A  N/A     11388    C+G   ...ekyb3d8bbwe\YourPhone.exe    N/A      |
|    0   N/A  N/A     11712    C+G   ...cw5n1h2txyewy\LockApp.exe    N/A      |
|    0   N/A  N/A     13692    C+G   ...108.62\msedgewebview2.exe    N/A      |
|    0   N/A  N/A     13984    C+G   ...lPanel\SystemSettings.exe    N/A      |
|    0   N/A  N/A     14376    C+G   ...perience\NVIDIA Share.exe    N/A      |
|    0   N/A  N/A     15220    C+G   ...perience\NVIDIA Share.exe    N/A      |
|    0   N/A  N/A     16620    C+G   ...y\ShellExperienceHost.exe    N/A      |
|    0   N/A  N/A     18360    C+G   ...ge\Application\msedge.exe    N/A      |
+-----------------------------------------------------------------------------+

C:\Users\Fishc>conda activate

(base) C:\Users\Fishc>conda -V
conda 4.9.2

(base) C:\Users\Fishc>python -V
Python 3.8.5
Activate the environment
Activate anaconda The environment is by command conda activate, Then the front appears (base), In the default environment (base Environmental Science ) Run in , In the following, the command line is preceded by (base), The environment is activated by default , If you want to activate other environments
C:\Users\Fishc>conda activate envs_name

(envs_name)C:\Users\Fishc>
envs_name Is the name of the environment to be activated , Modify as needed
Start formal installation
Fill the first hole
If anaconda Installed in the C Disk other than disk , So congratulations , At the end of the installation, there will be an error of insufficient permission , So change the folder permissions before installing . My folder is D:\anaconda3
Right click after the folder is selected , Open properties , Click Security , Choose SYSTEM Then click OK .
anaconda Source change
Select one of method 1 and method 2
Method 1
On the command line, enter the following command
(base) C:\Users\Fishc>conda config --set show_channel_urls yes
After running, it can be in C:\Users\Fishc The next file found is .condarc, Open this file in Notepad , Replace the contents with
channels:
  - http://mirrors.tuna.tsinghua.edu.cn/anaconda/pkgs/free/
  - http://mirrors.tuna.tsinghua.edu.cn/anaconda/pkgs/main/
  - http://mirrors.tuna.tsinghua.edu.cn/anaconda/pkgs/free/
  - http://mirrors.tuna.tsinghua.edu.cn/anaconda/cloud/pytorch/
  - http://mirrors.tuna.tsinghua.edu.cn/anaconda/cloud/peterjc123/
ssl_verify: true
show_channel_urls: true
It's here The second pit
Method 2
This is followed by the command line above , Run the following command , The added commands in the middle have been listed separately later , It can be copied directly
(base) C:\Users\Fishc>conda config --set show_channel_urls yes

(base) C:\Users\Fishc>conda config --add channels http://mirrors.tuna.tsinghua.edu.cn/anaconda/pkgs/free/

(base) C:\Users\Fishc>conda config --add channels http://mirrors.tuna.tsinghua.edu.cn/anaconda/pkgs/main/

(base) C:\Users\Fishc>conda config --add channels http://mirrors.tuna.tsinghua.edu.cn/anaconda/pkgs/free/

(base) C:\Users\Fishc>conda config --add channels http://mirrors.tuna.tsinghua.edu.cn/anaconda/cloud/pytorch/

(base) C:\Users\Fishc>conda config --add channels http://mirrors.tuna.tsinghua.edu.cn/anaconda/cloud/peterjc123/
The order is as follows
conda config --add channels http://mirrors.tuna.tsinghua.edu.cn/anaconda/pkgs/free/
conda config --add channels http://mirrors.tuna.tsinghua.edu.cn/anaconda/pkgs/main/
conda config --add channels http://mirrors.tuna.tsinghua.edu.cn/anaconda/pkgs/free/
conda config --add channels http://mirrors.tuna.tsinghua.edu.cn/anaconda/cloud/pytorch/
conda config --add channels http://mirrors.tuna.tsinghua.edu.cn/anaconda/cloud/peterjc123/
It's here The second pit
Fill the second pit
Each of them http No https, If you don't change here , After that, an error message will be displayed during the installation after the certificate expires .
Download and install CUDA
I downloaded it CUDA 11.3, Because when I installed it pytorch The latest display on the official website is this
pytorch Official website 
Baidu can be directly cuda11.3, The first one is 
Or the following website
Official website CUDA11.3
This is my choice , Click download to download , After downloading, you can use the compact installation directly ( That is, the default installation ) Just fine , The default installation location is C:\Program Files\NVIDIA GPU Computing Toolkit\CUDA\v11.3 Next , If the installation position is changed , Remember your installation location 
cudnn install
The official website is as follows
cudnn Official website
To download from the official website, you need to register an account , Fill out a questionnaire , It's more convenient . I found out he didn't 11.3, So choose 11.x The latest one is OK 
After downloading, unzip to get the following 3 A folder 
Find the installation location just remembered , Mine is C:\Program Files\NVIDIA GPU Computing Toolkit\CUDA\v11.3
The computer will automatically merge 2 A folder with the same name , So directly unzip the 3 A folder ( It's not a document ) Copy and paste here
test CUDA Is the installation complete
Command line run
C:\Users\Fishc>cd C:\Program Files\NVIDIA GPU Computing Toolkit\CUDA\v11.3\extras\demo_suite

C:\Program Files\NVIDIA GPU Computing Toolkit\CUDA\v11.3\extras\demo_suite>bandwidthTest.exe
[CUDA Bandwidth Test] - Starting...
Running on...

 Device 0: NVIDIA GeForce RTX 2080 Ti
 Quick Mode

 Host to Device Bandwidth, 1 Device(s)
 PINNED Memory Transfers
   Transfer Size (Bytes)        Bandwidth(MB/s)
   33554432                     12801.7

 Device to Host Bandwidth, 1 Device(s)
 PINNED Memory Transfers
   Transfer Size (Bytes)        Bandwidth(MB/s)
   33554432                     12682.5

 Device to Device Bandwidth, 1 Device(s)
 PINNED Memory Transfers
   Transfer Size (Bytes)        Bandwidth(MB/s)
   33554432                     520748.6

Result = PASS

NOTE: The CUDA Samples are not meant for performance measurements. Results may vary when GPU Boost is enabled.

C:\Program Files\NVIDIA GPU Computing Toolkit\CUDA\v11.3\extras\demo_suite>
notice Result = PASS Description has been successfully installed
Configure environment variables
double-click bin, Then copy the path 

Put the above folder ( namely C:\Program Files\NVIDIA GPU Computing Toolkit\CUDA\v11.3) Medium bin Add environment variables to the directory ( Click new and paste )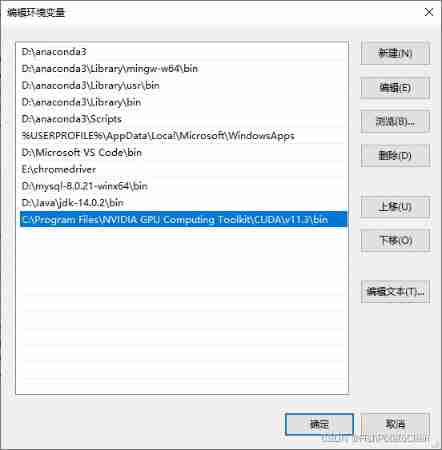
Create a new anaconda Environmental Science ( Optional )
Run... On the command line , Created an environment named pytorch_envs, Just make your own name
(base) C:\Users\Fishc>conda create --name pytorch_envs python=3.8
Activate this environment
C:\Users\Fishc>conda activate pytorch_envs

(pytorch_envs)C:\Users\Fishc>
The following text appears (pytorch_envs) By default, the environment has been activated
install pytorch
go back to pytorch Its official website , Select the appropriate condition
pytorch Official website 
You can get the corresponding commands that need to be run on the command line , namely conda install pytorch torchvision torchaudio cudatoolkit=11.3 -c pytorch
The third pit Here we go ~~
Fill the third pit
If you really follow the official website , Then the speed will be very touching , The previous source changes have been done in vain
The correct operation should run the following code , Get rid of the back -c pytorch
(pytorch_envs) C:\Users\Fishc>conda install pytorch torchvision torchaudio cudatoolkit=11.3
-c pytorch Download from the official website , But the official website is very slow
If just now No, newly build anaconda Environmental Science , That should be
(base) C:\Users\Fishc>conda install pytorch torchvision torchaudio cudatoolkit=11.3
installation is complete
As the installation proceeds , There will be options for the installer to choose , Just go back , Run the following test
(pytorch_envs) C:\Users\Fishc>python
Python 3.8.12 (default, Oct 12 2021, 03:01:40) [MSC v.1916 64 bit (AMD64)] :: Anaconda, Inc. on win32
Type "help", "copyright", "credits" or "license" for more information.
>>> import torch
>>> torch.__version__
'1.10.2'
>>>
No error message indicates that the installation has been completed
边栏推荐
- Interview questions on mobile terminal, Android and IOS compatibility
- QT realization tray
- Arrangement of statistical learning knowledge points -- maximum likelihood estimation (MLE) and maximum a posteriori probability (map)
- The R language uses the sample The split function divides the machine learning data set into training set and test set
- Dynamic simulation method of security class using Matlab based Matpower toolbox
- Solve the problem of uploading sftporg apache. commons. net. MalformedServerReplyException: Could not parse respon
- Ecmascript6 interview questions
- 最新hbuilderX编辑uni-app项目运行于夜神模拟器
- Improvement of hash function based on life game
- Topic 1 Single_Cell_analysis(1)
猜你喜欢

Right click the general solution of file rotation jam, refresh, white screen, flash back and desktop crash

Voice assistant - Qu - ner and intention slot model
![[RedisTemplate方法详解]](/img/ef/66d8e3fe998d9a788170016495cb10.png)
[RedisTemplate方法详解]

Unity uses shaders to highlight the edges of ugu I pictures

Voice assistant -- Qu -- semantic role annotation and its application

电脑连接上WiFi但是上不了网

Meter Reading Instrument(MRI) Remote Terminal Unit electric gas water
![‘CMRESHandler‘ object has no attribute ‘_ timer‘,socket. gaierror: [Errno 8] nodename nor servname pro](/img/de/6756c1b8d9b792118bebb2d6c1e54c.png)
‘CMRESHandler‘ object has no attribute ‘_ timer‘,socket. gaierror: [Errno 8] nodename nor servname pro
20220526 yolov1-v5

Fcpx plug-in: simple line outgoing text title introduction animation call outs with photo placeholders for fcpx
随机推荐
FPGA based communication system receiver [packet detection] development document
Connect to the database but cannot modify the data
Seeking for a new situation and promoting development, the head goose effect of Guilin's green digital economy
R语言caTools包进行数据划分、scale函数进行数据缩放、class包的knn函数构建K近邻分类器、比较不同K值超参数下模型准确率(accuracy)
QT realization tray
2021.10.29-30 scientific research log
The latest hbuilderx editing uni app project runs in the night God simulator
Chapter 2 - cyber threats and attacks
Velocity autocorrelation function lammps v.s MATALB
Thyristor, it is a very important AC control device
[tutorial] deployment process of yolov5 based on tensorflow Lite
vscode 1.68变化与关注点(整理导入语句/实验性新命令中心等)
Generalized semantic recognition based on semantic similarity
Leetcode notes: biweekly contest 79
2022r2 mobile pressure vessel filling test question simulation test platform operation
20220607. 人脸识别
Knife4j first use
Voice assistant - Qu - ner and intention slot model
Chapter 4 - key management and distribution
Vs 2019 MFC connects and accesses access database class library encapsulation through ace engine