当前位置:网站首页>Navigation component of Android architecture (2)
Navigation component of Android architecture (2)
2020-11-09 12:12:00 【I'm sorry.】
Nested navigation map
You can group a series of destinations into a parent navigation map ( be called " Root graph ") In a nested graph in . Nested diagrams are useful for organizing and reusing parts of an application interface .
Nested graphs can encapsulate their destinations . Like the root graph , The nested graph must have a destination identified as the starting destination . Destinations other than nested maps ( For example, on the root graph Destination ) The nested diagram can only be accessed through its starting destination
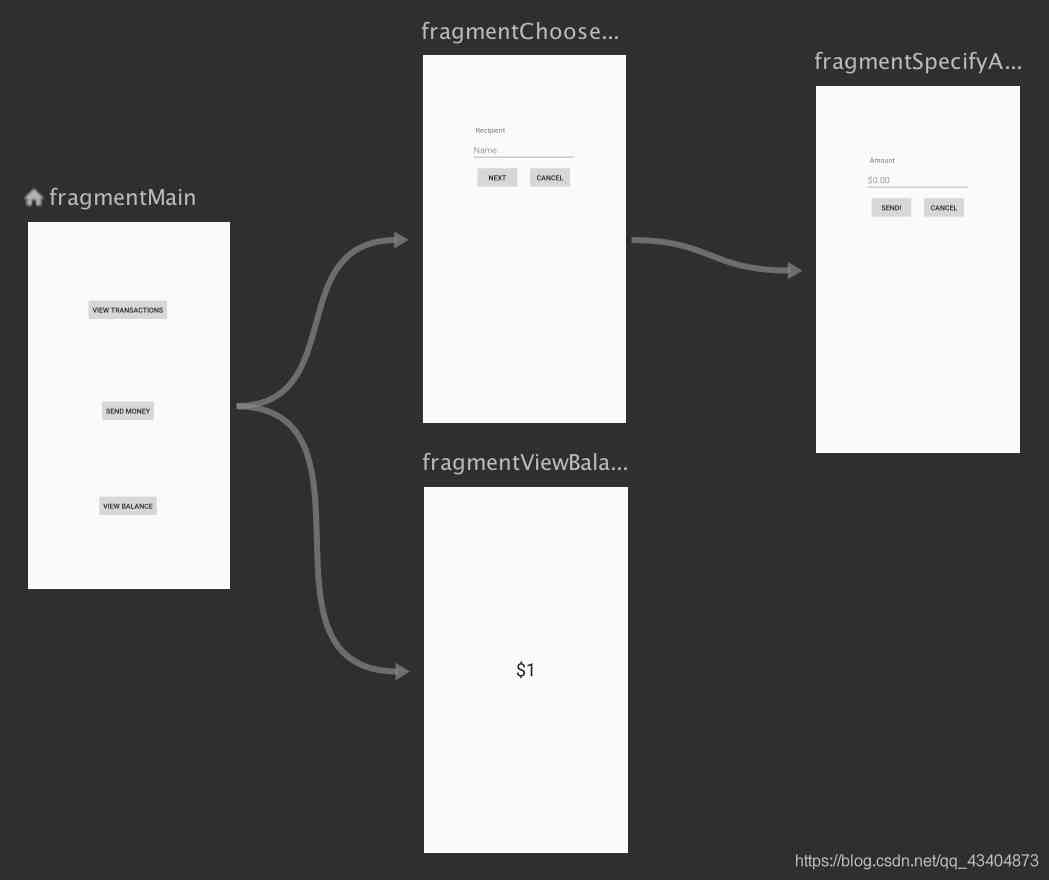
As this picture shows , We can fragmentChoose and fragmentSpecify Encapsulate into a Navigation, adopt include In the root graph
<!-- (root) nav_graph.xml -->
<?xml version="1.0" encoding="utf-8"?>
<navigation xmlns:android="http://schemas.android.com/apk/res/android"
    xmlns:app="http://schemas.android.com/apk/res-auto"
    xmlns:tools="http://schemas.android.com/tools"
    android:id="@+id/nav_graph"
    app:startDestination="@id/fragment">

    <include app:graph="@navigation/included_graph" />

    <fragment
        android:id="@+id/fragment"
        android:name="com.example.myapplication.BlankFragment"
        android:label="Fragment in Root Graph"
        tools:layout="@layout/fragment_blank">
        <action
            android:id="@+id/action_fragment_to_second_graph"
            app:destination="@id/second_graph" />
    </fragment>

    ...
</navigation>
Remember that : inclued_graph.xml There has to be app:startDestination Starting destination .
<!-- included_graph.xml -->
<?xml version="1.0" encoding="utf-8"?>
<navigation xmlns:android="http://schemas.android.com/apk/res/android"
    xmlns:app="http://schemas.android.com/apk/res-auto"
    xmlns:tools="http://schemas.android.com/tools"
    android:id="@+id/second_graph"
    app:startDestination="@id/includedStart">

    <fragment
        android:id="@+id/includedStart"
        android:name="com.example.myapplication.IncludedStart"
        android:label="fragment_included_start"
        tools:layout="@layout/fragment_included_start" />
</navigation>
This way include introduce , We can easily manage and achieve the effect of reuse .
Global operation
You can use global operations to create common operations that can be shared by multiple destinations . for example , You may want multiple buttons in different destinations to navigate to the same app home screen
stay Navigation Editor in , Global operations are represented by a small arrow pointing to the associated destination , Pictured Shown .

Create global operations
To create a global operation , Do the following :
- stay Graph Editor in , Click on a destination , Make it stand out .
- Right click on the destination , To display the context menu .
- Choose in turn Add Action > Global. The system will display an arrow to the left of the destination ().
- Click on Text TAB , To turn to XML Text view . Globally operated XML The text is roughly as follows :
<?xml version="1.0" encoding="utf-8"?>
<navigation xmlns:app="http://schemas.android.com/apk/res-auto"
            xmlns:tools="http://schemas.android.com/tools"
            xmlns:android="http://schemas.android.com/apk/res/android"
            android:id="@+id/main_nav"
            app:startDestination="@id/mainFragment">

  ...

  <action android:id="@+id/action_global_mainFragment"
          app:destination="@id/mainFragment"/>

</navigation>
Use global operations
To use a global operation in your code , Please put the resources of this global operation ID Passed to each interface element navigate() Method , This is shown in the following example :
viewTransactionsButton.setOnClickListener(new View.OnClickListener() {


   @Override
   public void onClick(View view) {


       Navigation.findNavController(view).navigate(R.id.action_global_mainFragment);
   }
});
such , No matter where you are Fragment, Use global resources ID, You can jump to mainFragment.
Of course , these Fragment Must belong to the same navigation map .
Go to your destination
Use ID Navigation
navigate(int) Accept resources from operations or destinations ID As a parameter . Navigation to the following code section shows how ViewTransactionsFragment
viewTransactionsButton.setOnClickListener(new View.OnClickListener() {


    @Override
    public void onClick(View view) {


        Navigation.findNavController(view).navigate(R.id.viewTransactionsAction);
    }
});
It should be noted that : ViewTransactionsFragment Must be in Navigation Register in
For buttons , You can also use it Navigation Class createNavigateOnClickListener() Easy way to navigate to your destination , As shown in the following example :
button.setOnClickListener(Navigation.createNavigateOnClickListener(R.id.next_fragment, null));
NavigationUI Update page components
NavigationalUI Introduce
Generally speaking , In the process of page switching , It's usually accompanied by App bar in menu Changes in the menu , For different pages ,App bar Medium menu The menu is likely to be different . for example , When ActionBar When the return button on the left is clicked , We need to respond to events , Go back to the previous page . since Navigation and App bar All need to handle page switching events , that , For the convenience of management ,Jetpack Introduced NavigationUi Components , send App bar The buttons and menus in can be associated with the page in the navigation map .
NavigationalUI Basic use
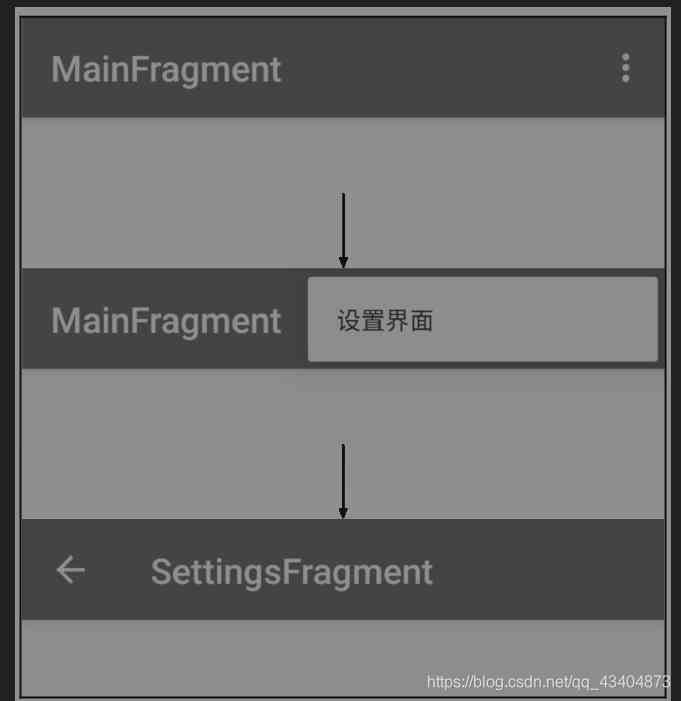
Suppose we have two pages ,MainFragment and SettingsFragment. these two items. Fragment Belong to MainActivity. MainFragment Of ActionBar There's a button on the right , Through this button , You can jump to SettingsFragment. And in the SettingsFragment Of ActionBar There's a back button on the left , Through this button , Can return MainFragment.
To configure nav.graph.xml
Project navigation map file nav_graph.xml, You can clearly see the relationship between the pages .MainActivity It's wrapped MainFragment and SettingsFragment. The default load is MainFragment. The code is as follows
<?xml version="1.0" encoding="utf-8"?>
<navigation xmlns:android="http://schemas.android.com/apk/res/android"
    xmlns:app="http://schemas.android.com/apk/res-auto"
    xmlns:tools="http://schemas.android.com/tools"
    android:id="@+id/nav_graph"
    app:startDestination="@id/mainFragment">

    <fragment
        android:id="@+id/mainFragment"
        android:name="com.example.jetpack.MainFragment"
        android:label="fragment_main"
        tools:layout="@layout/fragment_main" >
    </fragment>
    <fragment
        android:id="@+id/settingFragment"
        android:name="com.example.jetpack.settingFragment"
        android:label="fragment_setting"
        tools:layout="@layout/fragment_setting" />

</navigation>
menu file
stay menu_settings.xml In file , by ActionBar Add menu . It should be noted that , Of id And the navigation map SettingsFragment Of id It's consistent , This means , When it's time to click , Will jump to id The corresponding Fragments. namely SettingsFragment, The code is as follows
<?xml version="1.0" encoding="utf-8"?>
<menu xmlns:android="http://schemas.android.com/apk/res/android">
    <item
        android:id="@+id/settingFragment"
        android:icon="@drawable/ic_launcher_foreground"
        android:title=" Set the interface "
        />
</menu>
MainActivity Instantiate menu in
AppBarConfiguration
NavigationUI Use AppBarConfiguration Object management navigation button behavior in the upper left corner of the application display area , The behavior of the navigation buttons changes depending on whether the user is at the top destination .
By default , The starting destination of the application is the only top-level destination . When the user is at the top destination , The navigation button changes to a drawer navigation bar icon , When the user is on any other destination , The navigation button will appear as an up button ( Return button ).
Simply speaking
AppBarConfiguration appBarConfiguration =
        new AppBarConfiguration.Builder(navController.getGraph()).build();
When building AppBarConfiguration when , The input is the corresponding navigation map , Then the starting destination in the navigation map will show the drawer navigation bar icon , Navigation map, the rest Fragment The up button will be displayed , As shown in the figure :

This is the starting destination in the navigation map , There will be no up button ,

This is the rest of the navigation map Fragment, The up button will be displayed by default .
In some cases , If you want to specify multiple top-level destinations . In such a case , You can change to a set of destinations ID Pass to constructor , The code is as follows :
appBarConfiguration = new AppBarConfiguration.Builder(R.id.mainFragment,R.id.settingFragment).build();

such settingFragment There's no up button , Become a top destination
stay MainActivity Instantiate menu in . The code is as follows
@Override
    public boolean onCreateOptionsMenu(Menu menu) {


        getMenuInflater().inflate(R.menu.menu_settings,menu);
        return true;
    }
How do we get in code Response menu click event ? In the absence of NavigationUI Before component , We need to determine which menu item is clicked , Then write the corresponding code , Jump to the corresponding page . There is now a NavigationUI Components , It can automatically handle the jump logic for us
public class MainActivity extends AppCompatActivity {


    private AppBarConfiguration appBarConfiguration;
    private NavController navController;
    @Override
    protected void onCreate(Bundle savedInstanceState) {


        super.onCreate(savedInstanceState);
        setContentView(R.layout.activity_main);

        // obtain navController, adopt MainActivity blank NavHostFragment obtain
        navController = Navigation.findNavController(this,R.id.nav_host_fragment);
        // Put the navigation map and AppBarConfiguration Connect
        appBarConfiguration = new AppBarConfiguration.Builder(navController.getGraph()).build();
        // take AppBarConfiguration and NavController Bind up
        NavigationUI.setupActionBarWithNavController(this,navController,appBarConfiguration);
    }
    @Override
    public boolean onOptionsItemSelected(@NonNull MenuItem item) {


        return NavigationUI.onNavDestinationSelected(item,navController)||super.onOptionsItemSelected(item);
    }

    @Override
    public boolean onSupportNavigateUp() {


        return NavigationUI.navigateUp(navController,appBarConfiguration)||super.onSupportNavigateUp();
    }
}
We can go through MainActivity blank NavHostFragment obtain navController object , And through navController Get the navigation map and AppbarConfiguration Connect .
 // obtain navController, adopt MainActivity blank NavHostFragment obtain
        navController = Navigation.findNavController(this,R.id.nav_host_fragment);
        // Put the navigation map and AppBarConfiguration Connect
        appBarConfiguration = new AppBarConfiguration.Builder(navController.getGraph()).build();
Because in the layout file of navigation map and menu , We are SettingsFragment and menu Set the same Id. therefore , stay onOptionsItemSelected() In the method , adopt NavigationUI Can automatically complete page Jump
Again , Cover onSupportNavigateUp() Method , When we're in SettingsFragment Middle click ActionBar The back button on the left ,NavigationUI Can help us from SettingsFragment go back to MainFragment.
AppBarConfiguration be used for App bar Configuration of ,NavController For navigation and switching of pages . Then go through the following line of code , take App bar and NavController Bind up .
NavigationUI.setupActionBarWithNavController(this,navController,appBarConfiguration);
It should be noted that ,App bar Is in MainActivity Managed by . When from MainFragment Jump to SettingsFragment when , Need to be in SettingsFragment Medium coverage onCreateOptionsMenu() Method , And in this method, remove MainFragment The corresponding menu
@Override
    public void onCreateOptionsMenu(@NonNull Menu menu, @NonNull MenuInflater inflater) {


        menu.clear();
        super.onCreateOptionsMenu(menu, inflater);
    }
There must be a question , Why is it necessary to clean up ?
because MainFragment and SettingsFragment It's all in MainActivtiy Intermediate display , stay MainActivity Configured with App bar, MainFragment and SettingsFragment Switching is just in NavHostFragment Intermediate display ,NavHostFragment Relatively speaking, it belongs to MainActivity A component of , It doesn't change Appbar, So we need to be able to SettingsFragment eliminate menu;
Page switching monitoring
We can use NavController The one provided is called OnDestinationChangedListener The interface of , Monitor page switching events
 navController.addOnDestinationChangedListener(new NavController.OnDestinationChangedListener() {


            @SuppressLint("RestrictedApi")
            @Override
            public void onDestinationChanged(@NonNull NavController controller, @NonNull NavDestination destination, @Nullable Bundle arguments) {


//                Log.i("true",controller.toString());
                Log.i("true",destination.getNavigatorName()+destination.getDisplayName()+destination.getId());
                if(destination.getId() == R.id.settingsFragment) {


                    toolbar.setVisibility(View.GONE);
                    bottomNavigationView.setVisibility(View.GONE);
                } else {


                    toolbar.setVisibility(View.VISIBLE);
                    bottomNavigationView.setVisibility(View.VISIBLE);
                }
            }
        });
adopt destination.getId You can get the current fragment Of id, It can be based on destination.getId Determine which destination you've reached , For the destination App bar It's time to switch , Reach a different Fragment,App bar Different effects . The code example is as follows
 navController.addOnDestinationChangedListener(new NavController.OnDestinationChangedListener() {


            @SuppressLint("RestrictedApi")
            @Override
            public void onDestinationChanged(@NonNull NavController controller, @NonNull NavDestination destination, @Nullable Bundle arguments) {


//                Log.i("true",controller.toString());
                Log.i("true",destination.getNavigatorName()+destination.getDisplayName()+destination.getId());
                if(destination.getId() == R.id.settingFragment){


                    getSupportActionBar().setTitle(" Xiaoxin ");
                }else if(destination.getId() == R.id.mainFragment){


                    getSupportActionBar().setTitle(" Home page ");
                }
            }
        });
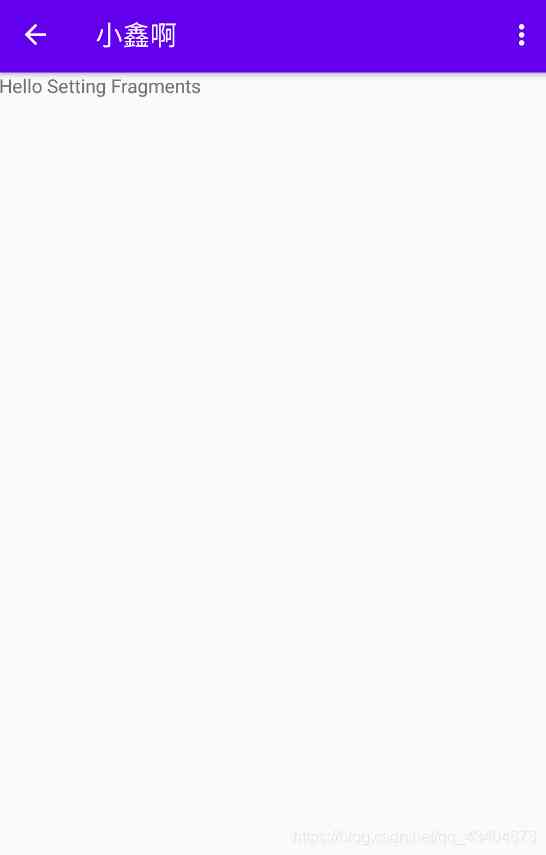
When you switch to settingsFragment when , The title became Xiaoxin , Arrived to modify App bar The effect of , You can also switch pages , change App bar The style of .
Okay , Basic Navigation That's all for the use of , deficiencies , I hope you will forgive me , thank you .
Next , Let's talk about ,Navigation The other two supported App bar And two other menus
- Toolbar
- CollapsingToolbarLayout
- App bar The drawer menu on the left (DrawLayout+NavigationView)
- At the bottom of the menu (BottomNavigation).
版权声明
本文为[I'm sorry.]所创,转载请带上原文链接,感谢
边栏推荐
- What really drags you down is sunk costs
- [design pattern] Chapter 4: Builder mode is not so difficult
- Review of hot spots of last week (11.2-11.8)
- Adobe experience design / XD 2020 software installation package (with installation tutorial)
- Implement crud operation
- 《内网安全攻防》配套视频 之 利用PS查询域内信息
- inet_ Pton () and INET_ Detailed explanation of ntop() function
- FGC online service troubleshooting, this is enough!
- For and for... In, for each and map and for of
- 050_ object-oriented
猜你喜欢

iPhone“连到系统上的设备没有发挥作用”原因分析及解决方法 20200105

Tidb x micro banking reduces time consumption by 58%, and distributed architecture helps to realize inclusive finance
Sql分组查询后取每组的前N条记录
What really drags you down is sunk costs

外贸自建网站域名的选择— Namesilo 域名购买

Vscode plug-in configuration pointing North
2020.11.07面试总结(面试12k)
android studio创建平板模拟器方法

从编码、网络传输、架构设计揭秘腾讯云高质量、高可用实时音视频技术实践...
EFF 认为 RIAA 正在“滥用 DMCA”来关闭 YouTube-DL
随机推荐
Wealth and freedom? Ant financial services suspended listing, valuation or decline after regulation
嗯,查询滑动窗口最大值的这4种方法不错....
Recommended tools for Mac
TiDB x 微众银行 | 耗时降低 58%,分布式架构助力实现普惠金融
Handwritten digital image recognition convolution neural network
Reading design patterns adapter patterns
天啦撸!打印日志竟然只晓得 Log4j?
Solve the problem of idea shortcut key Alt + insert invalid
Introduction to zero based im development (4): what is message timing consistency in IM systems?
SQL语句实现水仙花数求取
Handwriting Koa.js Source code
Android Studio Avd「真·小白食用方法」
解决IDEA快捷键 Alt+Insert 失效的问题
On the calculation of non interaction polarizability
Understanding runloop in OC
Complete set of linked list operations of data structure and algorithm series (3) (go)
Android权限大全
Well, these four ways to query the maximum value of sliding window are good
Looking for better dynamic getter and setter solutions
如何用函数框架快速开发大型 Web 应用 | 实战