当前位置:网站首页>【pytorch 修改预训练模型:实测加载预训练模型与模型随机初始化差别不大】
【pytorch 修改预训练模型:实测加载预训练模型与模型随机初始化差别不大】
2022-07-05 11:34:00 【网络星空(luoc)】
1. pytorch 预训练模型
卷积神经网络的训练是耗时的,很多场合不可能每次都从随机初始化参数开始训练网络。pytorch中自带几种常用的深度学习网络预训练模型,如VGG、ResNet等。往往为了加快学习的进度,在训练的初期我们直接加载pre-train模型中预先训练好的参数,model的加载如下所示:
import torchvision.models as models

#resnet
model = models.ResNet(pretrained=True)
model = models.resnet18(pretrained=True)
model = models.resnet34(pretrained=True)
model = models.resnet50(pretrained=True)

#vgg
model = models.VGG(pretrained=True)
model = models.vgg11(pretrained=True)
model = models.vgg16(pretrained=True)
model = models.vgg16_bn(pretrained=True)
2. 修改全连接层类别数目
预训练模型以 resnet50 为例。
model = torchvision.models.resnet50(pretrained=True)
#提取fc层中固定的参数
fc_features = model.fc.in_features
#修改类别为10,重定义最后一层
model.fc = nn.Linear(fc_features ,10)
print(model.fc)
或者直接传入类别个数:
self.resnet = torchvision.models.resnet50(pretrained=False,num_classes=10)
3. 修改某一层卷积
预训练模型以 resnet50 为例。
model = torchvision.models.resnet50(pretrained=True)
# 重定义第一层卷积的输入通道数
model.conv1 = nn.Conv2d(4, 64, kernel_size=7, stride=2, padding=3, bias=False)
4. 修改某几层卷积
4.1 去掉后两层(fc层和pooling层)
预训练模型以 resnet50 为例。
nn.module的model它包含一个叫做children()的函数,这个函数可以用来提取出model每一层的网络结构,在此基础上进行修改即可,修改方法如下(去除后两层):
resnet_50_s = torchvision.models.resnet50(pretrained=False)
resnet_layer = nn.Sequential(*list(resnet_50_s.children())[:-2])
self.resnet = resnet_layer
在去掉预训练resnet模型的后两层(fc层和pooling层)后,新添加一个上采样层、池化层和分类层,构建网络代码如下:
class Net_resnet50_upsample(nn.Module):
     def __init__(self):
         super(Net_resnet50_upsample, self).__init__()
         self.conv = nn.Conv2d(1, 3, kernel_size=1)
         resnet_50_s = torchvision.models.resnet50(pretrained=False)
         resnet_layer = nn.Sequential(*list(resnet_50_s.children())[:-2])
         self.resnet = resnet_layer
         # print(self.resnet)

         self.up7to14=nn.UpsamplingNearest2d(scale_factor=2)
         self.avgpool=nn.AvgPool2d(7,stride=2)
         self.fc = nn.Sequential(
             nn.Linear(2048 * 4 * 4, 1024),
             nn.ReLU(inplace=True),
             nn.Linear(1024, 128),
             nn.ReLU(inplace=True),
             nn.Linear(128, 10))
     def forward(self, x):
         x = self.conv(x)
         x = self.resnet(x)
         x=self.up7to14(x)
         x=self.avgpool(x)
         x = x.view(x.size(0), -1)
         x = self.fc(x)
         return x
4.2 增减多个卷积层
有的时候要修改网络中的层次结构,这时只能用参数覆盖的方法,即自己先定义一个类似的网络,再将预训练中的参数提取到自己的网络中来。这里以resnet预训练模型举例。
# coding=UTF-8
import torchvision.models as models
import torch
import torch.nn as nn
import math
import torch.utils.model_zoo as model_zoo

#Bottleneck是一个class 里面定义了使用1*1的卷积核进行降维跟升维的一个残差块,可以在github resnet pytorch上查看
class Bottleneck(nn.Module):
    expansion = 4

    def __init__(self, inplanes, planes, stride=1, downsample=None):
        super(Bottleneck, self).__init__()
        self.conv1 = nn.Conv2d(inplanes, planes, kernel_size=1, bias=False)
        self.bn1 = nn.BatchNorm2d(planes)
        self.conv2 = nn.Conv2d(planes, planes, kernel_size=3, stride=stride,
                               padding=1, bias=False)
        self.bn2 = nn.BatchNorm2d(planes)
        self.conv3 = nn.Conv2d(planes, planes * 4, kernel_size=1, bias=False)
        self.bn3 = nn.BatchNorm2d(planes * 4)
        self.relu = nn.ReLU(inplace=True)
        self.downsample = downsample
        self.stride = stride

    def forward(self, x):
        residual = x

        out = self.conv1(x)
        out = self.bn1(out)
        out = self.relu(out)

        out = self.conv2(out)
        out = self.bn2(out)
        out = self.relu(out)

        out = self.conv3(out)
        out = self.bn3(out)

        if self.downsample is not None:
            residual = self.downsample(x)

        out += residual
        out = self.relu(out)

        return out

#不做修改的层不能乱取名字,否则预训练的权重参数无法传入
class CNN(nn.Module):
    def __init__(self, block, layers, num_classes=9):
        self.inplanes = 64
        super(CNN, self).__init__()
        self.conv1 = nn.Conv2d(3, 64, kernel_size=7, stride=2, padding=3,
                               bias=False)
        self.bn1 = nn.BatchNorm2d(64)
        self.relu = nn.ReLU(inplace=True)
        self.maxpool = nn.MaxPool2d(kernel_size=3, stride=2, padding=1)
        self.layer1 = self._make_layer(block, 64, layers[0])
        self.layer2 = self._make_layer(block, 128, layers[1], stride=2)
        self.layer3 = self._make_layer(block, 256, layers[2], stride=2)
        self.layer4 = self._make_layer(block, 512, layers[3], stride=2)
        self.avgpool = nn.AdaptiveAvgPool2d(output_size=(1,1))
        # 新增一个反卷积层
        self.convtranspose1 = nn.ConvTranspose2d(2048, 2048, kernel_size=3, stride=1, padding=1, output_padding=0,
                                                 groups=1, bias=False, dilation=1)
        # 新增一个最大池化层
        self.maxpool2 = nn.MaxPool2d(kernel_size=3, stride=1, padding=1)
        # 去掉原来的fc层,新增一个fclass层
        self.fclass = nn.Linear(2048, num_classes)

        for m in self.modules():
            if isinstance(m, nn.Conv2d):
                n = m.kernel_size[0] * m.kernel_size[1] * m.out_channels
                m.weight.data.normal_(0, math.sqrt(2. / n))
            elif isinstance(m, nn.BatchNorm2d):
                m.weight.data.fill_(1)
                m.bias.data.zero_()

    def _make_layer(self, block, planes, blocks, stride=1):
        downsample = None
        if stride != 1 or self.inplanes != planes * block.expansion:
            downsample = nn.Sequential(
                nn.Conv2d(self.inplanes, planes * block.expansion,
                          kernel_size=1, stride=stride, bias=False),
                nn.BatchNorm2d(planes * block.expansion),
            )

        layers = []
        layers.append(block(self.inplanes, planes, stride, downsample))
        self.inplanes = planes * block.expansion
        for i in range(1, blocks):
            layers.append(block(self.inplanes, planes))

        return nn.Sequential(*layers)

    def forward(self, x):
        x = self.conv1(x)
        x = self.bn1(x)
        x = self.relu(x)
        x = self.maxpool(x)

        x = self.layer1(x)
        x = self.layer2(x)
        x = self.layer3(x)
        x = self.layer4(x)

        x = self.avgpool(x)
        # 新加层的forward
        x = x.view(x.size(0), -1)
        x = self.convtranspose1(x)
        x = self.maxpool2(x)
        x = x.view(x.size(0), -1)
        x = self.fclass(x)

        return x

# 加载model
resnet50 = models.resnet50(pretrained=False)
print(resnet50)
cnn = CNN(Bottleneck, [3, 4, 6, 3]) #3 4 6 3 分别表示layer1 2 3 4 中Bottleneck模块的数量。res101则为3 4 23 3
# 读取参数
pretrained_dict = resnet50.state_dict()
model_dict = cnn.state_dict()
# 将pretrained_dict里不属于model_dict的键剔除掉
pretrained_dict = {

    k: v for k, v in pretrained_dict.items() if k in model_dict}
# 更新现有的model_dict
model_dict.update(pretrained_dict)
# 加载我们真正需要的state_dict
cnn.load_state_dict(model_dict)
# print(resnet50)
print(cnn)
结果对比: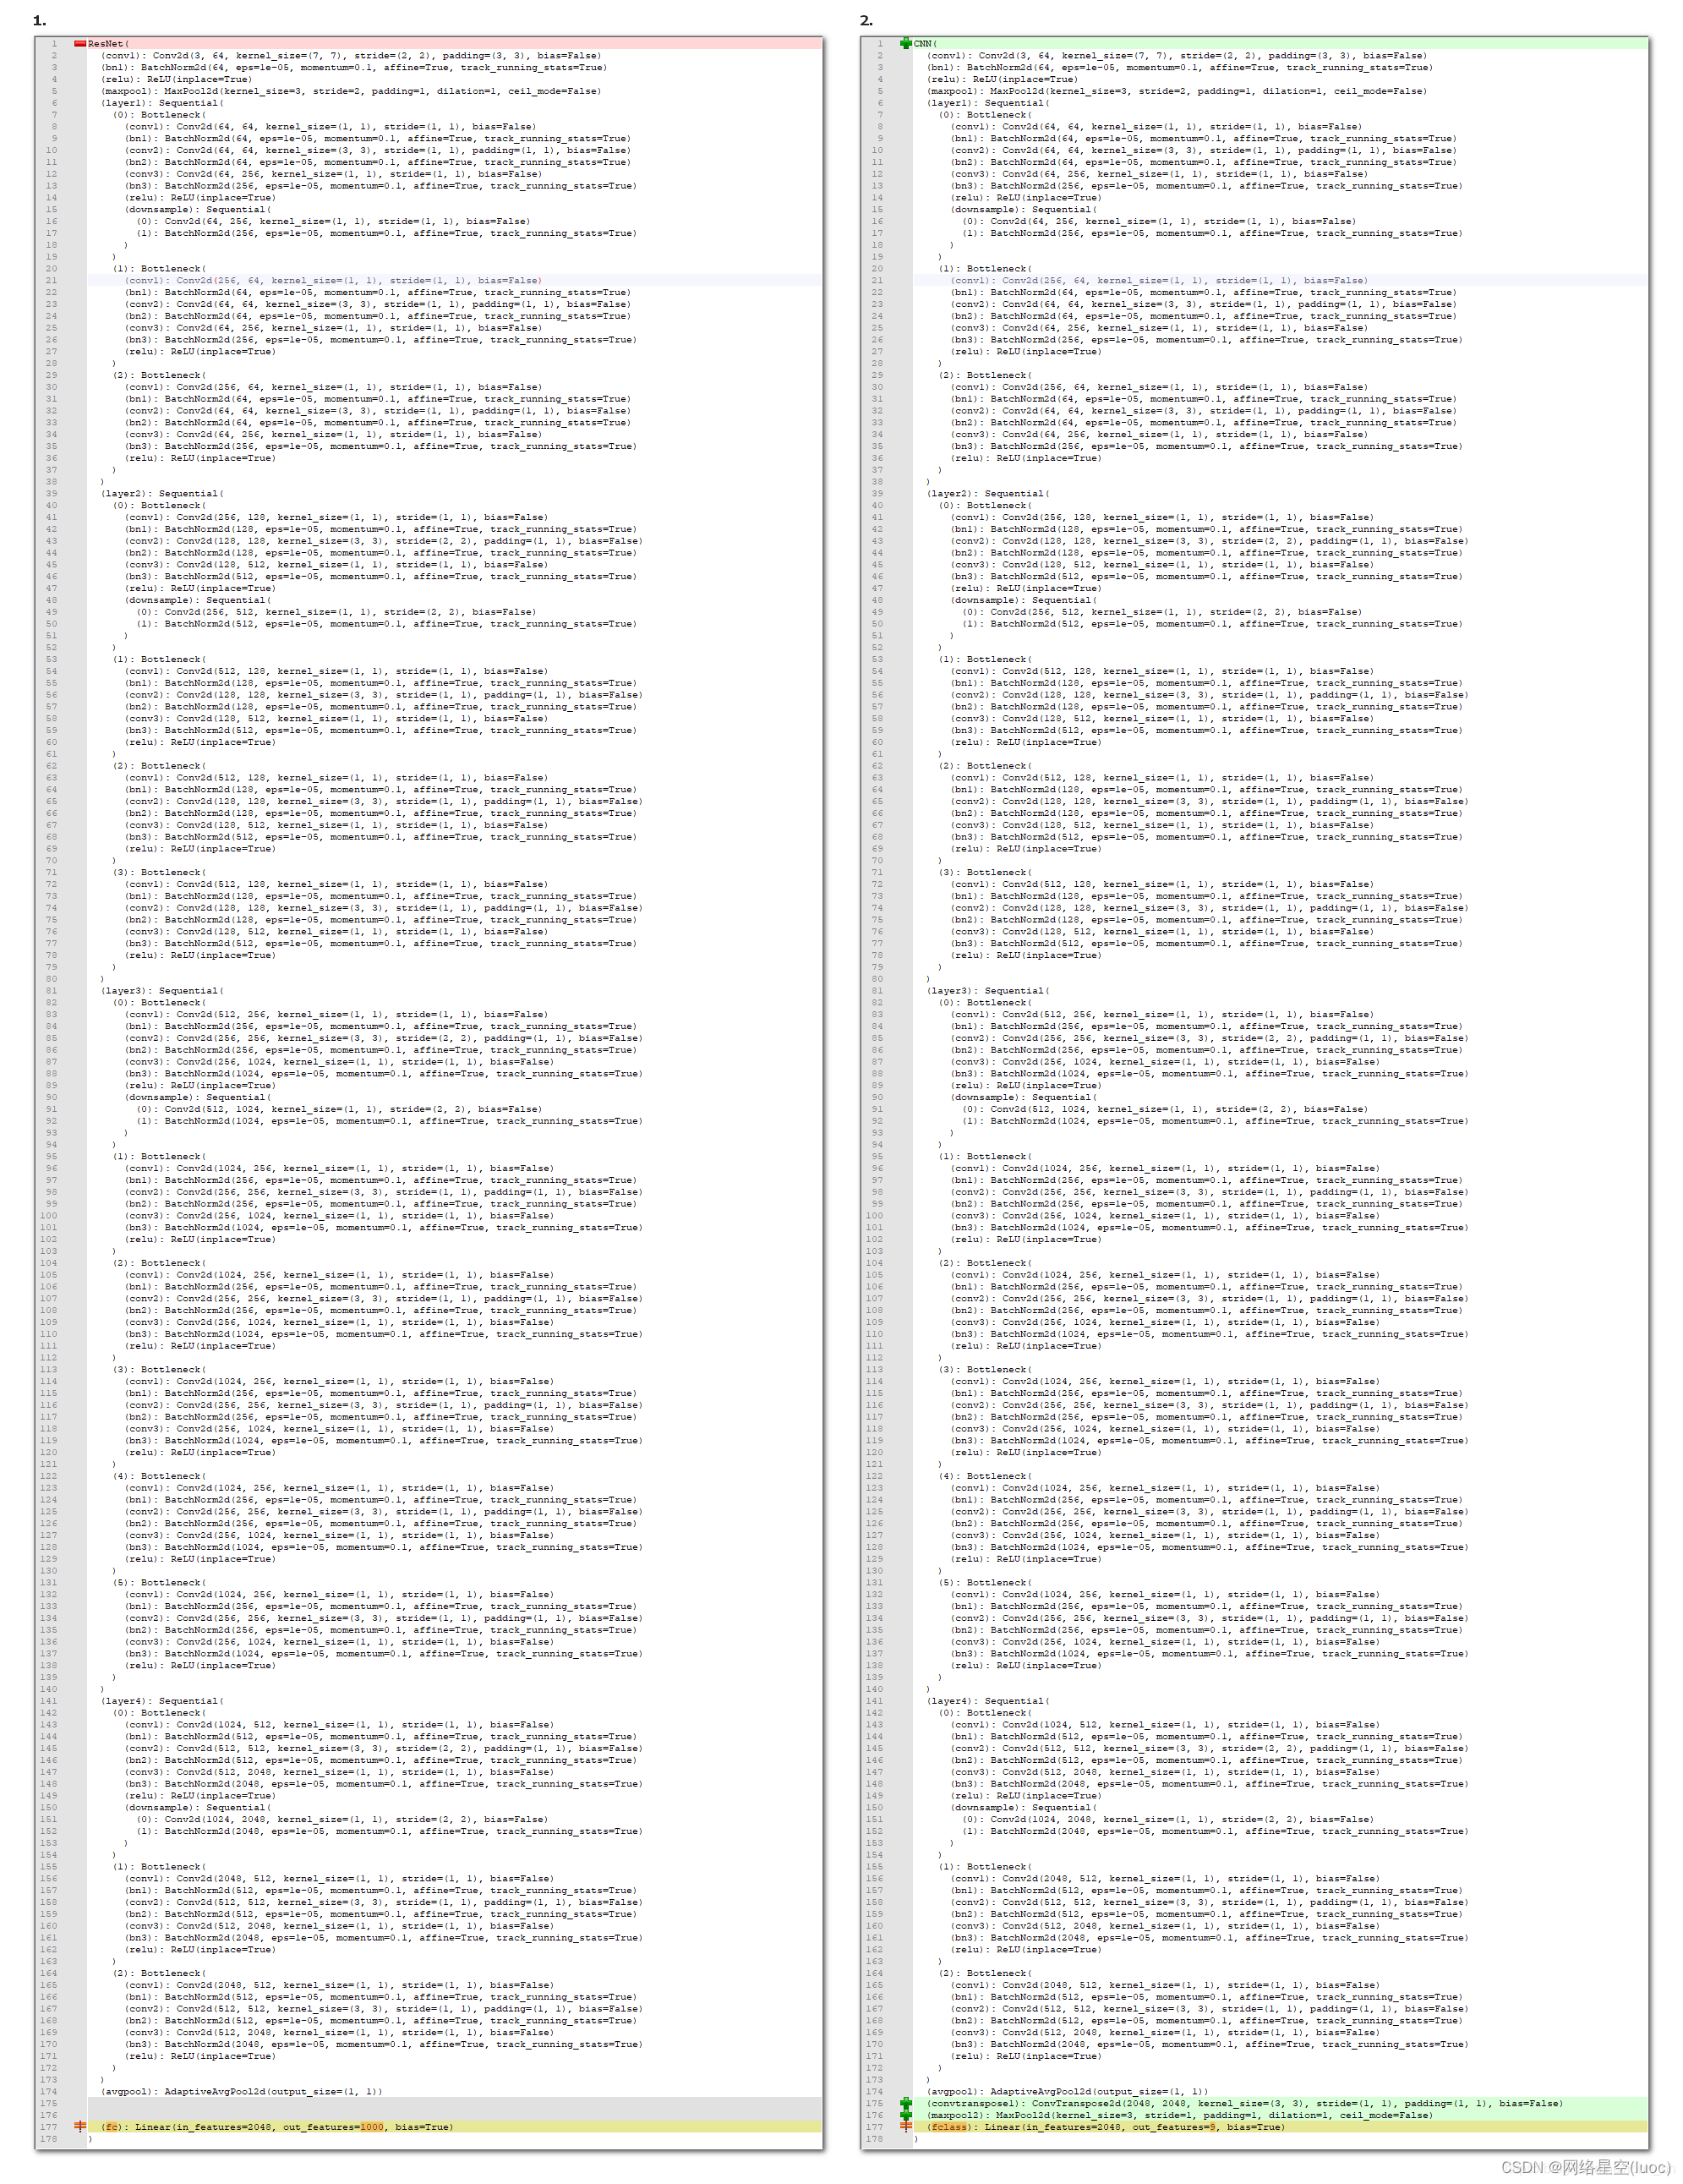
文章知识点与官方知识档案匹配,可进一步学习相关知识
边栏推荐
- [SWT component] content scrolledcomposite
- comsol--三维图形随便画----回转
- Technology sharing | common interface protocol analysis
- COMSOL -- 3D casual painting -- sweeping
- How did the situation that NFT trading market mainly uses eth standard for trading come into being?
- What does cross-border e-commerce mean? What do you mainly do? What are the business models?
- 7 大主题、9 位技术大咖!龙蜥大讲堂7月硬核直播预告抢先看,明天见
- Open3D 欧式聚类
- Ziguang zhanrui's first 5g R17 IOT NTN satellite in the world has been measured on the Internet of things
- [crawler] Charles unknown error
猜你喜欢
7.2 daily study 4

How to make your products as expensive as possible

1个插件搞定网页中的广告
comsol--三维图形随便画----回转
Oneforall installation and use
iTOP-3568开发板NPU使用安装RKNN Toolkit Lite2

《增长黑客》阅读笔记

全网最全的新型数据库、多维表格平台盘点 Notion、FlowUs、Airtable、SeaTable、维格表 Vika、飞书多维表格、黑帕云、织信 Informat、语雀

The ninth Operation Committee meeting of dragon lizard community was successfully held
go语言学习笔记-分析第一个程序
随机推荐
go语言学习笔记-分析第一个程序
pytorch-多层感知机MLP
COMSOL -- establishment of geometric model -- establishment of two-dimensional graphics
Proof of the thinking of Hanoi Tower problem
Cron expression (seven subexpressions)
项目总结笔记系列 wsTax KT Session2 代码分析
The art of communication III: Listening between people
《增长黑客》阅读笔记
idea设置打开文件窗口个数
无密码身份验证如何保障用户隐私安全?
Solve the grpc connection problem. Dial succeeds with transientfailure
XML解析
分类TAB商品流多目标排序模型的演进
Implementation of array hash function in PHP
解决访问国外公共静态资源速度慢的问题
How does redis implement multiple zones?
Solve the problem of slow access to foreign public static resources
MySQL 巨坑:update 更新慎用影响行数做判断!!!
Summary of thread and thread synchronization under window
7.2 daily study 4