当前位置:网站首页>ESP8266_ Access to the core suite of Baidu Internet of things and use mqtt protocol for communication
ESP8266_ Access to the core suite of Baidu Internet of things and use mqtt protocol for communication
2022-06-11 09:43:00 【Little tiger_ IOT】
1、 follow “ Quick start ” Quick start
1.1、 Operation process
Search Baidu AI Cloud , Registered account , Real name authentication ;
Get into “ product ”→“ The Internet of things ”→“ Internet of things core suite ”, There is an interface for creating instances , But I don't know how to use it ;
So first look at the document ,“ file ”→“ Internet of things core suite ”, Many descriptions about this , Operation guide 、 Development of guidelines 、API etc. ;
Find the information you need to know :
- “ The core concept ”, stay “ Internet of things core suite ” Some basic concepts used in ;
- “ System limitations ”, Yes MQTT Description of relevant limit values ;
- “ Quick start ”, Follow this section , Can Create a new instance , New equipment , Add the template , And through mqtt.fx 1.7.1 Subscribe and publish information ;
1.2、 Concepts learned during operation —— Templates
Add a template during the operation , What is a template ? Let's see what's in the template ?
Look at this interface , There are... In the template “ Subject name ”,“ describe ”,“ jurisdiction ”;
MQTT You need to publish and subscribe to topics , Naturally, you need to set the topic name , The template is used to set the topic name when adding devices ;
Templates test There are two default topic names 、 A new topic name :
- "$iot/{device Name}/msg": subscribe , The cloud sends messages to clients ;
- In the use of mqtt.fx When , Only this topic name can be used to subscribe to messages , You can't publish ;
- "$iot/{device Name}/events": Release , The client sends messages to the cloud ;
- In the use of mqtt.fx When , Only this topic name can be used to publish messages , Cannot subscribe to ;
- "$iot/{device Name}/user/both": subscribe 、 Release
- In the use of mqtt.fx When , You can use this topic name to subscribe to and publish messages ;

1.3、 Skills learned during operation —— user name 、 password
Although the user name and key are available when creating the device , But this is not a direct connection MQTT Username and password , To be encrypted , The following link is an online encryption calculator , The information to be entered can be found in the equipment details , And then click “ Get the current timestamp ”、“ Click calculate ” The following automatically generates .
however , Because I don't know much about MQTT, If you make a mistake, just disconnect , And you can't reconnect , The user name and password error will be displayed when reconnecting , You have to get the timestamp to generate a new user name and password , so much trouble , Then I found out The time stamp is filled in directly 0 The generated user name and password can also be established MQTT Connected , And it can be connected again after disconnection .
MQTT Connect information calculator - Baidu Tiangong IoT Core (bcebos.com)
1.4、 Problems encountered
mqtt.fx Use 1.7.1 edition
mqtt.fx 1.7.0 The version does have bug, It can be connected to the cloud , But I can't subscribe 、 Release the news , Please use 1.7.1 edition ;
Wrong topic name resulted in MQTT disconnect
At first, I thought the connection was unstable 、 perhaps mqtt.fx Version problem , After all, I just used 1.7.0 There are indeed bug Well , Actually, I don't know MQTT agreement , Therefore, the subject name is filled in incorrectly, resulting in , I also found it on the way 1.3 User name and password settings in , Specific examples are as follows ;
For example, the device name is "mqttfx", stay mqtt.fx After successfully connecting to :
stay subscribe Interface , You can subscribe to "$iot/mqttfx/user/both" and "$iot/mqttfx/msg", Other subscriptions will not take effect ( list ), No reaction ;
stay publish Interface , Can pass "$iot/mqttfx/events"、"$iot/mqttfx/user/both" To post news , Once the topic name is selected incorrectly, it will be disconnected immediately MQTT Connect ;

2、 Create two devices 、 Add rules , Realize two MQTT Client communication
2.1、 Briefly explain the idea
esp8266 Controlled equipment , Such as the courtesy lamp ;mqtt.fx It is a client that simulates the use of users , Like mobile phone. app The interface that can send the control light on and off .
from MQTT From the point of view of the agreement ,esp8266 and mqtt.fx All are MQTT client , Baidu AI Cloud is MQTT The server ;
esp8266 Message sent ,mqtt.fx You can receive ;
mqtt.fx Message sent ,esp8266 You can receive ;
So controlled devices and users , That is to say esp8266 and mqtt.fx Seems to be able to communicate directly , But not through cloud platform .
2.2、 Create two devices
Create two devices on the cloud , Corresponding ESP8266 and mqtt.fx, All are test Templates , That is, the topic is named "$iot/{device Name}/user/both", You can subscribe and publish ;

2.3、 Add rules
Even in the same instance , Different devices Can not be By subscribing to the same topic , To communicate , To add a rule ;
The rules , This is the configuration of data forwarding , Select data from the topic 1 Forward to topic 2;
I just created two devices , I began to think that devices can communicate directly under the same instance , Thinking about equipment “mqttfx” adopt "$iot/mqttfx/user/both" To post news , equipment “esp8266” Subscribe to topics "$iot/mqttfx/user/both", You can communicate , The actual test is not allowed .
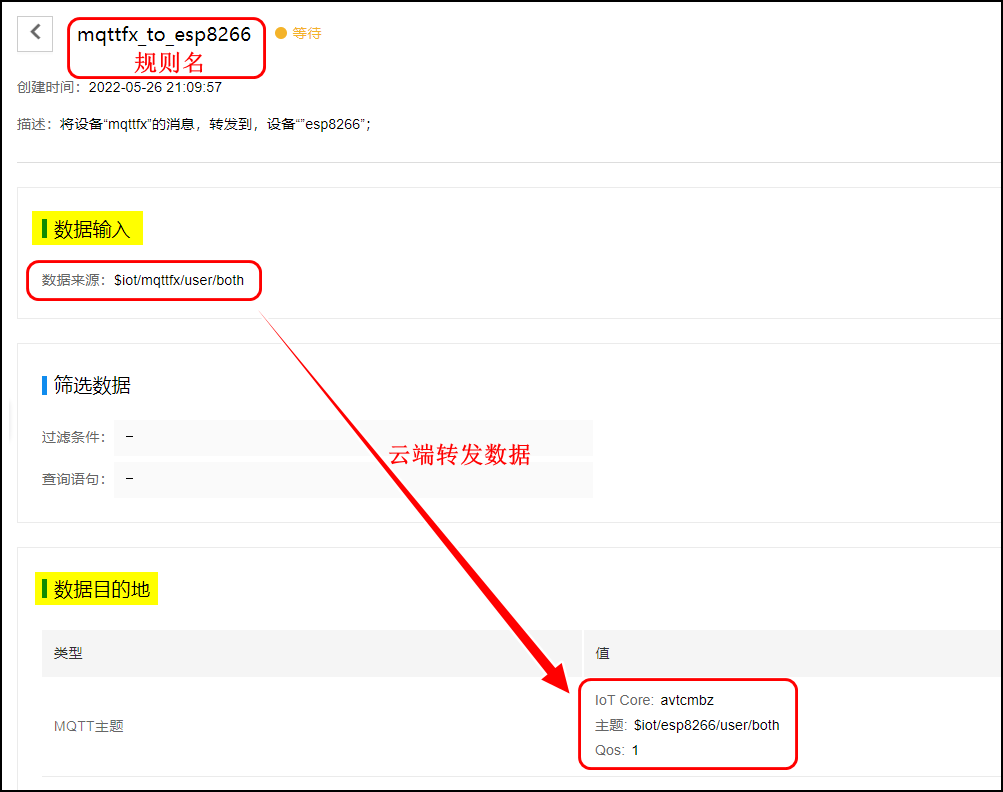
So we want the two devices to be able to communicate with each other , Two rules need to be set , A will device “mqttfx” Forward the message to the device “”esp8266”, The other will be the device ”esp8266” Forward the message to the device “mqttfx”;

Configure internal rules , Remember to enable
such as mqttfx_to_esp8266, Data source selection "$iot/mqttfx/user/both", Data destination selection "$iot/esp8266/user/both";
It can be mqttfx Through the theme "$iot/mqttfx/user/both" The published data is forwarded to "$iot/esp8266/user/both";
2.4、 Two MQTT Client communication
thus , It's ready to use mqtt.fx Simulation in two MQTT Data transmission between clients is realized , next step , That is, the devices in the cloud instance "esp8266" Replace the real ESP8266, Then still use mqtt.fx Impersonate another client .

3、ESP8266 Use MQTT Protocol communication
3.1、 The code migration
Originally intended to use routines directly , But I found it was not connected wifi, Print all the time "no 402 found, reconnect after 1s", So the replacement of what was written before can be connected wifi Code for , And temporarily comment out the rest of the routine , Not yet. , After a long time, I finally gave up using routines directly , Instead, all the code required by the routine is ported to the previous engineering framework , There was an episode about makefile Of , How to create a new folder to save source files and header files , I don't even care ..... Now we have to go back to the configuration makefile Knowledge of , What you haven't learned is a pit , If you don't fill it in, you will fall in sooner or later .
3.1.1、 stay app Under the folder , New subfolders modules and mqtt, And add .c The documents are as follows

3.1.2、 stay app/include Under the folder , New subfolders modules and mqtt, And add .h The documents are as follows
I put mqtt_config.h Also on the app/include/mqtt I'm off , Because it's all mqtt Related configuration , I want to put them together ;

3.1.3、 Copy app/user Under the Makefile, Paste the app/modules and app/mqtt Under the table of contents

3.1.4、 modify app/modules/Makefile and app/mqtt/Makefile, Replace with libxxx.a

3.1.5、 modify app/Makefile, Yes 3 It's about , Indicate the location of the new source file and header file , also .a Static library

3.1.6、 Copy user_main.c The content of
P.S. Because... Notice user_rf_cal_sector_set The content of is inconsistent with the previous , And this function is related to MQTT It is not relevant, so this function is not copied , It should be OK to copy it , But I haven't tried it myself, so here are the notes ;
This is the end of the migration , To sum up , Just copy mqtt and modules Source file and header file under , as well as user_main.c
3.2、 To configure mqtt_config.h
Where I make mosaics , It should be modified according to the content actually applied by Baidu AI Cloud ;

3.3、 modify user_main.c The topic to publish and subscribe to in is named "$iot/esp8266/user/both"

3.4、 Turn on debug.h Print in
I found this problem after downloading it ,debug.h It is not enabled by default INFO, So in the program INFO The printed information will not be displayed , Remember to add the following macro definitions :
#define GLOBAL_DEBUG_ON3.4、 compile 、 download , verification
open mqtt.fx, Put the device "mqttfx" Connect to the cloud , subscribe "$iot/mqttfx/user/both";
Reset esp8266, equipment "esp8266" Connect to the cloud , Sent "ESP8266_Online", Can be found in mqttfx You can receive , Again because "$iot/esp8266/user/both" The permission of is both publish and subscribe , therefore esp8266 I also received "ESP8266_Online";

equipment "mqttfx" In the theme "$iot/mqttfx/user/both" Next send "LED_ON", equipment "esp8266" Received subject "$iot/esp8266/user/both" Of "LED_ON", And the light is on ;
Empathy , send out "LED_OFF",esp8266 The light goes out ;

边栏推荐
- 【Objective-C】动态创建控件
- Flask (VIII) - form processing
- ESP8266_ SmartConfig
- Slice of go language foundation
- A summary of the problem type and method for proving the limit of sequence in postgraduate entrance examination
- The ins-30131 installer failed to verify the required initial settings
- 2161. divide the array according to the given number
- Use of MSF evaluation module
- Flask (II) - route
- About prototype and prototype chain
猜你喜欢

Exclusive interview - dialogue on open source Zhai Jia: excellent open source projects should be seen by more people. I am honored to participate in them
affair

MSF adds back door to normal program
ESP8266_接入百度物联网核心套件、使用MQTT协议通信

Package details

The first TOF related data set available for deep learning: deep learning for confidence information in stereo and TOF data fusion (iccv 2017)

New feature in ES6 -- arrow function
一万字彻底学会堆和二叉树

Method (common method), method execution memory analysis, method overloading mechanism, method recursion

CVPR 2021: learning continuous image representation with local implicit image function
随机推荐
POJ3250「Bad Hair Day」
Flask (IV) -- URL construction
Oracle XDB組件的重建
Device = depthai Device(““, False) TypeError: _init_(): incompatible constructor arguments.
Interview question 17.10 Main elements
ESP8266_ Connect to Alibaba cloud through mqtt protocol
Slice of go language foundation
Where is it safer to open an account for soda ash futures? How much does it cost to buy at least one hand?
Error [detectionnetwork (1)][warning]network compiled for 6 shapes, maximum available 10, compiling for 5 S
js中关键字this的理解
ESP8266_通过MQTT协议连接阿里云
affair
js基础--运算符
【音视频】SEI简介
Day44 database
ESP8266_SmartConfig
About prototype and prototype chain
Detailed explanation of this and static
Document object
Reconstruction des composants Oracle XDB