当前位置:网站首页>Sil/pil test of matlab code generation
Sil/pil test of matlab code generation
2022-07-02 09:55:00 【Quikk】
Matlab Code generation SIL/PIL test
One 、SIL And PIL Testing process
1.SIL(Software in the Loop), Use SIL Can be in PC End test generated code . PIL(Processor in the Loop), Use PIL It can be used in the actual target hardware or instruction set simulator Run the source code on to test .
Test standard : take PIL(SIL) The results were compared with the normal model test results contrast , You can get the execution effect of the generated code .
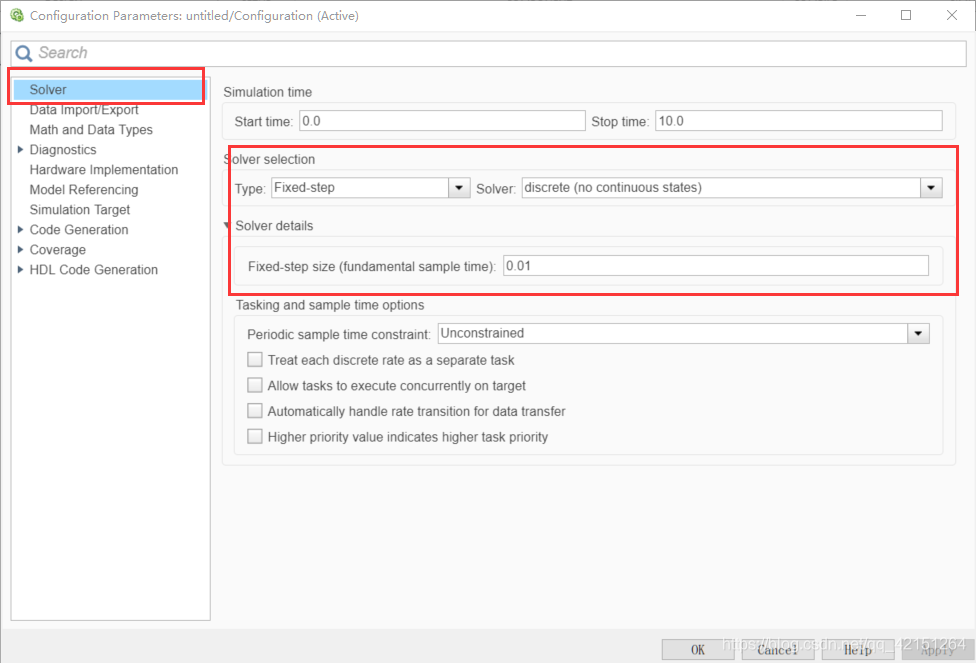
2. Configuration and PC Direct connection parameters of the end
Two 、Top Model Of SIL/PIL Simulation
characteristic :
1. You can directly use an independent code interface for testing
2. Models can be configured from Workspace Load test vector and excitation input
3. Conveniently in Top model、Normal、SIL、PIL Switch between
The official link : The official link 1
stay matlab command window Enter the following command :
model='rtwdemo_sil_topmodel';
close_system(model,0)    // Close without saving
open_system(model)		// open model
After the Simulink Open the following model :
stay matlab command window Enter the following command :
set_param(gcs, 'RecordCoverage','off');                            /* Close the model coverage record */
coverageSettings = get_param(model, 'CodeCoverageSettings');
coverageSettings.CoverageTool='None';							   /* Turn off code coverage logging */
set_param(model, 'CodeCoverageSettings',coverageSettings);
set_param(model, 'CodeExecutionProfiling','off');				  /* Turn off execution time analysis */
[ticks_to_count, reset, counter_mode, count_enable] = ...
rtwdemo_sil_topmodel_data(T); /* Set input parameters */
set_param(model, 'LoadExternalInput','on');
set_param(model, 'ExternalInput','ticks_to_count, reset, counter_mode, count_enable');
set_param(model, 'SignalLogging', 'on');
set_param(model, 'SignalLoggingName', 'logsOut'); /* Set related parameters */
set_param(model,'SimulationMode','normal')
[~, ~, yout_normal] = sim(model,10); /* function normal Model ( The results are stored in yout_normal)*/
set_param(model,'SimulationMode','Software-in-the-Loop (SIL)')
[~, ~, yout_sil] = sim(model,10); /* function SIL Model ( The results are stored in yout_sil)*/
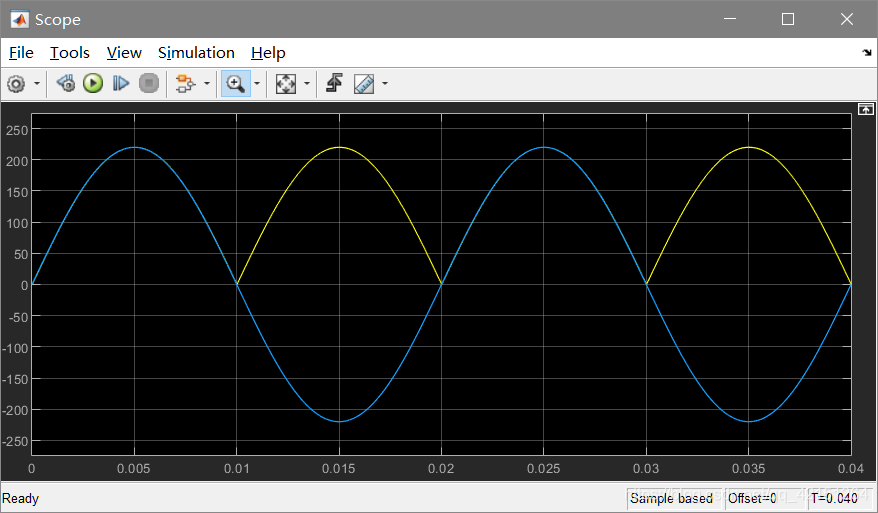
fig1 = figure;
subplot(3,1,1), plot(yout_normal), title('Counter Output for Normal Simulation')
subplot(3,1,2), plot(yout_sil), title('Counter Output for SIL Simulation')
subplot(3,1,3), plot(yout_normal-yout_sil), ...
title('Difference Between Normal and SIL'); /* The plot , Watch the difference */
Relevant settings in the model :

The execution of the whole model is , Input control parameters from the outside and execute , Then contrast SIL And normal Analyze the operation results under the model .
3、 ... and 、 Model based SIL(PIL) test
model='rtwdemo_sil_modelblock';
open_system(model); /* Open model */
coverageSettings = get_param(model, 'CodeCoverageSettings');
coverageSettings.CoverageTool='None';
set_param(model, 'CodeCoverageSettings',coverageSettings);
open_system('rtwdemo_sil_modelblock')
set_param('rtwdemo_sil_modelblock', 'CodeExecutionProfiling','off');
open_system('rtwdemo_sil_counter')
set_param('rtwdemo_sil_counter', 'CodeExecutionProfiling','off');
currentFolder=pwd;
save_system('rtwdemo_sil_counter', fullfile(currentFolder,'rtwdemo_sil_counter.slx'))
/* Turn off code coverage 、 Execution time analysis */
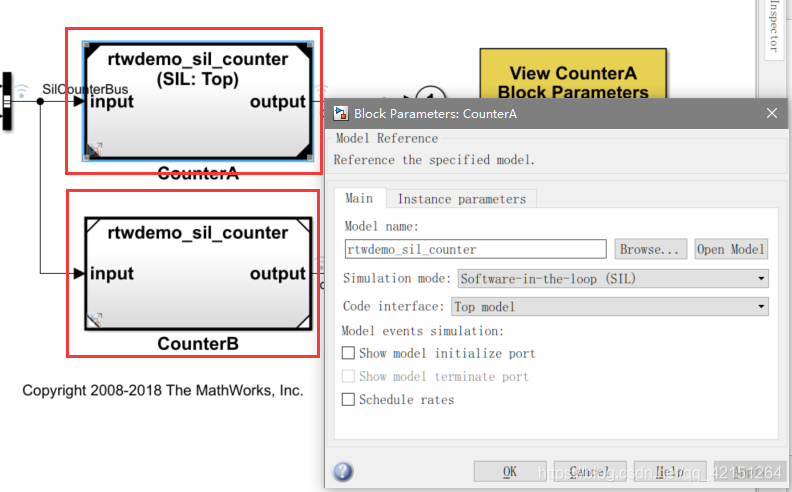
set_param([model '/CounterA'], 'CodeInterface', 'Top model'); /* Set the operation mode of the model */
out = sim(model,20); /* Began to run */
yout = find(out,'logsOut');
yout_sil = yout.get('counterA').Values.Data;
yout_normal = yout.get('counterB').Values.Data;
fig1 = figure;
subplot(3,1,1), plot(yout_normal), title('Counter Output for Normal Simulation')
subplot(3,1,2), ...
    plot(yout_sil), title('Counter Output for Model Block SIL (Top-Model) Simulation')
subplot(3,1,3), plot(yout_normal-yout_sil), ...
    title('Difference Between Normal and SIL');                   /* Draw a chart for analysis */
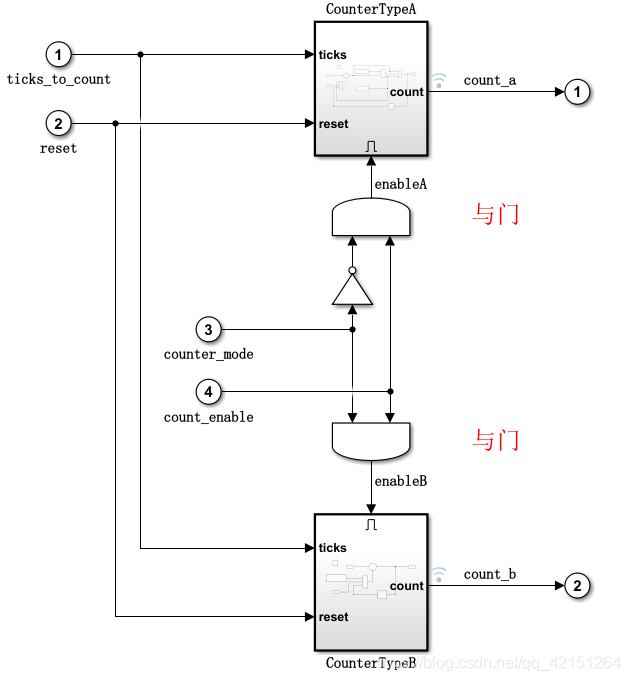
This mode is normal and SIL(PIL) They are encapsulated into a test module and executed at the same time ( As shown in figure of CounterA And CounterB), Compare the results after implementation .
Four 、 be based on SIL(PIL) Control module test
model='rtwdemo_sil_block';
close_system(model,0)
open_system(model)                  /* Open model */

out = sim(model,10);
yout_normal = find(out,'yout');
clear out                          /* Startup model */   Here is normal Simulation of the model

set_param(model,'CreateSILPILBlock','SIL');
close_system('untitled',0);
rtwbuild([model '/Controller'])

controllerBlock = [model '/Controller'];
blockPosition = get_param(controllerBlock,'Position');
delete_block(controllerBlock);
add_block('untitled/Controller',[controllerBlock '(SIL)'],...
          'Position', blockPosition);
close_system('untitled',0);
clear controllerBlock blockPosition
Then a new model Build box :
controllerBlock = [model '/Controller'];
blockPosition = get_param(controllerBlock,'Position');
delete_block(controllerBlock); // Delete the module in the original model
add_block('untitled/Controller',[controllerBlock '(SIL)'],... // The generated Model Replace the module in the original model
'Position', blockPosition);
close_system('untitled',0);
clear controllerBlock blockPosition
out = sim(model,10); // Start the simulation
machine_precision = eps(single(yout_normal));
tolerance = 4 * machine_precision; // Set the simulation tolerance
yout_sil = find(out,'yout');
tout = find(out,'tout');
fig1 = figure;
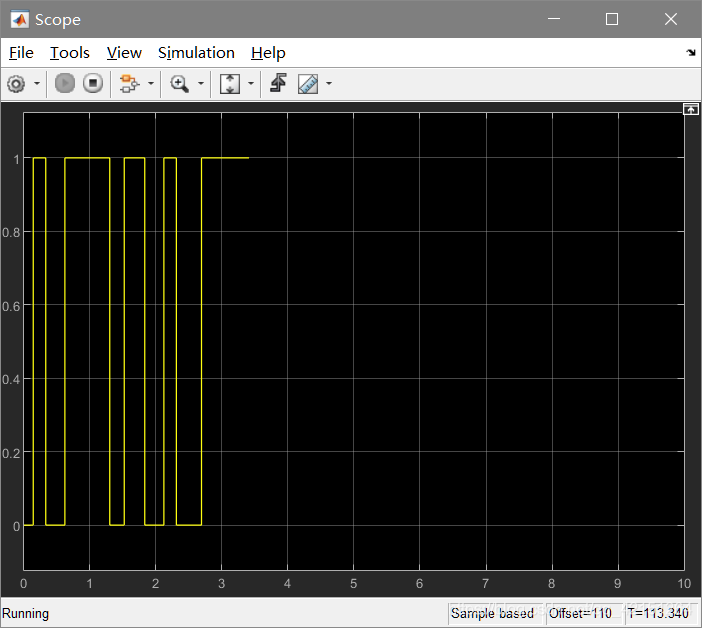
subplot(3,1,1), plot(yout_normal), title('Controller Output for Normal Simulation')
subplot(3,1,2), plot(yout_sil), title('Controller Output for SIL Simulation')
subplot(3,1,3), plot(tout,abs(yout_normal-yout_sil),'g-', tout,tolerance,'r-'), ...
title('Normal and SIL Difference and Error Tolerance'); // The plot
close_system(model,0);
if ishandle(fig1), close(fig1), end
clear fig1
simResults={'out','yout_sil','yout_normal','tout','machine_precision'};
save([model '_results'],simResults{:});
clear(simResults{:},'simResults') // Close image
5、 ... and 、 summary
PIL Testing , You can verify the test generated code .C2000 The test of is similar to the above , The specific description link is as follows : The official link
边栏推荐
- Alibaba /热门json解析开源项目 fastjson2
- Read 30 minutes before going to bed every day_ day4_ Files
- Operation and application of stack and queue
- 【UE5】动画重定向:如何将幻塔人物导入进游戏玩耍
- 2837xd代码生成模块学习(4)——idle_task、Simulink Coder
- tinyxml2 读取和修改文件
- Read Day6 30 minutes before going to bed every day_ Day6_ Date_ Calendar_ LocalDate_ TimeStamp_ LocalTime
- 【UE5】蓝图制作简单地雷教程
- QT信号槽总结-connect函数错误用法
- 在SQL注入中,为什么union联合查询,id必须等于0
猜你喜欢
2837xd代码生成模块学习(1)——GPIO模块
2837xd code generation - stateflow (1)
2837xd code generation - stateflow (2)

Kinect DK obtains color RGB images in cv:: mat format (used in openpose)
2837xd code generation module learning (4) -- idle_ task、Simulink Coder
【UE5】蓝图制作简单地雷教程

在SQL注入中,为什么union联合查询,id必须等于0

个人经历&&博客现状
2837xd Code Generation - Supplement (1)
滲透測試的介紹和防範
随机推荐
三相并网逆变器PI控制——离网模式
Data insertion in C language
2837xd 代碼生成——StateFlow(4)
三相逆变器离网控制——PR控制
2837xd 代码生成——补充(2)
每天睡前30分钟阅读Day6_Day6_Date_Calendar_LocalDate_TimeStamp_LocalTime
图像识别-数据清洗
Required request body is missing: (cross domain problem)
渗透测试的介绍和防范
2837xd代码生成模块学习(3)——IIC、eCAN、SCI、Watchdog、eCAP模块
Attack and defense world web advanced area unserialize3
How to use PHP spoole to implement millisecond scheduled tasks
每天睡觉前30分钟阅读_day3_Files
道阻且长,行则将至
Bold prediction: it will become the core player of 5g
In SQL injection, why must the ID of union joint query be equal to 0
QT信号槽总结-connect函数错误用法
ESLint 报错
个人经历&&博客现状
C语言之数据插入