当前位置:网站首页>Yolov4 target detection backbone
Yolov4 target detection backbone
2022-07-05 08:36:00 【Chengxin】
YOLOv4 Code explanation notes -Backbone
- Backbone
- Definition of activation function --Mish
- Definition of global variables
- Definition of convolution module --CBM
- Definition of small residual module --Resunit
- Definition of large residual module --CSP1
- Definition of large residual module -CSPx
- CSPDarknet53 The network structures,
- Initialization and loading of weights
- Build the model and its return value
- ****YOLOv4 The overall network structure is shown in the figure :****
Backbone
Definition of activation function –Mish
import math
import torch
import torch.nn as nn
import numpy as np
import torch.nn.functional as F
from model.layers.attention_layers import SEModule, CBAM
import config.yolov4_config as cfg

class Mish(nn.Module):
	def __init__(self):
		super(Mish, self).__init__()
	def forward(self, x):
		return x*torch.tanh(F.softplus(x))
This part defines the one we are in yolov4 An activation function to be used in Mish(), This activation function will appear in each convolution module .
Mish The advantages of activation functions :
There are no boundaries ( That is, a positive value can reach any height ) Avoid saturation due to capping . Theoretically, a slight allowance for negative values allows for better gradient flow , Not like it ReLU A hard zero boundary like in , And the smooth activation function allows better information to go deep into the neural network , So as to get better accuracy and generalization .
Various activation functions can refer to the great God bubbliiiing This blog of : Various activation functions Activation Functions Introduction and analysis of advantages and disadvantages
Definition of global variables
norm_name = {
    "bn":nn.BatchNorm2d}
activate_name = {

	"relu":nn.ReLU,
	"leaky":nn.LeakyReLU,
	"linear":nn.Identity,
	"mish":Mish(),
}
Here we mainly define global variables , In the form of a dictionary , It is convenient for us to call all kinds of torch.nn Various tool functions , Increased code readability .
Definition of convolution module –CBM
class Convolutional(nn.Module):
	def __init__(
		self,
		filters_in,
		filters_out,
		kernel_size,
		stride=1,
		norm="bn",
		activate="mish",
	):
		super(Convolutional, self).__init__()
		self.norm = norm
		self.activate = activate
		self.__conv = nn.Conv2d(
			in_channels = filters_in,
			out_channels = filters_out,
			kernel_size = kernel_size,
			stride = stride,
			padding = kernel_size//2,
			bias = not norm,
		)
		if norm:
			assert norm in norm_name.keys
			if norm == "bn":
				self.__norm = norm_name[norm](num_features=filters_out)
		if activate:
			assert activate in activate_name.keys()
			if activate == "leaky":
				self.__activate = activate = activate_name[activate](
					negative_slope = 0.1, inplace=True
				)
			if activate == "relu":
				self.__activate = activate_name[activate](inplace=True)
			if activate == "mish":
				self._-activate = activate_name[activate]
	def forward(self, x):
		x = self.__conv(x)
		if self.norm:
			x = self.__norm(x)
		if self.activate:
			x = self.__activate(x)
		return x
In this part , We have mainly completed one CBM A definition of convolution module , It involves a convolution operation , once BatchNorm Operation sum once Mish Activate function operation . The sequence is as shown in this code , In the forward function , Contraformal parameter x First convolution, then bn Algorithm again Mish Activate .
In code padding=kernel_size//2 It's a way of rounding down , The purpose is to keep the size of the characteristic image under different convolution kernel sizes consistent (ps:padding The premise of this value taking method is stride=1)
Three activation functions are involved in the code , Include leaky,relu, as well as mish, stay YOLOv4 What we use in this project is mish.
In code bias=not norm It should mean when BN When the algorithm , No offset operation , If not deliberately set , The default is true. stay YOLOv4 In, we adopt BN Algorithm , therefore norm Set to ture,if The judgment statement will choose to BN Algorithm assignment norm, So that later calls . The visualization is shown in the figure :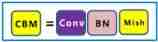
Definition of small residual module –Resunit
class CSPBlock(nn.Module):
	def __init__(
		self,
		in_channels,
		out_channels,
		hidden_channels = None,
		residual_activation = "linear",
	):
		super(CSPBlock, self).__init__()
		if hidden_channels is None:
			hidden_channels = out_channels
		self.block = nn.Sequential(
			Convolutional(in_channels,hidden_channels, 1),
			Convolutional(hidden_channels,out_channels, 3),
		)
		self.activation = activate_name[residual_activation]
		self.attention = cfg.ATTENTION["TYPE"]
		if self.attention == "SEnet":
			self.attention_module = SEModule(out_channels)
		elif self.attention == "CBAM":
			self.attention_module = CBAM(out_channels)
		elif
			self.attention == None
	def forward(self, x):
		residual = x
		out = self.block(x)
		if self.attention is not None:
			out = self.attention_module(out)
		out += residual
		return out
In this part of the code , The residual module is defined Resunit, This module consists of two CBM A small module and a residual edge . Two of them CBM The small network composed of modules is defined in self.block in , The size of one convolution kernel is 1, The size of a convolution kernel is 3. Then define a self.activation There is no call in the code , My understanding is that the activation function of the residual edge is assigned to self.activation, The activation function is key by “linear” The activation function of , Find the global variables defined above , The corresponding activation function is nn.Identity(), The activation function knows , Its role in the network is only to increase the number of layers , There is no other operation on our input , It can be understood as the function of a bridge , therefore key The name is linear, That is, linear mapping . Because there is no substantive role , Therefore, the author does not appear where the call is in the following code ( Maybe it called , It's just that I didn't find ~~doge). Where did you get to , Now we have defined Resunit Convolution edge of , Then the following three attention algorithms , Three usage scenarios are defined :SEnet,CBAM and None( What kind of attention mechanism is used , Depends on the settings in the configuration file , stay config In file ). The specific attention mechanism is YOLO The role of the algorithm , Check out this blog :SEnet,CBAM. All in all , Brief overview , Attention mechanism can effectively improve the accuracy of image classification and target detection . Keep looking down , Come to the forward function section , This part can be clearly seen , The input has passed the above definition self.block Convolution network and attention Algorithm ( If any ), Get the output out, Then define our input as residual( Residual strength , stay YOLO Medium is the residual edge ),add What I got in front of me out On , Get the final output . Come here , Our residual module Resunit Just define it ~. Network visualization is shown in the figure :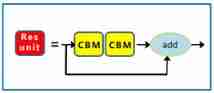
Definition of large residual module –CSP1
class CSPFirstStage(nn.Module):
	def __init__(self, in_channels, out_channels):
		super(CSPFirstStage, self).__init__()
		self.downsample_conv = Convolutional(in_channels, out_channels, 3, stride=2)
		self.split_conv0 = Convolutional(out_channels, out_channels, 1)
		self.split_conv1 = Convolutional(out_channels, out_channels, 1)
		self.blocks_conv = nn.Sequential(
			CSPBlock(out_channels, out_channels, in_channels),
			Convolutiona(out_channels, out_channels, 1),
		)
		self.concat_conv = Convolutional(out_channels * 2, out_channels, 1)

	def forward(self, x):
		x = self.downsample_conv(x)
		x0 = self.split_conv0(x)
		x1 = self.split_conv1(x)
		x1 = self.block_conv(x1)
		x = torch.cat([x0, x1], dim = 1)
		x = self.concat_conv(x)
		return x
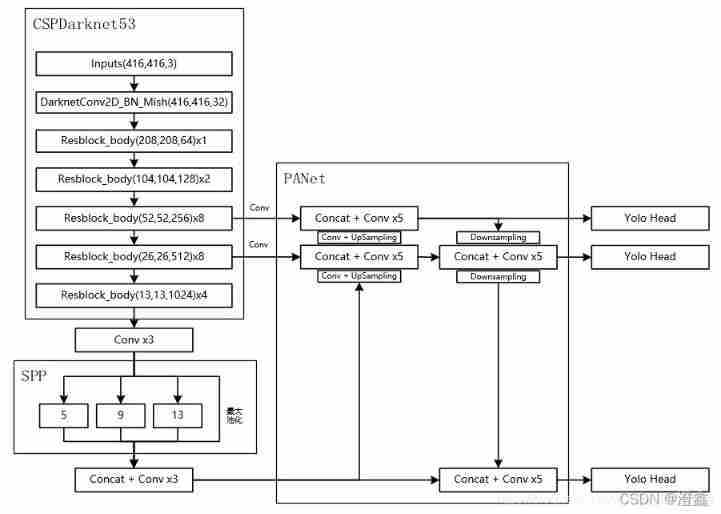
In this part , We define a large residual module . The small residual module defined above will be an important part of this large residual module ( You can view the details YOLOv4 Frame diagram after network visualization ). Now? , Start to explain this part of the code ~. First of all, according to the YOLOv4 We can clearly find the network framework of , Whenever our input passes through a large residual module , Will be downsampled once , That is, the size of the output feature map becomes that of the input feature map 1/2, Therefore, a de sampled CBM, Then in order to distinguish the input , We defined two CBM, The output leads to different branches , A path to the small residual module , One leads to the residual side . There is also a small residual module in the line of small residual module CSP And a convolution module CBM, So it defines self.blocks_conv To build this network .
Then according to the forward function, we can see , First on the trunk , It is also the only way for input. There is a downsampling CBM Convolution module , Then the output is divided into two branches , A network structure with small residual modules , A residual edge passing through the large residual module , According to the self.concat_conv The function superimposes the outputs of the two branches on the dimension . The large residual network defined in this part is CSPDarknet53 The first piece of the network , There is only one Resunit Component's CSP. The visualization of this part of the code is shown in the figure :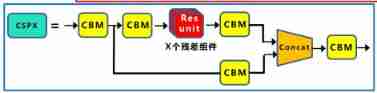
Definition of large residual module -CSPx
class CSPStage(nn.Module):
	def __init__(self, in_channels, out_channels, num_blocks):
		super(CSPStage, self).__init__()

		self.downsample_conv = Convolutional(
			in_channels, out_channels, 3, stride = 2
		)

		self.split_conv0 = Convolutional(out_channels, out_channels//2, 1)
		self.split_conv1 = Convolutional(out_channels, out_channels//2, 1)
		self.blocks_conv = nn.Sequential(
			*[
				CSPBlock(out_channels//2 , out_channels//2)
				for _ in range(num_blocks)
			],
			Convolutional(out_channels//2, out_channels//2, 1)
		)
		self.concat_conv = Convolutional(out_channels, out_channels, 1)

	def forward(self, x):
		x = self.downsample_conv(x)
		x0 = self.split0_conv0(x)
		x1 = self.split1_conv1(x)

		x1 = self.blocks_conv(x1)
		x = torch.cat([x0, x1], dim = 1)
		x = self.concat_conv(x)

		return x
This part of the code is the same as the previous CSP1 The code of is basically similar , The only difference is what is called in the large residual module defined here Resunit The number of components can be customized , That is, there is one more variable in this class , namely num_blocks. Another difference is , In order to ensure that concat after , The number of channels of the characteristic graph remains unchanged , So here before the last stack , The number of channels output by the convolution module of the previous times is changed into out_channels//2, So at the end of the stack , Both input and output are channels , This is different from CSPFirstStage Last of all (out_channels * 2, out_channels).
CSPDarknet53 The network structures,
That's all YOLOv4 Backbone network we need to define all the modules , Then it officially began to build blocks CSPDarknet53 Build it up !!
class CSPDarknet53(nn.Module):
	def __init__(
		self,
		stem_channels = 32,
		feature_channels = [64, 128, 256, 512, 1024],
		num_features = 3,
		weight_path = None,
		resume = False,
	):
		super(CSPDarknet53, self).__init__()

		self.stem_conv = Convolutional(3, stem_channels, 3)
		self.stages = nn.ModuleList(
			[
				CSPFirststage(stem_channels, feature_channels[0]),
				CSPStage(feature_channels[0], feature_channels[1], 2),
				CSPStage(feature_channels[1], feature_channels[2], 8),
				CSPStage(feature_channels[2], feature_channels[3], 8),
				CSPStage(feature_channels[3], feature_channels[4], 4),
			]
		)
		self.feature_channels = feature_channels
		self.num_features = num_features

		if weight_path and not resume:
			self.load_CSPdarknet_weights(weight_path)
		else:
			self._initialize_weights()

	def forward(self, x):
		x = self.stem_conv(x)
		features = []
		for stage in self.stage:
			x = stage(x)
			features.append(x)

		return feature[-self.num_features:]
stay self.stages in , We use it nn.ModuleList() To build our network , among CSPStage The third parameter of the method is represented in the large residual module ,Resunit Number of components . stay forward in , Build a feature list , And use a loop , To traverse the network we build self.stages, This is also the use of nn.ModuleList() Methods to build the benefits of the network . Then we can put these five csp The output of the component is append Enter this empty list , The last thing to come back is feature[-self.num_features:], and self.num_features Already defined as 3,. So why only need to return the last three feature outputs of the list , Here we can find out from the following figure , Enter after entering the network , Only those three outputs are really transmitted to the next network structure , It's from csp8,csp8,csp4 Outgoing output , This is why we return to the last three features of the list . According to the network structure, we know , Input will first encounter a CBM Convolution module , namely self.stem_conv(). Input is 3 Because the input image at the beginning is a color image , Yes rgb Pixel value of three channels , Then our output needs to become 32 Characteristic diagram of the channel , Finish this step , It's just that the number of channels has increased , The size of the feature drawing is still the size of the original drawing ( You can see the visualization of the whole network ). It follows that , One at a time csp When the module , There will be a downsampling operation and a feature map stacking operation , So the corresponding , The output characteristic graph is Enter 1/2, And the number of channels will become input 2 times .CSPDarknet53 Pictured :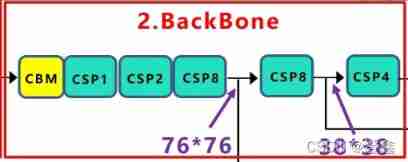
Initialization and loading of weights
    def _initialize_weights(self):
        print("**" * 10, "Initing CSPDarknet53 weights", "**" * 10)

        for m in self.modules():
            if isinstance(m, nn.Conv2d):
                n = m.kernel_size[0] * m.kernel_size[1] * m.out_channels
                m.weight.data.normal_(0, math.sqrt(2.0 / n))
                if m.bias is not None:
                    m.bias.data.zero_()

                print("initing {}".format(m))
            elif isinstance(m, nn.BatchNorm2d):
                m.weight.data.fill_(1)
                m.bias.data.zero_()

                print("initing {}".format(m))

    def load_CSPdarknet_weights(self, weight_file, cutoff=52):
        "https://github.com/ultralytics/yolov3/blob/master/models.py"

        print("load darknet weights : ", weight_file)

        with open(weight_file, "rb") as f:
            _ = np.fromfile(f, dtype=np.int32, count=5)
            weights = np.fromfile(f, dtype=np.float32)
        count = 0
        ptr = 0
        for m in self.modules():
            if isinstance(m, Convolutional):
                # only initing backbone conv's weights
                # if count == cutoff:
                # break
                # count += 1

                conv_layer = m._Convolutional__conv
                if m.norm == "bn":
                    # Load BN bias, weights, running mean and running variance
                    bn_layer = m._Convolutional__norm
                    num_b = bn_layer.bias.numel()  # Number of biases
                    # Bias
                    bn_b = torch.from_numpy(weights[ptr : ptr + num_b]).view_as(
                        bn_layer.bias.data
                    )
                    bn_layer.bias.data.copy_(bn_b)
                    ptr += num_b
                    # Weight
                    bn_w = torch.from_numpy(weights[ptr : ptr + num_b]).view_as(
                        bn_layer.weight.data
                    )
                    bn_layer.weight.data.copy_(bn_w)
                    ptr += num_b
                    # Running Mean
                    bn_rm = torch.from_numpy(
                        weights[ptr : ptr + num_b]
                    ).view_as(bn_layer.running_mean)
                    bn_layer.running_mean.data.copy_(bn_rm)
                    ptr += num_b
                    # Running Var
                    bn_rv = torch.from_numpy(
                        weights[ptr : ptr + num_b]
                    ).view_as(bn_layer.running_var)
                    bn_layer.running_var.data.copy_(bn_rv)
                    ptr += num_b

                    print("loading weight {}".format(bn_layer))
                else:
                    # Load conv. bias
                    num_b = conv_layer.bias.numel()
                    conv_b = torch.from_numpy(
                        weights[ptr : ptr + num_b]
                    ).view_as(conv_layer.bias.data)
                    conv_layer.bias.data.copy_(conv_b)
                    ptr += num_b
                # Load conv. weights
                num_w = conv_layer.weight.numel()
                conv_w = torch.from_numpy(weights[ptr : ptr + num_w]).view_as(
                    conv_layer.weight.data
                )
                conv_layer.weight.data.copy_(conv_w)
                ptr += num_w

                print("loading weight {}".format(conv_layer))
Build the model and its return value
def _BuildCSPDarknet53(weight_path, resume):
    model = CSPDarknet53(weight_path=weight_path, resume=resume)

    return model, model.feature_channels[-3:]
Come here ,YOLOv4 The backbone network of is all defined , But this is just the beginning , There is more work to be done , At present, it is only the tip of the iceberg . Deep learning , A long way to go , To be continued ~
YOLOv4 The overall network structure is shown in the figure :
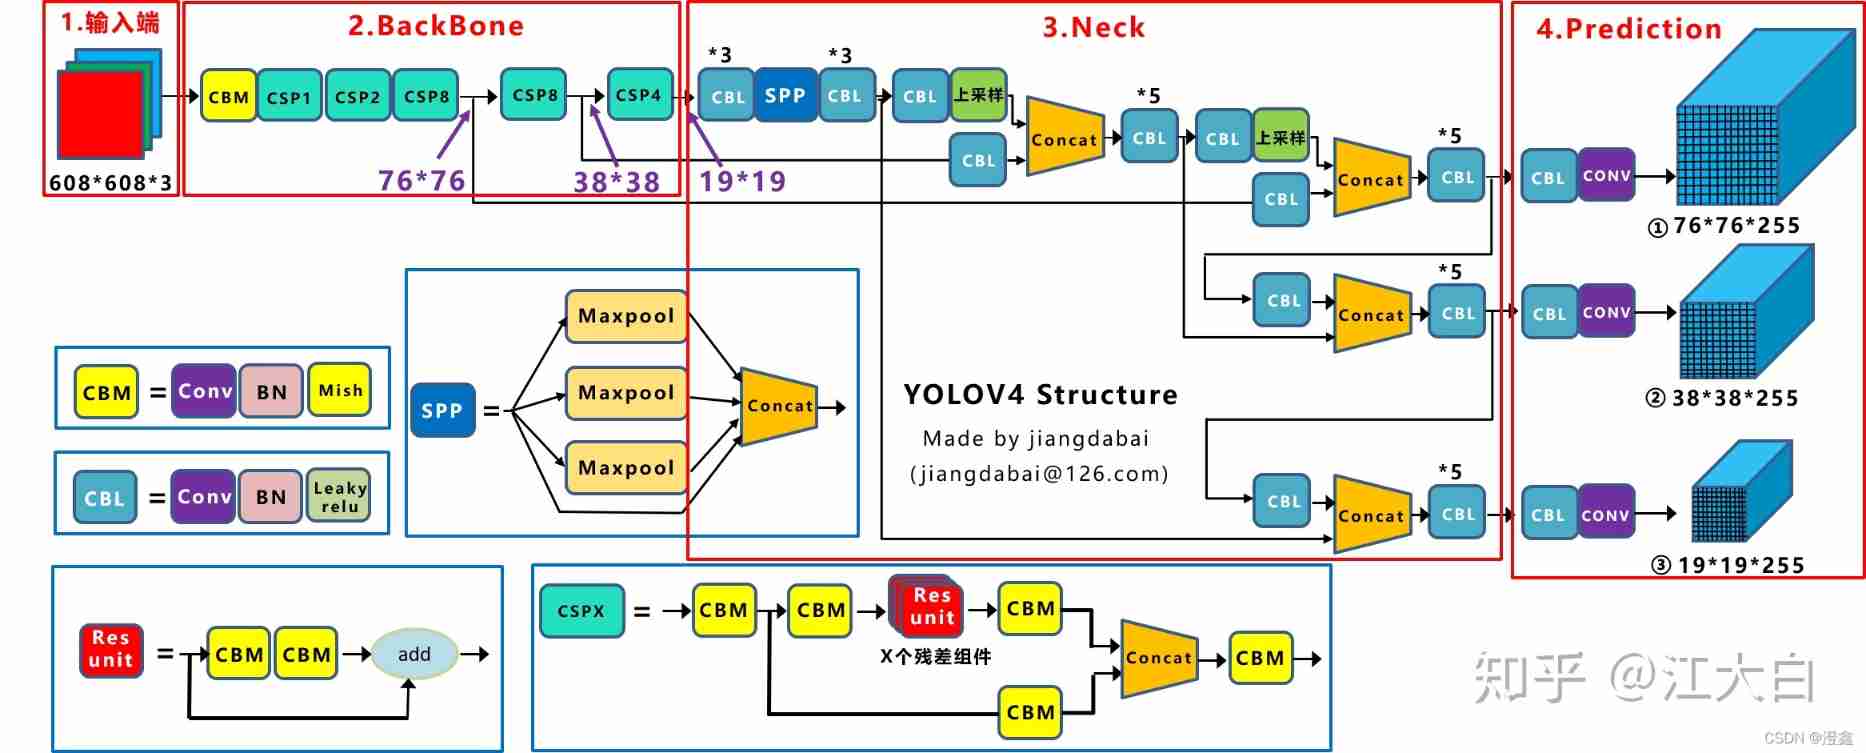
Here, the input image size is 408*408 For example .
边栏推荐
- 【三层架构】
- Count the number of inputs (C language)
- Agile project management of project management
- Esp8266 interrupt configuration
- QEMU STM32 vscode debugging environment configuration
- Esphone Feixun DC1 soft change access homeassstant
- 猜谜语啦(2)
- 319. 灯泡开关
- Cinq détails de conception du régulateur de tension linéaire
- Guess riddles (5)
猜你喜欢
MATLAB小技巧(28)模糊综合评价
STM32---IIC

Guess riddles (3)
STM32 --- serial port communication
DCDC circuit - function of bootstrap capacitor
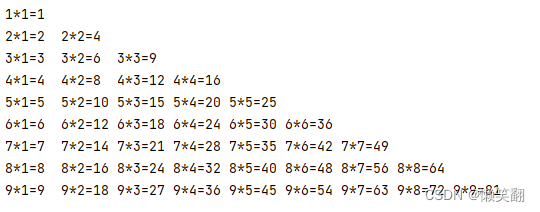
Example 008: 99 multiplication table

Explore the authentication mechanism of StarUML
Business modeling of software model | vision
MATLAB小技巧(28)模糊綜合評價
实例001:数字组合 有四个数字:1、2、3、4,能组成多少个互不相同且无重复数字的三位数?各是多少?
随机推荐
猜谜语啦(8)
Run菜单解析
2022.7.4-----leetcode. one thousand and two hundred
Several problems to be considered and solved in the design of multi tenant architecture
实例008:九九乘法表
TypeScript手把手教程,简单易懂
Esphone Feixun DC1 soft change access homeassstant
319. Bulb switch
Agile project management of project management
Example 002: the bonus paid by the "individual income tax calculation" enterprise is based on the profit commission. When the profit (I) is less than or equal to 100000 yuan, the bonus can be increase
Google sitemap files for rails Projects - Google sitemap files for rails projects
Detailed summary of FIO test hard disk performance parameters and examples (with source code)
实例001:数字组合 有四个数字:1、2、3、4,能组成多少个互不相同且无重复数字的三位数?各是多少?
Chapter 18 using work queue manager (1)
Cmder of win artifact
STM32 single chip microcomputer - bit band operation
go依赖注入--google开源库wire
实例007:copy 将一个列表的数据复制到另一个列表中。
An enterprise information integration system
第十八章 使用工作队列管理器(一)