当前位置:网站首页>Galera cluster of MariaDB - dual active and dual active installation settings
Galera cluster of MariaDB - dual active and dual active installation settings
2022-07-04 23:14:00 【Zuo Mingshui】
MariaDB Of Galera colony - Double main and double active installation settings
One 、Galera principle
1、 brief introduction
Galera Cluster for MySQL It is a set of multi master based on synchronous replication MySQL Clustering solutions , Easy to use , No single point of failure , High availability , It can ensure the security and expansion of data at any time when the business is growing .
2、Galera Main features of multi master model
Based on synchronous replication
Multi master server topology `
You can read and write on any node
Automatic removal of faulty nodes
Automatically add new nodes
Real row level concurrent replication
The client is connected to the operation unit MySQL The experience of database is consistent
3、 install Galera Precautions when
Galera Cluster is based on wsrep By agreement , So there is no need to configure in advance MySQL Asynchronous replication .
Cannot be installed at the same time MariaDB-Server and Galera-Server.
Use Galera The multi master model requires at least three nodes .
( Because of the installation Galera-server It will be replaced when mariadb-server; The three nodes are used to arbitrate out master)
4、 working principle 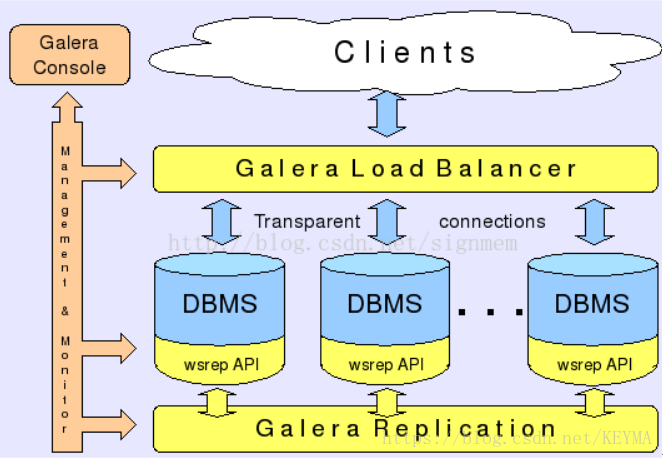
Mariadb It can be regarded as a common database , Responsible for connecting applications (web, API etc. ); pure mariadb Unable to synchronize data from multiple primary servers ; Data synchronization in multiple databases is controlled by wsrep Interface implementation ; ultimate objective , Implement multiple MySQL Read and write at the same time .
wsrep API
wsrep API Is a database plug-in interface , It is similar to an application , Mainly for write replication
This program is mainly used to define how the application calls the replication library to realize writeback
wsrep API Dynamically loaded by applications that support library changes
Global transaction ID(GTID)
wsrep API Describe the following replication model , An application , Such as an object currently in the database , Currently modified by the client , Object changes cause transactions to produce a series of atomic changes , All nodes in the cluster have the same object , And the synchronous replication applications have their own nodes , Generate the same changes in the same order to achieve data synchronization
In the end ,wsrep API A global transaction will be allocated ID The ID It has the following functions
Identify changes to objects
Identify the object itself ID Last state ( Under normal circumstances ,ID It is continuous )
GTID contain
One UUID As the identification of the object and the serial number of the experience change , Serial number will change continuously .
GTID Allow comparing application status , Establish the order of object changes , Decide whether changes to objects need to be updated GTID
Usually GTID It will be recorded in the following format
45eec521-2f34-11e0-0800-2a36050b826b:94530586304
Two 、 build yum Source , To configure yum The configuration file
0、 Operating environment
The system version used in this article is CentOS7.3
Be careful : This article closes selinux, as well as iptables.
1、 Using the Internet Yum The sources are as follows : If there is no exact version yum During installation, the corresponding small version upgrade of the installed database related software will appear .
vim /etc/yum.repos.d/mariadb.repo
[mariadb]
name = MariaDB
baseurl = http://yum.mariadb.org/5.5/centos7-amd64
gpgkey=https://yum.mariadb.org/RPM-GPG-KEY-MariaDB
gpgcheck=1
enabled=0
2、 If you can't connect to the Internet , You need to download the matching software package on the website according to the version of the database itself , Build local yum Source
a、 Corresponding address :
http://yum.mariadb.org/
b、 Turn on http service , Create the corresponding directory :
mkdir -v /var/www/html/mariadb/
mkdir -v /var/www/html/mariadb/repodata
mkdir -v /var/www/html/mariadb/rpms
ll /var/www/html/mariadb/
c、 The content to be downloaded is similar to Internet Correspondence on :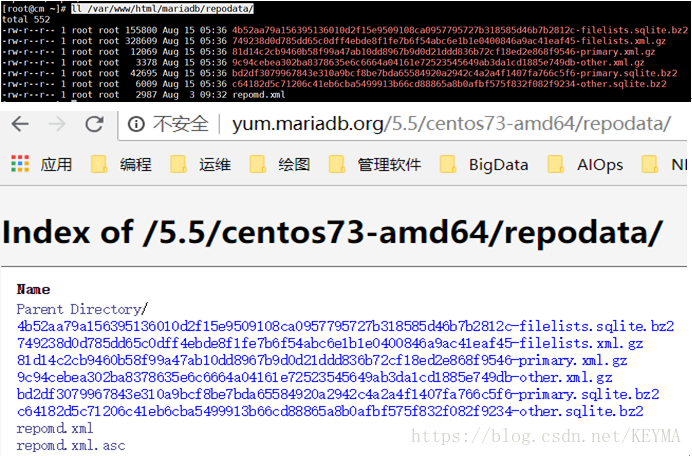
d、rpm Software comparison 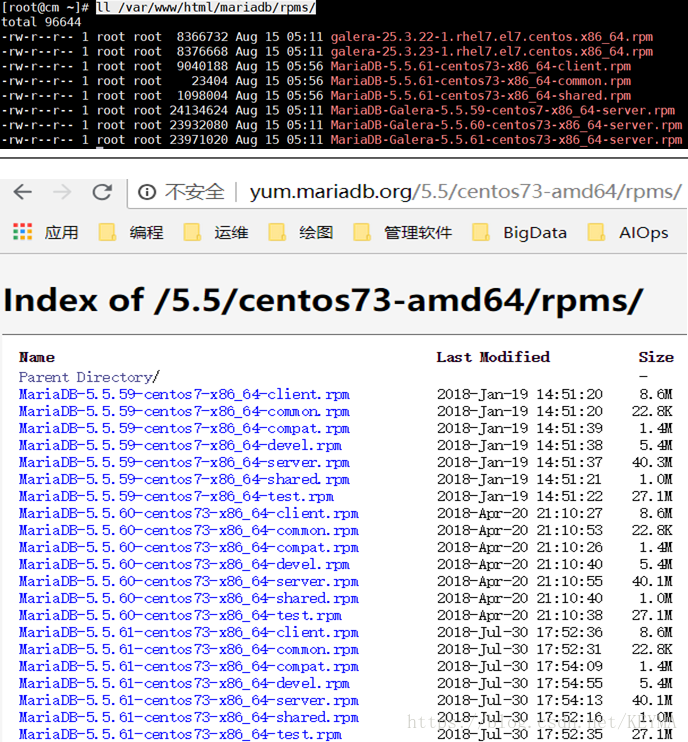
3、 ... and 、 install Galera Software
yum --enablerepo=mariadb -y install MariaDB-Galera-server
yum -y install rsync
1、yum During installation, the corresponding dependent software version will be found according to the software version
for example :
Install 3 Packages (+3 Dependent packages)
MariaDB-5.5.61-centos73-x86_64-client.rpm
MariaDB-5.5.61-centos73-x86_64-common.rpm
MariaDB-5.5.61-centos73-x86_64-shared.rpm
galera-25.3.23-1.rhel7.el7.centos.x86_64.rpm
MariaDB-Galera-server-5.5.61-centos73-x86_64-server.rpm
2、 The possible result is that there will be a certain small version upgrade of the database related software
Four 、Mariadb Master profile
1、 Edit the coordination file :
a、 When modifying the configuration file , Back up the configuration file first
cp /etc/my.cnf.d/server.cnf /etc/my.cnf.d/server.cnf.bak
b、 The screenshot of some contents of the original configuration file is as follows 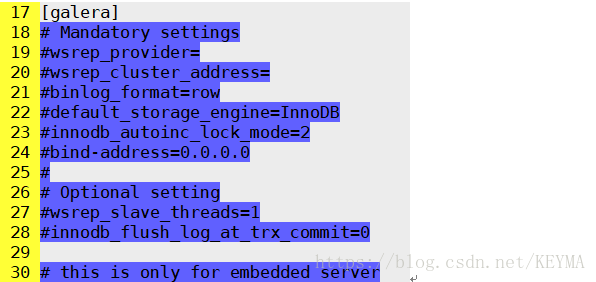
c、 Edit and configure the following
vim /etc/my.cnf.d/server.cnf
:set nu
19 That's ok : Specify who will complete data replication for data synchronization between databases
wsrep_provider=/usr/lib64/galera/libgalera_smm.so
20 That's ok : Specify all database nodes in the cluster , Use gcomm agreement
wsrep_cluster_address=“gcomm:// 192.168.244.163, 192.168.244.169”
21 That's ok : Refers to online redo logs , Just solve the comment directly
binlog_format=row
22 That's ok : Specify the database engine used
default_storage_engine=InnoDB
23 That's ok :
innodb_autoinc_lock_mode=2
24 That's ok : All network cards of this machine
bind-address=0.0.0.0
following 3 Configuration is a new addition !!
Specify cluster name :
wsrep_cluster_name=“test_cluster”
wsrep_node_address=“192.168.244.163” ( Appoint wsrep Node address , This refers to the current node )
wsrep_sst_method=rsync( The copy method is rsync, Be sure to install rsync)
d、 Then copy to other nodes
Put the corresponding real node wsrep_node_address Change the address to itself IP Address
cp /etc/my.cnf.d/server.cnf /etc/my.cnf.d/server.cnf.bak
scp 192.168.244.163:/etc/my.cnf.d/server.cnf /etc/my.cnf.d/server.cnf
e、 Configuration items of the final configuration file
14 #
15 # * Galera-related settings
16 #
17 [galera]
18 # Mandatory settings
19 wsrep_provider=/usr/lib64/galera/libgalera_smm.so
20 wsrep_cluster_address=“gcomm://192.168.244.163,192.168.244.169”
21 binlog_format=row
22 default_storage_engine=InnoDB
23 innodb_autoinc_lock_mode=2
24 bind-address=0.0.0.0
25 #
26 # Optional setting
27 #wsrep_slave_threads=1
28 #innodb_flush_log_at_trx_commit=0
29
30 # this is only for embedded server
31
32 #added the parts
33 wsrep_cluster_name=“test_cluster”
34 wsrep_node_address=“192.168.244.163”
35 wsrep_sst_method=rsync
f、 Screenshot of configuration items in the final configuration file 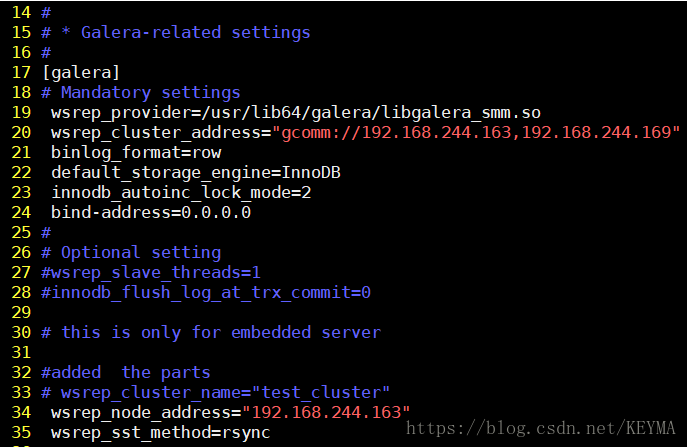
5、 ... and 、 Start at each node ( colony )
/etc/rc.d/init.d/mysql bootstrap
The startup effect is shown in the figure below :
/etc/rc.d/init.d/mysql status bootstrap
Check the startup status as shown below :
Or view ports :
netstat -ntl
6、 ... and 、 To configure MySQL The basic setting of is MySQL initialization
For the initial installation, you need to initialize on each database node ;
If the database is already in use , This operation is not required for this database node .
mysql_secure_installation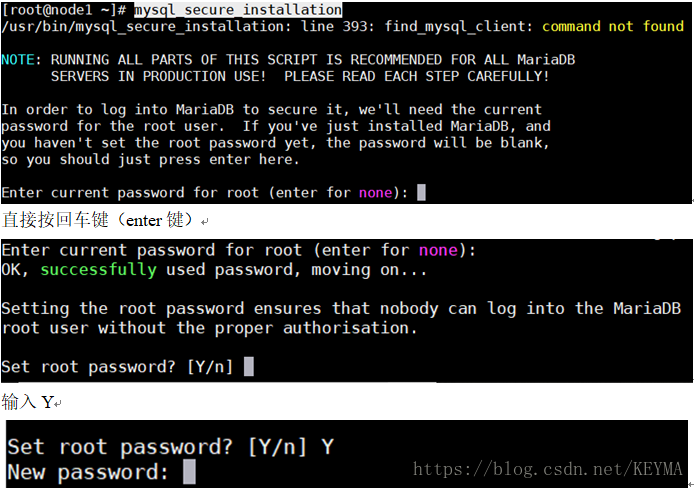
Set up root User's password , Here you specify , The code must remember , Later use , This is set to root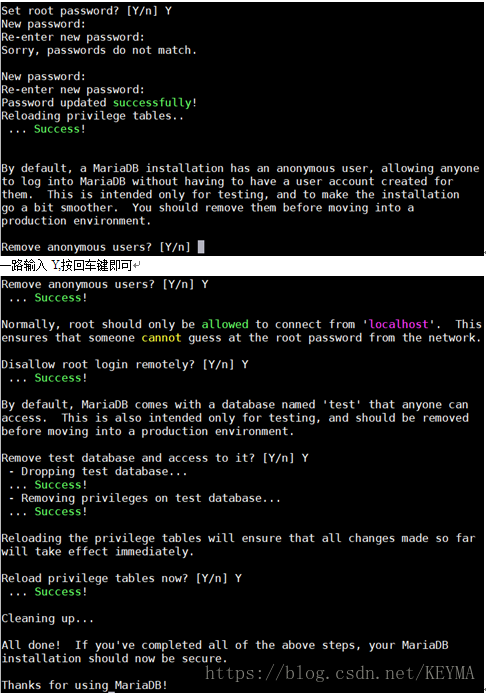
7、 ... and 、 Node , start-up MySQL
systemctl start mysql
systemctl status mysql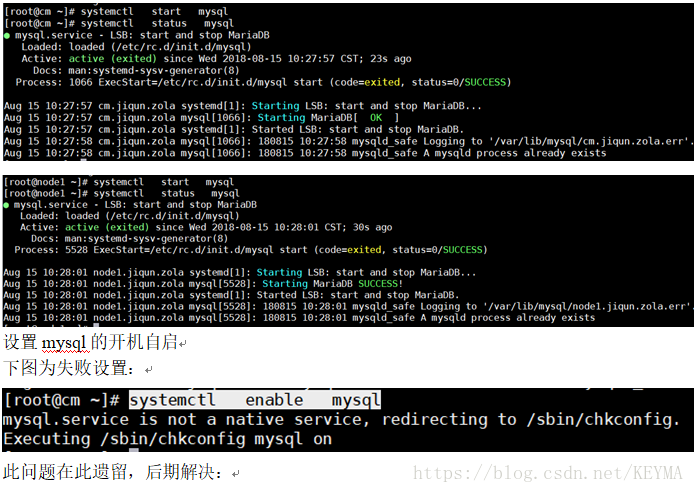
8、 ... and 、 Verify whether the database cluster is successfully built
1、 Log in to the database
mysql -u root –p
2、 Query the database for information about the database cluster nodes
show status like ‘wsrep_%’;
Normal cluster display results :
wsrep_connected = on Link opened
wsrep_cluster_size =2 Number of nodes in the cluster
wsrep_incoming_addresses=ip1,1p2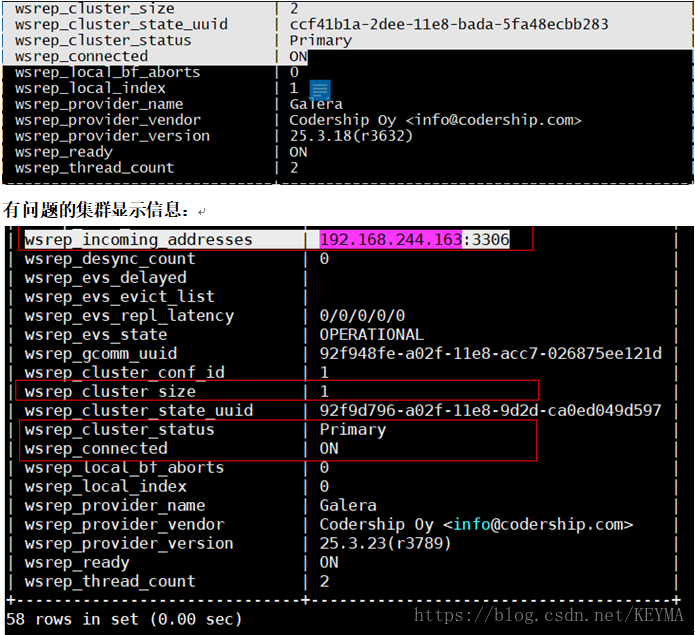
If it were not so , Restart the cluster services and MySQL
Stop the cluster directly :
/etc/rc.d/init.d/mysql stop bootstrap
Then check the data status :
systemctl status mysql.service
Then start the cluster on their respective nodes , After the cluster is successfully started , Start the database on their respective nodes again
Enter the database to view the cluster details , If you don't join the cluster , Again restart database , Look again .
Here, , Restart the database directly :( This solution )
systemctl restart mysql.service
Check the database cluster results again :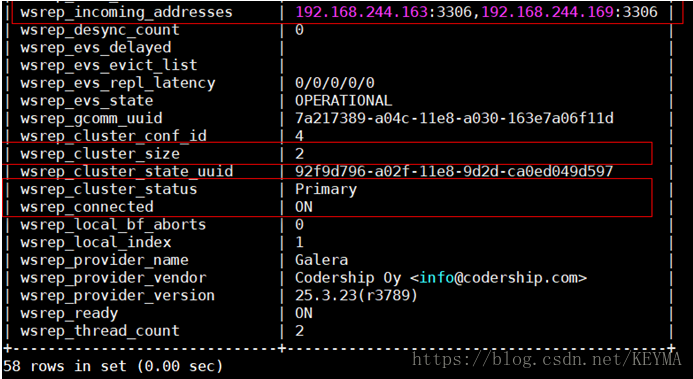
3、 Test the dual active function of the database cluster
a. Create a database and create a new table in it .
create database wsrep_test;
use wsrep_test;
create table wsrep_test (id int auto_increment not null primary key,name varchar(30) not null);
desc wsrep_test;
Create a name wsrep_test Table of , There are two fields , One is id, One is name. among id The field is set to auto grow .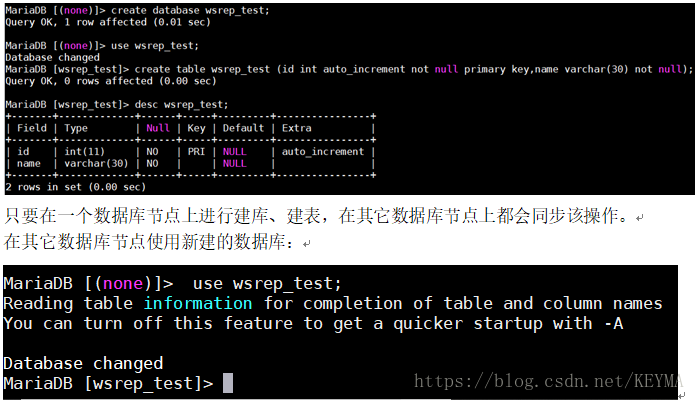
b. insert data
insert into wsrep_test.wsrep_test (name) values (‘node1’);
insert into wsrep_test.wsrep_test (name) values (‘node2’);
insert into wsrep_test.wsrep_test (name) values (‘node3’);
insert into wsrep_test.wsrep_test (name) values (‘node4’);
insert into wsrep_test.wsrep_test (name) values (‘node5’);
select * from wsrep_test.wsrep_test;
Operational renderings :
Before inserting data , Table data of all database nodes :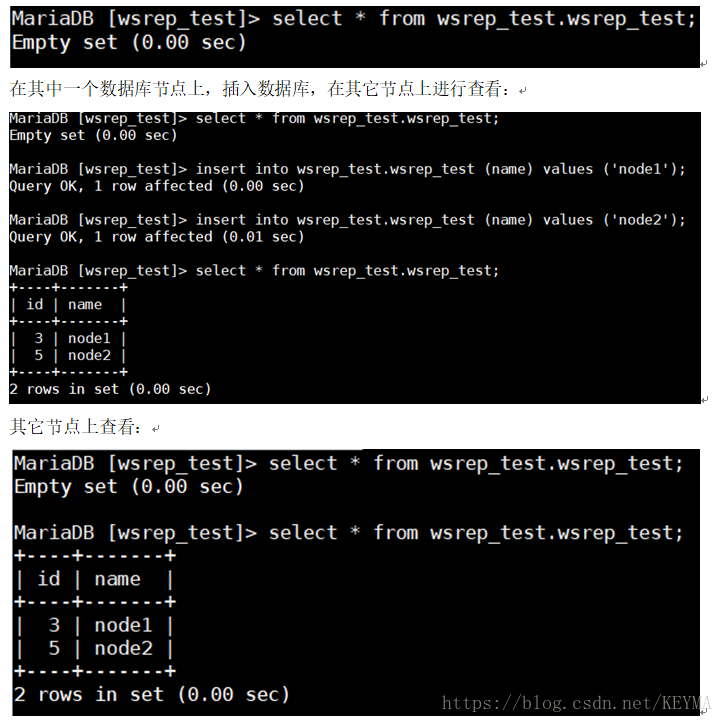
As shown in the above figure , said mariadb Of galera The cluster dual active and dual active installation is set successfully !
The final effect is to insert data on any node , Finally, you can query in every node . And in the multi master model , By setting id Step size of automatic growth , Avoid automatic growth in multiple nodes id No. 2 conflict .
matters needing attention :
Start all the clusters of the node first , Then start up MySQL data .
After the cluster software starts , Check status , It's OK after success .
If there is no cluster node ,MySQL The database service needs to be restarted
For details, please see , official account 
边栏推荐
- How can enterprises cross the digital divide? In cloud native 2.0
- EditPlus--用法--快捷键/配置/背景色/字体大小
- Set up a website with a sense of ceremony, and post it to 1/2 of the public network through the intranet
- Sword finger offer 68 - ii The nearest common ancestor of binary tree
- Qt加法计算器(简单案例)
- Servlet+JDBC+MySQL简单web练习
- cout/cerr/clog的区别
- 【ODX Studio编辑PDX】-0.3-如何删除/修改Variant变体中继承的(Inherited)元素
- 常用技术指标之一文读懂BOLL布林线指标
- 小程序vant tab组件解决文字过多显示不全的问题
猜你喜欢
Redis introduction complete tutorial: detailed explanation of ordered collection

cout/cerr/clog的区别
MariaDB的Galera集群应用场景--数据库多主多活

常用技术指标之一文读懂BOLL布林线指标
Redis入门完整教程:哈希说明
Redis入門完整教程:Pipeline

One of the commonly used technical indicators, reading boll Bollinger line indicators
Redis introduction complete tutorial: List explanation

Qt加法计算器(简单案例)

Docker镜像的缓存特性和Dockerfile
随机推荐
HMS core unified scanning service
Redis入门完整教程:有序集合详解
【ODX Studio编辑PDX】-0.3-如何删除/修改Variant变体中继承的(Inherited)元素
Common methods in string class
HMS core machine learning service
Redis getting started complete tutorial: hash description
One of the commonly used technical indicators, reading boll Bollinger line indicators
高通WLAN框架学习(30)-- 支持双STA的组件
LabVIEW中比较两个VI
小程序vant tab组件解决文字过多显示不全的问题
Qt加法计算器(简单案例)
Redis入门完整教程:Redis使用场景
Servlet服务器端和客户端中文输出乱码问题
OSEK标准ISO_17356汇总介绍
ScriptableObject
ECS settings SSH key login
A complete tutorial for getting started with redis: Pipeline
Sword finger offer 68 - I. nearest common ancestor of binary search tree
Wechat official account solves the cache problem of entering from the customized menu
List related knowledge points to be sorted out