PerconaXtraDBCluster8.0 Directions
| date | author | edition | remarks |
|---|---|---|---|
| 2020-06-19 | Ding bin | V1.0 | |
1. PXC Introduce
1.1. PXC brief introduction
PXC yes Percona XtraDB Cluster Abbreviation , yes Percona Free of charge from the company MySQL Cluster products .PXC The role of is through mysql Self contained Galera Cluster technology , Will be different mysql Instances are linked together , Realize multi master cluster . stay PXC Each of the clusters mysql Nodes are all readable and writable , That is, the master node in the concept of master-slave , There are no read-only nodes .
Percona Server yes MySQL Improved version , Use XtraDB Storage engine , In terms of function and performance MySQL There is a significant improvement , If the InnoDB Performance of , by DBA Provides some very useful performance diagnostic tools , In addition, there are more parameters and commands to control the behavior of the server .
PXC It's a set MySQL High availability cluster solution , Compared with the traditional cluster architecture based on master-slave replication mode PXC The most prominent feature is to solve the problem of long criticized data replication delay , Basically, it can achieve real-time synchronization . And between nodes , Their relationship with each other is equal .PXC The main concern is data consistency , The act of treating things , Or execute... On all nodes , Either not , Its implementation mechanism determines that it treats consistency very strictly , It's a perfect guarantee MySQL Data consistency of cluster ;
1.2. PXC Features and advantages
A. Fully compatible with MySQL.
B. Synchronous replication , Transactions are either committed or not committed on all nodes .
C. The master replicate more , Writes can be performed on any node .
D. Apply events in parallel on the slave server , True parallel replication .
E. Automatic node configuration , Data consistency , It's no longer asynchronous replication .
F. Fail over : Because it supports multi write , So in case of database failure, it is easy to carry out failover .
G. Automatic node cloning : When adding nodes or shutting down maintenance , Incremental data or basic data does not need to be manually backed up ,galera cluster Will automatically pull online node data , The cluster will eventually become consistent ;
PXC The biggest advantage : Strong consistency 、 No synchronization delay
1.3. PXC The limitations and disadvantages of
1) Replication only supports InnoDB engine , Other storage engine changes do not replicate
2) Write efficiency depends on the slowest of the nodes
1.4. PXC Common ports
1) 3306: The port number of the external service of the database .
2) 4444: request SST The port of .
3) 4567: A port number for communication between group members
4) 4568: For transmission IST.
A term is used to explain :
SST(State Snapshot Transfer): Full transmission
IST(Incremental state Transfer): Incremental transmission
1.5. PXC Limit
( One ) Storage engine :
be based on PXC Replication of is only applicable to InnoDB Storage engine .
Tables for other storage engines , Include mysql.* System tables like tables , No writes will be copied .
If you create users, you can't synchronize ? On this question . Based on DDL Mode statements are still supported .
DDL Statements are implemented in a statement level manner ( I don't use row Pattern ).
Yes mysql.* All of the tables have been DDL Changes to the mode will be copied at the statement level .
Such as :CREATE USER… DDL Be copied ( Sentence level )INSERT INTO mysql.user… myisam Storage engine , Will not be copied , Because not DDL Statements can also be configured wsrep_replicate_myisam Parameter realization ( Not recommended )
( Two ) Unsupported query :
LOCK TABLES Not supported in multi master mode UNLOCK TABLES as well as LOCK TABLES
Lock function , Such as GET_LOCK(),RELEASE_LOCK() Not waiting to be supported
( 3、 ... and ) Query log cannot be directed to table :
If query logging is enabled , The log must be forwarded to a file
Use general_log and general_log_file Select query log record and log file name
log_output = file # Author : Leshami # Blog : https://blog.csdn.net/leshami
( Four ) Maximum transaction size :
The maximum transaction size allowed is determined by wsrep_max_ws_rows and wsrep_max_ws_size Variable definitions
LOAD DATA INFILE How to deal with every 10000 Line submit once . For large transactions, many small transactions will be decomposed
( 5、 ... and ) Cluster optimistic concurrency control :
PXC Clusters use optimistic concurrency control , The transaction is sent out COMMIT It may still stop at this stage
There can be two transactions that write to the same row and in separate Percona XtraDB Submit in the cluster node , And only one of them can successfully submit .
Those who fail will be suspended . For cluster level abort ,Percona XtraDB Cluster returns deadlock error code :
(Error: 1213 SQLSTATE: 40001 (ER_LOCK_DEADLOCK)).
( 6、 ... and ) I won't support it XA Business :
( 7、 ... and ) Hardware configuration short board limit :
The write throughput of the whole cluster is limited by the weakest node . If a node slows down , The whole cluster slows down .
If you need stable high performance , Then it should be supported by the corresponding hardware .
( 8、 ... and ) The recommended minimum cluster size is 3 Nodes . The third node can be the arbiter .
( Nine ) InnoDB Fake change feature is not supported .
( Ten ) enforce_storage_engine=InnoDB And wsrep_replicate_myisam=OFF( Default ) Are not compatible .
( 11、 ... and ) All tables must have primary keys , Does not support the condition without primary key delete.
( Twelve ) Avoid high load ALTER TABLE … IMPORT / EXPORT
Running in cluster mode Percona XtraDB When the cluster , Please avoid ALTER TABLE … IMPORT / EXPORT The workload . If it is not synchronized on all nodes , It may lead to node inconsistency .
1.6. Extended reading :Percona and MariaDB contrast
1.6.1. origin
Since Oracle acquired MySQL after , There will be MySQL Potential risks of closed sources . and Oracle To cultivate MySQL This free son doesn't care too much , The speed of bug fixing and version upgrading has been very slow for some time , So the industry's attitude towards MySQL There is generally no optimism about the future of . So the community USES branching to avoid this risk , Google, for example 、Facebook、RedHat All will MySQL Replaced with a derivative version , Some domestic enterprises have given up MySQL Official edition , Like Alibaba and Tencent, they have made their own MySQL Derivative .
at present MySQL There are many derivative databases in the field , The mainstream is official MySQL、MariaDB as well as Percona Server, A few of them have ALI's OceanBase And Tencent CDB wait . that Percona and MariaDB These two main MySQL How do branches come into being ?
1.6.2. MariaDB
At first MySQL The father of Monty stay 1979 Written in MySQL First line of code for , Later, it gradually created MySQL company , After that, we will use 10 Billion dollars to sell to Sun, result Sun Also put MySQL To sell to Oracle,Monty Run away in anger , With MySQL5.5 Created... For the foundation MariaDB database , So it was born MySQL The most well-known derivative of the branch .
1.6.3. Percona Server
Percona Server yes MySQL Consultancy, Percona The performance of the release is closest to MySQL Enterprise Edition MySQL product .Percona The company in MySQL A lot of work has been done on database optimization , So much so that Percona Server The database is MySQL Among many branches , At high load 、 It works well in high concurrency situations , Even Alibaba's OceanBase Databases should learn from Percona Server.
1) The performance is close to
In fact, under normal circumstances ,MariaDB and Percona Server The performance is similar , Why is that so ?
MySQL 4 and 5 Use MyISAM As the default storage engine . from MySQL 5.5 Start , From the default storage engine MyISAM Change to InnoDB. This is because for a long time MyISAM No transaction support is provided , bring MySQL Free from the threshold of strong data consistency , It is InnoDB The addition of , In making MySQL from Oracle Take a share of the market share .
Let's see MariaDB The storage engine used . Because of copyright ,MariaDB Give up in the first place InnoDB This let MySQL Brilliant storage engine , Finally, I chose XtraDB Engine as InnoDB An alternative .
One side ,XtraDB The downward compatibility that the engine can do , When you create a data table ,InnoDB The engine is automatically replaced with XtraDB engine , Users and clients don't feel it at all MariaDB and MySQL The difference between . On the other hand ,XtraDB Good support for business , Let the user also not feel XtraDB and InnoDB The difference between . in addition , In multicore CPU And big memory ,XtraDB Performance ratio InnoDB Better .
I'd like to add another sentence here ,XtraDB Engine is Percona The company developed and designed , And MySQL5.1 Built in InnoDB comparison , The number of transactions executed per unit time is the latter 2.7 times . And in Percona Server It is also used by default XtraDB engine . So MariaDB and Percona Server Under normal conditions, the performance is basically flat . But under the condition of high concurrency and high load ,Percona Server Better performance of .
2) Deployment platform
MariaDB Cross platform is better , Support Windows The platform and Linux platform , But not supported MacOS platform . If in MacOS On the platform MacOS You need to install Brew.
Percona Server Cross-platform is not supported , Only in Linux Platform installation
3) Compatibility
MariaDB And Percona Server Each of them chose to be right MySQL Compatible way .MariaDB The starting point is MySQL5.5, Then on MySQL reform , And with MySQL5.6 There is a big difference between the above versions . For example, in a single table to store one to many relational data ,MariaDB I chose DynamicColume( Dynamic column ) Realization way , and MySQL The choice is JSON The way . Although it's all one to many relationship , however MariaDB Dynamic columns are very cumbersome to use , Array format is not supported , contrary MySQL The implementation of is much better . in addition MariaDB Dynamic does not support indexing , So it's very slow to find data by fields in dynamic columns , and MySQL Support JSON Indexes , Query speed will be much faster .
Percona Server And MariaDB Different , It's first compatible with MySQL And then optimize , So users can easily get from MySQL Migrate to Percona Server above , Instead of thinking about compatibility .
4) choice
Choice is a painful thing , about MariaDB and Percona Server Two databases , There are also differences among major companies , Taobao uses Percona Server, and Google and Facebook Then stand on MariaDB here . From this we can see that , Enterprises that focus on database stability and reliability will choose Percona Server, Including the use of Percona Server Organized Percona XtraDB Cluster colony , The strict data read and write consistency is reflected in the , This is extremely important for business systems , Reading and writing speed is only second . That data is of low value , Enterprises that focus on data reading and writing speed , Prefer to use MariaDB, Because with MariaDB To form a Replication colony , In preservation SEO Search for 、 Forum post 、 News and information 、 Faster on social information .
Speaking of this , choice MariaDB still Percona Server, The only measure is whether to store business data .
2. pxc and proxysql install
This section will describe from the present pxc Official website https://www.percona.com/software/mysql-database/percona-xtradb-cluster The latest published pxc edition :8.0.19 edition ( Compatible with support mysql8.0 edition ), stay 3 platform centos7.5 On the operating system server , In order to have sudo Permissions of the user installed in the system standard path ( It's usually /usr/bin Next ) Details of the practical process of .
Besides , Whereas pxc The cluster needs load balancing and read-write separation to provide read-write query services , Need to be in pxc After the cluster installation is complete , Install another high availability mysql Middleware agent . frequently-used mysql Middleware has mycat、proxysql wait .Pxc Official website percona It is highly recommended to install proxysql As a middleware load balancing proxy server , To be responsible for distributing all the outside world to pxc Read, write and query operations of cluster . So this section will also describe pxc Middleware proxy server proxysql Installation details of . Generally speaking proxysql It's better to be different from pxc Install on the service node machine , It can also be in a certain pxc Install on the service node . The installation process of this article is in pxc1 Installed on the node machine .
In addition, I would like to add a few points :
1) pxc Provided by the official website pxc Both conventional and mainstream cluster installation methods are pxc All software commands ( In fact, after installation, the command name is mysql) All installed in the system standard path ( Here is /usr/bin) Next . It is not supported to install it in the directory specified by other users . Therefore, it is suggested that everything should be said pxc Attempts to install the command toolset to a user specified directory are terminated , It is suggested not to try , Because this installation method is not mainstream , The official website does not provide such support .
2) This section only deals with pxc Clusters and proxysql The download and installation of the agent command and the initial startup prove whether the command is successfully installed and available . About pxc Cluster configuration details and cluster deployment details 、proxy The connection of pxc The details of the cluster will be in the next section “pxc Cluster deployment and proxysql Proxy middleware configuration uses ” In detail .
3) Percona The official website provides a copy of <<PerconaXtraDBCluster8.0.19.10.pdf>> PDF The installation and use guide of the document is attached to the project delivery list , For reference .
2.1. preparation
2.1.1. Environmental preparation
Distributed pxc The cluster must at least be running on 3 On servers or more , Otherwise, there will be consistency problems such as cleft brain . This article is based on the installation in 3 platform vmware Virtual machine , The virtual machine nodes are shown in the following table :
All of the vmware Virtual machine configuration is CPU:8 nucleus , Memory 6G, Hard disk is enough .
2.1.2. System preparation
All of the following operations need to be performed on all machines root Users may have sudo The authority of the user to execute .
2.1.2.1. establish pxc Clustered basedir route
With root User permissions are in 3 Uniform path location creation on machines pxc Clustered basedir. In the future basedir The directory will create pxc Clustered datadir /tmpdir/logdir etc. . Must ensure basedir The hard disk space of the path can meet the demand of future business data growth , Hard disk space is big enough . this paper basedir Path is /opt/pxc.


2.1.2.2. New special linux Users and groups
New special linux Users and groups , So that the process can be run safely
a) groupadd mysql
 establish group mysql

vim /etc/group
You'll find that the last line has mysql User group
b) adduser -g mysql mysql
 establish mysql user , Simultaneous addition mysql User group , Automatically create mysql Of homedir by /home/mysql

vim /etc/passwd  You can see that the last line is mysql user .
c) passwd mysql
by mysql User new password
d) take mysql Users join sudo jurisdiction
chmod +w /etc/sudoers

vim /etc/sudoers
Add as follows :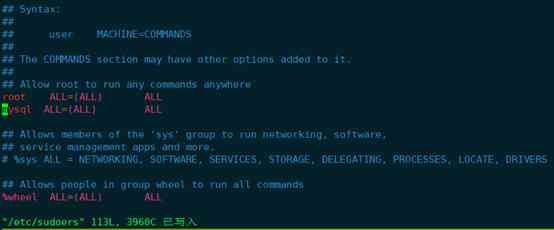
And then execute chmod -w /etc/sudoers
e) mkdir /opt/pxc/data
mkdir /opt/pxc/tmp

mkdir /opt/pxc/log

chown -R pxc:pxc /opt/pxc
modify pxc Clustered basedir route /opt/pxc It belongs to user and group by mysql User name and mysql Group . The above data tmp log 3 The categories will be mysql Service datadir logdir tmpdir etc. .
Be careful : All of the following is about pxc Cluster installation operation , You can use mysql User plus sudo perform . Or directly with root User execution can also .
2.1.2.3. Unload to pxc Install influential software or libraries
f) Uninstall standard path installed mysql Wait for the order 
so 3 On the machine /usr/bin The path has been installed before mysql PerconaXtraDBCluster. ( This is the result of the previous test installation , Now before re installing , To install the previous standard path location mysql All relevant program commands are unloaded .)
If it was through yum install percona-xtradb-cluster Installed , The unloading method is :
yum remove percona-xtradb-cluster
It's over percona-xtradb-cluster after which mysql

Find out mysql The order is still in , To continue processing , adopt rpm -qa Check all tapes mysql Wording rpm The installation package is as follows :
And then do it one by one rpm -e --nodeps Or perform yum remove xxxx Remove the following :


Finally again which mysql Found no more , All uninstalled successfully .
Cent7b The unloading process on the machine is as follows :


The above shows that cent7b The machine is unloaded .
Cent7a The unloading process of the machine is as follows :


thus ,cent7a/cent7b/cent7c 3 Has been installed on machines mysql or percona All relevant commands have been removed .
g) There are some CentOS The version is bound by default mariadb-libs, In the installation PXC You need to uninstall it before
yum -y remove mari*


The above operations can be seen through
yum remove mari* or rpm -qa | grep -i mari | xargs rpm -ev –nodeps It's all right .
2.1.2.4. A firewall 、selinux And port preparation
CentOS7 The opening and closing of ports are controlled by firewalls ,Centos from 6 Upgrade to 7 after , It's not the same as before iptables Command control linux port ,centos7 Instead, use firewalld Instead of the original centos6 Of iptables.
2.1.2.4.1. Centos7 A brief introduction to firewall usage
Here is a brief description of centos7 Firewall related operation usage :
View firewall status :(active (running) It's open )
1) View firewall service status
systemctl status firewalld

systemctl The usage is as follows :
2) Turn on / Turn off firewall :
 Turn on the firewall :systemctl start firewalld
 Turn off firewall :systemctl stop firewalld
 prohibit firewalld Boot up :systemctl disable firewalld
firewalld Boot up :systemctl enable firewalld
3) Query port number 3306 Open or not
firewall-cmd --query-port=3306/tcp
so 3306 Firewall port not open
4) Query which ports are open
firewall-cmd --list-port
5) service iptables restart
firewall-cmd --reload
6) Open port
firewall-cmd --zone=public --add-port=3306/tcp --permanent
--zone # Scope
--add-port=3306/tcp # Add port , The format is : port / Communication protocol
--permanent # permanent , Failure after restart without this parameter
Be careful : After opening the port, you must execute firewall-cmd --reload To restart the firewall to take effect , Otherwise it doesn't work .
2.1.2.4.2. pxc Cluster deployment involves the required firewall port operations
As mentioned in the previous section ,pxc Clusters need to be open by default 4 Ports :3306,4444,4567,4568.
3306-mysql Instance port
4567-pxc cluster Ports for communication
4444- be used for SST The port of transmission
4568- be used for IST The port of transmission
Make sure that pxc The ports between cluster machines communicate normally , Or just shut down the firewall of each machine , Either turn on the firewall of all machines, but at the same time turn on the following 4 Ports .
programme 1: Turn off firewall systemctl stop firewalld
programme 2: Turn on the firewall, but at the same time 4 The ports are as follows
systemctl start firewalld
firewall-cmd --zone=public --add-port=3306/tcp --permanent
firewall-cmd --zone=public --add-port=4444/tcp --permanent
firewall-cmd --zone=public --add-port=4567/tcp --permanent
firewall-cmd --zone=public --add-port=4568/tcp --permanent
firewall-cmd --reload
This paper adopts the scheme 2, Turn on the firewall, but at the same time turn on the above 4 Ports , The effect is as follows :
Pay attention to open the firewall to perform the following :systemctl enable firewalld Make sure to turn on the firewall next time .
2.1.2.4.3. pxc Cluster deployment involves the required selinux operation
pxc Cluster deployment needs to put SELINUX Value is set to disabled
View now selinux The state of :sestatus
Temporarily Closed selinux:setenforce 0
Temporarily open , from permissive turn enforcing:setenforce 1
But when it is turned on again, this change will not work . To be permanent, you need to modify the document /etc/selinux/config
vim /etc/selinux/config
Modify the file SELINUX=disable that will do .
thus ,pxc All the necessary preparations for the installation of the cluster are completed . Install now pxc colony .
2.2. install pxc colony
Percona About the official website 3 Kind of pxc Cluster installation scheme :
1)  adopt percona Warehouse installation ;
2)  Install through the downloaded binary package ;
3)  Source code compilation and installation .
above 3 Of the installation methods 3) Source code compilation and installation is the most complicated , Many dependencies need to be resolved at compile time , Slow speed and complicated process are not recommended installation methods .Percona The most recommended installation is recommended percona Warehouse installation . Of course , By getting from percona The official website downloads the binary package direct installation is also the official website comparison recommended installation method .
adopt percona Warehouse install and install this through the downloaded binary package 2 Each installation scheme has its own advantages and disadvantages : adopt percona The warehouse installation operation is the simplest ,centos Of yum or ubuntu Of apt-get Such as software installers can automatically find the required library for installation , One click installation , It's easy to operate . The disadvantage is that the download speed of dependency package is slow during the installation process , It takes a long time . Install through the downloaded binary package because the binary package has been downloaded in advance , It saves the download process , Installation time is short . The disadvantage is that you need to install it step by step , The operation is a little more complicated .
This paper focuses on the use of 2) Install through the downloaded binary package . But it will be right 1) adopt percona The practical process of warehouse installation scheme is briefly described . In the production environment, it is recommended to use 2) Install through the downloaded binary package .
In the end, it is explained again that pxc Cluster installation means : From the current pxc Official website
https://www.percona.com/software/mysql-database/percona-xtradb-cluster
The latest published pxc edition :8.0.19 edition ( Compatible with support mysql8.0 edition ), stay 3 platform centos7.5 On the operating system server , In order to have sudo Permissions of the user installed in the system standard path ( It's usually /usr/bin Next ) Details of the practical process of .
4.3.1. adopt percona Warehouse installation pxc colony
stay centos7 through yum It can be installed directly pxc Cluster command , But it needs special configuration yum Source .Percona The official website provides a configuration tool for this purpose :percona-release Simplify yum install pxc Clustered yum Source configuration process .Percona-release Please refer to the webpage for detailed usage :
https://www.percona.com/doc/percona-repo-config/percona-release.html#rpm-based-gnu-linux-distributions.
The following is a brief description of its installation steps :
2.2.1.1. install percona-release
yum install https://repo.percona.com/yum/percona-release-latest.noarch.rpm

After installation, you will find that percona-release The command is ready to use , Its yum Source directory :/etc/yum.repos.d/ There is one more... In the catalog percona-origin-release.repo Of yum Source configuration file .
2.2.1.2. configuration setup pxc80 And related dependency tools yum Source
perform :percona-release enable-only pxc-80 release command , Lead to yum The source directory has been regenerated yum install pxc8.0 The required yum Source file :percona-pxc-80-release.repo, Previous percona-original-release.repo The file was renamed to percona-original-release.repo.bak 了 .( Be careful :/etc/yum.repos.d There are only .repo The file with suffix will take effect , Other documents are not valid .)

Then perform :percona-release enable tools release To configure yum install pxc8.0 Depending on the toolset yum Source . After completion ,/etc/yum.repos.d Directory new generation percona-tools-release.repo Source file .

2.2.1.3. yum perform install percona-xtradb-cluster
yum install percona-xtradb-cluster


A key to install , But the installation process is very slow to download , It's very time consuming , For hours or so .
After installation , perform which mysql, You can see /usr/bin Appear under directory mysql. adopt mysql –version You can see that this is the installed pxc8.0 Version of mysql.
Whereas yum install pxc8.0 The process download is too time consuming , In the production environment, we strongly recommend that you download a good binary package file to install in the next section pxc colony . Before we move on to the next section , Please uninstall or remove all yum Installed mysql or percona Related documents .
4.3.2. Install through the downloaded binary package pxc colony
2.2.2.1. Download the binary package file
adopt https://www.percona.com/downloads/Percona-XtraDB-Cluster-LATEST/ Download the relevant binary package :
Download is very slow , For hours or so .
Although the main program binary package download is complete , But not enough . Besides pxc8.0 You also need to download the dependent packages as follows :
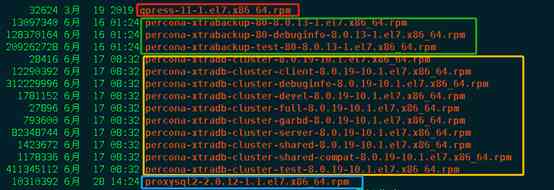
percona-xtrabackup-80
qpress
Next , Don't start with https://repo.percona.com/release/7/RPMS/x86_64/ Download... In turn :
percona-xtrabackup-80-8.0.13-1.el7.x86_64.rpm
percona-xtrabackup-80-debuginfo-8.0.13-1.el7.x86_64.rpm
percona-xtrabackup-test-80-8.0.13-1.el7.x86_64.rpm
above 3 File and
qpress-11-1.el7.x86_64.rpm file ;
Again from https://repo.percona.com/release/7/os/x86_64/ or https://www.percona.com/downloads/proxysql2/ download proxysql2-2.0.12-1.1.el7.x86_64.rpm This proxysql2 Package .(proxysql2 The specific usage will be mentioned later , It's recommended better pxc Load balancing middleware of cluster .)
above 5 File and Percona-XtraDB-Cluster-8.0.19-r217-el7-x86_64-bundle.tar After decompression 10 File confluence , total 15 File , Formed pxc8.0_on_centos7_tarball The folder is centos7 All binaries required to install binary packages locally .
pxc8.0_on_centos7_tarball See the project file for the compressed package pxc8.0_on_centos7_tarball.tar.gz, file size 1.1Gb. therefore , Refer to this document when installing , No need to download every file from scratch , Use project files directly pxc8.0_on_centos7_tarball.tar.gz that will do . Otherwise, the download process is extremely time consuming , For hours .

2.2.2.2. Install local binary package files
Be careful : This section is recommended for installation in production environment pxc colony .
Use... Before installing yum install The following third-party dependency libraries are available for installation :
yum install -y openssl socat procps-ng chkconfig procps-ng coreutils shadow-utils grep libaio libev libcurl perl-DBD-MySQL perl-Digest-MD5 libgcc libstdc++ libgcrypt libgpg-error zlib glibc openssl-libs

Next, the official installation pxc8.0.
Respectively in cent7a/cent7b/cent7c 3 On a machine with root The user to create /root/tmp,
Unzip the project delivery list pxc8.0_on_centos7_tarball.tar.gz To /root/tmp Under the table of contents :

cd /root/tmp/pxc8.0_on_centos7_tarball/
yum localinstall *.rpm
Complete the continuous contract 2-3 You can complete the installation in minutes .
which mysql Find out /usr/bin/mysql ,mysql –version So this mysql yes pxc Version of mysql.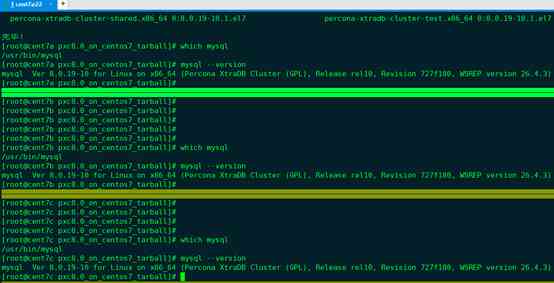
4.3.3. Initial start up mysql Service and modify administrator users (root) password
from now on , start-up mysql Switch to service or modify its configuration mysql Under the user .
Initial start up mysql The service must be handled as follows :
modify mysql In the service configuration file datadir tmpdir logdir and logdir And so on .
As mentioned in the previous section , Have already put /opt/pxc Catalog as pxc Clustered basedir.
Centos Next Pxc In the cluster mysql The default profile is /etc/my.cnf.
vim /etc/my.cnf
The default configuration file is as follows :
Change it to :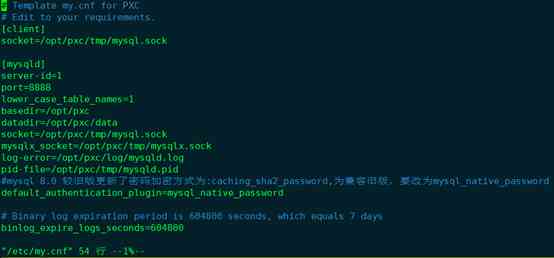
The above configuration will pxc The default port for external services ( yes 3306) Change it to 8888. And create /opt/pxc Next data tmp log3 The contents are as follows mysql Data storage directory of the service ,tmp Contents and log Catalog . Still change all directories to mysql Users and mysql Group .
mkdir -p /opt/pxc/data
mkdir -p /opt/pxc/tmp
mkdir -p /opt/pxc/log
At the same time 8888 Port join firewall open port .
lower_case_table_names=1 Make the database show case insensitive .
default_authentication_plugin=mysql_native_password It's for compatibility with older versions mysql Password encryption method of .
Next, start the... On each node mysql service . Note that you have to switch to mysql User to sudo systemctl start mysql Command to start .( Of course sudo service mysql start Command start can also .)
sudo systemctl status mysql   # Inquire about mysql Service status
sudo systemctl stop mysql # stop it mysql service 

so 8888 The port is provided externally mysql Query service .
vim /opt/pxc/log/mysqld.log You can see mysql The service startup log is as follows :
The next important thing is to log in for the first time , Input password , modify root password , And create root@% Accounts make root Can be from any host Connect mysql service .
perform grep password /opt/pxc/log/mysqld.log Query from log mysql First temporary password 
Then perform :mysql -uroot -p Connect with the above temporary password mysql
And then modify root@localhost password :
ALTER USER 'root'@'localhost' IDENTIFIED BY 'rootPass';
FLUSH PRIVILEGES;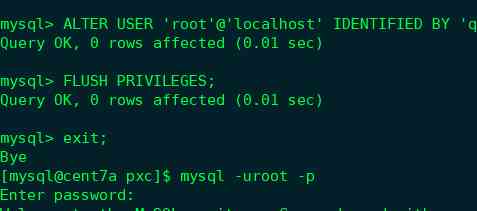
Revised root@localhost After the password exit Try logging in with your new password after exiting .
Another important operation is : establish root@% Users make root Users can choose from any host Connect mysql service .
CREATE USER 'root'@'%' IDENTIFIED BY 'rootPass' ;
GRANT ALL ON *.* TO 'root'@'%';
FLUSH PRIVILEGES;
Next, use... On the remote host navicat Try to connect as follows :
Repeat the above settings on the other two servers to complete the operation .
thus ,pxc Cluster command tool installation completed . At this point, every one of them mysql Services are all isolated instances , It doesn't form a cluster .
Let's talk about pxc Cluster deployment and proxysql Proxy middleware configuration uses .
3. Deploy pxc colony
Deploy pxc Clustering is based on the previous section 3 A node mysql The command can start the connection normally . The next operation is as follows :
3.1. Stop... On all nodes mysql service
stay cent7a、cent7b 、cent7c The command is executed on the three nodes in turn :sudo systemctl stop mysql
3.2. modify cent7a Node /etc/my.cf
sudo vim /etc/my.cf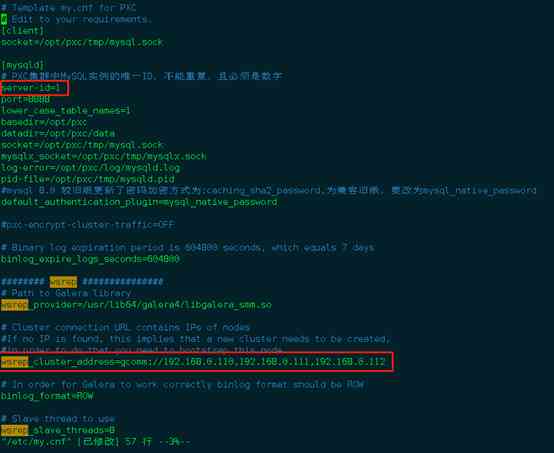

The important changes are shown in the above two figures , A brief explanation is as follows :
server-id yes pxc Examples are in pxc The only one in the cluster id, It has to be numbers , Can't repeat , Different pxc Cluster nodes are set in turn 1,2,3....

wsrep_provider Just keep it set .

wsrep_cluster_address yes pxc The cluster address , At least for all nodes in the cluster 1 It's worth . But it is strongly recommended that all cluster nodes ip All write .

wsrep_node_address At present pxc Node ip Address .

wsrep_cluster_name yes pxc Cluster name , This value of all nodes must be consistent .

wsrep_node_name At present pxc Name of node , Different nodes must be inconsistent .
The point is :pxc-encrypt-cluster-traffic The value is ON and OFF Two possible values . The default value is ON, That is, if the file is not configured with , amount to pxc-encrypt-cluster-traffic=ON. At present, the configuration item in the file is in the comment state , That is to say pxc-encrypt-cluster-traffic=ON. The meaning of the configuration item is pxc Whether the communication between all nodes in the cluster is encrypted or not ,OFF Indicates no encryption ,ON Presentation encryption , It uses TSL verification . It is also highly recommended by the government ON With TLS Encrypt authentication communication .Mysq The first time the program starts, it will be in datadir namely :/opt/pxc/data Automatically generate related TLS Certification related documents , The documents have been .pem The suffix ends .
Set up pxc-encrypt-cluster-traffic=ON after ,PXC Cluster nodes will communicate with each other through these authentication files . The only thing to notice is that , These authentication files of all nodes must be consistent . It's very important .
Set up the others in the same way as above 2 Of nodes /etc/my.cf file .
3.3. Sync TLS authenticated document
Copy cent7a Node datadir namely /opt/pxc/data All under directory *.pem File to all other nodes datadir namely /opt/pxc/data Under the table of contents .
3.4. Boot up pxc The first node in the cluster
Here is cent7a The first node in the cluster . stay cent7a On the implementation :
sudo systemctl start [email protected]
You can see a lot of mysqld The service is started , Many ports are listening .
next mysql Log in to the service , perform show status LIKE 'wsrep%';
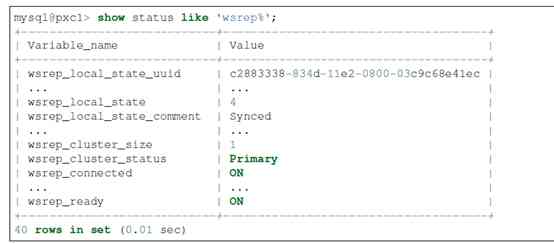
among wsrep_cluster_size by 1, Show that now pxc There is only 1 Nodes .wsrep_local_state_comment by Synced indicate pxc The cluster node has passed through . Each time a node is added to the cluster , It is strongly recommended that this value be Synced After that, we can operate ,1 One by one 1 Nodes join , Don't join all nodes at once .
3.5. Add other nodes to pxc colony
First in cent7b On the implementation :sudo systemctl start mysql
( Be careful : Only the first node needs to boot up , The order is :sudo systemctl start [email protected], The subsequent commands to add other nodes are :sudo systemctl start mysql)
Note that in this way, the other nodes are added to the first node in turn pxc colony , The data of all subsequent nodes will be cleared , And then the node 1 Guide the data synchronization of the node .
Log in to the second node again mysql service ,mysql The user name and password are directly synchronized to the user name and password of the boot node . Carry on :show status LIKE 'wsrep%';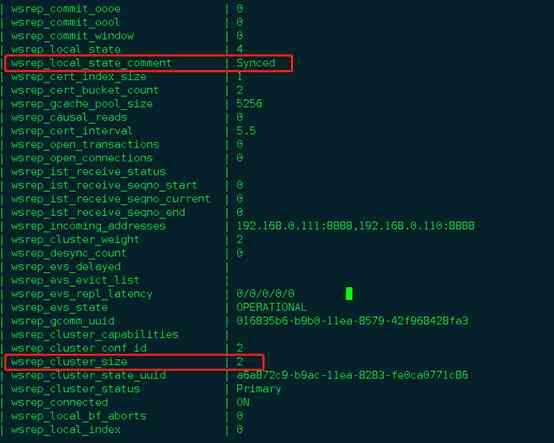
Found at this time pxc Number of clusters 2,Synced Indicates that the data is synchronized .
Next, the same method is used to start the 3 Nodes .

thus ,pxc The cluster deployment is started .
Be careful :
After the entire cluster is shut down, you want to start with a node as the first startup node , But nodes use systemctl start [email protected] Can't start , Generally, the shutdown time of the node is not the latest shutdown time in the cluster , If it is forced to start, there may be data differences that are not safe , So one way is to find the last closed node of the cluster as the first startup node to restart the whole cluster , Or modify it without losing data mysql Under the installation folder grastate.dat file , Will be one of the safe_to_boostrap Set to 1 After forced start .

3.6. verification PXC Correctness of cluster data replication
stay 3 All nodes are marked with mysql Client program login mysql service : The executive order is :
mysql -uroot -h cent7a -P 8888 -p
And implement prompt u@h> as follows :
The final formation is as follows mysql The state within the client program that has an explicit command line prompt , Here's the picture .
Next, do the following in turn :


The above steps are in 3 Different nodes mysql Service alternates , Finally, the expected data can be found , prove pxc Cluster data replication function work well.
4. proxysql Proxy middleware configuration uses
proxysql yes percona Officially highly recommended support pxc Clustered mysql middleware , It can provide many functions such as load balancing and read-write separation . Be careful :pxc8.0 No longer supported proxysql v1 edition , Support proxysql v2 edition .
Proxysql After the service starts , A daemons provide to the outside world mysql Traffic distribution service , Another monitoring process monitors the daemons in real time , Once it is found that the daemons are down, the daemons will be restarted immediately , To minimize downtime , Guarantee as much as possible proxysql High service availability .
4.1. Proxysql Installation
Proxysql Yes 2 Installation methods : adopt yum Install and pass through rpm Program installation .
Yum install proxysql Need configuration yum Source , The method is the same as that mentioned in the previous section : Use percona release, And then execute : percona-release enable tools release After completion ,/etc/yum.repos.d Directory new generation percona-tools-release.repo The document is proxysql The required yum Source . Next :yum install proxysql2 About need 15 Minutes to complete the installation .
This section recommends downloading from the official website rpm The package file is in centos7 On the direct execution of rpm install , The advantage is that you don't have to download , Fast installation .Rpm The package file can be found in In the project delivery list :pxc8.0_on_centos7_tarball.tar.gz After decompression :proxysql2-2.0.12-1.1.el7.x86_64.rpm.
And then execute :
sudo rpm -ivh proxysql2-2.0.12-1.1.el7.x86_64.rpm
After installation which proxysql You can see proxysql Program installation completed ,proxysql –version As you can see, yes proxysql 2.0 edition .
I also want to know rpm The contents of a document or rpm What is installed , You can view the following commands .
rpm -qpl proxysql2-2.0.12-1.1.el7.x86_64.rpm
 or
rpm -ql proxysql2
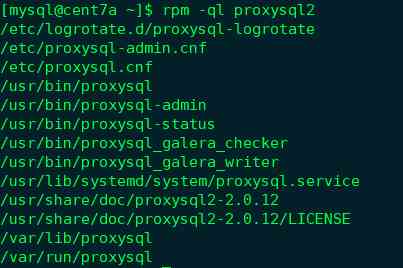
so proxysql The relevant important configuration files are /etc/proxysql.cnf and /etc/proxysql-admin.cnf.proxysql The overall configuration of can be from proxysql.cnf read ,admin Configuration can be from proxysql-admin.cnf heat load Come in .
Be careful :
There's something on a machine proxysql after , Log in on the same machine proxysql Services also need to be installed on the same machine mysql Client program . In this paper, because the proxysql The program is installed in cent7a The machine has been installed before pxc. So there is already mysql Client program , There is no need for additional installation .
4.2. Proxysql Service configuration and startup
Let's talk about proxysql Service configuration and startup .
Execute sequentially :
sudo mkdir /opt/proxysql
sudo chown proxysql:proxysql /opt/proxysql
The above creates /opt/proxysql The catalogue is proxysql Of datadir.
Next open /etc/proxysql.cnf
sudo vim /etc/proxysql.cnf, It can be seen that the following paragraph in the red box is very important , The main idea is :/etc/proxysql.cnf As proxysql The configuration file for the service is only valid when the service is first started . The second time I start the service later , Read only /etc/proxysql.cnf Of datadir Set up , The default setting is /var/lib/proxysql, And then to datadir Under the catalog is to find sql Library files are usually proxysql.db, If you find the file , The file is always loaded to initialize the configuration service .
Read only if the file cannot be found /etc/proxysql.cnf File to load boot proxysql service .
If you want to force loading /etc/proxysql.cnf File content to start proxysql service , execute systemctl start proxysql-initial It's not conventional systemctl start proxysql.
Next, revise it as follows :
In the red box below 
It is amended as follows :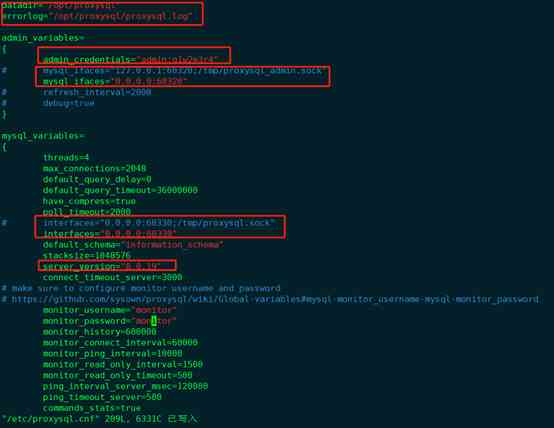
datadir and errorlog The file locations have been reconfigured to /opt/proxysql Catalog ( It's been created before ).
admin_credentials It's setting up login proxysql The user name and password of the management interface of , Here instead admin:q1w2e3r4.
And you can see that proxysql After the service starts, there will be 2 Ports :6032 yes proxysql Management interface port of ,6033 yes proxysql Provide external connection to the back end pxc The port of database data flow query and so on , similar mysql Of 3306.
To verify the change , We changed the ports to 60330 and 60320.
Be careful not to forget cent7a Open up 60320 and 60330 Firewall port of .
There's a little detail before starting :
sudo vim /usr/lib/systemd/system/proxysql.service
It needs to be changed PID Options :
It is amended as follows :
Save exit after execution sudo systemctl daemon-reload Reload modification .
thus , We have configured the above proxysql, Next :sudo systemctl start proysql You can start proxysql service .
The next in cent7a On the implementation :
mysql -uadmin -P60320 -h 127.0.0.1 –p
Password input q1w2e3r4 To log in proxysql Management interface of .
4.3. Proxysql First dynamic configuration of service management interface
Log in to proxysql After the management interface , To configure some basic configurations dynamically for the first time , So that proxysql You can use .
First modify prompt The tips are as follows :
show databases;
main Kuo is proxysql Currently configured memory library . disk Is a library of configurations that are persisted to a file ; monitor yes proxysql Monitoring background pxc A library of cluster related configurations .
Stats Related libraries are state collection related libraries .
The brief explanation is ,proxysql Equipped with 3 There is a kind of effective space ,Memory,Runtime,Disk. Memory and disk It corresponds to the configuration in memory and the configuration stored on disk persistently .Runtime It's the runtime configuration , Effective in time .
3 The relationship between the spaces is as follows :
Next ,show tables; You can see that there are many watches , One of the more important ones is
global_variables
mysql_servers
mysql_users
The next dynamic configuration involves these table.
perform select * from mysql_servers; It's an empty table .
Table mysql_servers What's stored is proxysql Connect back end pxc Clustered mysql Information of service node . Very important .
Now add all the pxc Cluster node to proxysql.
4.3.1. For the first time to add pxc Cluster node to proxysql
Execute the following commands in turn :
INSERT INTO mysql_servers(hostgroup_id, hostname, port) VALUES(0,'192.168.0.110',8888);

INSERT INTO mysql_servers(hostgroup_id, hostname, port) VALUES(0,'192.168.0.111',8888);

INSERT INTO mysql_servers(hostgroup_id, hostname, port) VALUES(0,'192.168.0.112',8888);
You can pxc Clustered cent7a cent7b cent7c3 All nodes join proxysql.
Be careful :
hostgroup_id In general , Write as a group , Read as a group , Here we use the default 0, Read and write .
status by ONLINE Express 3 Each node can provide services . The brief explanation is as follows :
1) ONLINE: The current status of the backend instance is normal

2) SHUNNED: Temporarily removed , Maybe because of the back end  too many connections error, Or exceeded the tolerable delay threshold  max_replication_lag

3) OFFLINE_SOFT:" Soft offline " state , No longer accept new connections , But the established connection will wait for the active transaction to complete .

4) OFFLINE_HARD:" Hard offline " state , No longer accept new connections , Established connection or forced to break . When the back-end instance is down or the network is unreachable , There will be .
Weight Represents the probability of connecting a node , The more likely the rate will be . The default is 1.
Besides max_connections,comment All of them can be modified .
Note that after performing the above operations, be sure to perform the following 2 Operations :
LOAD MYSQL SERVERS TO RUNTIME; # Load the current changes to runtime
SAVE MYSQL SERVERS TO DISK; # Save the current changes to DISK
show create table mysql_serversG
hostgroup_id:ProxySQL adopt hostgroup Organize the back end in the form of db example , One hostgroup Represents belonging to the same role .
The primary key of the table is (hostgroup_id, hostname, port), With hostname:port In more than one hostgroup in .
One hostgroup There can be multiple instances , That is, multiple slaves , May be through weight Assign weights .
hostgroup_id 0 It's a special one hostgroup, When routing queries , If the rule is not matched, the default selection is hostgroup 0.
show create table mysql_usersG
username,password: Connect to back end MySQL or ProxySQL The certificate of the instance , Refer to password management .
The password can be inserted in clear text , Can also pass PASSWORD() Insert ciphertext ,proxysql With * Start to determine whether the insertion is ciphertext .
however runtime_mysql_users Li Tong is ciphertext , So plaintext inserts , Again SAVE MYSQL USERS TO MEM, What you see at this time is also HASH Ciphertext .
active: Whether it is effective for the user ,active=0 Of users will be tracked in the database , But it will not be loaded into the data structure in memory .
default_hostgroup: When the user's request does not match the rule , Send to by default hostgroup, Default 0.
default_schema: This user did not specify schema when , Default schema.
The default is NULL, In fact, the dependent variable mysql-default_schema Influence , The default is information_schema.
transaction_persistent: If set to 1, Connected to the ProxySQL After the conversation , If in a hostgroup The business has been opened on , So the following sql It's going to stay here hostgroup On , Whether it matches other routing rules or not , Until the end of the transaction .
frontend: If set to 1, Then the user name 、 Password pairs ProxySQL Authentication .
backend: If set to 1, Then the user name 、 The password is directed to mysqld The server authenticates .
Be careful : At present, all users need to “ front end ” and “ Back end “ Set to 1, The future version of ProxySQL Will separate between the front end and the back end crendentials. In this way , The front end will never know the credentials that connect directly to the back end , Force all to pass ProxySQL And increase the security of the system .
4.3.2. establish proxysql Monitoring users
Suppose you create proxysql The monitoring user name and password are :proxysql_monitor and q1w2e3r4.
Go to any place first pxc Create the user on the cluster node , And to confer USAGE jurisdiction .
The implementation details are as follows :
And then to proxysql Manage the interface to add pxc The monitoring user name and password information is as follows :
Last , Load into runtime And save it to Disk, as follows :
Finally, check the monitoring log :
SELECT * FROM monitor.mysql_server_connect_log ORDER BY time_start_us DESC LIMIT 10;
SELECT * FROM monitor.mysql_server_ping_log ORDER BY time_start_us DESC LIMIT 10;
You can see proxysql It's been properly monitored pxc Clustered 3 There are nodes . The previous default setting is monitor Users can't monitor .
4.3.3. establish proxysql Client users
Proxysql Want to be mysql middleware Provide for backend pxc Agent traffic service of cluster , You have to have client users . Note that this user is currently following the back end pxc The users of the cluster providing services to the outside world are the same .
Because it's already created in the previous article pxc The external service users of the cluster are root@%, The password is q1w2e3r4.
therefore , This section only needs to be in proxysql Create this in the management interface root@% Users can .
The implementation details are as follows :
Finally, don't forget to implement :
Then you can do whatever you want mysql Client login proxysql Of 60330 Port and root@%,q1w2e3r4 visit pxc colony .
Such as through navicat as follows :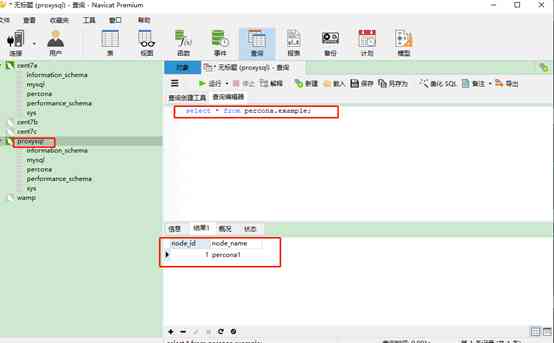
Before that 3.6 Section is in pxc Created on the cluster percona.example The data of the table can be passed here by proxysql stay navicat Check it out on the website , prove proxysql Can effectively provide services to the outside world .
4.3.4. verification proxysql Read load balancing
stay navicat Create a new query execution select @@hostname, give the result as follows :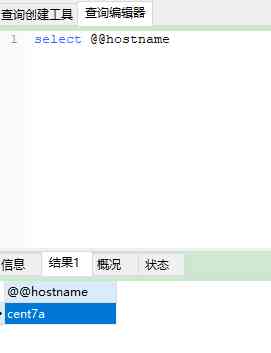
Again from navicat Create a new query , Do the same select @@hostname give the result as follows :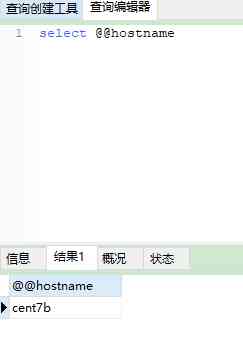
Open a new inquiry , Do the same select @@hostname, give the result as follows :
You can see different queries , From different pxc Different nodes of the cluster , It reflects the load balance .
stay Proxysql Management interface execution statement :
select * from stats.stats_mysql_connection_pool You can see right now Proxysql And backstage pxc Clustered connection pool situation , as follows :
You can see hostgroup by 0 Of 3 platform pxc Machine Service all connection Used And connection Ok.
