当前位置:网站首页>[flask] official tutorial -part1: project layout, application settings, definition and database access
[flask] official tutorial -part1: project layout, application settings, definition and database access
2022-07-06 01:28:00 【Coriander Chrysanthemum】
background
The previous articles should be roughly right flask Into the door . Actual combat is the last word , According to the actual combat content, if you don't understand anything, you need to consult materials and learn , In this way, we can have a deeper understanding of many concepts . Now let's have a simple overview according to the official tutorial web application demo.
This tutorial will lead us to create a project named Flaskr Basic Blog Application . Users will be able to register 、 Sign in 、 Create posts and edit or delete their own posts . You will be able to package and install the application on other computers .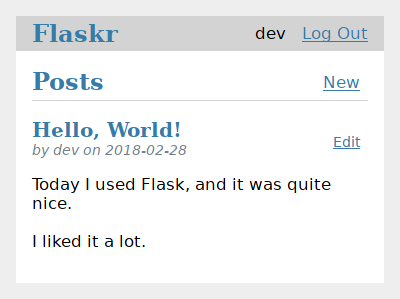
Then it is also assumed that readers are right python Have some understanding .
Although it aims to provide a good starting point , But this tutorial does not cover Flask All functions of . This tutorial uses only Flask and Python Content provided . In another project , You may decide to use Extensions Or other libraries to simplify some tasks .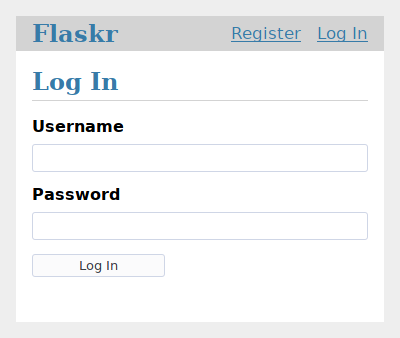
Flask Very flexible . It does not require you to use any specific project or code layout . however , At the first beginning , Using a more organized approach would be very helpful . This means that this tutorial will require some template files , But this is done to avoid many common pitfalls encountered by new developers , And it creates a project that is easy to expand . Once you know Flask Be more familiar with , You can jump out of this structure , make the best of Flask The flexibility of the .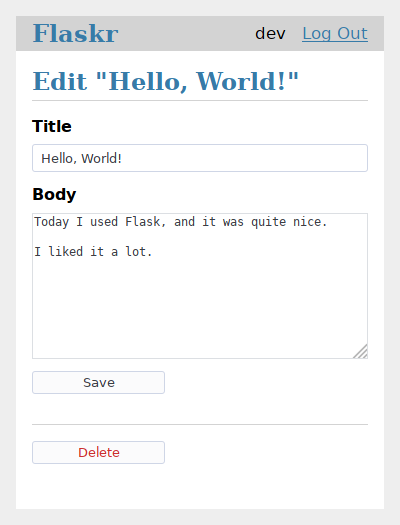
The official address of this project code is as follows :https://github.com/pallets/flask/tree/main/examples/tutorial
This part mainly includes : Project layout 、 Application settings 、 Define and access three parts of the database .
The program development environment is also the virtual machine created before and conda A virtual environment . First, find a path to create a folder :
mkdir flask-tutorial
Project layout
Although for flask Come on , A script file can open a web application, But as the number of projects increases , Writing each module separately will make it easier to develop and manage . In this case , stay flask-tutorial There is a similar layout under the folder ( Official documents ):
/home/user/Projects/flask-tutorial
├── flaskr/
│   ├── __init__.py
│   ├── db.py
│   ├── schema.sql
│   ├── auth.py
│   ├── blog.py
│   ├── templates/
│   │   ├── base.html
│   │   ├── auth/
│   │   │   ├── login.html
│   │   │   └── register.html
│   │   └── blog/
│   │       ├── create.html
│   │       ├── index.html
│   │       └── update.html
│   └── static/
│       └── style.css
├── tests/
│   ├── conftest.py
│   ├── data.sql
│   ├── test_factory.py
│   ├── test_db.py
│   ├── test_auth.py
│   └── test_blog.py
├── venv/
├── setup.py
└── MANIFEST.in
besides , This project can install one python Install the package into the system , The startup is also a comparison scheme and a test module is added . It can be said that although the sparrow is small, it has five internal organs .
If you use git Version control , There should be git Relevant directories, etc . Of course , Just now I mentioned that this project can be like installation python The bag is the same , Then while installing , Some files will be generated , This is also not in the current directory .
And then we can see , Static folder for project ,templates All folders are flaskr Under the table of contents .
Application settings
One flask Applications are essentially Flask An instance of this class . All about this application , For example, configuration information 、URL You need to register in this class . establish Flask The most direct way for an application is to create a global... Directly at the top of the code Flask example , For example, the following example (hello.py):
from flask import Flask

app = Flask(__name__)


@app.route('/')
def hello():
    return 'Hello, World!'
Although this is simple and useful in some cases , But as the project develops , It may lead to some thorny problems .
We can create it inside the function , Instead of creating globally Flask example . This function is called application application factory. Any configuration required by the application 、 Registration and other settings will be done inside the function , Then it will return to the application . This way is still very interesting , Let's move on .
This Application Factory
Before that, use pycharm Connect to the development environment .
Now it's time to start writing code , Are you looking forward to it . Create another one under the project path packageflaskr, If using pycharm establish , Automatically created __init__.py file , as follows :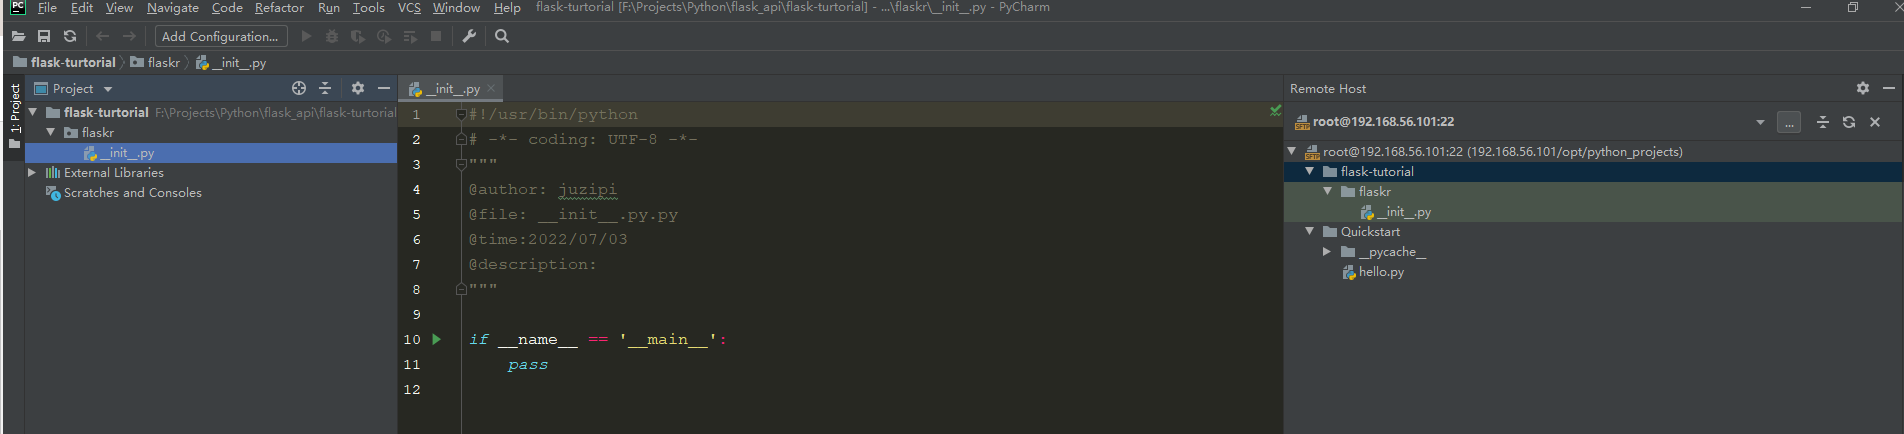
This Application Factory The main content of is in this __init__.py In file , Now add the following to it :
import os

from flask import Flask


def create_app(test_config=None):
    # create and configure the app
    app = Flask(__name__, instance_relative_config=True)
    app.config.from_mapping(
        SECRET_KEY='dev',
        DATABASE=os.path.join(app.instance_path, 'flaskr.sqlite'),
    )

    if test_config is None:
        # load the instance config, if it exists, when not testing
        app.config.from_pyfile('config.py', silent=True)
    else:
        # load the test config if passed in
        app.config.from_mapping(test_config)

    # ensure the instance folder exists
    try:
        os.makedirs(app.instance_path)
    except OSError:
        pass

    # a simple page that says hello
    @app.route('/hello')
    def hello():
        return 'Hello, World!'

    return app
What does the above code mean ?
create_appIs an application factory function ;app=Flask(__name__, instance_relative_config=True), establish Flask example ,__name__It is the present. Python Module name .app It is through it to locate and set some paths .instance_relative_config=Truetell app The program configuration file is relative to the instance folder , It can be easily read app Configuration file for . The instance folder is located in flaskr Out of bag , It can be saved Local data that should not be submitted to version control , For example, configure secrets and database files .
app.config.from_mapping()Set some default configurations that the application will use :SECRET_KEY,Flask And extended use SECRET_KEY To secure data . It's set to ‘dev’ To provide convenient values during development , But it should be overwritten with random values when deploying .DATABASE:SQLite The path where the database file will be saved . It is located inapp.instance_pathNext , This is a Flask The path chosen for the instance folder .
app.config.from_pyfile(): Use... From the instance folder config.py file ( If there is ) The obtained value overrides the default configuration . for example , At deployment time , This can be used to set up a real SECRET_KEY.test_config: It can be passed to the factory , And will be used instead of instance configuration . In this way, the tests you will write later in this tutorial can be configured independently of any development values you have configured .
os.makedirs(): Make sureapp.instance_pathThere is .Flask The instance folder will not be created automatically , But you need to create it , Because the project will be created there SQLite Database files .@app.route(): Create a simple route , To see how the application works before moving on to the rest of the tutorial . It's inURL /helloAnd the function that returns the response , String character “Hello, World!”.
app Operation of
Now we can use it flask Command to run the application . When the terminal is running , Need to tell Flask Where did you find us application, By setting application For development mode , It is convenient for us to debug , Development mode will display the interactive debugger when the page throws an exception , And restart the server when you change the code . You can keep it running , Then follow the tutorial to reload the browser page .. It should be noted that , When the terminal executes the run command , Need to be in flask-tutorial Under the folder .

In order to enable the host to access this service , I added --host=0.0.0.0 Parameters . The operation process is as follows :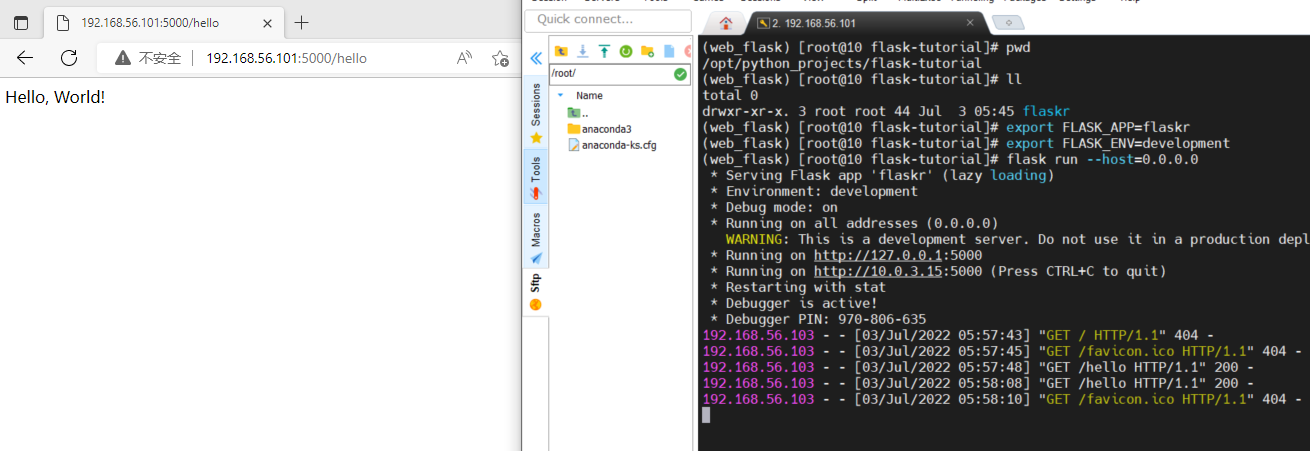
If port occupancy occurs , You can refer to :【Centos7】 A firewall (firewall) Summary of common commands
Define and access databases
A simple application It's ready to run . The project we wrote is a blog system , Then you need data to store blogs , User information content . To be sure, this system is relatively simple , It uses a relatively lightweight database SQLite(python sqlite3).
SQLite Very convenient , Because it does not need to set up a separate database server and is built in Python. however , If concurrent requests try to write to the database at the same time , They will slow down as each write sequence occurs . Small applications don't notice this . Once you get bigger , You may want to switch to a different database .
This small project will not be introduced in depth sqlite Use , You can check the relevant content online by yourself .
Connect to database
Use SQLite database ( And most of the others Python Database library ) The first thing to do is to create a connection to it . Any queries and operations are performed using connections , The connection closes after the work is completed .
stay Web In the application , This connection is usually associated with the request . It is created when processing requests , And close before sending the response .
Now we are flaskr Create under file db.py file , And write the following code in this document :
import sqlite3

import click
from flask import current_app, g
from flask.cli import with_appcontext


def get_db():
    if 'db' not in g:
        g.db = sqlite3.connect(
            current_app.config['DATABASE'],
            detect_types=sqlite3.PARSE_DECLTYPES
        )
        g.db.row_factory = sqlite3.Row

    return g.db


def close_db(e=None):
    db = g.pop('db', None)

    if db is not None:
        db.close()
For the code above , The explanation is as follows :
g: It is a special object , It is unique for each request . It is used to store data that may be accessed by multiple functions during the request . If called for the second time in the same request get_db, Then the connection will be stored and reused , Instead of creating new connections .current_app: It is another special object , It points to the Flask Applications . Because we used application factory, So there are no application objects when writing the rest of the code .get_dbWill be called when the application is created and processing the request , So you can usecurrent_app.sqlite3.connect(): It is established with DATABASE Configure the connection of the file pointed to by the key . The file does not have to exist , And it won't exist until you initialize the database later .sqlite3.Row: Tell the connection that the return behavior is similar to dicts The line of . This allows access to columns by name .close_db(): By checking whetherg.dbTo check whether a connection has been created . If the connection exists , Turn it off . following , We will tell the application aboutclose_dbfunction , So that it can be called after each request .
Create table
stay SQLite in , Data is stored in tables and columns . These need to be created before you store and retrieve data .Flaskr Users will be stored in user In the table , And store the post in post In the table . Use the SQL Command to create a file flaskr/schema.sql:
DROP TABLE IF EXISTS user;
DROP TABLE IF EXISTS post;

CREATE TABLE user (
  id INTEGER PRIMARY KEY AUTOINCREMENT,
  username TEXT UNIQUE NOT NULL,
  password TEXT NOT NULL
);

CREATE TABLE post (
  id INTEGER PRIMARY KEY AUTOINCREMENT,
  author_id INTEGER NOT NULL,
  created TIMESTAMP NOT NULL DEFAULT CURRENT_TIMESTAMP,
  title TEXT NOT NULL,
  body TEXT NOT NULL,
  FOREIGN KEY (author_id) REFERENCES user (id)
);
The following is db.py Add a little more sql Running commands .
def init_db():
    db = get_db()

    with current_app.open_resource('schema.sql') as f:
        db.executescript(f.read().decode('utf8'))


@click.command('init-db')
@with_appcontext
def init_db_command():
    """Clear the existing data and create new tables."""
    init_db()
    click.echo('Initialized the database.')
It should be noted that :
open_resource()Will openflaskrA file in the directory , It's very useful , Because you may not know where the location is when you deploy the application in the future .get_dbWill return a database connection , Used to execute commands read from files .click.command()Define a name init-db The command line command of , It calls init_db Function and display the success message to the user . This can be seen later when initializing the database .
Application registration
close_db and init_db_command The function needs to be registered in the application instance ; otherwise , They will not be used by applications . however , Because you are using factory functions , Therefore, this instance is not available when writing functions . Then you need to write a function that accepts the application and registers . Need to be in db.py Add the following functions to the :
def init_app(app):
    app.teardown_appcontext(close_db)
    app.cli.add_command(init_db_command)
Program description :
app.teardown_appcontext()tell Flask Call this function when cleaning up after returning the response .app.cli.add_command()Add one that can be used flask New command called by command .
Import and call this function from the factory . Before returning to the application , Put the new code at the end of the factory function . The operation is as follows :
def create_app():
    app = ...
    # existing code omitted

    from . import db
    db.init_app(app)

    return app
Initialize database file
Now? init-db Already registered in the application , have access to flask Command to call it , Similar to the previous run command .
notes : If you are still running the server from the previous page , You can stop the server , Or run this command in the new terminal . If you use a new terminal , Please remember to change to your project directory and activate as before . You also need to set FLASK_APP and FLASK_ENV, Remember in the same way as before .
Now let's run this command on the terminal to initialize the database :flask init-db
After execution , We can do it in flaskr Of instance Create a flaskr.sqlite file .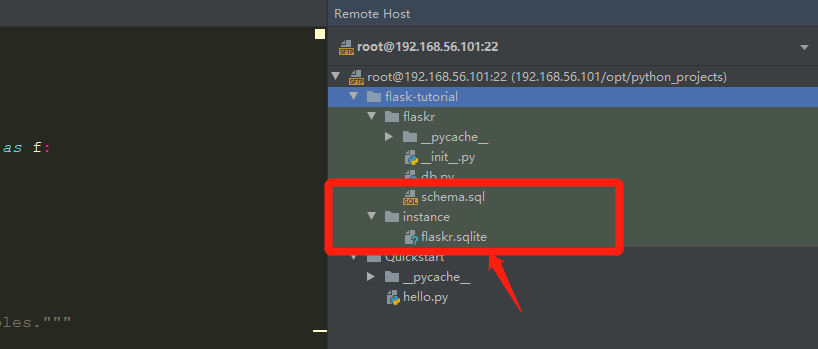
You can also download the database file to this computer , And then use pycharm Database view tool to view the table structure , as follows :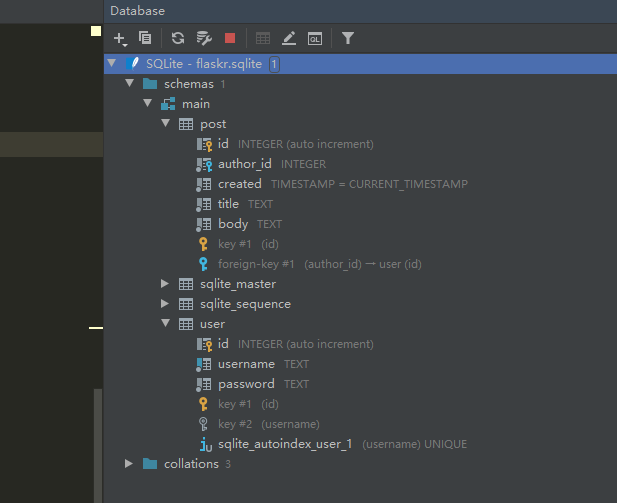
This command line command flask init-db And db.py in init_db_command() Functions are bound , This function needs to be registered to app In this application , Because this function needs to use app Some configurations in the application , Such as :schema.sql Folder where the file is located, etc .
边栏推荐
- The basic usage of JMeter BeanShell. The following syntax can only be used in BeanShell
- In the era of industrial Internet, we will achieve enough development by relying on large industrial categories
- 记一个 @nestjs/typeorm^8.1.4 版本不能获取.env选项问题
- Code Review关注点
- ORA-00030
- 【Flask】获取请求信息、重定向、错误处理
- General operation method of spot Silver
- 基于DVWA的文件上传漏洞测试
- 1791. Find the central node of the star diagram / 1790 Can two strings be equal by performing string exchange only once
- 现货白银的一般操作方法
猜你喜欢

500 lines of code to understand the principle of mecached cache client driver
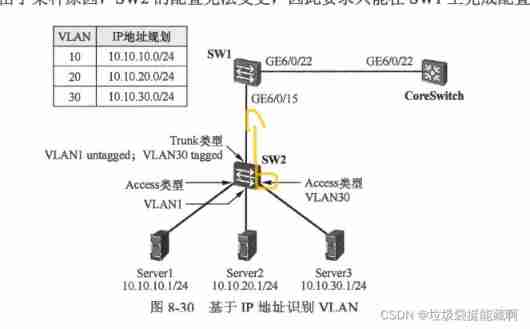
Huawei Hrbrid interface and VLAN division based on IP
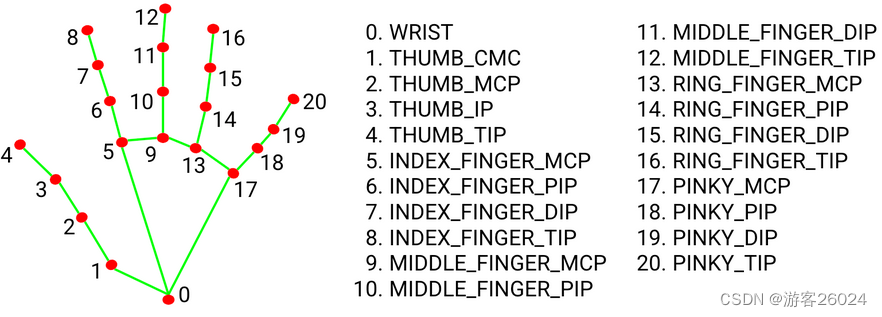
3D视觉——4.手势识别(Gesture Recognition)入门——使用MediaPipe含单帧(Singel Frame)和实时视频(Real-Time Video)
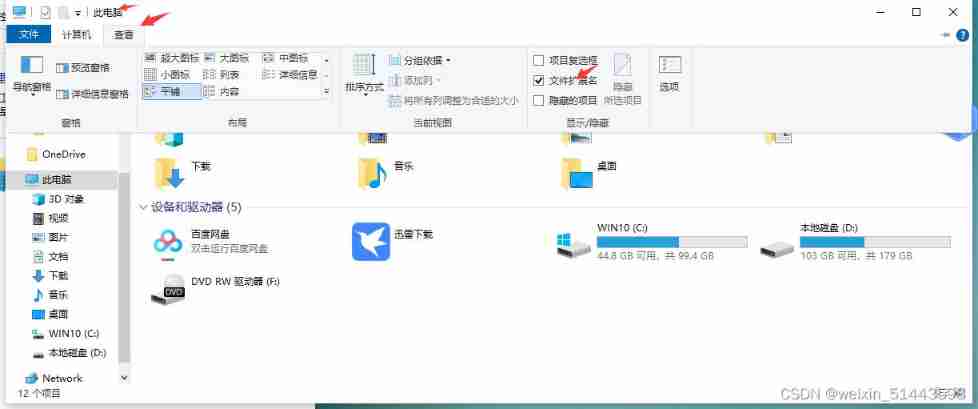
Win10 add file extension
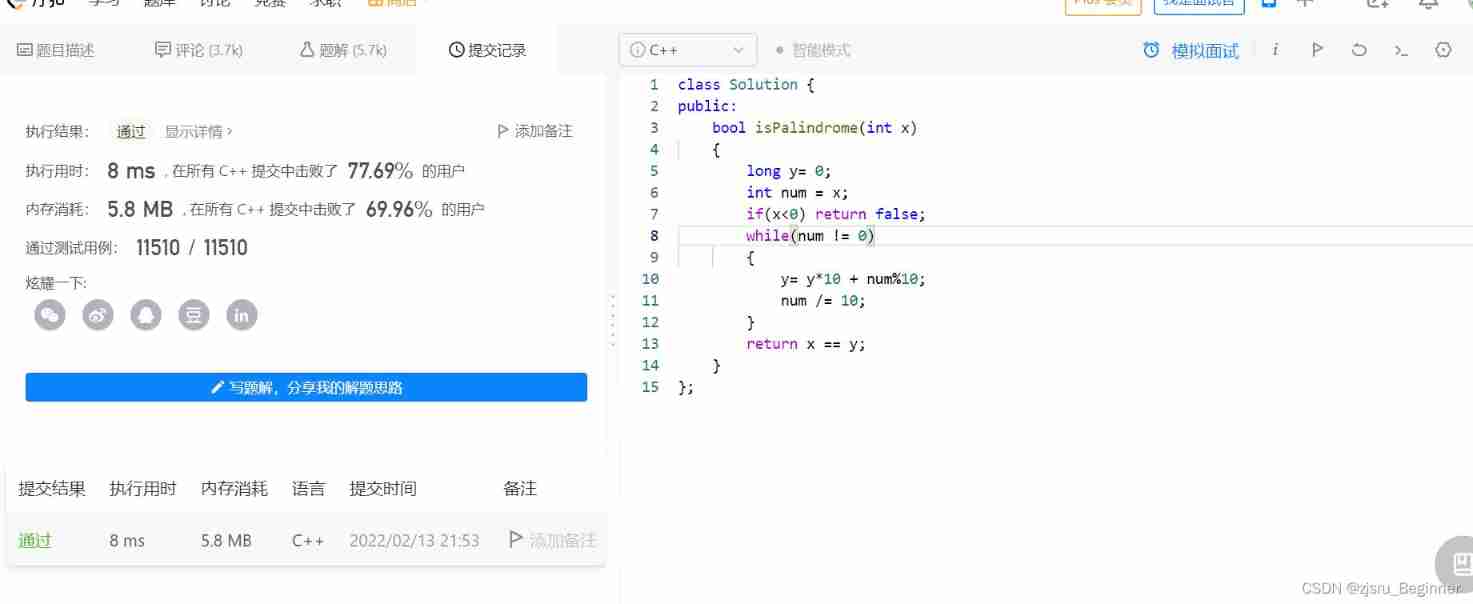
Force buckle 9 palindromes
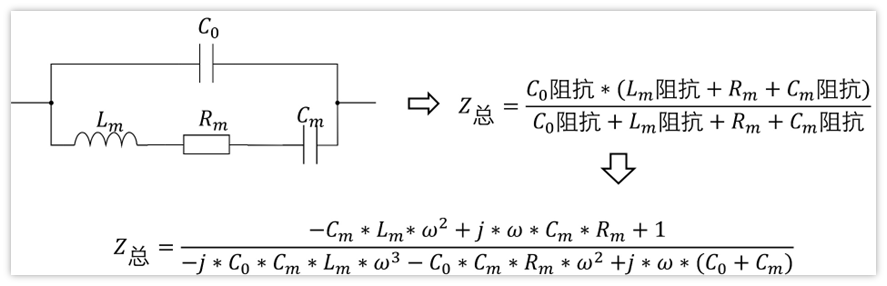
How does the crystal oscillator vibrate?
![[technology development -28]: overview of information and communication network, new technology forms, high-quality development of information and communication industry](/img/94/05b2ff62a8a11340cc94c69645db73.png)
[technology development -28]: overview of information and communication network, new technology forms, high-quality development of information and communication industry

servlet(1)
leetcode刷题_平方数之和
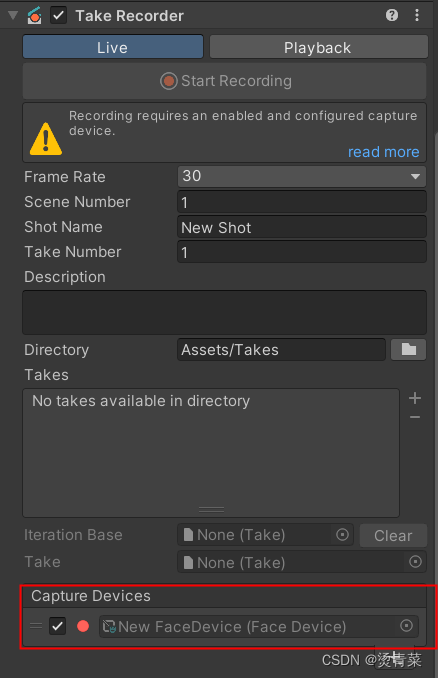
Unity | 实现面部驱动的两种方式
随机推荐
[detailed] several ways to quickly realize object mapping
[Arduino syntax - structure]
Unity VR resource flash surface in scene
ClickOnce 不支持请求执行级别“requireAdministrator”
干货!通过软硬件协同设计加速稀疏神经网络
How to extract MP3 audio from MP4 video files?
3D视觉——4.手势识别(Gesture Recognition)入门——使用MediaPipe含单帧(Singel Frame)和实时视频(Real-Time Video)
Threedposetracker project resolution
Une image! Pourquoi l'école t'a - t - elle appris à coder, mais pourquoi pas...
282. Stone consolidation (interval DP)
Leetcode1961. 检查字符串是否为数组前缀
Idea sets the default line break for global newly created files
c#网页打开winform exe
Opinions on softmax function
How does the crystal oscillator vibrate?
How to see the K-line chart of gold price trend?
[机缘参悟-39]:鬼谷子-第五飞箝篇 - 警示之二:赞美的六种类型,谨防享受赞美快感如同鱼儿享受诱饵。
Internship: unfamiliar annotations involved in the project code and their functions
Alibaba-Canal使用详解(排坑版)_MySQL与ES数据同步
【Flask】静态文件与模板渲染