当前位置:网站首页>ZABBIX 5.0 - LNMP environment compilation and installation
ZABBIX 5.0 - LNMP environment compilation and installation
2022-07-05 12:19:00 【Xiaobo】
Deployment steps :
 One 、 preparation

 close selinux And the firewall

1. vi /etc/selinux/config     or

 sed -i ‘s/SELINUX=enforcing/SELINUX=disabled’  /etc/selinux/config

2.  systemctl stop firewalld     systemctl disable firewalld    or

 service iptables stop     chkconfig iptables off


 Two 、 install mysql database

1.  uninstall mysql and mariadb Related software and create mysql user

rpm -e --nodeps mariadb-libs

useradd -d /home/mysql  mysql


2. Download it on the official website rpm package

# rpm -ivh mysql80-community-release-el7-3.noarch.rpm

wget https://dev.mysql.com/get/mysql57-community-release-el7-9.noarch.rpm
rpm -ivh mysql57-community-release-el7-9.noarch.rpm

yum -y install mysql-community-server


3. start-up mysql  Enter settings root password

systemctl start mysqld.service

sudo grep 'temporary password' /var/log/mysqld.log

mysql -u root -p

mysql> alter user 'root'@'localhost' identified by 'Galaxy123..';

mysql> flush privileges;

 or

mysqladmin -uroot -p'xxxx' password 'xxxxx'


4. establish zabbix Database and zabbix Users and permissions

mysql> CREATE DATABASE zabbix character set utf8 collate utf8_bin;

mysql> CREATE USER 'zabbix'@'%' IDENTIFIED BY 'xxxxxx';

mysql> GRANT ALL PRIVILEGES ON zabbix.* TO 'zabbix'@'%' WITH GRANT OPTION;

mysql> FLUSH PRIVILEGES;

mysql> quit;


 3、 ... and 、 Import zabbix data

1.tar xf zabbix-5.0.13.tar.gz

2.cd  ./zabbix-5.0.13/database/mysql

3.mysql -uzabbix -p zabbix < ./schema.sql

4.mysql -uzabbix -p zabbix < ./images.sql

5.mysql -uzabbix -p zabbix < ./data.sql

 or

mysql>use zabbix;

mysql>source /opt/zabbix-5.0.3/database/mysql/schema.sql

mysql>source /opt/zabbix-5.0.3/database/mysql/data.sql

mysql>source /opt/zabbix-5.0.3/database/mysql/images.sql


 Four 、 Compilation and installation zabbix-server

1. install zabbix The support function of depends on the package

yum install -y gcc mysql-community-devel net-snmp-devel libxml2-devel  unixODBC-devel libcurl-devel libssh2-devel OpenIPMI-devel openssl-devel openldap-devel libevent-devel pcre-devel


2. install java Environmental Science

yum install -y java-1.8.0-openjdk  java-1.8.0-openjdk-devel


3. Compilation and installation

cd  /opt/zabbix-5.0.13/

./configure --prefix=/usr/local/zabbix --enable-server    --enable-agent --with-mysql --enable-ipv6 --with-libcurl  --with-libxml2 --with-openipmi --with-net-snmp --with-ssh2 --with-unixodbc --with-openssl   --enable-java


4.make && make install


5. modify server The configuration file

LogFile=/usr/local/zabbix/log/zabbix_server.log

LogFileSize=5

PidFile=/usr/local/zabbix/zabbix_server.pid

DBHost=192.0.0.38

DBName=zabbix

DBUser=zabbix

DBPassword=

AllowRoot=1


6. modify agent The configuration file

PidFile=/usr/local/zabbix/zabbix_agentd.pid

LogType=file

LogFile=/usr/local/zabbix/log//zabbix_agentd.log

Server=

ServerActive=

Hostname=

Include=/usr/local/zabbix/etc/zabbix_agentd.conf.d/*.conf

AllowRoot=1

UnsafeUserParameters=1


7.mkdir /usr/local/zabbix/log


 5、 ... and 、 Compilation and installation Nginx

1. tar xf  nginx-1.20.1.tar.gz

2. cd  ./nginx-1.20.1


3. Install dependency packages

yum install -y gcc  pcre pcre-devel zlib zlib-devel openssl openssl-devel


4. Compilation and installation
./configure --prefix=/usr/local/nginx --with-http_stub_status_module  --with-http_ssl_module  --with-pcre

### http_ssl_module Support https;stub_status_module Support monitoring status

5.make && make install


6. modify nginx Configuration file to support php-fpm
server {

1.listen   80;      ### The port can be changed or not

2.server_name  localhost;       ### Change cost machine ip

3.index  index.html index.htm index.php;    ### add to index.php

4.location /nginx_status {

                stub_status     on;

            }              ### Add this field to open nginx_status modular , monitor nginx need


5.#location ~ \.php$ {

    #    root           html;             ###/usr/local/nginx/html

    #    fastcgi_pass   127.0.0.1:9000;

    #    fastcgi_index  index.php;

    #   fastcgi_param  SCRIPT_FILENAME $document_root$fastcgi_script_name;

    #    include        fastcgi_params;

    #}

### Uncomment this section , modify fastcgi_param Field :$document_root$fastcgi_script_name


 6、 ... and 、 Compilation and installation PHP

1.tar xf php-7.3.29.tar.gz

2.cd php-7.3.29

3. Install dependency packages

yum install -y libjpeg-devel  libpng-devel libxml2-devel bzip2-devel libcurl-devel freetype-devel gd openldap-devel openssl-devel


4. Compilation and installation

./configure --prefix=/usr/local/php --enable-fpm --enable-mbstring --with-openssl    --with-mysqli --with-mysql-sock --with-gd   --enable-pdo --with-pdo-mysql --with-gettext  --enable-sockets --enable-bcmath    --enable-xml --with-bz2  --with-freetype-dir=/usr/local --with-libxml-dir=/usr/local    --with-zlib --with-curl --with-jpeg-dir=/usr/local --with-png-dir=/usr/local  --with-ldap --with-libdir=lib64

### --enable-fpm Enable php-fpm . --with-mysql and  --enable-gd-native-ttf   stay PHP7.3 To discard  --with-pdo-mysql Instead of --with-mysql, --enable-gd-native-ttf Parameter discard has no effect

#PHP7.4 Version compilation error configure: WARNING: unrecognized options: --with-gd, --with-freetype-dir, --with-libxml-dir, --with-jpeg-dir, --with-png-dir   The reason is that these parameters are in 7.4 Version does not support
# resolvent :  Use these three parameters instead  --enable-gd --with-jpeg --with-freetype


5.make && make install


6. modify php The configuration file

cd /opt/php-7.3.29

cp php.ini-production  /usr/local/php/lib/php.ini

vi /usr/local/php/lib/php.ini

    date.timezone = Asia/Shanghai

    post_max_size = 20M

    upload_max_filesize = 20M

    max_execution_time = 300

    max_input_time = 300

    memory_limit = 1024M

7.
cd /usr/local/php/etc

cp php-fpm.conf.default   php-fpm.conf

cp php-fpm.d/www.conf.default   php-fpm.d/www.conf


 7、 ... and 、 Copy zabbix Front end to nginx Default web Catalog

cd /opt/zabbix-5.0.13/

cp -a ui/* /usr/local/nginx/html/
To write systemd Service startup file , Easy to manage
vi /usr/lib/systemd/system/zabbix_server.service
[Unit]
Description=Zabbix Server
After=syslog.target
After=network.target

[Service]
Environment="CONFFILE=/usr/local/zabbix/etc/zabbix_server.conf"
Type=forking
PIDFile=/usr/local/zabbix/zabbix_server.pid
Restart=on-failure
KillMode=control-group
ExecStart=/usr/local/zabbix/sbin/zabbix_server -c $CONFFILE
ExecStop=/bin/kill -SIGTERM $MAINPID
RestartSec=10s

[Install]
WantedBy=multi-user.target
vi /lib/systemd/system/nginx.service
[Unit]
Description=nginx			#  Describe the service
After=network.target			#  Describe the type of service

[Service]
Type=forking				#  Background operation
ExecStart=/usr/local/nginx/sbin/nginx			#  function
ExecReload=/usr/local/nginx/sbin/nginx -s reload		#  restart
ExecStop=/usr/local/nginx/sbin/nginx -s quit		#  stop it
PrivateTmp=true				#  Allocate separate temporary space to services

[Install]
WantedBy=multi-user.target		#  Multi user
vi /usr/lib/systemd/system/php-fpm.service
[Unit]
Description=php-fpm
After=network.targe

[Service]
Type=forking
ExecStart=/usr/local/php/sbin/php-fpm
PrivateTmp=true

[Install]
WantedBy=multi-user.target
vi /usr/lib/systemd/system/zabbix_agentd.service
[Unit]
Description=Zabbix Agent
After=syslog.target
After=network.target

[Service]
Environment="CONFFILE=/usr/local/zabbix/etc/zabbix_agentd.conf"
Type=forking
PIDFile=/usr/local/zabbix/zabbix_agentd.pid
Restart=on-failure
KillMode=control-group
ExecStart=/usr/local/zabbix/sbin/zabbix_agentd -c $CONFFILE
ExecStop=/bin/kill -SIGTERM $MAINPID
RestartSec=10s

[Install]
WantedBy=multi-user.target
# matters needing attention mysql 8.0 edition problem
# stay MySQL 8.0.11 in ,caching_sha2_password Is the default authentication plug-in , It's not what it used to be
mysql_native_password. About the impact of this change on server operation and the compatibility of the server with clients and connectors
 Information about , see also caching_sha2_password As the preferred authentication plug-in .
( Translated from https://dev.mysql.com/doc/refman/8.0/en/caching-sha2-pluggable-authentication.html)

 from 8.0.11 Since version , No longer like mysql5.7 As in previous versions , When setting the user password, the default authentication method is
caching_sha2_password, If you find an upgrade mysql8.0.11 The original program cannot be connected mysql,
 Can be quickly in mysql command line client The client is set to mysql5.7 And previous versions of password authentication ,
 meanwhile MYSQL8.0.11 The way to change the password is not the same as before , The original order to partially change the password is mysql8.0.11 Next not available .
> use mysql
> ALTER USER 'root'@'localhost' IDENTIFIED WITH mysql_native_password BY ' Your password ';
> FLUSH PRIVILEGES;

 Two ,mysql  The latest version is installed 8.0.11 After the user is created and authorized , Prompt for authorized users to connect to the database
The server requested authentication method unknown to the client
 After consulting some relevant materials, it is found that it is due to the new version mysql Account password unlocking mechanism is inconsistent
 terms of settlement :
 Delete the created user and authorization ,
 find mysql Configure the file and add
default_authentication_plugin=mysql_native_password
 Change to the original verification method , Then create a new user and authorize
 or
mysql -uroot -p
use mysql;
ALTER USER 'root'@'localhost' IDENTIFIED WITH mysql_native_password BY ' Your password ';
边栏推荐
- Linux Installation and deployment lamp (apache+mysql+php)
- Learn the memory management of JVM 03 - Method area and meta space of JVM
- Liunx prohibit Ping explain the different usage of traceroute
- Acid transaction theory
- July Huaqing learning-1
- Learn the garbage collector of JVM -- a brief introduction to Shenandoah collector
- The survey shows that traditional data security tools cannot resist blackmail software attacks in 60% of cases
- Learn the memory management of JVM 02 - memory allocation of JVM
- Automated test lifecycle
- Network five whip
猜你喜欢
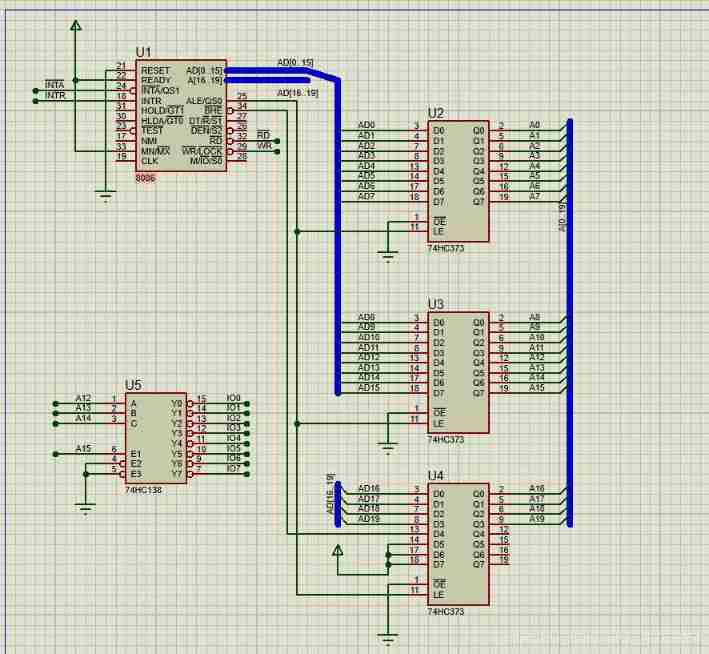
16 channel water lamp experiment based on Proteus (assembly language)
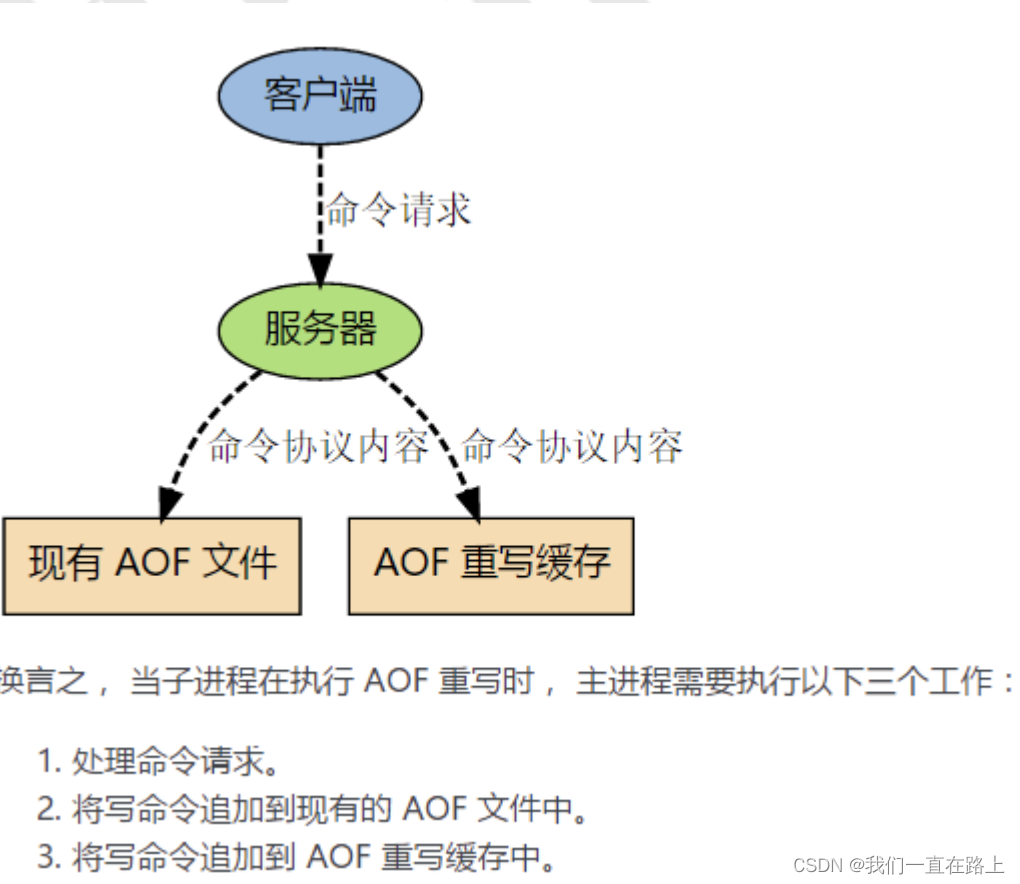
Principle of persistence mechanism of redis
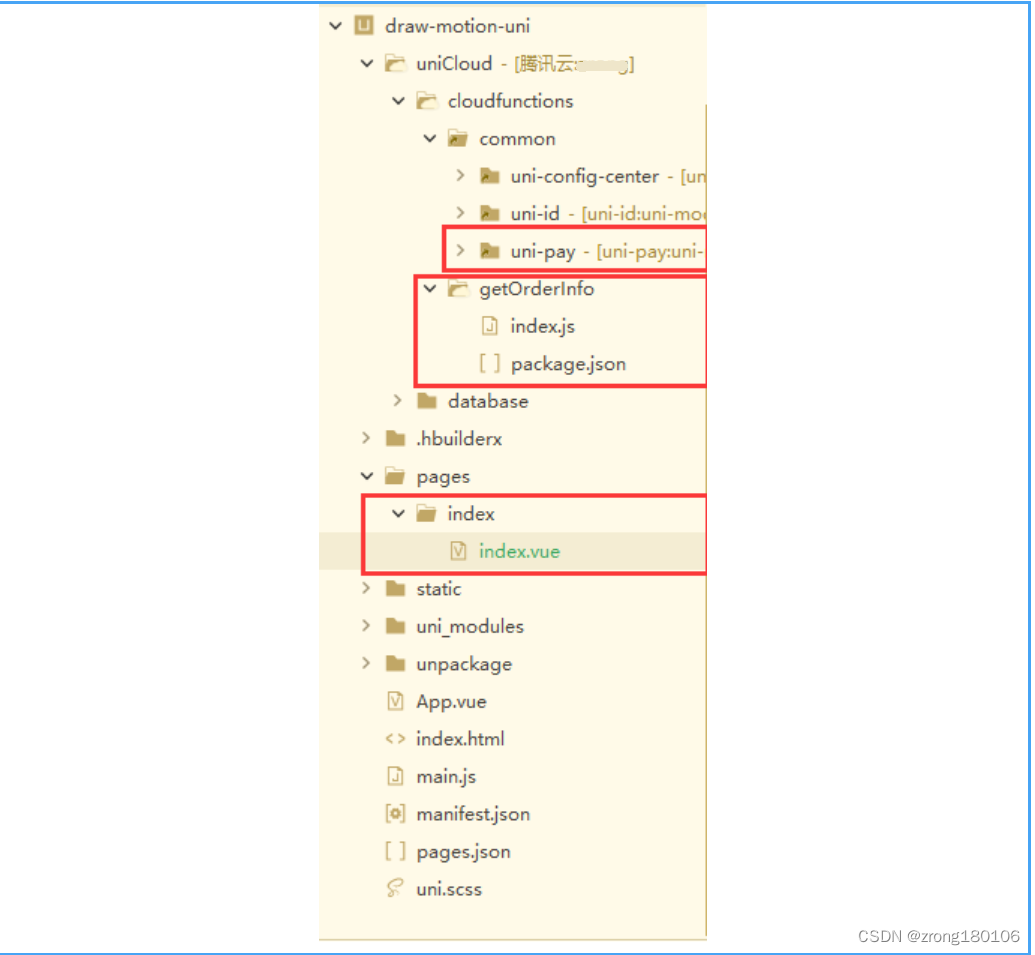
Uniapp + unicloud + Unipay realize wechat applet payment function

MySQL splits strings for conditional queries
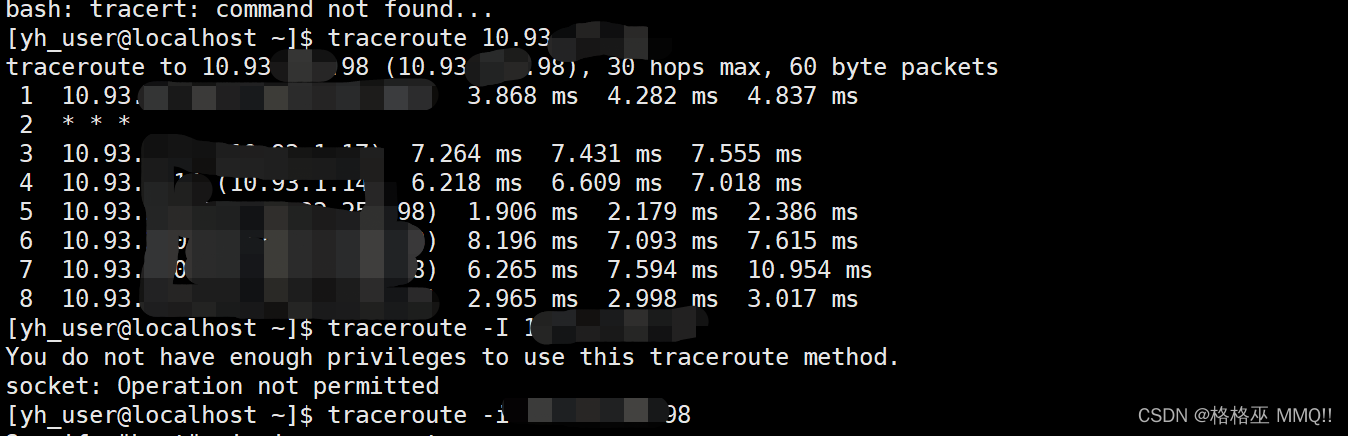
Liunx prohibit Ping explain the different usage of traceroute
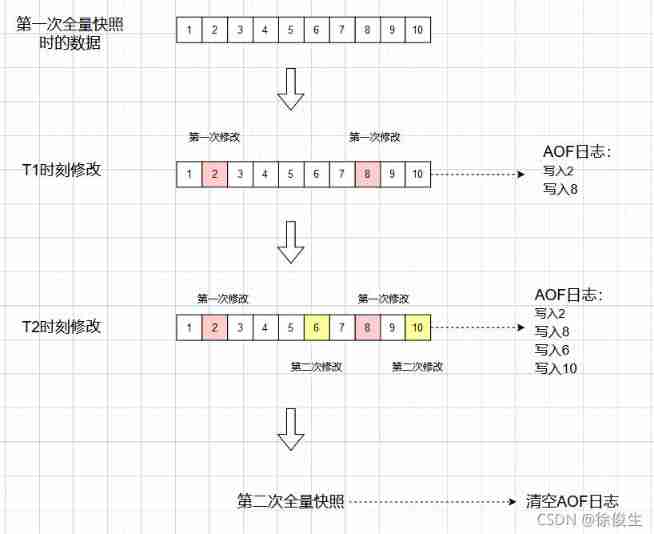
Understand redis persistence mechanism in one article
自动化测试生命周期
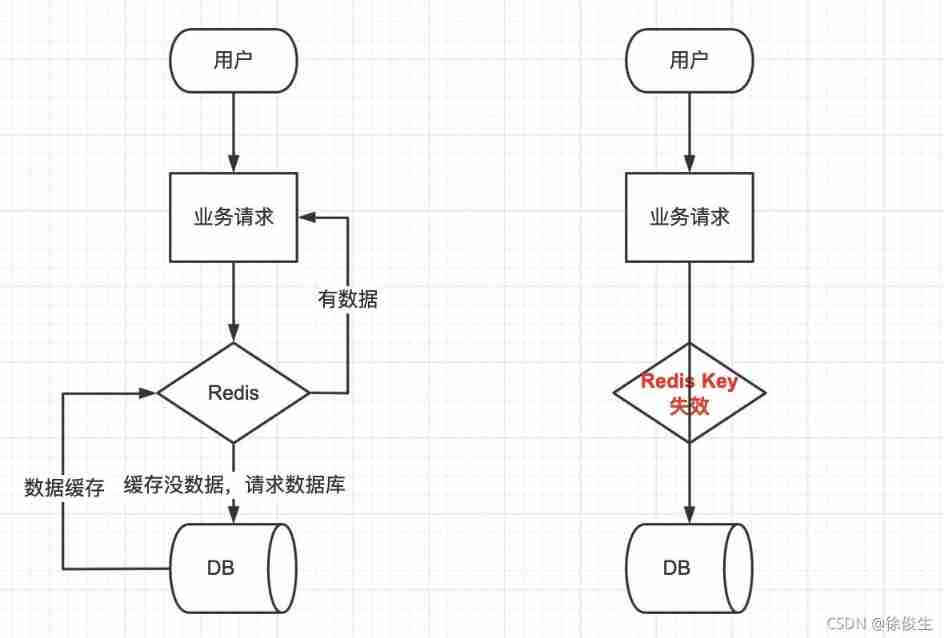
About cache exceptions: solutions for cache avalanche, breakdown, and penetration
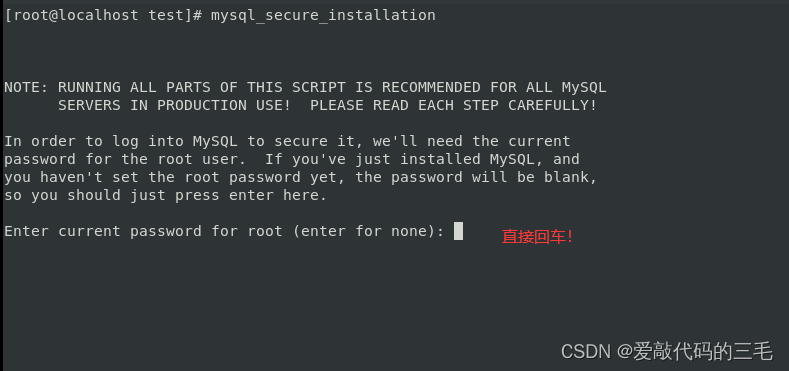
Linux Installation and deployment lamp (apache+mysql+php)
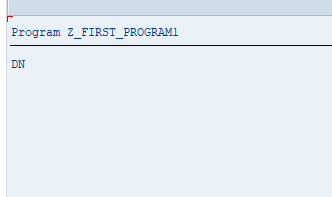
ABAP table lookup program

随机推荐
Redis cluster (master-slave) brain crack and solution
[HDU 2096] 小明A+B
16 channel water lamp experiment based on Proteus (assembly language)
HiEngine:可媲美本地的云原生内存数据库引擎
Learn the garbage collector of JVM -- a brief introduction to Shenandoah collector
Differences between IPv6 and IPv4 three departments including the office of network information technology promote IPv6 scale deployment
MySQL index (1)
什么是数字化存在?数字化转型要先从数字化存在开始
Troubleshooting of high memory usage of redis in a production environment
POJ-2499 Binary Tree
JS for loop number exception
byte2String、string2Byte
Read and understand the rendering mechanism and principle of flutter's three trees
JS for循环 循环次数异常
byte2String、string2Byte
多表操作-自关联查询
GPS數據格式轉換[通俗易懂]
Get all stock data of big a
1 plug-in to handle advertisements in web pages
手机 CPU 架构类型了解