当前位置:网站首页>Use of tiledlayout function in MATLAB
Use of tiledlayout function in MATLAB
2022-07-04 14:15:00 【jk_ one hundred and one】
Catalog
Specify the flow block arrangement
Create shared titles and axis labels
Set properties for the coordinate area
Create coordinate areas that occupy multiple rows and columns
Place the coordinate area object from a specific numbered block
Display polar and geographic maps
Reconfigure the contents of the previous block
Reconfigure the cross block coordinate area
Replace the contents of the previous block
Show the shared color bar in a separate block
Manually create and configure coordinate areas
tiledlayout The function is to create a block diagram layout .
grammar
tiledlayout(m,n)
tiledlayout('flow')
tiledlayout(___,Name,Value)
tiledlayout(parent,___)
t = tiledlayout(___)
explain
tiledlayout(m,n) Create a block diagram layout , Used to display multiple drawings in the current drawing window . The layout has fixed m×n Block arrangement , Up to m*n Plots . If there is no picture window ,MATLAB A drawing window will be created and the layout will be placed in it . If the current drawing window contains an existing coordinate area or layout ,MATLAB It will be replaced with a new layout .
A block diagram layout contains an invisible block grid that covers the entire window or parent container . Each block can contain a coordinate area for displaying the drawing . After creating the layout , call nexttile Function to place the coordinate area object into the layout . Then call the drawing function to draw in the coordinate area .
tiledlayout('flow') Specify the layout 'flow' Block arrangement . first , Only one empty block fills the entire layout . When you call nexttile when , The layout will be adjusted as needed to adapt to the new coordinate area , At the same time, keep the aspect ratio of all blocks about 4:3.
tiledlayout(___,Name,Value) Use one or more names - Value specifies other options for the layout for the group parameter . Please specify these options after all other input parameters . for example ,tiledlayout(2,2,'TileSpacing','compact') Create a 2×2 Layout , The minimum spacing between blocks . About the attribute list , see also TiledChartLayout attribute .
tiledlayout(parent,___) Create a layout in the specified parent container instead of in the current drawing window . Please specify the parent container before all other input parameters .
t = tiledlayout(___) return TiledChartLayout object . After creating the layout , Use t Configure the properties of the layout .
Example
establish 2×2 Layout
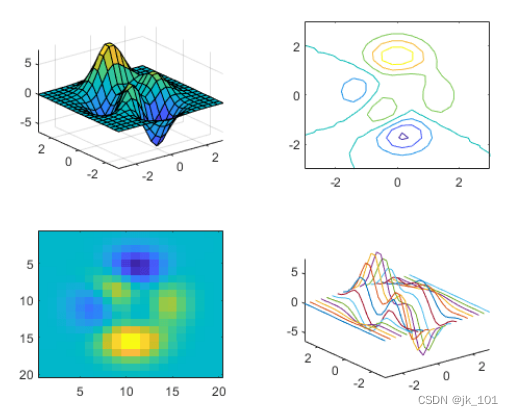
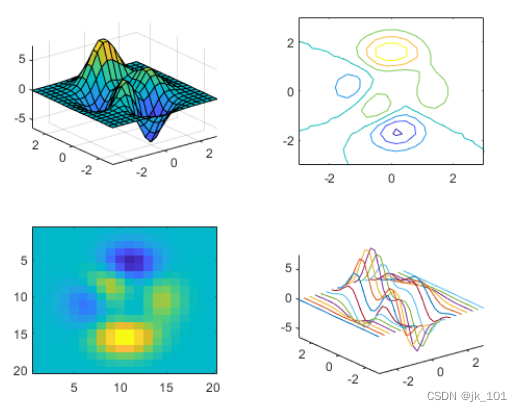
Create a 2×2 Block diagram layout , And call peaks Function to get the coordinates of the predefined surface . By calling nexttile function , Create a coordinate area object in the first block . And then call surf Function to plot in the coordinate area . Repeat the process for the other three blocks using different drawing functions .
tiledlayout(2,2);
[X,Y,Z] = peaks(20);

% Tile 1
nexttile
surf(X,Y,Z)

% Tile 2
nexttile
contour(X,Y,Z)

% Tile 3
nexttile
imagesc(Z)

% Tile 4
nexttile
plot3(X,Y,Z)
As shown in the figure :
Specify the flow block arrangement
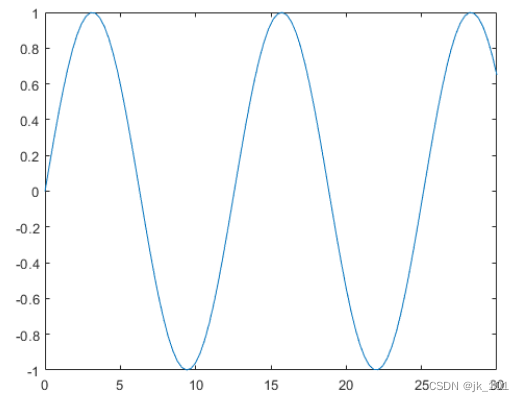
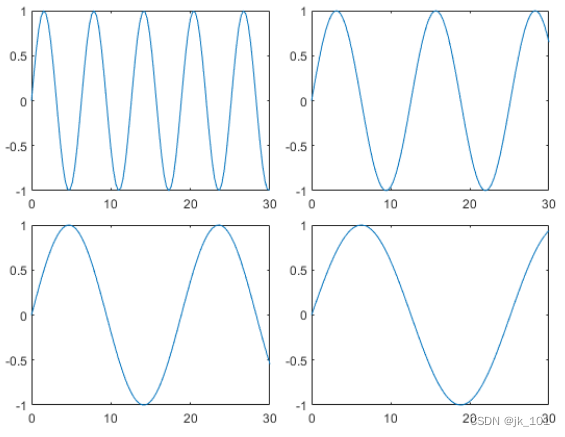
Create four coordinate vectors :x、y1、y2 and y3. use 'flow' Parameter call tiledlayout function , To create a block diagram layout that can accommodate any number of coordinate areas . call nexttile Function to create the first coordinate area . Then draw in the first block y1. The first figure fills the entire layout .
x = linspace(0,30);
y1 = sin(x/2);
y2 = sin(x/3);
y3 = sin(x/4);

% Plot into first tile three times
tiledlayout('flow')
nexttile
plot(x,y1)
As shown in the figure :
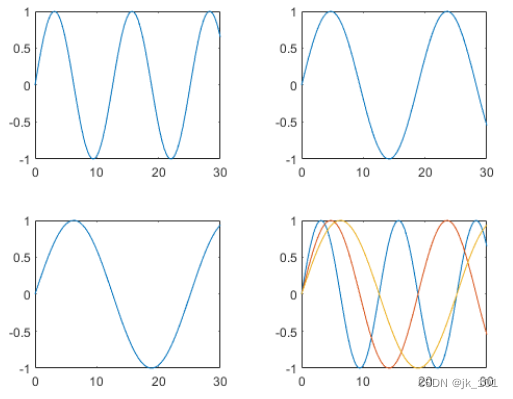
Create a second block and coordinate area , And draw it into the coordinate area .
nexttile
plot(x,y2)
As shown in the figure :

Repeat the process to create a third plot .
nexttile
plot(x,y3)
As shown in the figure :

Repeat the process to create a fourth plot . This time, , By drawing y1 After the call hold on Draw all three lines in the same coordinate area .
nexttile
plot(x,y1)
hold on
plot(x,y2)
plot(x,y3)
hold off
As shown in the figure :
Adjust layout spacing
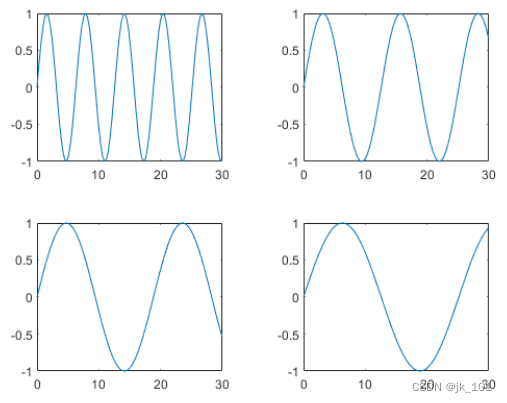
Create five coordinate vectors :x、y1、y2、y3 and y4. And then call tiledlayout Function to create 2×2 Layout , And specify the return parameters to store TileChartLayout object . Calling plot Function before , call nexttile Function to create a coordinate area object in the next empty block .
x = linspace(0,30);
y1 = sin(x);
y2 = sin(x/2);
y3 = sin(x/3);
y4 = sin(x/4);
t = tiledlayout(2,2);

% Tile 1
nexttile
plot(x,y1)

% Tile 2
nexttile
plot(x,y2)

% Tile 3
nexttile
plot(x,y3)

% Tile 4
nexttile
plot(x,y4)
As shown in the figure :
By way of TileSpacing Property is set to 'compact' To reduce the spacing of tiles . And then by putting Padding Property is set to 'compact', Reduce the space between the edge of the layout and the edge of the drawing window .
t.TileSpacing = 'compact';
t.Padding = 'compact';
As shown in the figure :
Create shared titles and axis labels
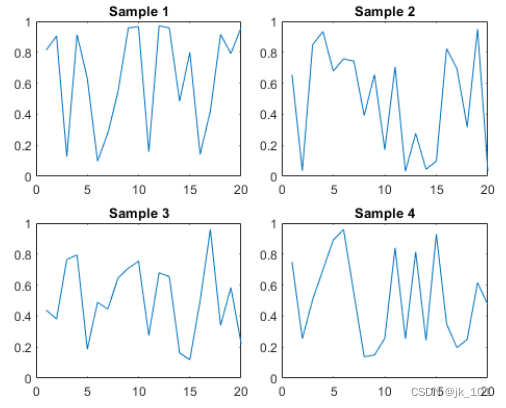
Create a 2×2 Block diagram layout t. Appoint TileSpacing name - Value pair group parameter , To minimize the space between blocks . Then create a drawing with a title in each block .
t = tiledlayout(2,2,'TileSpacing','Compact');

% Tile 1
nexttile
plot(rand(1,20))
title('Sample 1')

% Tile 2
nexttile
plot(rand(1,20))
title('Sample 2')

% Tile 3
nexttile
plot(rand(1,20))
title('Sample 3')

% Tile 4
nexttile
plot(rand(1,20))
title('Sample 4')
As shown in the figure :
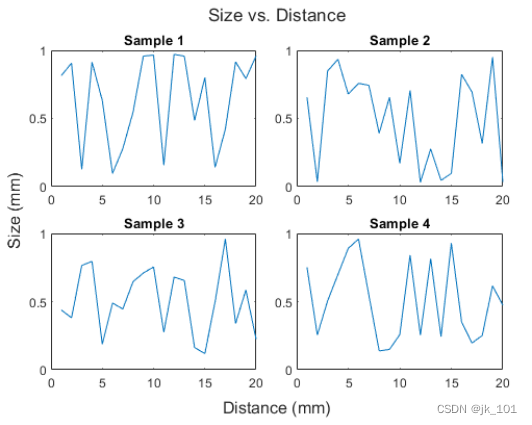
By way of t Pass to title、xlabel and ylabel function , Show shared titles and axis labels .
title(t,'Size vs. Distance')
xlabel(t,'Distance (mm)')
ylabel(t,'Size (mm)')
As shown in the figure :
Create a layout in the panel
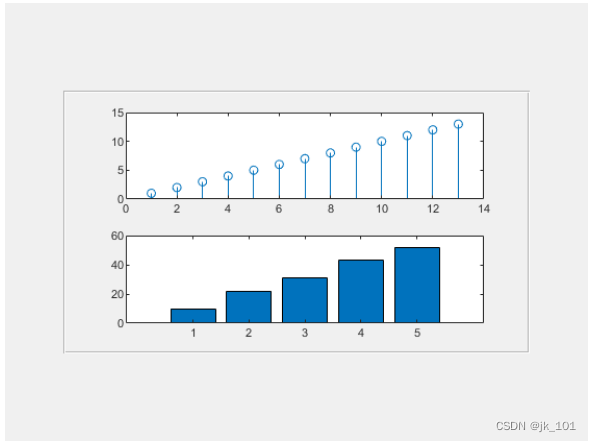
Create a panel in the drawing window . Then by specifying the panel object as tiledlayout First argument to function , Create a block diagram layout in the panel . Show a plot in each block .
p = uipanel('Position',[.1 .2 .8 .6]);
t = tiledlayout(p,2,1);

% Tile 1
nexttile(t)
stem(1:13)

% Tile 2
nexttile(t)
bar([10 22 31 43 52])
As shown in the figure :
Set properties for the coordinate area
call tiledlayout Function to create 2×1 Block diagram layout . Call with an output parameter nexttile Function to store the coordinate area . Then draw into the coordinate area , And will x and y The color of the axis is set to red . Repeat the process in the second block .
t = tiledlayout(2,1);

% First tile
ax1 = nexttile;
plot([1 2 3 4 5],[11 6 10 4 18]);
ax1.XColor = [1 0 0];
ax1.YColor = [1 0 0];

% Second tile
ax2 = nexttile;
plot([1 2 3 4 5],[5 1 12 9 2],'o');
ax2.XColor = [1 0 0];
ax2.YColor = [1 0 0];
As shown in the figure :

Create coordinate areas that occupy multiple rows and columns
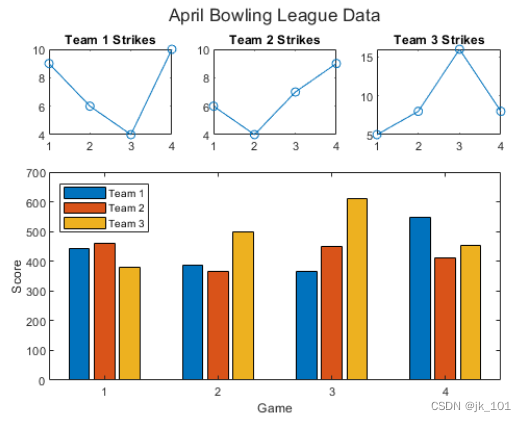
take scores and strikes Defined as a vector containing data from four bowling leagues . Then create a block diagram layout , And display three tiles , Show the number of strokes of each team .
scores = [444 460 380
          387 366 500
          365 451 611
          548 412 452];

strikes = [9  6  5
           6  4  8
           4  7  16
           10 9  8];

t = tiledlayout('flow');

% Team 1
nexttile
plot([1 2 3 4],strikes(:,1),'-o')
title('Team 1 Strikes')

% Team 2
nexttile
plot([1 2 3 4],strikes(:,2),'-o')
title('Team 2 Strikes')

% Team 3
nexttile
plot([1 2 3 4],strikes(:,3),'-o')
title('Team 3 Strikes')
As shown in the figure :

call nexttile Function to create a coordinate area object occupying two rows and three columns . Then a bar chart with legend is displayed in this coordinate area , And configure the axis scale value and label . call title Function to add a block to the layout .
nexttile([2 3]);
bar([1 2 3 4],scores)
legend('Team 1','Team 2','Team 3','Location','northwest')

% Configure ticks and axis labels
xticks([1 2 3 4])
xlabel('Game')
ylabel('Score')

% Add layout title
title(t,'April Bowling League Data')
As shown in the figure :
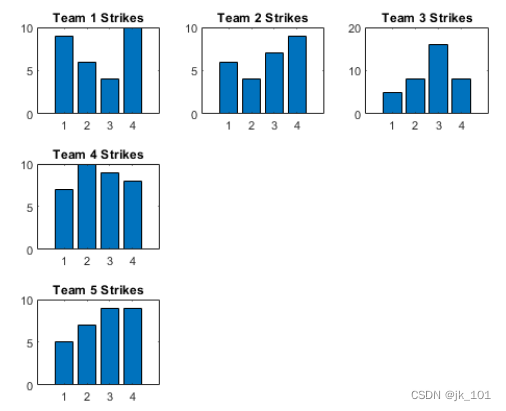
Place the coordinate area object from a specific numbered block
To place the coordinate area object from a specific location , Please specify the block number and span value . take scores and strikes Defined as a vector containing data from four bowling leagues . And then create a 3×3 Block diagram layout , And display five bar graphs , It shows the number of strokes of each team .
scores = [444 460 380 388 389
          387 366 500 467 460
          365 451 611 426 495
          548 412 452 471 402];

strikes = [9  6  5  7  5
           6  4  8 10  7
           4  7 16  9  9
           10  9  8  8  9];

t = tiledlayout(3,3);

% Team 1
nexttile
bar([1 2 3 4],strikes(:,1))
title('Team 1 Strikes')

% Team 2
nexttile
bar([1 2 3 4],strikes(:,2))
title('Team 2 Strikes')

% Team 3
nexttile
bar([1 2 3 4],strikes(:,3))
title('Team 3 Strikes')

% Team 4
nexttile
bar([1 2 3 4],strikes(:,4))
title('Team 4 Strikes')

% Team 5
nexttile(7)
bar([1 2 3 4],strikes(:,5))
title('Team 5 Strikes')
As shown in the figure :
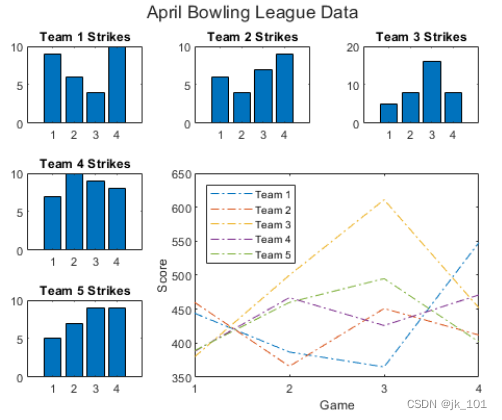
Show a larger plot with a legend . call nexttile Function to place the upper left corner of the coordinate area in the fifth block , And make the coordinate area occupy two rows and two columns of the block . Draw scores for all teams . take x The axis is configured to display four scales , And add labels for each axis . Then add a shared title at the top of the layout .
nexttile(5,[2 2]);
plot([1 2 3 4],scores,'-.')
labels = {'Team 1','Team 2','Team 3','Team 4','Team 5'};
legend(labels,'Location','northwest')

% Configure ticks and axis labels
xticks([1 2 3 4])
xlabel('Game')
ylabel('Score')

% Add layout title
title(t,'April Bowling League Data')
As shown in the figure :
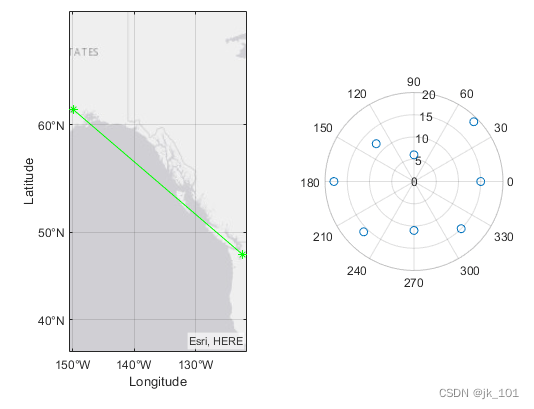
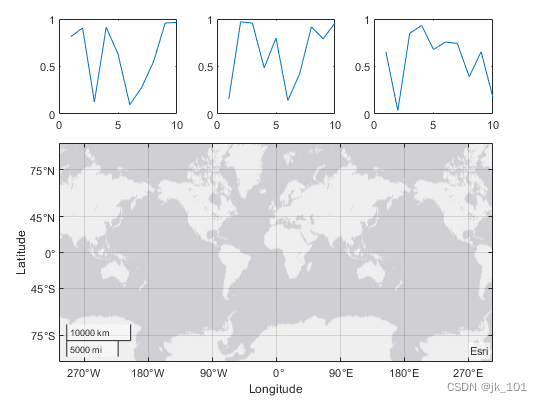
Display polar and geographic maps
establish 1×2 Block diagram layout . In the first block , Display a geographic map containing lines connecting two cities on the map . In the second block , Create a scatter plot in polar coordinates .
tiledlayout(1,2)

% Display geographic plot
nexttile
geoplot([47.62 61.20],[-122.33 -149.90],'g-*')

% Display polar plot
nexttile
theta = pi/4:pi/4:2*pi;
rho = [19 6 12 18 16 11 15 15];
polarscatter(theta,rho)
As shown in the figure :
Reconfigure the contents of the previous block
nexttile A useful use of output parameters is when you want to adjust the content of the previous block . for example , You may decide to reconfigure the color map used in the previous drawing .
Create a 2×2 Block diagram layout . call peaks Function to get the coordinates of the predefined surface . Then create a different surface graph in each block .
tiledlayout(2,2);
[X,Y,Z] = peaks(20);

% Tile 1
nexttile
surf(X,Y,Z)

% Tile 2
nexttile
contour(X,Y,Z)

% Tile 3
nexttile
imagesc(Z)

% Tile 4
nexttile
plot3(X,Y,Z)
As shown in the figure :
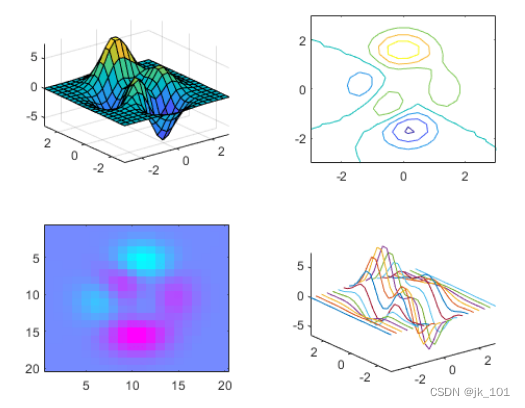
To change the color map in the third block , Please get the coordinate area in the block . Call... By specifying the block number nexttile function , And return the output parameters of the coordinate area . Then pass the coordinate area to colormap function .
ax = nexttile(3);
colormap(ax,cool)
As shown in the figure :
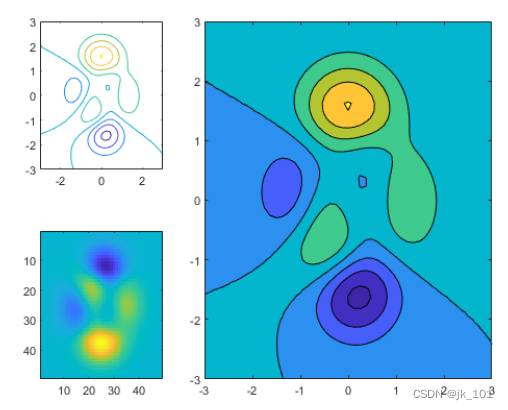
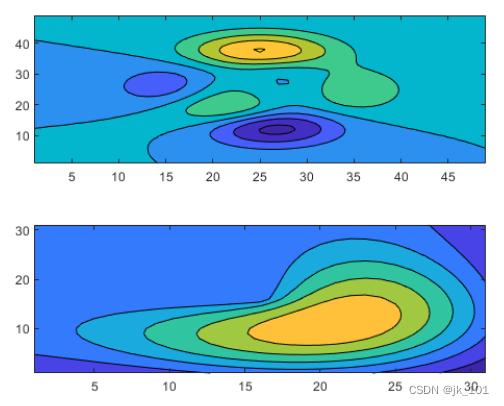
Reconfigure the cross block coordinate area
Create a 2×3 Block diagram layout , It contains two diagrams located in separate blocks , And a graph spanning two rows and two columns .
t = tiledlayout(2,3);
[X,Y,Z] = peaks;

% Tile 1
nexttile
contour(X,Y,Z)

% Span across two rows and columns
nexttile([2 2])
contourf(X,Y,Z)

% Last tile
nexttile
imagesc(Z)
As shown in the figure :
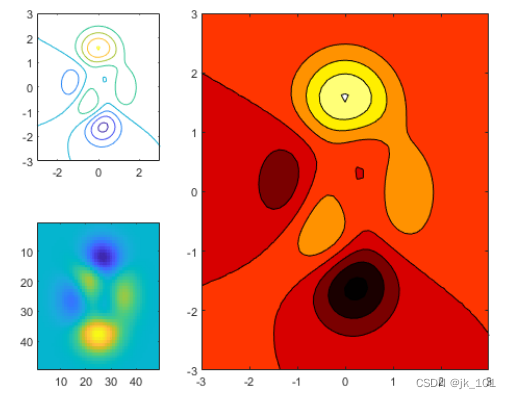
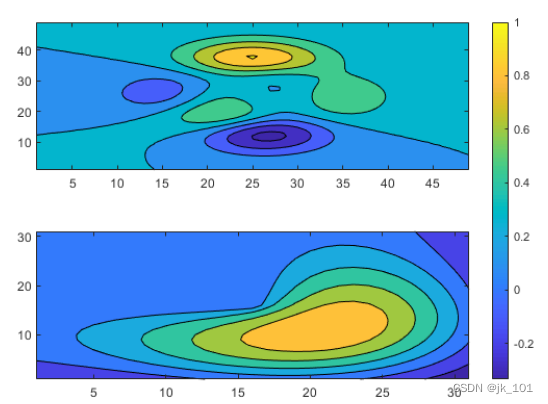
To change the color map across the block coordinate area , Please mark the location of the block as the location of the block in the upper left corner of the coordinate area . In this case , The upper left corner is in the second block . Use 2 Call as block position nexttile function , And specify the output parameters to return the coordinate area object of this position . Then pass the coordinate area to colormap function .
ax = nexttile(2);
colormap(ax,hot)
As shown in the figure :
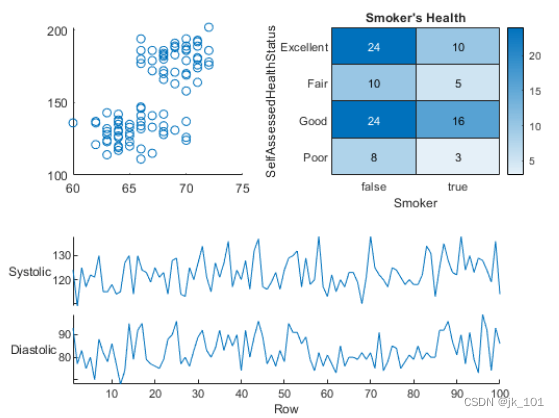
Replace the contents of the previous block
load patients Data sets , And create a table based on a subset of variables . And then create a 2×2 Block diagram layout . Display the scatter plot in the first block , Show the heat map in the second block , And display the stacking diagram across the bottom two blocks .
load patients
tbl = table(Diastolic,Smoker,Systolic,Height,Weight,SelfAssessedHealthStatus);
tiledlayout(2,2)

% Scatter plot
nexttile
scatter(tbl.Height,tbl.Weight)

% Heatmap
nexttile
heatmap(tbl,'Smoker','SelfAssessedHealthStatus','Title','Smoker''s Health');

% Stacked plot
nexttile([1 2])
stackedplot(tbl,{'Systolic','Diastolic'});
As shown in the figure :
call nexttile, And assign the block number as 1 So that the coordinate area in the block becomes the current coordinate area . Replace the content of the block with a scatter histogram .
nexttile(1)
scatterhistogram(tbl,'Height','Weight');
As shown in the figure :

Show the shared color bar in a separate block
When you want to share a color bar or legend between two or more diagrams , It can be placed in a separate block . Create in the block diagram layout peaks and membrane Filled contour map of dataset .
Z1 = peaks;
Z2 = membrane;
tiledlayout(2,1);
nexttile
contourf(Z1)
nexttile
contourf(Z2)
As shown in the figure :
Add a color bar , And move it to east Block .
cb = colorbar;
cb.Layout.Tile = 'east';
As shown in the figure :
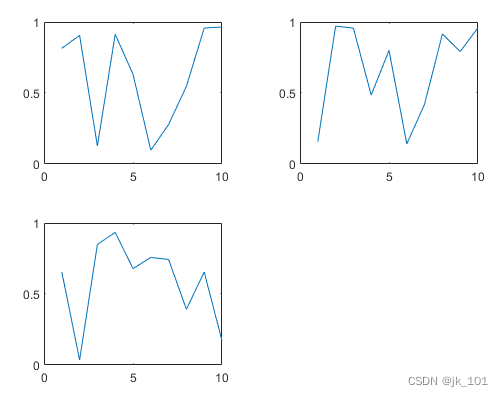
Manually create and configure coordinate areas
Sometimes , You may need to manually create the coordinate area before calling the drawing function . When creating the coordinate area , Please put parent The parameter is specified as the block diagram layout . Then set the coordinate area Layout Property to locate the coordinate area .
Create a block diagram layout t And designate 'flow' Block arrangement . Display a plot in each of the first three blocks .
t = tiledlayout('flow');
nexttile
plot(rand(1,10));
nexttile
plot(rand(1,10));
nexttile
plot(rand(1,10));
As shown in the figure :
By calling geoaxes Function to create a geographic coordinate area object gax, And will t Designated as parent Parameters . By default , The coordinate area enters the first block , So by putting gax.Layout.Tile Set to 4 Move it to the fourth block . By way of gax.Layout.TileSpan Set to [2 3], Make the coordinate area occupy the 2×3 Area .
gax = geoaxes(t);
gax.Layout.Tile = 4;
gax.Layout.TileSpan = [2 3];
As shown in the figure :
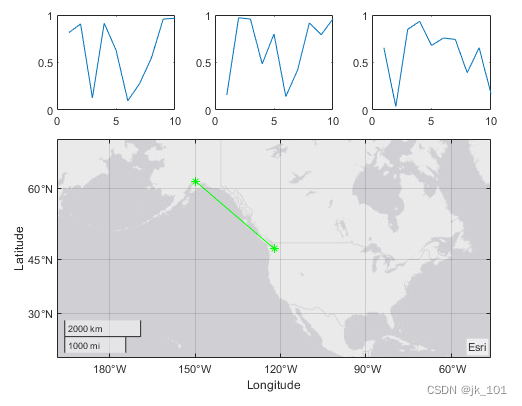
call geoplot function . Then configure the map center and zoom level for the coordinate area .
geoplot(gax,[47.62 61.20],[-122.33 -149.90],'g-*')
gax.MapCenter = [47.62 -122.33];
gax.ZoomLevel = 2;
As shown in the figure :
Input parameter description
m - Row number
Row number , Specify as a positive integer .
n - Number of columns
Number of columns , Specify as a positive integer .
parent - Parent container
Parent container , Designated as Figure、Panel、Tab、TiledChartLayout or GridLayout object .
name - Value parameter
Example : tiledlayout(2,2,'TileSpacing','compact') establish 2×2 Layout , The minimum spacing between each block .
Specify optional 、 Separated by commas Name,Value For group parameters .Name For parameter name ,Value Is the corresponding value .Name Must be in quotation marks .
Multiple names can be specified in any order - Value pair group parameter , Such as Name1,Value1,...,NameN,ValueN Shown .
TileSpacing - Block spacing
Block spacing , Designated as 'loose'、'compact'、'tight' or 'none'. Use this attribute to control the spacing between blocks .
The following table shows how each value affects 2×2 Appearance of the layout .
| value | appearance |
|---|---|
'loose' |
|
| 'compact' |
|
| 'tight' |
|
| 'none' |
|


Padding - Padding around the layout
Fill around the layout , Designated as 'loose'、'compact' or 'tight'. No matter which value this attribute uses , The layout will be all decorative elements ( Such as shaft label ) Provide space .
The following table shows how each value affects 2×2 Appearance of the layout .
| value | appearance |
|---|---|
'loose' |
|
| 'compact' |
|
| 'tight' |
|


边栏推荐
- 中邮科技冲刺科创板:年营收20.58亿 邮政集团是大股东
- Golang 使用 JSON unmarshal 数字到 interface{} 数字变成 float64 类型(转)
- 瑞吉外卖笔记
- Fs7867s is a voltage detection chip used for power supply voltage monitoring of digital system
- CVPR 2022 | greatly reduce the manual annotation required for zero sample learning, and propose category semantic embedding rich in visual information (source code download)
- Install and use MAC redis, connect to remote server redis
- 30: Chapter 3: develop Passport Service: 13: develop [change / improve user information, interface]; (use * * * Bo class to accept parameters, and use parameter verification)
- [matlab] summary of conv, filter, conv2, Filter2 and imfilter convolution functions
- 德明利深交所上市:市值31亿 为李虎与田华夫妻档
- 【Antd踩坑】Antd Form 配合Input.Group时出现Form.Item所占据的高度不对
猜你喜欢
![Supprimer les lettres dupliquées [avidité + pile monotone (maintenir la séquence monotone avec un tableau + Len)]](/img/af/a1dcba6f45eb4ccc668cd04a662e9c.png)
Supprimer les lettres dupliquées [avidité + pile monotone (maintenir la séquence monotone avec un tableau + Len)]

好博医疗冲刺科创板:年营收2.6亿 万永钢和沈智群为实控人
基于PaddleX的智能零售柜商品识别
吃透Chisel语言.09.Chisel项目构建、运行和测试(一)——用sbt构建Chisel项目并运行

小程序直播 + 电商,想做新零售电商就用它吧!

Innovation and development of independent industrial software
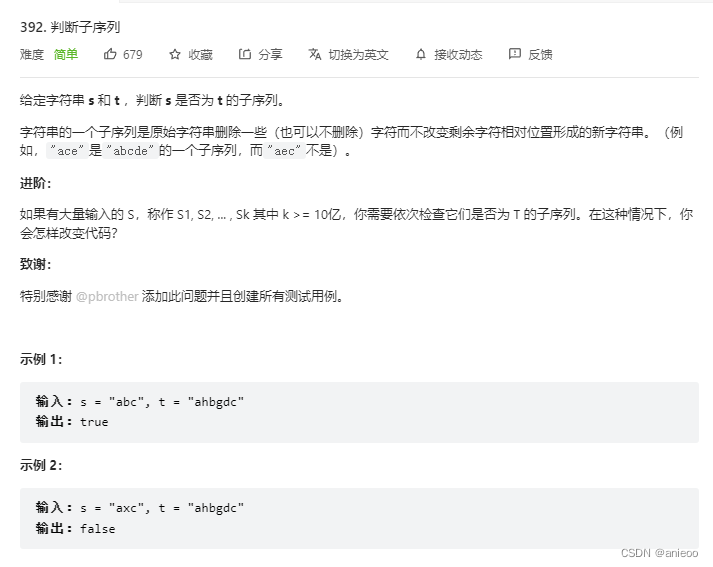
392. 判断子序列
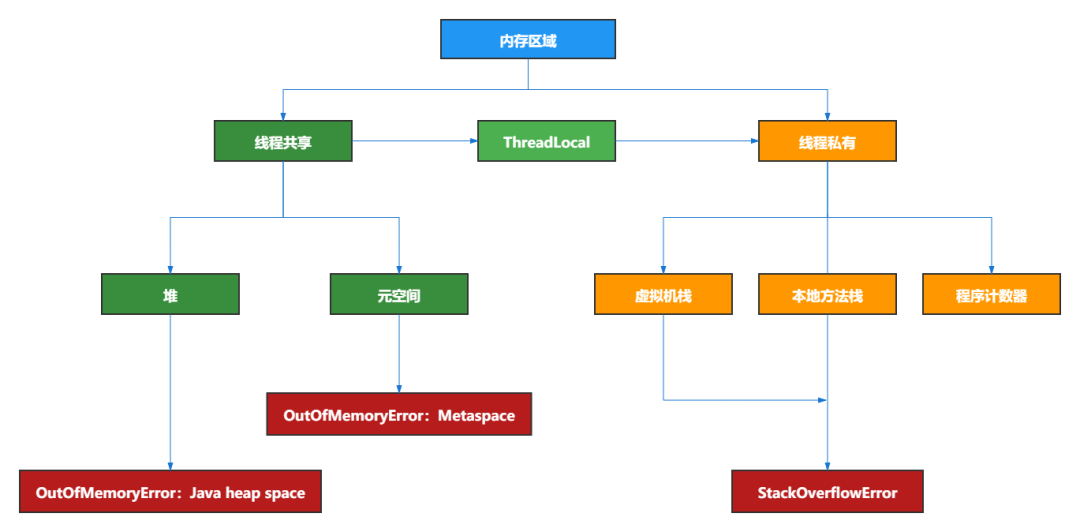
JVM 内存布局详解,图文并茂,写得太好了!
![递增的三元子序列[贪心训练]](/img/92/7efd1883c21c0e804ffccfb2231602.png)
递增的三元子序列[贪心训练]
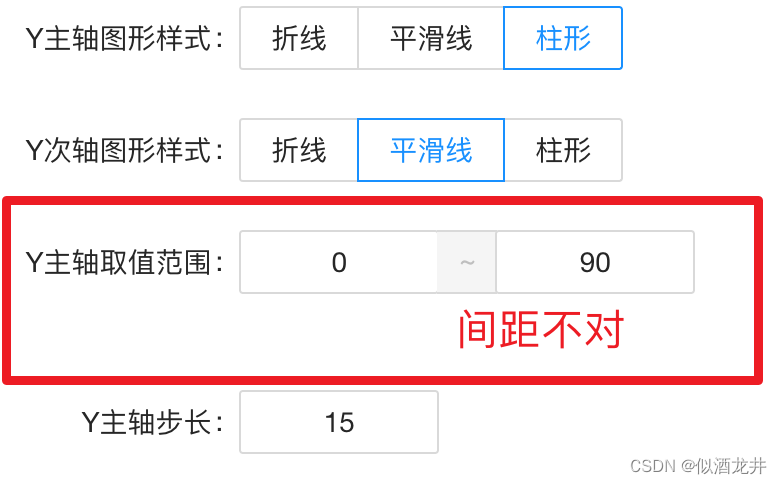
【Antd踩坑】Antd Form 配合Input.Group时出现Form.Item所占据的高度不对
随机推荐
MySQL 5 installation and modification free
mac redis安装与使用,连接远程服务器 redis
【Antd踩坑】Antd Form 配合Input.Group时出现Form.Item所占据的高度不对
海外游戏代投需要注意的
R语言使用epiDisplay包的dotplot函数通过点图的形式可视化不同区间数据点的频率、使用by参数指定分组参数可视化不同分组的点图分布
LifeCycle
R语言使用lattice包中的bwplot函数可视化箱图(box plot)、par.settings参数自定义主题模式
Product identification of intelligent retail cabinet based on paddlex
go vendor 项目迁移到 mod 项目
[antd] how to set antd in form There is input in item Get input when gourp Value of each input of gourp
Error in find command: paths must precede expression (turn)
MongoDB常用28条查询语句(转)
数据仓库面试问题准备
安装Mysql
php 日志调试
Dgraph: large scale dynamic graph dataset
去除重复字母[贪心+单调栈(用数组+len来维持单调序列)]
1200. Minimum absolute difference
Unittest框架之断言
sharding key type not supported