当前位置:网站首页>Dlib+Opencv库实现疲劳检测
Dlib+Opencv库实现疲劳检测
2022-07-01 18:41:00 【Keep_Trying_Go】
文章目录
1.关键点检测
https://mydreamambitious.blog.csdn.net/article/details/125542337
2.算法实现的核心点
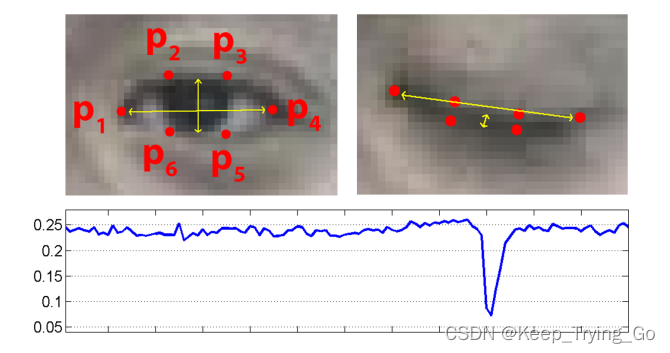

其中纵横比表示衡量是否眨眼;p1,p2,p3,p4,p5,p6为人眼的关键点坐标,||p2-p6||表示两个关键点之间的欧式距离。其实你只要看懂上面的图和公式即可。
论文地址
http://vision.fe.uni-lj.si/cvww2016/proceedings/papers/05.pdf
参考理论详解
https://blog.csdn.net/uncle_ll/article/details/117999920
3.算法实现
注:这个代码看起来有点多(复杂),但是读者不要“害怕”,这个思路非常的清晰,只要一步一步的来就很容易明白其中实现的过程(不难理解)。
(1)人脸的关键点集合
#对于68个检测点,将人脸的几个关键点排列成有序,便于后面的遍历
shape_predictor_68_face_landmark=OrderedDict([
    ('mouth',(48,68)),
    ('right_eyebrow',(17,22)),
    ('left_eye_brow',(22,27)),
    ('right_eye',(36,42)),
    ('left_eye',(42,48)),
    ('nose',(27,36)),
    ('jaw',(0,17))
])
(2)加载人脸检测库和人脸关键点检测库
# 加载人脸检测与关键点定位
#http://dlib.net/python/index.html#dlib_pybind11.get_frontal_face_detector
detector = dlib.get_frontal_face_detector()
#http://dlib.net/python/index.html#dlib_pybind11.shape_predictor
criticPoints = dlib.shape_predictor("shape_predictor_68_face_landmarks.dat")
(3)绘制人脸检测的框
#绘制人脸画矩形框
def drawRectangle(detected,frame):
    margin = 0.2
    img_h,img_w,_=np.shape(frame)
    if len(detected) > 0:
        for i, locate in enumerate(detected):
            x1, y1, x2, y2, w, h = locate.left(), locate.top(), locate.right() + 1, locate.bottom() + 1, locate.width(), locate.height()

            xw1 = max(int(x1 - margin * w), 0)
            yw1 = max(int(y1 - margin * h), 0)
            xw2 = min(int(x2 + margin * w), img_w - 1)
            yw2 = min(int(y2 + margin * h), img_h - 1)

            cv2.rectangle(frame, (x1, y1), (x2, y2), (0, 255, 0), 2)

            face = frame[yw1:yw2 + 1, xw1:xw2 + 1, :]
            cv2.putText(frame, 'Person', (locate.left(), locate.top() - 10),
            cv2.FONT_HERSHEY_SIMPLEX, 1.2, (255, 0, 0), 3)
    return frame
(4)对检测之后的人脸关键点坐标进行转换
#对检测之后获取的人脸关键点坐标进行转换
def predict2Np(predict):
    # 创建68*2关键点的二维空数组[(x1,y1),(x2,y2)……]
    dims=np.zeros(shape=(predict.num_parts,2),dtype=np.int)
    #遍历人脸的每个关键点获取二维坐标
    length=predict.num_parts
    for i in range(0,length):
        dims[i]=(predict.part(i).x,predict.part(i).y)
    return dims
(5)计算欧式距离
#计算欧式距离
def Euclidean(PointA,PointB):
    x=math.fabs(PointA[0]-PointB[0])
    y=math.fabs(PointA[1]-PointB[1])
    Ear=math.sqrt(x*x+y*y)
    return Ear
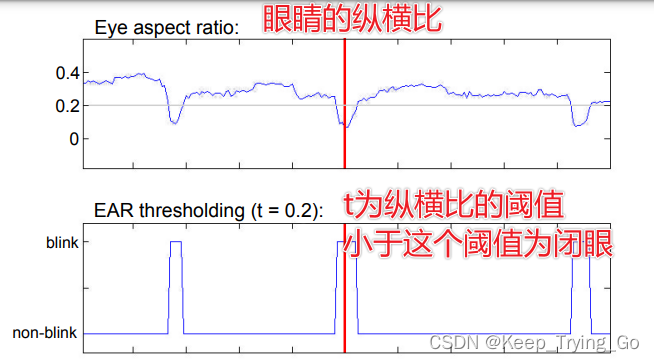
(6)计算眼睛的纵横比
#计算是否眨眼的距离
def ComputeCloseEye(left_eye):
    #计算P2与P6,P3与P5
    P1=Euclidean(left_eye[1],left_eye[5])
    P2=Euclidean(left_eye[2],left_eye[4])
    #计算P1与P4
    P3=Euclidean(left_eye[0],left_eye[3])
    #计算P
    P=(P1+P2)/(2*P3)
    return P
(7)对人脸关键点绘制点
#获取左眼和右眼的关键点坐标值
avg_Ear=0.0
def draw_left_and_right_eye(detected,frame):
    global avg_Ear
    for (step,locate) in enumerate(detected):
        #获取人眼的关键点
        dims=criticPoints(frame,locate)
        #将得到的坐标值转换为二维
        dims=predict2Np(dims)
        #获取左眼的关键点坐标值列表
        left_eye=dims[42:48]
        # 获取右眼的关键点坐标值列表
        right_eye=dims[36:42]
        #绘制左眼的点
        for (x, y) in left_eye:
            cv2.circle(img=frame, center=(x, y),
                       radius=2, color=(0, 255, 0), thickness=-1)
        #绘制右眼的点
        for (x, y) in right_eye:
            cv2.circle(img=frame, center=(x, y),
                       radius=2, color=(0, 255, 0), thickness=-1)
        #计算距离
        earLeft=ComputeCloseEye(left_eye)
        earRight=ComputeCloseEye(right_eye)
        #计算左眼和右眼的平均纵横比
        avg_Ear=(earRight+earLeft)/2
        cv2.putText(img=frame,text='CloseEyeDist: '+str(round(avg_Ear,2)),org=(20,50),
                    fontFace=cv2.FONT_HERSHEY_SIMPLEX,fontScale=1.0,
                    color=(0,255,0),thickness=2)
    return frame,avg_Ear
(8)设置相关的阈值
#设置纵横比的阈值
Ear_Threshod=0.2
#眨眼动作是一个快速闭合的过程,眨眼持续差不多为100-400ms
#设置当连续3帧的纵横比都小于阈值则表示眨眼
Ear_frame_Threshold=3
#一次任务中的总的眨眼次数
ToClose_Eye=0
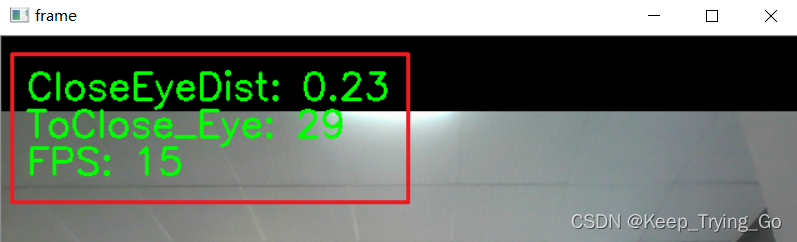
(9)实时的人脸关键点检测
#实时的人脸关键点检测
def detect_time():
    cap=cv2.VideoCapture(0)
    #记录连续眨眼的次数
    count=0
    global ToClose_Eye

    while cap.isOpened():
        #记录开始时间
        statime=time.time()
        ret,frame=cap.read()
        #检测人脸位置
        detected = detector(frame)
        #利用定位到的人脸进行人脸关键点检测
        frame = drawRectangle(detected, frame)
        frame,avg_Ear=draw_left_and_right_eye(detected,frame)
        if avg_Ear<Ear_Threshod:
            count+=1
            if count>=Ear_frame_Threshold:
                ToClose_Eye+=1
                count=0
        cv2.putText(img=frame,text='ToClose_Eye: '+str(ToClose_Eye),org=(20,80),fontFace=cv2.FONT_HERSHEY_SIMPLEX,
                    fontScale=1.0,color=(0,255,0),thickness=2)

        #记录结束时间
        endtime=time.time()
        FPS=1/(endtime-statime)
        cv2.putText(img=frame, text='FPS: '+str(int(FPS)), org=(20, 110), fontFace=cv2.FONT_HERSHEY_SIMPLEX,
                    fontScale=1.0, color=(0, 255, 0), thickness=2)
        cv2.imshow('frame', frame)
        key=cv2.waitKey(1)
        if key==27:
            break
    cap.release()
    cv2.destroyAllWindows()
(10)整体代码
import os
import cv2
import dlib
import time
import math
import numpy as np
from collections import OrderedDict

#对于68个检测点,将人脸的几个关键点排列成有序,便于后面的遍历
shape_predictor_68_face_landmark=OrderedDict([
    ('mouth',(48,68)),
    ('right_eyebrow',(17,22)),
    ('left_eye_brow',(22,27)),
    ('right_eye',(36,42)),
    ('left_eye',(42,48)),
    ('nose',(27,36)),
    ('jaw',(0,17))
])

# 加载人脸检测与关键点定位
#http://dlib.net/python/index.html#dlib_pybind11.get_frontal_face_detector
detector = dlib.get_frontal_face_detector()
#http://dlib.net/python/index.html#dlib_pybind11.shape_predictor
criticPoints = dlib.shape_predictor("shape_predictor_68_face_landmarks.dat")

#绘制人脸画矩形框
def drawRectangle(detected,frame):
    margin = 0.2
    img_h,img_w,_=np.shape(frame)
    if len(detected) > 0:
        for i, locate in enumerate(detected):
            x1, y1, x2, y2, w, h = locate.left(), locate.top(), locate.right() + 1, locate.bottom() + 1, locate.width(), locate.height()

            xw1 = max(int(x1 - margin * w), 0)
            yw1 = max(int(y1 - margin * h), 0)
            xw2 = min(int(x2 + margin * w), img_w - 1)
            yw2 = min(int(y2 + margin * h), img_h - 1)

            cv2.rectangle(frame, (x1, y1), (x2, y2), (0, 255, 0), 2)

            face = frame[yw1:yw2 + 1, xw1:xw2 + 1, :]
            cv2.putText(frame, 'Person', (locate.left(), locate.top() - 10),
            cv2.FONT_HERSHEY_SIMPLEX, 1.2, (255, 0, 0), 3)
    return frame

#对检测之后获取的人脸关键点坐标进行转换
def predict2Np(predict):
    # 创建68*2关键点的二维空数组[(x1,y1),(x2,y2)……]
    dims=np.zeros(shape=(predict.num_parts,2),dtype=np.int)
    #遍历人脸的每个关键点获取二维坐标
    length=predict.num_parts
    for i in range(0,length):
        dims[i]=(predict.part(i).x,predict.part(i).y)
    return dims

#计算欧式距离
def Euclidean(PointA,PointB):
    x=math.fabs(PointA[0]-PointB[0])
    y=math.fabs(PointA[1]-PointB[1])
    Ear=math.sqrt(x*x+y*y)
    return Ear
#计算是否眨眼的距离
def ComputeCloseEye(left_eye):
    #计算P2与P6,P3与P5
    P1=Euclidean(left_eye[1],left_eye[5])
    P2=Euclidean(left_eye[2],left_eye[4])
    #计算P1与P4
    P3=Euclidean(left_eye[0],left_eye[3])
    #计算P
    P=(P1+P2)/(2*P3)
    return P


#获取左眼和右眼的关键点坐标值
avg_Ear=0.0
def draw_left_and_right_eye(detected,frame):
    global avg_Ear
    for (step,locate) in enumerate(detected):
        #获取人眼的关键点
        dims=criticPoints(frame,locate)
        #将得到的坐标值转换为二维
        dims=predict2Np(dims)
        #获取左眼的关键点坐标值列表
        left_eye=dims[42:48]
        # 获取右眼的关键点坐标值列表
        right_eye=dims[36:42]
        #绘制左眼的点
        for (x, y) in left_eye:
            cv2.circle(img=frame, center=(x, y),
                       radius=2, color=(0, 255, 0), thickness=-1)
        #绘制右眼的点
        for (x, y) in right_eye:
            cv2.circle(img=frame, center=(x, y),
                       radius=2, color=(0, 255, 0), thickness=-1)
        #计算距离
        earLeft=ComputeCloseEye(left_eye)
        earRight=ComputeCloseEye(right_eye)
        #计算左眼和右眼的平均纵横比
        avg_Ear=(earRight+earLeft)/2
        cv2.putText(img=frame,text='CloseEyeDist: '+str(round(avg_Ear,2)),org=(20,50),
                    fontFace=cv2.FONT_HERSHEY_SIMPLEX,fontScale=1.0,
                    color=(0,255,0),thickness=2)
    return frame,avg_Ear

#设置纵横比的阈值
Ear_Threshod=0.2
#眨眼动作是一个快速闭合的过程,眨眼持续差不多为100-400ms
#设置当连续3帧的纵横比都小于阈值则表示眨眼
Ear_frame_Threshold=3
#一次任务中的总的眨眼次数
ToClose_Eye=0

#实时的人脸关键点检测
def detect_time():
    cap=cv2.VideoCapture(0)
    #记录连续眨眼的次数
    count=0
    global ToClose_Eye

    while cap.isOpened():
        #记录开始时间
        statime=time.time()
        ret,frame=cap.read()
        #检测人脸位置
        detected = detector(frame)
        #利用定位到的人脸进行人脸关键点检测
        frame = drawRectangle(detected, frame)
        frame,avg_Ear=draw_left_and_right_eye(detected,frame)
        if avg_Ear<Ear_Threshod:
            count+=1
            if count>=Ear_frame_Threshold:
                ToClose_Eye+=1
                count=0
        cv2.putText(img=frame,text='ToClose_Eye: '+str(ToClose_Eye),org=(20,80),fontFace=cv2.FONT_HERSHEY_SIMPLEX,
                    fontScale=1.0,color=(0,255,0),thickness=2)

        #记录结束时间
        endtime=time.time()
        FPS=1/(endtime-statime)
        cv2.putText(img=frame, text='FPS: '+str(int(FPS)), org=(20, 110), fontFace=cv2.FONT_HERSHEY_SIMPLEX,
                    fontScale=1.0, color=(0, 255, 0), thickness=2)
        cv2.imshow('frame', frame)
        key=cv2.waitKey(1)
        if key==27:
            break
    cap.release()
    cv2.destroyAllWindows()


if __name__ == '__main__':
    print('Pycharm')
    detect_time()
边栏推荐
- Why do independent website sellers start to do social media marketing? The original customer conversion rate can be improved so much!
- ES6数组去重的三个简单办法
- Halcon image calibration enables subsequent image processing to become the same as the template image
- 市值蒸发740亿,这位大佬转身杀入预制菜
- How to use the low code platform of the Internet of things for personal settings?
- Lefse analysis
- SuperVariMag 超导磁体系统 — SVM 系列
- Lake Shore M91快速霍尔测量仪
- Example explanation: move graph explorer to jupyterlab
- Navicat premium 15 permanent cracking and 2021 latest idea cracking (valid for personal testing)
猜你喜欢

Mise en place d'une plate - forme générale de surveillance et d'alarme, quelles sont les conceptions nécessaires dans l'architecture?
bean的生命周期核心步骤总结

PMP是被取消了吗??
AI training speed breaks Moore's law; Song shuran's team won the RSS 2022 Best Paper Award
Docker deploy mysql8.0

【快应用】text组件里的文字很多,旁边的div样式会被拉伸如何解决

【直播预约】数据库OBCP认证全面升级公开课
What designs are needed in the architecture to build a general monitoring and alarm platform
The best landing practice of cave state in an Internet ⽹⾦ financial technology enterprise

Getting started with kubernetes command (namespaces, pods)
随机推荐
lefse分析
Leetcode-128 longest continuous sequence
实例讲解将Graph Explorer搬上JupyterLab
Lefse analysis
Privacy sandbox is finally coming
VBA simple macro programming of Excel
docker 部署mysql8.0
GameFramework食用指南
app发版后的缓存问题
【AGC】如何解决事件分析数据本地和AGC面板中显示不一致的问题?
SuperOptiMag 超导磁体系统 — SOM、SOM2 系列
Navicat premium 15 permanent cracking and 2021 latest idea cracking (valid for personal testing)
Halcon image calibration enables subsequent image processing to become the same as the template image
AI 训练速度突破摩尔定律;宋舒然团队获得RSS 2022最佳论文奖
How to operate technology related we media well?
AppGallery Connect场景化开发实战—图片存储分享
SuperVariMag 超导磁体系统 — SVM 系列
Why do independent website sellers start to do social media marketing? The original customer conversion rate can be improved so much!
Huawei cloud experts explain the new features of gaussdb (for MySQL)
Love business in Little Red Book