当前位置:网站首页>Ros2 - Service Service (IX)
Ros2 - Service Service (IX)
2022-07-05 06:51:00 【Me and nano】
ROS2 Robot operating system
List of articles
Preface
Topic communication can realize multiple ROS One way transmission of data between nodes , Use this asynchronous communication mechanism , Publishers cannot accurately know whether subscribers receive messages , In this lecture, we will study together ROS Another common communication method —— service , It can achieve the synchronous communication effect similar to what you asked and answered .
One 、 Service details
client / Server model
From the perspective of service implementation mechanism , This form of asking and answering is called client / Server model , Referred to as CS Model , When the client needs some data , For a specific service , Send request information , After the server receives the request , It will process and feed back the response information .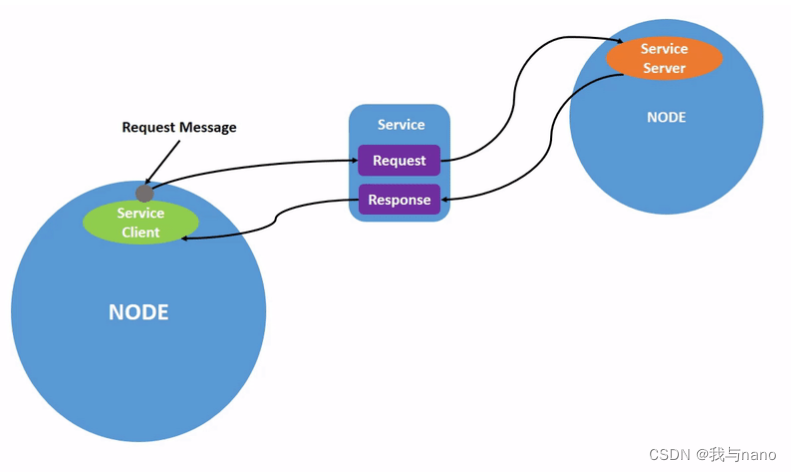
This communication mechanism is also very common in life , For example, we often browse various web pages , At this point, your computer browser is the client , Through the domain name or various operations , Send a request to the web server , After receiving it, the server returns the page data that needs to be displayed . This is the way that client-side rendering used when learning crawlers before .
Synchronous communication
This process generally requires that the faster the better , Suppose the server doesn't respond for half a day , Your browser keeps circling , It may be that the server is down , Or the network is bad , So compared with topic communication , In service communication , The client can receive the response information , Determine the state of the server , We also call it synchronous communication
One to many communication
For example, Gu Yueju website , The server is the only one , There are not many exactly the same Gu Yueju websites , But the client that can visit Gu Yueju website is not unique , Everyone can see the same interface . So in the service communication model , The server side is unique , But the client can not be unique .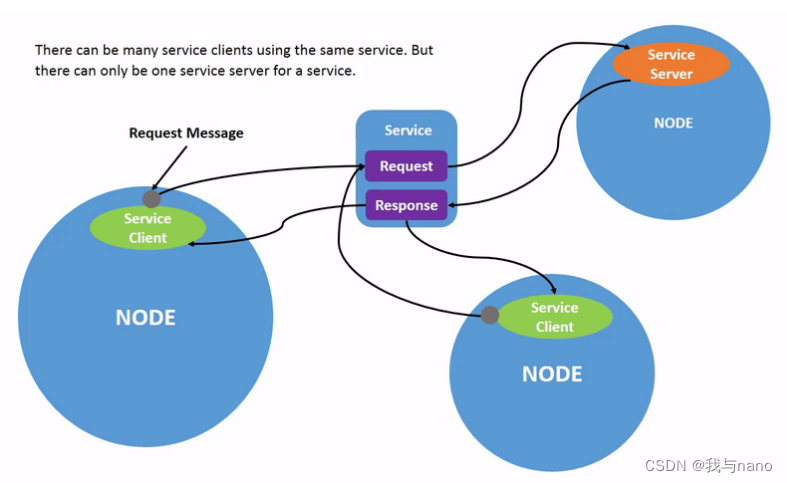
Service interface
Similar to topic communication , The core of service communication is still to transmit data , The data becomes two parts , A requested data , For example, the command to request the location of Apple , There is also a feedback data , For example, feedback the data of Apple coordinate position , These data are the same as topic news , stay ROS It is also defined in the standard , Topic use .msg File defines , The service USES .srv File defines
Two 、 Service cases
1. Addition solver
Now everyone is right ROS Service communication should have a basic understanding , Next we are going to start writing code . Or start with a relatively simple routine , It's also ROS An official routine , Realize the function of an addition solver through services .
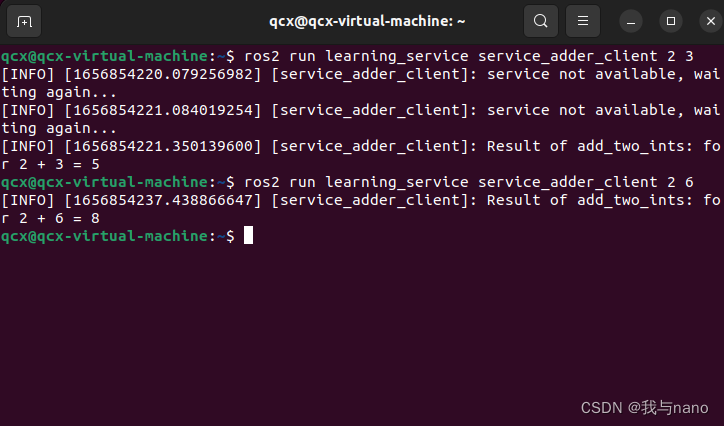
When we need to calculate the sum of two addends , Through the client node , Encapsulate two addends into request data , For services “add_two_ints” Send out , The server-side node that provides this service , After receiving the requested data , Start adding , And encapsulate the sum result into response data , Feedback to the client , Then the client can get the desired results .
Start two terminals , And run the following nodes , The first node is the server , Wait for the requested data and provide the summation function , The second node is the client , Send the two addends passed in and wait for the sum result .
ros2 run learning_service service_adder_server
ros2 run learning_service service_adder_client 2 3
Server code implementation
import rclpy                                     # ROS2 Python Interface library
from rclpy.node   import Node                    # ROS2  Node class
from learning_interface.srv import AddTwoInts    #  Customized service interface

class adderServer(Node):
    def __init__(self, name):
        super().__init__(name)                                                           # ROS2 Node parent class initialization
        self.srv = self.create_service(AddTwoInts, 'add_two_ints', self.adder_callback)  #  Create a server object ( Interface type 、 service name 、 Server callback function )

    def adder_callback(self, request, response):   #  Create callback function , Execute the processing of data after receiving the request
        response.sum = request.a + request.b       #  Complete the addition and sum calculation , Put the results into the feedback data
        self.get_logger().info('Incoming request\na: %d b: %d' % (request.a, request.b))   #  Output log information , Prompt that the addition and summation calculation has been completed
        return response                          #  Feedback and response information

def main(args=None):                             # ROS2 Node main entrance main function
    rclpy.init(args=args)                        # ROS2 Python Interface initialization
    node = adderServer("service_adder_server")   #  establish ROS2 Node object and initialize
    rclpy.spin(node)                             #  Loop waiting for ROS2 sign out
    node.destroy_node()                          #  Destroy the node object
    rclpy.shutdown()                             #  close ROS2 Python Interface
Client code
import sys

import rclpy                                  # ROS2 Python Interface library
from rclpy.node   import Node                 # ROS2  Node class
from learning_interface.srv import AddTwoInts #  Customized service interface

class adderClient(Node):
    def __init__(self, name):
        super().__init__(name)                                       # ROS2 Node parent class initialization
        self.client = self.create_client(AddTwoInts, 'add_two_ints') #  Create a service client object ( Service interface type , service name )
        while not self.client.wait_for_service(timeout_sec=1.0):     #  Wait for the server to start successfully
            self.get_logger().info('service not available, waiting again...')
        self.request = AddTwoInts.Request()                          #  Create the data object of the service request

    def send_request(self):                                          #  Create a function to send service requests
        self.request.a = int(sys.argv[1])
        self.request.b = int(sys.argv[2])
        self.future = self.client.call_async(self.request)           #  Send service requests asynchronously

def main(args=None):
    rclpy.init(args=args)                        # ROS2 Python Interface initialization
    node = adderClient("service_adder_client")   #  establish ROS2 Node object and initialize
    node.send_request()                          #  Send service request

    while rclpy.ok():                            # ROS2 The system operates normally
        rclpy.spin_once(node)                    #  Loop through the nodes once

        if node.future.done():                   #  Whether the data processing is completed
            try:
                response = node.future.result()  #  Receive feedback data from the server
            except Exception as e:
                node.get_logger().info(
                    'Service call failed %r' % (e,))
            else:
                node.get_logger().info(          #  Print out the feedback received
                    'Result of add_two_ints: for %d + %d = %d' %
                    (node.request.a, node.request.b, response.sum))
            break

    node.destroy_node()                          #  Destroy the node object
    rclpy.shutdown()                             #  close ROS2 Python Interface
After writing the code, you need to set the compilation options of the function package , Let the system know Python Program entry , To open a feature pack setup.py file , Add the following entry point configuration :
    entry_points={

        'console_scripts': [
         'service_adder_client  = learning_service.service_adder_client:main',
        ],
    },
Process summary
Analyze the above procedures , If we want to achieve one A client , The process is as follows :
Programming interface initialization
Create nodes and initialize
Create client objects
Create and send request data
Wait for the server to answer the data
Destroy the node and close the interface
Analyze the above procedures , If we want to achieve one A server , The process is as follows :
Programming interface initialization
Create nodes and initialize
Create server-side objects
Service through callback function
Feed back the response result to the client
Destroy the node and close the interface
2. Machine vision recognition
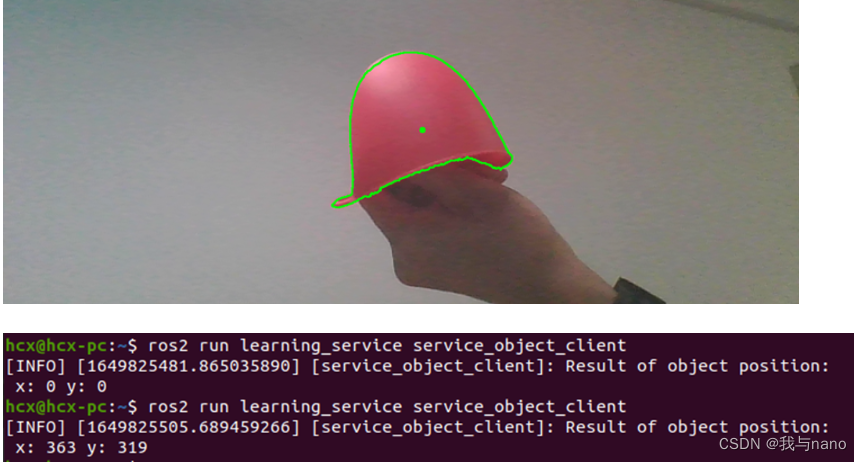
All right. , The addition solver has been implemented , Think back to the visual recognition process we just mentioned , When we need to know the position of the target object , Through the mechanism of service communication , Isn't it more reasonable 
Running effect
Three nodes will appear :
Camera drive node , Publish image data ;
Visual recognition node , Subscribe to image data , And it integrates a server-side object , Be ready to provide the target location ;
Client node , We can think of it as a node for robot target tracking , When you need to move according to the target , Just send a request , Then get a current target location .
Start three terminals , Run the above three nodes respectively :
ros2 run usb_cam usb_cam_node_exe
ros2 run learning_service service_object_server
ros2 run learning_service service_object_client
Client code parsing
import rclpy                                            # ROS2 Python Interface library
from rclpy.node   import Node                           # ROS2  Node class
from learning_interface.srv import GetObjectPosition    #  Customized service interface

class objectClient(Node):
    def __init__(self, name):
        super().__init__(name)                          # ROS2 Node parent class initialization
        self.client = self.create_client(GetObjectPosition, 'get_target_position')
        while not self.client.wait_for_service(timeout_sec=1.0):
            self.get_logger().info('service not available, waiting again...')
        self.request = GetObjectPosition.Request()

    def send_request(self):
        self.request.get = True
        self.future = self.client.call_async(self.request)

def main(args=None):
    rclpy.init(args=args)                             # ROS2 Python Interface initialization
    node = objectClient("service_object_client")      #  establish ROS2 Node object and initialize
    node.send_request()

    while rclpy.ok():
        rclpy.spin_once(node)

        if node.future.done():
            try:
                response = node.future.result()
            except Exception as e:
                node.get_logger().info(
                    'Service call failed %r' % (e,))
            else:
                node.get_logger().info(
                    'Result of object position:\n x: %d y: %d' %
                    (response.x, response.y))
            break
    node.destroy_node()                              #  Destroy the node object
    rclpy.shutdown()                                 #  close ROS2 Python Interface
Server code parsing
import rclpy                                           # ROS2 Python Interface library
from rclpy.node import Node                            # ROS2  Node class
from sensor_msgs.msg import Image                      #  Image message type
import numpy as np                                     # Python Numerical calculation library
from cv_bridge import CvBridge                         # ROS And OpenCV Image conversion class
import cv2                                             # Opencv Image processing library
from learning_interface.srv import GetObjectPosition   #  Customized service interface

lower_red = np.array([0, 90, 128])     #  Red HSV Lower threshold
upper_red = np.array([180, 255, 255])  #  Red HSV Upper threshold

class ImageSubscriber(Node):
    def __init__(self, name):
        super().__init__(name)                              # ROS2 Node parent class initialization
        self.sub = self.create_subscription(
            Image, 'image_raw', self.listener_callback, 10) #  Create subscriber object ( Message type 、 Topic name 、 Subscriber callback function 、 The queue length )
        self.cv_bridge = CvBridge()                         #  Create an image conversion object , be used for OpenCV Image and ROS Mutual conversion of image messages of

        self.srv = self.create_service(GetObjectPosition,   #  Create a server object ( Interface type 、 service name 、 Server callback function )
                                       'get_target_position',
                                       self.object_position_callback)
        self.objectX = 0
        self.objectY = 0

    def object_detect(self, image):
        hsv_img = cv2.cvtColor(image, cv2.COLOR_BGR2HSV)      #  Images from BGR The color model is converted to HSV Model
        mask_red = cv2.inRange(hsv_img, lower_red, upper_red) #  Image binarization
        contours, hierarchy = cv2.findContours(
            mask_red, cv2.RETR_LIST, cv2.CHAIN_APPROX_NONE)   #  Contour detection in image

        for cnt in contours:                                  #  Remove some noise with too small contour area
            if cnt.shape[0] < 150:
                continue

            (x, y, w, h) = cv2.boundingRect(cnt)              #  Get the upper left corner of the outline of the apple xy Pixel coordinates and the width and height of the contour range
            cv2.drawContours(image, [cnt], -1, (0, 255, 0), 2)#  Outline the apple
            cv2.circle(image, (int(x+w/2), int(y+h/2)), 5,
                       (0, 255, 0), -1)                       #  Draw the center point of the apple image

            self.objectX = int(x+w/2)
            self.objectY = int(y+h/2)

        cv2.imshow("object", image)                            #  Use OpenCV Display the processed image effect
        cv2.waitKey(50)

    def listener_callback(self, data):
        self.get_logger().info('Receiving video frame')        #  Output log information , Prompt that the callback function has been entered
        image = self.cv_bridge.imgmsg_to_cv2(data, 'bgr8')     #  take ROS The image message is transformed into OpenCV Images
        self.object_detect(image)                              #  Apple detection

    def object_position_callback(self, request, response):     #  Create callback function , Execute the processing of data after receiving the request
        if request.get == True:
            response.x = self.objectX                          #  Target object XY coordinate
            response.y = self.objectY
            self.get_logger().info('Object position\nx: %d y: %d' %
                                   (response.x, response.y))   #  Output log information , Prompt that feedback has been given
        else:
            response.x = 0
            response.y = 0
            self.get_logger().info('Invalid command')          #  Output log information , Prompt that feedback has been given
        return response


def main(args=None):                                 # ROS2 Node main entrance main function
    rclpy.init(args=args)                            # ROS2 Python Interface initialization
    node = ImageSubscriber("service_object_server")  #  establish ROS2 Node object and initialize
    rclpy.spin(node)                                 #  Loop waiting for ROS2 sign out
    node.destroy_node()                              #  Destroy the node object
    rclpy.shutdown()                                 #  close ROS2 Python Interface
3、 ... and 、 Service command line operation
$ ros2 service list                  #  View the list of services
$ ros2 service type <service_name>   #  View service data types
$ ros2 service call <service_name> <service_type> <service_data>   #  Send service request
summary
Topics and services are ROS The two most commonly used data communication methods in , The former is suitable for sensors 、 Control instructions and other periodicity 、 Unidirectional data , The latter is suitable for asking and answering , Data with higher synchronization requirements , For example, get the target location recognized by machine vision .
In the process of robot development , Similar communication applications can be found everywhere ,ROS For most common scenarios , Standard topics and service data types are designed , Like image data 、 Radar data 、 Odometer data, etc , However, the software and hardware of robots are complicated , Many times these standard definitions cannot meet our needs , This is the time , We are going to customize the communication interface .
边栏推荐
- 【软件测试】06 -- 软件测试的基本流程
- The differences and connections among cookies, sessions, JWT, and tokens
- 6-3 find the table length of the linked table
- 使用paping工具进行tcp端口连通性检测
- 全局变量和静态变量的初始化
- 摄像头的MIPI接口、DVP接口和CSI接口
- The problem of Chinese garbled code in the vscode output box can be solved once for life
- Orin 两种刷机方式
- Volcano resource reservation feature
- Getting started with typescript
猜你喜欢

Financial risk control practice -- feature derivation based on time series
![[MySQL 8.0 does not support capitalization of table names - corresponding scheme]](/img/ea/a1e0722c43f56aff3e79f95c99ba8a.png)
[MySQL 8.0 does not support capitalization of table names - corresponding scheme]
Get class files and attributes by reflection
![[Gaode map POI stepping pit] amap Placesearch cannot be used](/img/4c/55586ffcc2267c477a4532ab51a0c1.png)
[Gaode map POI stepping pit] amap Placesearch cannot be used
【软件测试】03 -- 软件测试概述
. Net core stepping on the pit practice
The problem of Chinese garbled code in the vscode output box can be solved once for life
![[QT] QT multithreading development qthread](/img/7f/661cfb00317cd2c91fb9cc23c55a58.jpg)
[QT] QT multithreading development qthread
![[algorithm post interview] interview questions of a small factory](/img/62/6e330b1eba38f2dc67b21a10f0e2a8.jpg)
[algorithm post interview] interview questions of a small factory
What is linting
随机推荐
vim
逻辑结构与物理结构
2. Addition and management of Oracle data files
Database mysql all
. Net core stepping on the pit practice
A brief introduction to heading/pitch/roll and omega/phi/kappa
H5内嵌App适配暗黑模式
2022 winter vacation training game 5
Build a microservice cluster environment locally and learn to deploy automatically
数据库Mysql全部
MQClientException: No route info of this topic: type_ topic
【MySQL8.0不支持表名大写-对应方案】
使用paping工具进行tcp端口连通性检测
扫盲-以太网MII接口类型大全-MII、RMII、SMII、GMII、RGMII、SGMII、XGMII、XAUI、RXAUI
Vant Weapp SwipeCell設置多個按鈕
Record of problems in ollvm compilation
1. Create Oracle database manually
H5 embedded app adapts to dark mode
Volcano 资源预留特性
Integer to 8-bit binary explanation (including positive and negative numbers) scope of application -127~+127