当前位置:网站首页>Based on vs2017 and cmake GUI configuration, zxing and opencv are used in win10 x64 environment, and simple detection of data matrix code is realized
Based on vs2017 and cmake GUI configuration, zxing and opencv are used in win10 x64 environment, and simple detection of data matrix code is realized
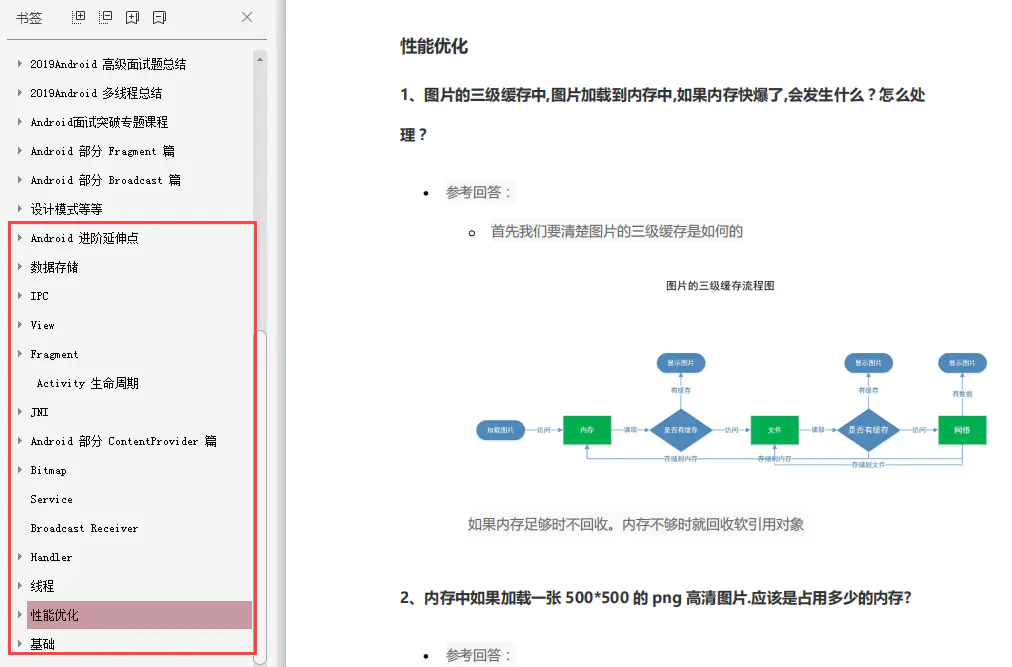
2022-07-05 19:50:00 【heartinsharp】
Software download :
Download and install... First VS2017 and cmake-gui, Links are as follows :
VS2017:
1、 Official website : download Visual Studio Tools - Free installation Windows、Mac、Linux
2、 Network disk : link :https://pan.baidu.com/s/1UNDEgL17D9bsN_-RPAAWcA Extraction code :70nl
cmake-gui:
1、 Official website :Download | CMake
2、 Network disk : link :https://pan.baidu.com/s/1upDXsU5_T8Wno5hVC6AATQ Extraction code :4v2w
Installation method :
VS2017: Double click Install Package -> Modify the path -> Click on “ install ”-> installation is complete .


After installation, it is the same as the screenshot below , We can click “ start-up ” Open up .

Open as shown in the figure below , Click on “ later “--->” start-up VS“
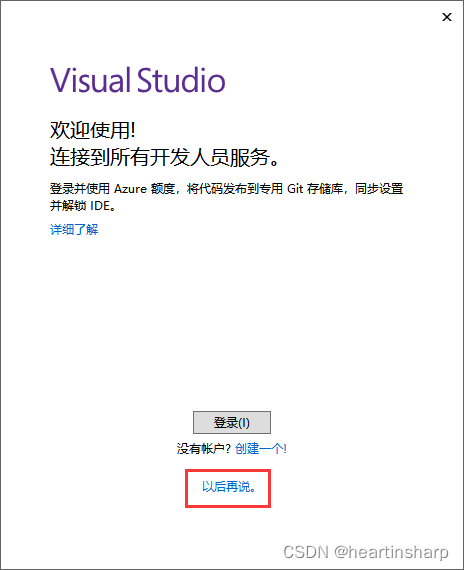
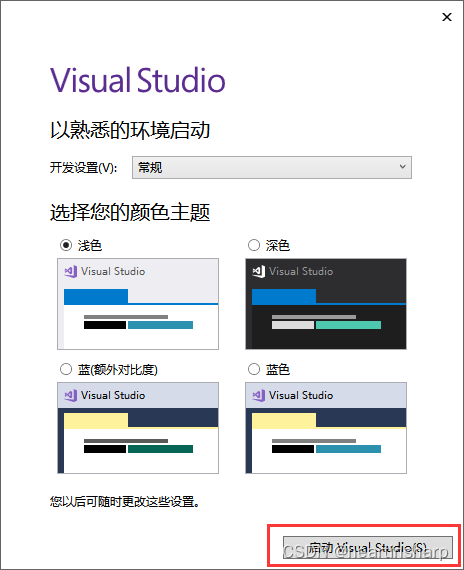
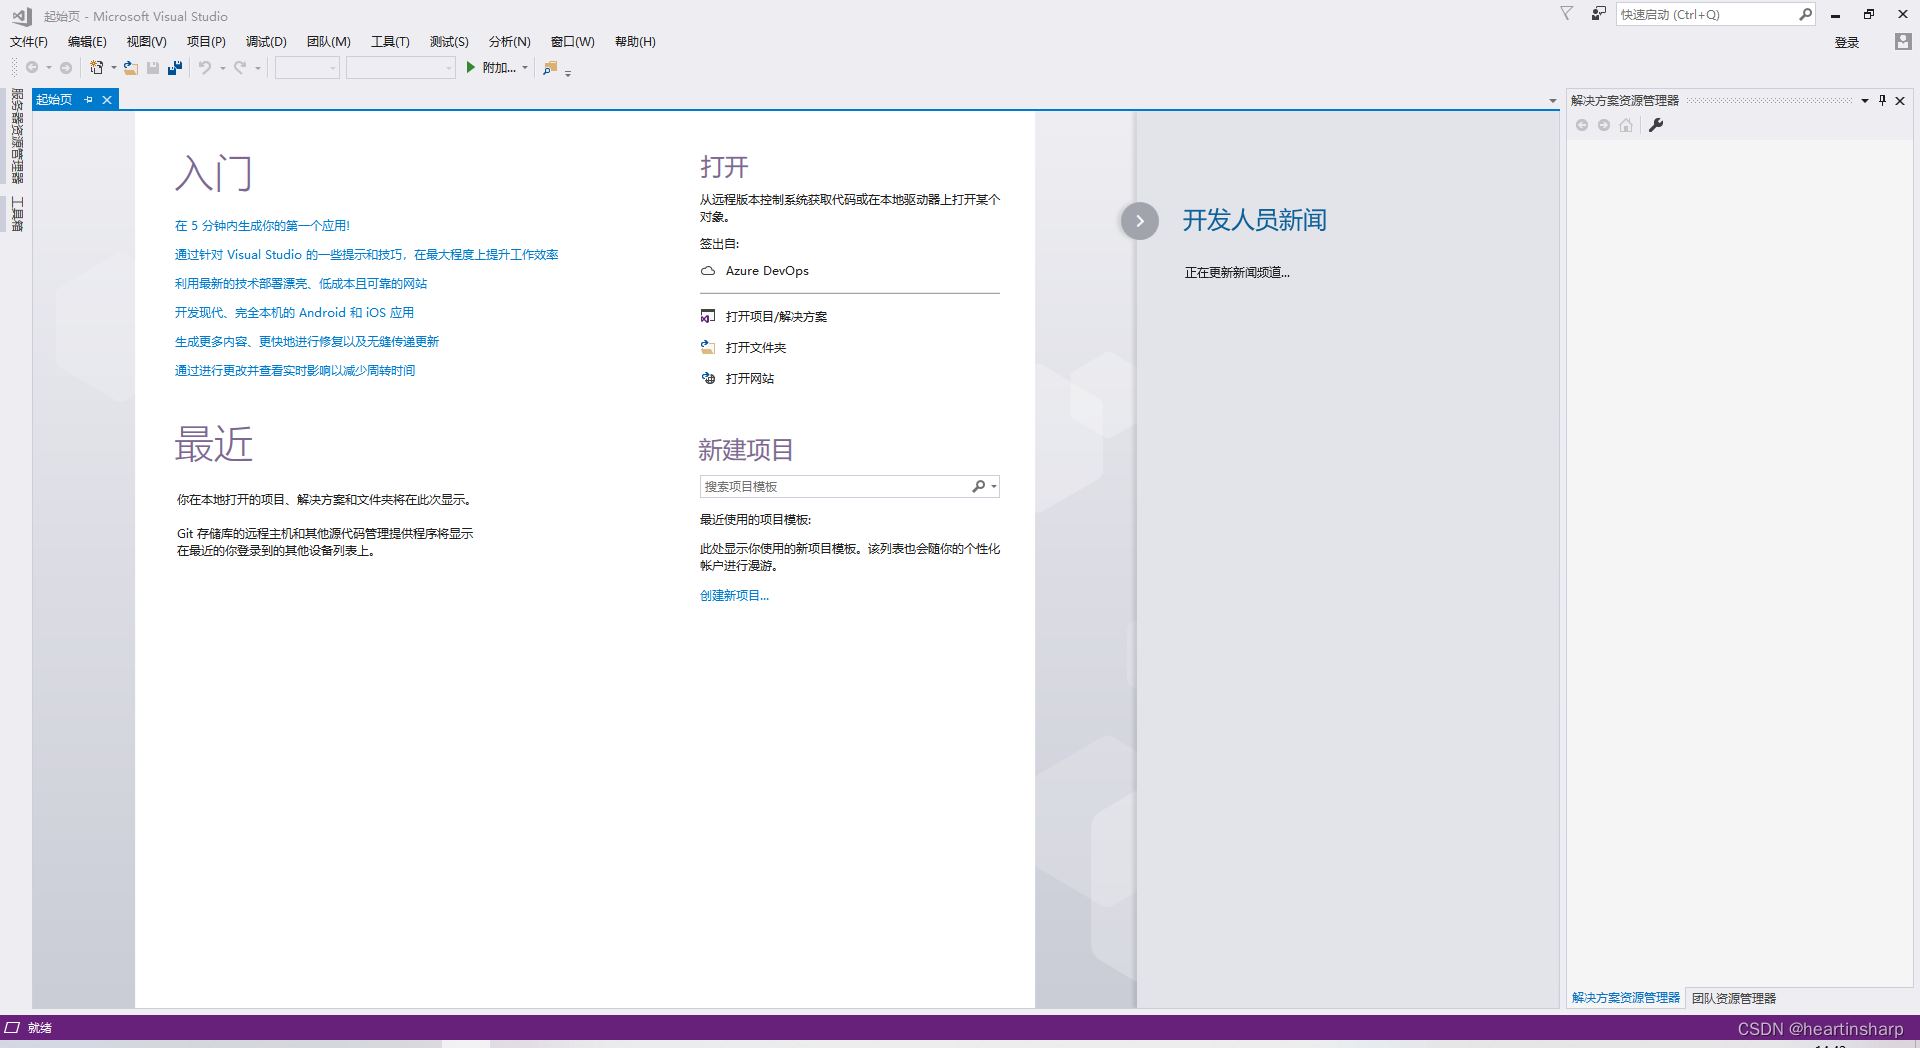
So you OK 了 .
Because my notebook only has C disc , So it is directly installed in C Underneath , However, I still recommend installing it in C Under the plate , It seems that the speed will be faster ,VS2017 The installation of is slow , It takes a while .
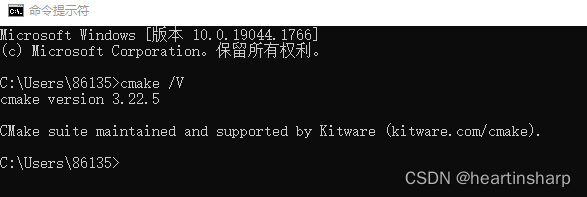
cmake-gui: Double click Install Package -> All the way next( There are several places to pay attention to )->install->finish-> open cmd, Input cmake /V You can see cmake edition .
When you just double-click to open, the installer needs to initialize for a while , Just wait .


It's better to set it like this , Choose the middle one to directly configure the environment variables , Check the one in the lower left corner to create an icon on the desktop , More convenient .


Last , stay cmd Input in cmake /V
Download and compile source code
The code download
opencv Open source code download :
1、 Official website :Releases - OpenCV、Release 3.4.1 · opencv/opencv_contrib · GitHub
2、 Network disk ( Not compiled ):
link :https://pan.baidu.com/s/1d17p0EEwPmYP3gu_ZbYTJg Extraction code :4h7q
( The compiled ):
link :https://pan.baidu.com/s/1EAiCLkw3pCbgZilVNvhsQA Extraction code :9xzw
ZXing Open source code download :
1、 Official website :GitHub - yuriiz/zxing-cpp: ZXing C++ Library with Python bindings
2、 Network disk ( Not compiled ):
link : link :https://pan.baidu.com/s/1We9BYvKdz6XmCTMTEpZA8A Extraction code :j9pi
( The compiled ):
link : link :https://pan.baidu.com/s/16XXKt7VqgowRxTnVnWV8sQ Extraction code :c780
compile
opencv compile :
1、 First , Unpack and download opencv Source code , It looks like this inside

2、 Create a new folder elsewhere to receive opencv Compiled project file , Pictured

The above one is the extracted folder , The following is the newly created folder .
3.1、 Compile the generated opencv Of vs There are two ways to project , The first is to open cmake-gui, And set it in sequence , Finally, click finish

Wait for build to complete , After completion, there will be a pile of red , Don't worry about him , The only thing we need to change is BUILD The first thing and WITH The first thing , I don't quite understand this , Suggestions for reference [c++ opencv][ The basic chapter -1]-windows Compile below opencv library _ The end of the world ba The blog of -CSDN Blog as well as opencv Description of each library _ A wasted cup of wine blog -CSDN Blog _opencv library
You can also change nothing directly , Click again on the “configure” and “generate”.

Then click again “Configure”, Click when finished “Generate” That's it .

3.2、 The second is to use cmd To compile and generate opencv Of vs project
First, decompress it opencv-34.1 Create a new build file . Then open the cmd And enter build File directory , Last input cmake -G "Visual Studio 15 2017 Win64" .. And return


One click generation , Very convenient
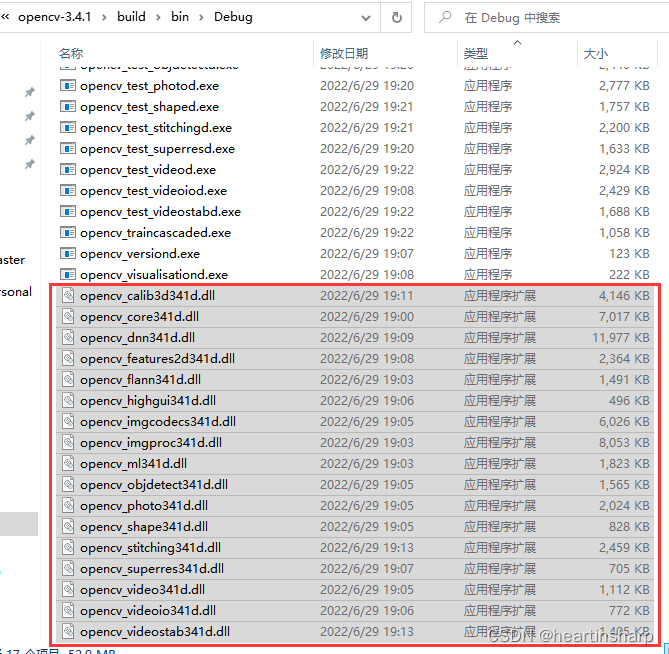
4、 View the generated files

5、 double-click “OpenCV.sln”. Get into VS2017, The default is debug Pattern , It can also be modified to release Pattern , Right click “ Solution OpenCV” And click the “ attribute ” You can modify , It seems that it's OK not to change . Then click “ Build solution ”, Waiting for build , This will take a long time , Just wait

After generation, see the following figure .

6、 Create a folder anywhere ( Any name ), Create a “include” Folders and one “lib” Folder , As shown in the figure below

Then put the lib Copy the file to the above lib In the folder .

Extracted before opencv Source code found in include, The inside of opencv and opencv2 Copy the folder to the one created above buildLib The folder include in .

And then modules Some of the things used in opencv Modular opencv2 The folder is also copied to buildLib Of include in , Just copy it directly . Here, for convenience, you can go directly to modules Folder search opencv2, Then select all and copy it .

Last , Find in the first layer of the generated folder bin Folder , Put everything in it dll File copy to buildLib Of bin In the folder .
such , The preparations outside are finished .
7、 Next, create a new vs engineering , Click on “ project ”--->“ attribute ”

Then modify as follows
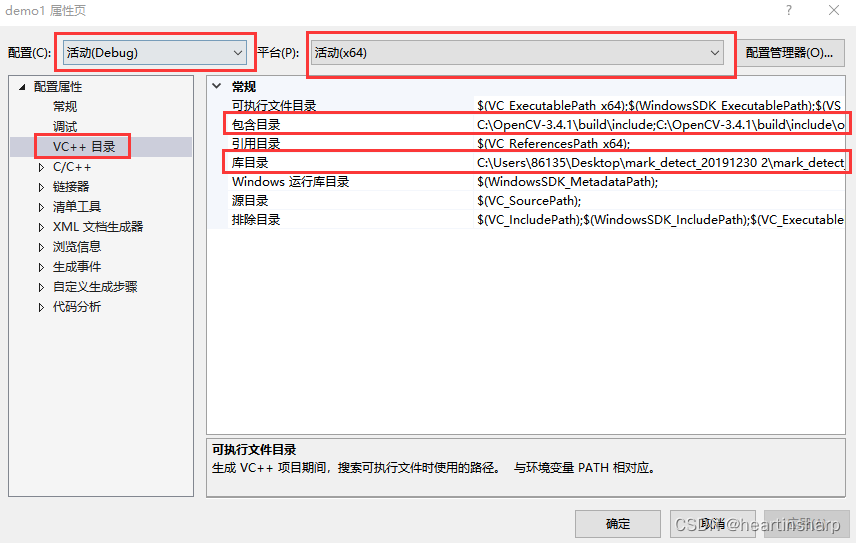

Then modify


Click on “ determine ”, Then you can try the following code , If the picture is displayed successfully, it will be successful .
#include <iostream>
#include <opencv2/opencv.hpp>

using namespace std;
using namespace cv;

int main()
{
	Mat a;
    //  Change the image path by yourself
	a = imread("C:\\Users\\86135\\Desktop\\lena.png", 1);
	imshow("a", a);
	waitKey(0);
	destroyAllWindows();
}
zxing compile
zxing Is based on opencv QR code decoding library , Therefore, you must put opencv Good configuration . Configuration method and opencv Almost the same , It's also
1、 First create a new folder to store cmake Generated vs project , And then use cmake To generate this vs project , Here I use cmd To generate , It's actually using commands cmake -G "Visual Studio 15 2017 Win64" .. To generate .
Create a new one in the extracted folder build Folder

open cmd Get into build Folder in which , Enter the command cmake -G "Visual Studio 15 2017 Win64" .. And go back to execute . 

Wrong report , Say we can't find it opencv Configuration item for , Here we need to be in zxing Of cmakelists Add a line to it
set(OpenCV_DIR C:/Users/86135/Desktop/every/Opencv/buildLib/lib)
Just like this.

Save and exit , Enter the just cmd Once again, just order .
Wait a minute , You have to opencv Of cmake Add the file to the corresponding location . Remember we just generated opencv Project , Copy the following three files to buildLib Of lib In the folder , As shown in the figure below


Okay , It should now be able to generate successfully zxing Of vs Project , Let's do it again cmd The order of . give the result as follows :

very good , No report error , Let's look at build The documents inside .

2、 And then use vs2017 Open this project , Set up debug or release, Build solution
The same as usual , double-click “zxing.sln” open vs project . First set up release, Then generate the solution .


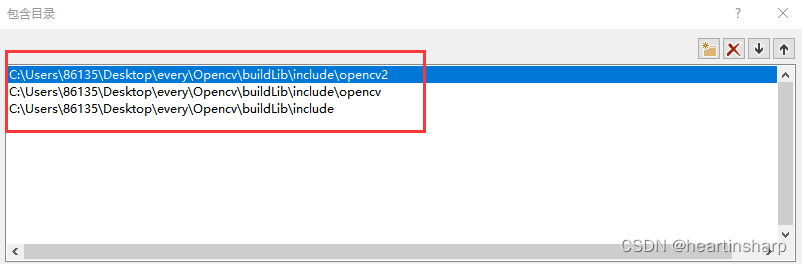
3、 Create a new folder to place include Document and lib file , And then in the newly created vs Add items including directories and library directories to the project

The generated lib Put the file in the above lib In the folder

Put the following two folders zxing Copy the folder to the above include In the folder


Okay , Now? zxing The external configuration has been completed .
4、 Create a vs The project is for running data matrix Decoding the code
First , Set the properties of the item , As shown below


Fill in the code below :
//zxing
#include "zxing/LuminanceSource.h"
#include "zxing/Reader.h"
#include "zxing/common/GlobalHistogramBinarizer.h"
#include "zxing/DecodeHints.h"
#include "zxing/datamatrix/DataMatrixReader.h"
#include "zxing/MatSource.h"
#include "zxing/result.h"
#include "zxing/BinaryBitmap.h"
#include "zxing/Binarizer.h"
#include "zxing/Exception.h"
//opencv
#include "opencv2/opencv.hpp"
#include "opencv2/highgui/highgui.hpp"
#include "opencv2/imgproc/imgproc.hpp"
#include "opencv2/core/core.hpp"

/******************************************************************************************
Function:        DataMatrixDecoder
Description:     data matrix QR code analysis
Input:           image_path: QR code image path
Return:           Analysis results
*******************************************************************************************/
std::string DataMatrixDecoder(std::string image_path) {
	// Initialize the parsing result
	std::string content = "";
	// Read the picture
	cv::Mat matSrc = cv::imread(image_path, 1);
	// If the reading fails, it returns
	if (!matSrc.data) {
		fprintf(stderr, "read image error: %s", image_path.c_str());
		return content;
	}

	try
	{
		// Convert to grayscale
		cv::Mat matGray;
		cv::cvtColor(matSrc, matGray, CV_BGR2GRAY);

		zxing::Ref<zxing::LuminanceSource> source = MatSource::create(matGray);
		/*int width = source->getWidth();
		int height = source->getHeight();*/
		/*fprintf(stderr, "image width: %d, height: %d\n", width, height);*/
		zxing::Ref<zxing::Reader> reader;
		reader.reset(new zxing::datamatrix::DataMatrixReader);
		zxing::Ref<zxing::Binarizer> binarizer(new zxing::GlobalHistogramBinarizer(source));
		zxing::Ref<zxing::BinaryBitmap> bitmap(new zxing::BinaryBitmap(binarizer));
		// Start decoding
		zxing::Ref<zxing::Result> result(reader->decode(bitmap, zxing::DecodeHints(zxing::DecodeHints::DATA_MATRIX_HINT)));
		// Get the parsing result
		content = result->getText()->getText();
	}
	catch (zxing::Exception e)
	{
	}

	return content;
}

int main() {
	std::string result = DataMatrixDecoder("images/zc2.png");
	std::cout << result << std::endl;
}
The path of the image needs to be modified .
Original picture :

result :

As shown in the figure above , Output string “Data Matrix” It was successful !
Okay , This sharing is over , I hope you guys can point out the mistakes , thank you !
appendix
4、C++ utilize zxing Identify QR code - Grey letter network ( Software development blog aggregation )
10、C++ Zxing opencv distinguish Data Matrix QR code _Sharon Liu The blog of -CSDN Blog
边栏推荐
- 【合集- 行业解决方案】如何搭建高性能的数据加速与数据编排平台
- MySQL中字段类型为longtext的值导出后显示二进制串方式
- Debezium series: record the messages parsed by debezium and the solutions after the MariaDB database deletes multiple temporary tables
- UWB ultra wideband positioning technology, real-time centimeter level high-precision positioning application, ultra wideband transmission technology
- 爬虫练习题(二)
- Common operators and operator priority
- aggregate
- Float. The specific meaning of the return value of floattorawintbits is to convert float into byte array
- Fuzor 2020 software installation package download and installation tutorial
- What are general items
猜你喜欢
安卓面试宝典,2022Android面试笔试总结
Common - Hero Minesweeper

ACM getting started Day1
如何安全快速地从 Centos迁移到openEuler
40000 word Wenshuo operator new & operator delete
大厂面试必备技能,2022Android不死我不倒
Webuploader file upload drag upload progress monitoring type control upload result monitoring control

【合集- 行业解决方案】如何搭建高性能的数据加速与数据编排平台

UWB ultra wideband positioning technology, real-time centimeter level high-precision positioning application, ultra wideband transmission technology
![[FAQ] summary of common causes and solutions of Huawei account service error 907135701](/img/1d/0e716533237c0e4463f5d6357395bd.png)
[FAQ] summary of common causes and solutions of Huawei account service error 907135701
随机推荐
软件测试工程师是做什么的?待遇前景怎么样?
IBM has laid off 40 + year-old employees in a large area. Mastering these ten search skills will improve your work efficiency ten times
Complete interview questions for interviewers and senior Android engineers in front-line Internet enterprises
S7-200SMART利用V90 MODBUS通信控制库控制V90伺服的具体方法和步骤
[OBS] qstring's UTF-8 Chinese conversion to blog printing UTF-8 char*
ACM getting started Day1
再忙不能忘安全
The binary string mode is displayed after the value with the field type of longtext in MySQL is exported
Vagrant2.2.6 supports virtualbox6.1
How to apply smart contracts more wisely in 2022?
【obs】libobs-winrt :CreateDispatcherQueueController
C application interface development foundation - form control (5) - grouping control
No matter how busy you are, you can't forget safety
PHP uses ueditor to upload pictures and add watermarks
Fundamentals of shell programming (Part 8: branch statements -case in)
Bitcoinwin (BCW)受邀参加Hanoi Traders Fair 2022
Add data to excel small and medium-sized cases through poi
Redis cluster simulated message queue
Debezium series: parsing the default value character set
What is the core value of testing?