当前位置:网站首页>Gradle源码解析:生命周期的三个阶段
Gradle源码解析:生命周期的三个阶段
2022-08-02 03:27:00 【Android技术栈】
一、简介
1、gradle是什么,能做什么?
gradle是和maven、ant一样是一个强大的构建工具,使用构建工具来描述它还不能凸显他的强大,确切的说应该是编程框架
2、gradle组成
groovy语法(相当于安卓使用java)
build script block(点build文件)
gradle api(和安卓一样在java的基础上还有添加了自己的api)
3、和maven ant相比的优势
更灵活: maven\ant构建程序时不能修改构建的过程(构建脚本) (例如修改打包出的apk名字gradle就可轻松做到)
粒度性: maven\ant构建程序时源代码和构建工具相互独立; 我们不知道源码做了什么
gradle从源码的编译、资源的编译、生成一个个Task逐个执行Task;Task源码开源
扩展性: 支持插件机制
兼容性:兼容所有ant、maven功能
二、生命周期
也就是各种任务(Task)的执行过程
ps:任务也有依赖性,某个任务执行如果依赖其他任务,则需要执行完其他任务;再执行此任务
1、声明周期的三个阶段
(1)情景回顾
诸如Executing task xxx、Configure project、BUILD SUCCESSFUL in 0s之类的,其实这些过程就是gradle执行声明周期的一些流程
(2)生命周期的三个阶段
1、initialization:初始化阶段
执行工程的setting.gradle文件
- 解析整个工程下的所有Project,构建所有的Project对应的project对象
2、Configuration:配置阶段
解析所有project对象中的task,构建好所有的task拓扑图(有向无环图)
- 这个有向无环其实就是各个执行一个Task所依赖的其他Task而形成的一种关系
3、Excution:执行阶段 执行具体的task,及其依赖的task(先执行目标Task依赖的Task,再执行目标Task)
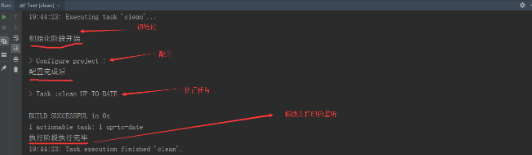
如上情景回顾的实例,用户可以通过命令行输入命令,或者通过右面的Gradle窗口的Task下双击Task名执行Gradle任务;执行了clean命令
观察发现:
1、19:04:22: Executing task ‘clean’…这里开始初始化
2、Configure project :这里开始配置
3、Task :clean执行任务(clean没有依赖其他的Task所以直接执行了clean,你如果执行build任务,或在执行前先执行build依赖的task)
2、声明周期的常见监听方法
- tips:Project,Task,是Gradle提供的api
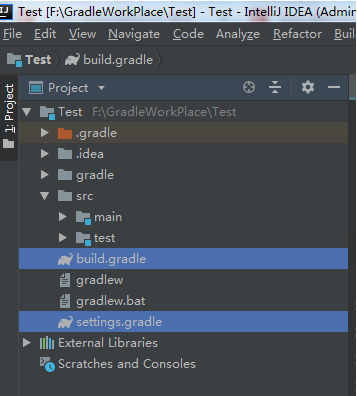
建立个Gradle工程
*和建立什么HelloWord项目一样,一直next即可,建立完成后会有如下两个点gradle文件
1、由上我们知道你执行一个任务时,会先读取这个setting.gradle完成工程初始化、配置、然后再执行具体任务
2、在看看Build.gradle文件,其实他就是一个任务名,即Task的名字。和上文的clean一样是一个任务。我们可以在命令行输入 gradle build或者右面的Gradle窗口,双击Task先的build即可执行build任务。这时便会执行build.gradle内部的代码的
(1)初始化结束/配置开始阶段的监听
<pre spellcheck="false" class="md-fences md-end-block ty-contain-cm modeLoaded" lang="java" cid="n67" mdtype="fences" style="box-sizing: border-box; overflow: visible; font-family: var(--monospace); font-size: 0.9em; display: block; break-inside: avoid; text-align: left; white-space: normal; background-image: inherit; background-position: inherit; background-size: inherit; background-repeat: inherit; background-attachment: inherit; background-origin: inherit; background-clip: inherit; background-color: rgb(248, 248, 248); position: relative !important; border: 1px solid rgb(231, 234, 237); border-radius: 3px; padding: 8px 4px 6px; margin-bottom: 15px; margin-top: 15px; width: inherit; color: rgb(51, 51, 51); font-style: normal; font-variant-ligatures: normal; font-variant-caps: normal; font-weight: 400; letter-spacing: normal; orphans: 2; text-indent: 0px; text-transform: none; widows: 2; word-spacing: 0px; -webkit-text-stroke-width: 0px; text-decoration-style: initial; text-decoration-color: initial;">this.beforeEvaluate {}
</pre>
(2)配置阶段完成后的监听
this.afterEvaluate {} 1
(3)执行任务完成
this.gradle.buildFinished {} 1
(4)初始化阶段开始
只需在setting.gradle 文件中写逻辑即可,我们知道这里肯定会在初始化之前执行。
3、声明周期监听Demo
(1)setting.gradle
<pre spellcheck="false" class="md-fences md-end-block ty-contain-cm modeLoaded" lang="java" cid="n76" mdtype="fences" style="box-sizing: border-box; overflow: visible; font-family: var(--monospace); font-size: 0.9em; display: block; break-inside: avoid; text-align: left; white-space: normal; background-image: inherit; background-position: inherit; background-size: inherit; background-repeat: inherit; background-attachment: inherit; background-origin: inherit; background-clip: inherit; background-color: rgb(248, 248, 248); position: relative !important; border: 1px solid rgb(231, 234, 237); border-radius: 3px; padding: 8px 4px 6px; margin-bottom: 15px; margin-top: 15px; width: inherit; color: rgb(51, 51, 51); font-style: normal; font-variant-ligatures: normal; font-variant-caps: normal; font-weight: 400; letter-spacing: normal; orphans: 2; text-indent: 0px; text-transform: none; widows: 2; word-spacing: 0px; -webkit-text-stroke-width: 0px; text-decoration-style: initial; text-decoration-color: initial;">rootProject.name = 'Test'
println("初始化阶段开始")
</pre>
(2)build.gradle
<pre spellcheck="false" class="md-fences md-end-block ty-contain-cm modeLoaded" lang="java" cid="n78" mdtype="fences" style="box-sizing: border-box; overflow: visible; font-family: var(--monospace); font-size: 0.9em; display: block; break-inside: avoid; text-align: left; white-space: normal; background-image: inherit; background-position: inherit; background-size: inherit; background-repeat: inherit; background-attachment: inherit; background-origin: inherit; background-clip: inherit; background-color: rgb(248, 248, 248); position: relative !important; border: 1px solid rgb(231, 234, 237); border-radius: 3px; padding: 8px 4px 6px; margin-bottom: 15px; margin-top: 15px; width: inherit; color: rgb(51, 51, 51); font-style: normal; font-variant-ligatures: normal; font-variant-caps: normal; font-weight: 400; letter-spacing: normal; orphans: 2; text-indent: 0px; text-transform: none; widows: 2; word-spacing: 0px; -webkit-text-stroke-width: 0px; text-decoration-style: initial; text-decoration-color: initial;">plugins {
 id 'groovy'
}

group 'Test'
version '1.0-SNAPSHOT'

repositories {
 mavenCentral()
}

dependencies {
 compile 'org.codehaus.groovy:groovy-all:2.3.11'
 testCompile group: 'junit', name: 'junit', version: '4.12'
}
//----------------------------以上为系统的,以下为我们自己写的回调demo------------------------------------
//配置阶段开始前 监听回调
this.beforeEvaluate {}

// 配置阶段完成后
this.afterEvaluate {
 println("配置完成后")
}

this.gradle.buildFinished {
 println("执行阶段执行完毕")
}

</pre>
(3)随便执行个Task
我们就执行个系统自带的Task-clean
(4)观察结果
4、其他常见监听方式
<pre spellcheck="false" class="md-fences md-end-block ty-contain-cm modeLoaded" lang="java" cid="n87" mdtype="fences" style="box-sizing: border-box; overflow: visible; font-family: var(--monospace); font-size: 0.9em; display: block; break-inside: avoid; text-align: left; white-space: normal; background-image: inherit; background-position: inherit; background-size: inherit; background-repeat: inherit; background-attachment: inherit; background-origin: inherit; background-clip: inherit; background-color: rgb(248, 248, 248); position: relative !important; border: 1px solid rgb(231, 234, 237); border-radius: 3px; padding: 8px 4px 6px; margin-bottom: 15px; margin-top: 15px; width: inherit; color: rgb(51, 51, 51); font-style: normal; font-variant-ligatures: normal; font-variant-caps: normal; font-weight: 400; letter-spacing: normal; orphans: 2; text-indent: 0px; text-transform: none; widows: 2; word-spacing: 0px; -webkit-text-stroke-width: 0px; text-decoration-style: initial; text-decoration-color: initial;">//等同beforeEvaluate
this.gradle.beforeProject {}
//等同配置阶段完成后
this.gradle.afterProject {}
</pre>
Gradle的生命周期的相关内容,由于篇幅的原因,今天就介绍到这里
有需要学习更多Android进阶技术的同学;我自荐一套《完整的Android的资料,以及一些视频课讲解》大家可以在评论区下方留言发送“进阶”或“笔记”或者直接私信我 即可 免费获取

最后我想说:
对于程序员来说,要学习的知识内容、技术有太多太多,要想不被环境淘汰就只有不断提升自己,从来都是我们去适应环境,而不是环境来适应我们
技术是无止境的,你需要对自己提交的每一行代码、使用的每一个工具负责,不断挖掘其底层原理,才能使自己的技术升华到更高的层面
Android 架构师之路还很漫长,与君共勉
边栏推荐
猜你喜欢
![WeChat applet development video loading: [Rendering layer network layer error] Failed to load media](/img/24/e12a1312aee28a43428b2ae0bfbe00.png)
WeChat applet development video loading: [Rendering layer network layer error] Failed to load media

记账凭证的种类、记账凭证的基本内容、记账凭证的填制要求、记账凭证的审核
VIKINGS: 1 vulnhub walkthrough

GreenOptic: 1 vulnhub walkthrough

ES6 three-dot operator, array method, string extension method
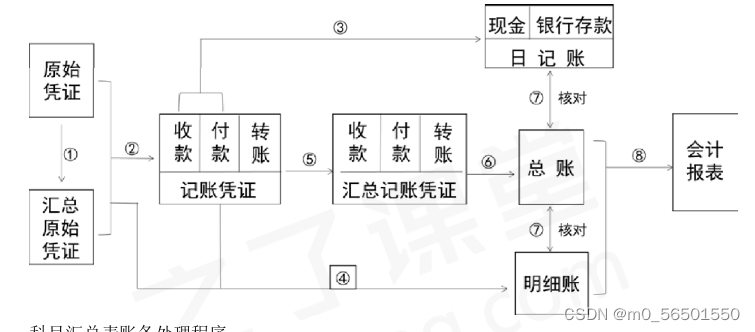
账务处理程序、记账凭证账务处理程序、汇总记账凭证账务处理程序、科目汇总表账务处理程序、会计信息化概述、信息化环境下会计账务处理的基本要求(此章出1道小题)
Shuriken: 1 vulnhub walkthrough

重点考:金融资产概述、交易性金融资产的概念、交易性金融资产的账务处理(取得、持有。出售)、
文件包含漏洞

The shooting range that web penetration must play - DVWA shooting range 1 (centos8.2+phpstudy installation environment)
随机推荐
CTF-Neting Cup Past Topics
web渗透必玩的靶场——DVWA靶场 1(centos8.2+phpstudy安装环境)
C language uses stack to calculate infix expressions
Pycharm packages the project as an exe file
(4) Function, Bug, Class and Object, Encapsulation, Inheritance, Polymorphism, Copy
[Hello World教程] 使用HBuilder和Uni-app 生成一个简单的微信小程序DEMO
CSRF (Cross Site Request Forgery)
解密:链动2+1的商业模式
PHP deserialization vulnerability
广告电商「私域打工人」职业前景:你离月薪6万,还差多远?
Cookie is used to collect the admin privileges CTF foundation problem
Shuriken: 1 vulnhub walkthrough
php函数漏洞总结
Go Build报错汇总(持续更新)
链动2+1模式开发系统
CTF入门之php文件包含
重点考:金融资产概述、交易性金融资产的概念、交易性金融资产的账务处理(取得、持有。出售)、
最简单的FRP内网穿透教程
The learning path of a network security mouse - the basic use of nmap
链动2+1无限循环系统,2022年起盘成功率超高的模式