当前位置:网站首页>MongoDB permission verification is turned on and mongoose database configuration
MongoDB permission verification is turned on and mongoose database configuration
2022-08-04 23:42:00 【@weida】

ExpressThe most commonly used databases for projects aremongodb,and with modulesmongoose完成对数据库的访问.
This article assumes that you have done it correctlymongodb数据库的安装,下面是针对mongodbThe setup and project configuration work.
一、为mongodbDatabase settings permission verification
在mongodb安装完成之后,Permission verification is turned off by default,That is to say, you can access the data in the database without using any password.,This practice is very dangerous in a production environment.
如何查看我们的mongodbDoes the database have permission verification enabled??非常简单,我们只需要打开mongodb的安装目录,found in it named/bin/mongod.cfg的配置文件,查看其中security选项下的authroization配置,If the option is commented out or empty,Indicates that permission verification is not enabled.
#security:
#authorization: enabled
配置文件中的
#表示注释,这里虽然authorization被设置为了enabled,But because it is commented out, it still means that permission verification is not turned on.
如果您的mongodbPermission verification has not been turned on,Follow the steps below to complete the setup.
1.1 创建超级管理员
mongodb在完成安装之后,Three databases are created by default,分别为admin、config、local.其中,adminThe database administrator ismongodb的超级管理员.
Creating a super administrator requires two commands:
use admin

db.createUser({

  user:'admin',
  pwd:'123456',
  roles:[{
    role:'root',db:'admin'}]
})
The above command will beadmin数据库创建一个名为admin的超级管理员(角色为root),其密码为123456(Be sure to use a complex password for production environments,to ensure database security).
After the super administrator is created,我们可以使用命令show users查看当前数据库中的用户,The process of creating a super administrator is as follows:
> use admin
switched to db admin
> db.createUser({

... user:'admin',
... pwd:'123456',
... roles:[{
    role:'root',db:'admin'}]
... })
Successfully added user: {

        "user" : "admin",
        "roles" : [
                {

                        "role" : "root",
                        "db" : "admin"
                }
        ]
}
> show users
{

        "_id" : "admin.admin",
        "userId" : UUID("c17aa709-a1d8-4a76-8d5b-0b61bb589d49"),
        "user" : "admin",
        "db" : "admin",
        "roles" : [
                {

                        "role" : "root",
                        "db" : "admin"
                }
        ],
        "mechanisms" : [
                "SCRAM-SHA-1",
                "SCRAM-SHA-256"
        ]
}
1.2 修改mongod.cfg配置
修改/bin/mongod.cfg文件中的security选项如下:
security:
   authorization: enabled
1.3 重启mongodb服务
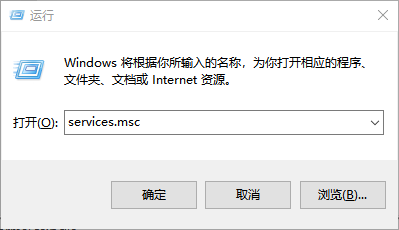
- 使用快捷键
win + R,并输入services.msc,然后回车
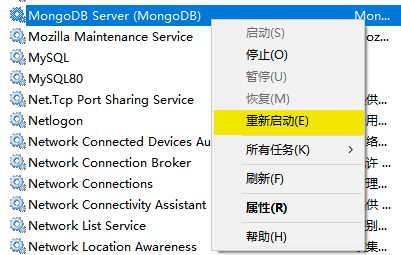
- 在服务列表中找到
MongoDB Server (MongoDB) - 右键选择
重新启动
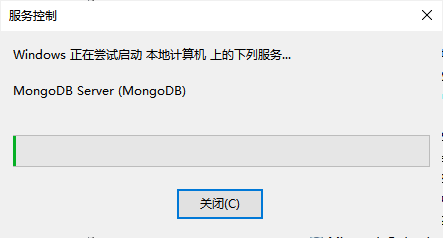
- Waiting for the service is restarted
1.4 使用密码登录mongodb
使用如下命令,连接数据库,If you can successfully connect to the database,Indicates that we have turned on permission verification,and created a super administrator.
> mongo admin -u admin -p 123456
After enabling permission verification,使用
mongocommand can still connectmongodb数据库,但是,如果我们使用show dbsCommand to view the database will encounter a permission error,or can't see the database list.
After completing the creation of the super administrator,We also need to create one more user for the project database,Used to access the project database.
这就和使用LinuxDo not use the super administrator directly in the systemrootThe same is true for direct operating system resources.
1.5 Create a user for the project database
Suppose now that a database for the project has been createddb_ahoh,You can use the following command to create an access-onlyad_ahoh的用户ahohAdmin.
use db_ahoh

db.createUser({

  user:"ahohAdmin",
  pwd:"123456",
  roles:[{
    role:"dbOwner",db:"db_ahoh"}]
})
The above command is databasedb_ahoh创建了一个名为ahohAdmin的用户,This is the role of the userdbOwner,只能访问db_ahoh一个数据库.
在
mongodb中,To create a database, you only need to insert a piece of data into the database.,例如,The following two commands can create a databasedb_ahoh:
use db_ahohdb.tb_users.insert({username:"xiaoming"})The above command when creating the database,Created a table by the way
tb_users,并插入了一条数据.
1.6 Log in with the project database user
在完成ahohAdmin用户创建之后,You can use the following command to connect to the database:
mongo db_ahoh -u ahohAdmin -p 123456
此时,如果我们执行show dbs指令,only see one database:
> show dbs
db_ahoh  0.000GB
二、使用mongoose连接数据库
mongoosemodules are operationsmongodb的 不二之选,我们需要先安装mongoose包之后,Re-connect to the database.
2.1 安装mongoose模块
使用以下命令,安装mongoose模块:
npm i mongoose
2.2 编辑数据库连接URI
Similar to other relational databases,在连接数据库的时候,Requires a string similar to a web page connection,Used to indicate the name of the database to connect to、端口、IP、用户名和密码等信息,格式如下:
mongodb://<username>:<password>@<IP>:<port>/<database>
If you and the database configured in this article are exactly the same,那么您可以使用下面的URI连接mongodb数据库:
mongodb://ahohAdmin:123456@localhost:27017/db_ahoh
这个重要的链接Often placed in a separate configuration file,Rather than hard coded in the code.
2.3 创建配置文件config.js
在node项目中,We usually use aconfig.jsFile to store some important configuration information.
在项目根目录下创建文件夹config/,然后在其中创建一个名为config.js的配置文件.
Edit the content in the configuration file as follows:
/* config/config.js */
module.exports = {

    mongoURI: "mongodb://ahohAdmin:[email protected]:27017/db_ahoh",
}
2.4 使用mongoose连接数据库
in the main file of the projectapp.js中执行以下步骤,连接mongodb数据库.
- 引入
mongoose模块
const mongoose = require('mongoose')
- 使用
uri连接数据库
const dbUrl = require('./config/config').mongoURI
mongoose.connect(dbUrl)
  .then(()=>{
     console.log('MongoDB connected!')  }) //连接成功输出 MongoDB connected!
  .catch(err => console.log(err))
- 测试连接是否成功
执行命令npm run serve启动系统,观察控制台输出.
PS E:\Code\Express\express-server> npm run serve

> [email protected] serve
> nodemon ./bin/www

[nodemon] 2.0.16
[nodemon] to restart at any time, enter `rs`
[nodemon] watching path(s): *.*
[nodemon] watching extensions: js,mjs,json
[nodemon] starting `node ./bin/www`
MongoDB connected!
输出MongoDB connected!表示数据库连接成功.
三、项目代码
边栏推荐
猜你喜欢
直接插入排序
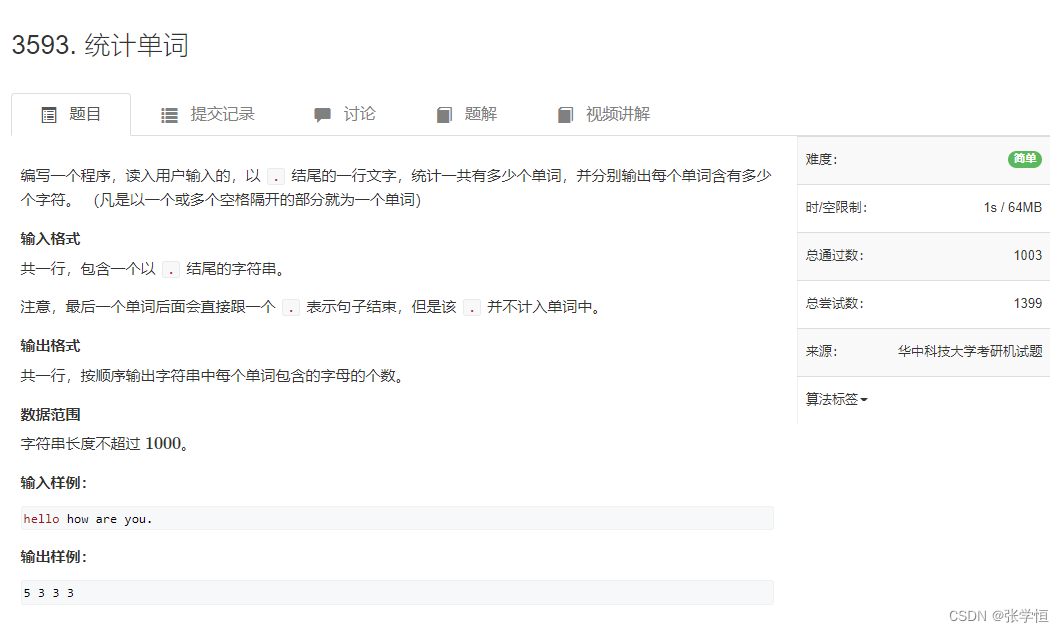
统计单词(DAY 101)华中科技大学考研机试题
![[Cultivation of internal skills of string functions] strcpy + strcat + strcmp (1)](/img/b6/5a1c8b675dc7f67f359c25908403e1.png)
[Cultivation of internal skills of string functions] strcpy + strcat + strcmp (1)

Pytorch分布式训练/多卡/多GPU训练DDP的torch.distributed.launch和torchrun
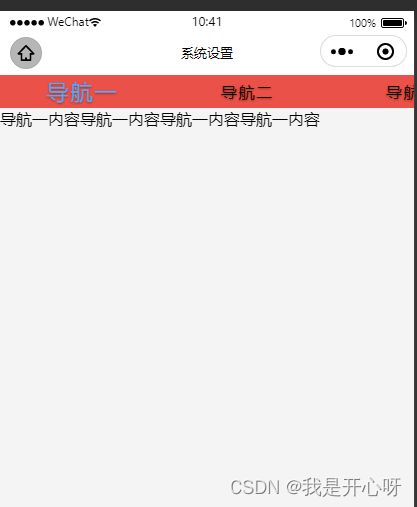
Uniapp dynamic sliding navigation effect demo (finishing)
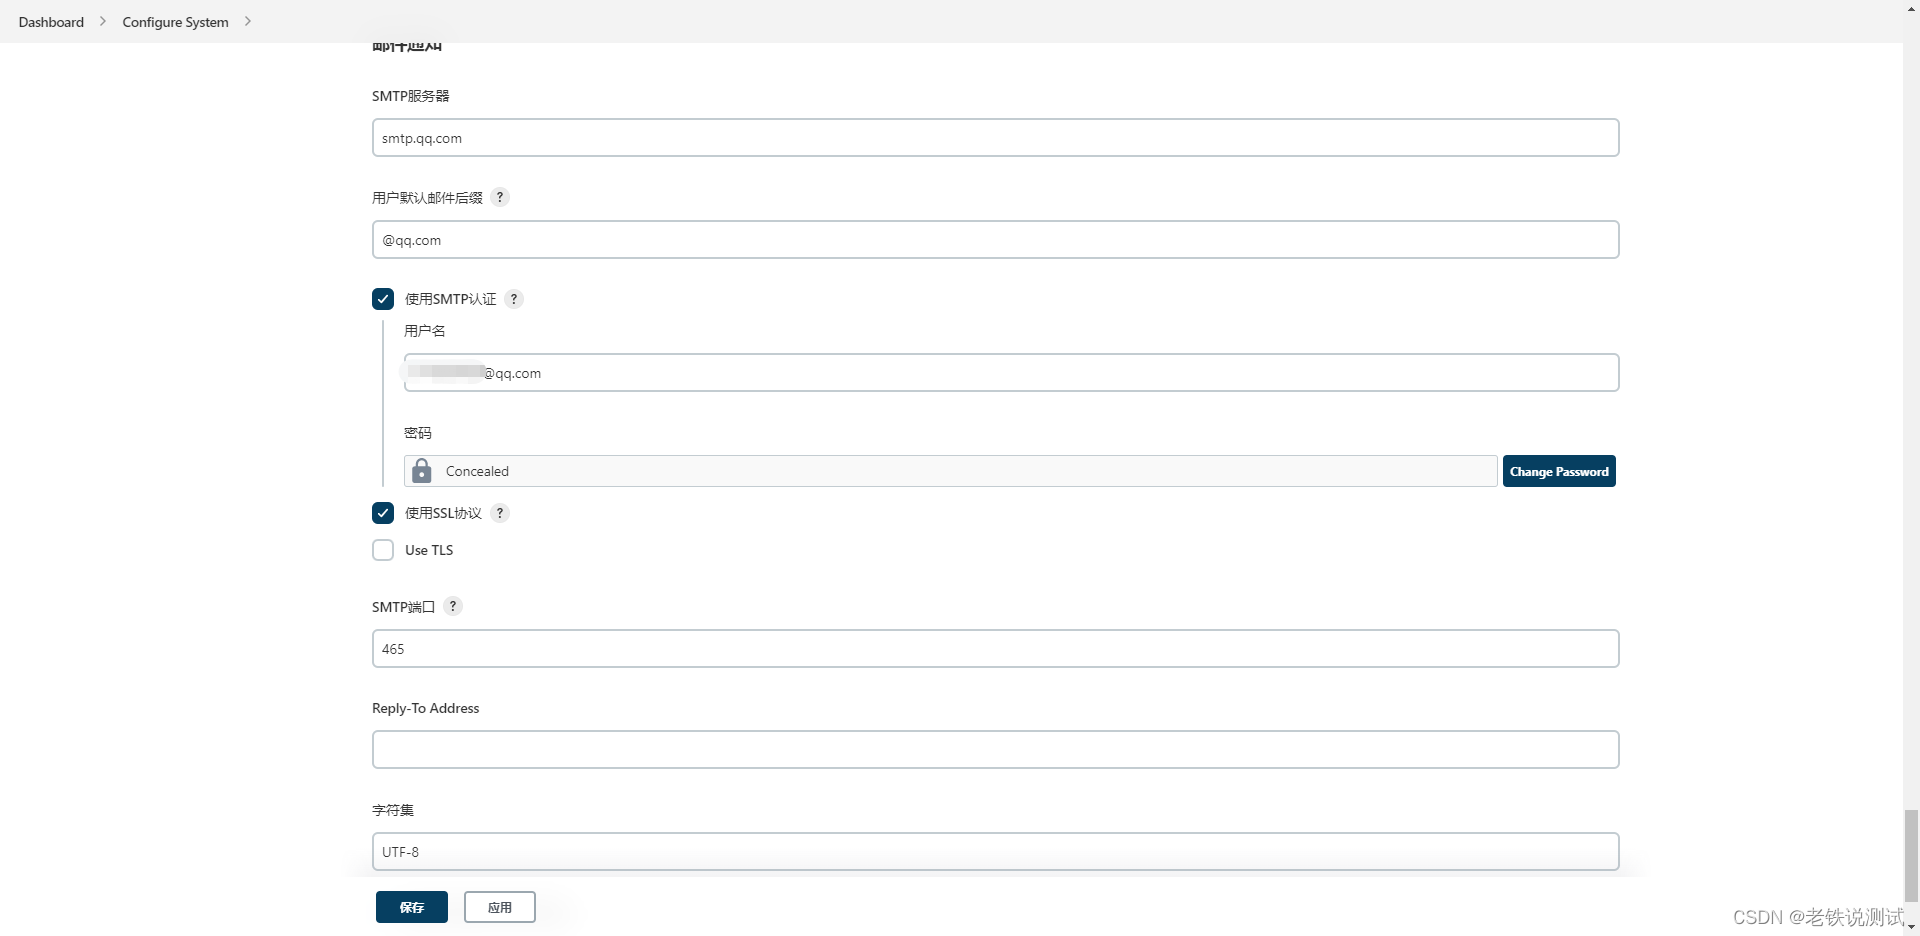
jenkins发送邮件系统配置

安全软件 Avast 与赛门铁克诺顿 NortonLifeLock 合并案获英国批准,市值暴涨 43%
Since a new byte of 20K came out, I have seen what the ceiling is

矩阵数学原理
NebulaGraph v3.2.0 Release Note, many optimizations such as the performance of querying the shortest path
随机推荐
三、实战---爬取百度指定词条所对应的结果页面(一个简单的页面采集器)
手写分布式配置中心(1)
线程三连鞭之“线程的状态”
对“为什么一些程序员很傲慢”的解读
文献阅读十——Detect Rumors on Twitter by Promoting Information Campaigns with Generative Adversarial Learn
The role of the annotation @ EnableAutoConfiguration and how to use
PID Controller Improvement Notes No. 7: Improve the anti-overshoot setting of the PID controller
Pytorch分布式训练/多卡/多GPU训练DDP的torch.distributed.launch和torchrun
#yyds干货盘点#交换设备丢包严重的故障处理
Develop a SpaceX website based on the Appian low-code platform
Implementing class target method exception using proxy object execution
uniapp horizontal tab (horizontal scrolling navigation bar) effect demo (organization)
2022/8/3
The market value of 360 has evaporated by 390 billion in four years. Can government and enterprise security save lives?
入门3D游戏建模师知识必备
Literature reading ten - Detect Rumors on Twitter by Promoting Information Campaigns with Generative Adversarial Learn
话题 | 雾计算和边缘计算有什么区别?
kernel问题定位手段总结
【软件测试】常用ADB命令
~ hand AHB - APB Bridge 】 【 AMBA AHB bus