当前位置:网站首页>Introduction and use of Haystack
Introduction and use of Haystack
2022-08-02 14:21:00 【Spaghetti Mixed with No. 42 Concrete】
Haystack的介绍和使用
一,什么是Haystack
Search is an increasingly important topic.Users increasingly rely on search to separate and quickly find useful information from noisy information.此外,Search Search for insight into what is welcome,Improve hard-to-find things on your website.
为此,HaystackTrying to integrate custom search,Make it as simple as possible and flexible enough to handle more advanced use cases.haystackSupports multiple search engines,不仅仅是whoosh,使用
solr、elastic search等搜索,也可通过haystack,And just switch the engine directly,You don't even need to modify the search code.
二,安装相关的包
pip install django-haystack
pip install whoosh
pip install jieba
三,配置
1:将Haystack添加到settings.py中的INSTALLED_APPS中:
INSTALLED_APPS = [
    'django.contrib.admin',
    'django.contrib.auth',
    'django.contrib.contenttypes',
    'django.contrib.sessions',
    'django.contrib.sites',
    # 添加
    'haystack',
    # 你的app
    'blog',
]
2:在你的settings.pyAdd a setting to indicate the backend the site profile is using,and other backend settings.
HAYSTACK——CONNECTIONS是必需的设置,并且应该至少是以下的一种:
Solr:
HAYSTACK_CONNECTIONS = {

    'default': {

        'ENGINE': 'haystack.backends.solr_backend.SolrEngine',
        'URL': 'http://127.0.0.1:8983/solr'
        # ...or for multicore...
        # 'URL': 'http://127.0.0.1:8983/solr/mysite',
    },
}
Elasticsearch:
HAYSTACK_CONNECTIONS = {

    'default': {

        'ENGINE': 'haystack.backends.elasticsearch_backend.ElasticsearchSearchEngine',
        'URL': 'http://127.0.0.1:9200/',
        'INDEX_NAME': 'haystack',
    },
}
Whoosh:
#需要设置PATH到你的Whoosh索引的文件系统位置
import os
HAYSTACK_CONNECTIONS = {

    'default': {

        'ENGINE': 'haystack.backends.whoosh_backend.WhooshEngine',
        'PATH': os.path.join(os.path.dirname(__file__), 'whoosh_index'),
    },
}

# 自动更新索引
HAYSTACK_SIGNAL_PROCESSOR = 'haystack.signals.RealtimeSignalProcessor'
Xapian:
#首先安装Xapian后端(http://github.com/notanumber/xapian-haystack/tree/master)
#需要设置PATH到你的Xapian索引的文件系统位置.
import os
HAYSTACK_CONNECTIONS = {

    'default': {

        'ENGINE': 'xapian_backend.XapianEngine',
        'PATH': os.path.join(os.path.dirname(__file__), 'xapian_index'),
    },
}
下面我们以whoosh为例进行操作.
四,配置路由
在整个项目的urls.py中,Configure the search functionurl路径
urlpatterns = [
    ...
    url(r'^search/', include('haystack.urls')),
]
五,创建索引
Create a new one under your application directorysearch_indexes.py文件,文件名不能修改!
from haystack import indexes
from app01.models import Article

class ArticleIndex(indexes.SearchIndex, indexes.Indexable):
    #类名必须为需要检索的Model_name+Index,这里需要检索Article,所以创建ArticleIndex
    text = indexes.CharField(document=True, use_template=True)#创建一个text字段
    #其它字段
    desc = indexes.CharField(model_attr='desc')
    content = indexes.CharField(model_attr='content')

    def get_model(self):#重载get_model方法,必须要有!
        return Article

    def index_queryset(self, using=None):
        return self.get_model().objects.all()
ps:为什么要创建索引呢,索引就像一本书的目录,可以为读者提供更快速的导航与查找.在这里也是同样的道理,当数据量非常大的时候,若要从
It is almost impossible to find all the things in this data that satisfy the search criteria,将会给服务器带来极大的负担,所以我们需要为指定的数据添加一个索引.
The details of the index implementation are not something we need to care about,But on which fields it creates an index,怎么指定,下面来说明:
每个索引里面必须有且只能有一个字段为 document=Ture,这代表着haystack和搜索引擎将使用此字段的内容作为索引进行检索(primary field)
其他的字段只是附属的属性,方便调用,No basis for searching.
注意:如果一个字段设置了document=True,则一般约定此字段名为text,这是ArticleIndexConsistent writing in the class.
另外,我们在text字段上提供了use_template=Ture.这允许我们使用一个数据模板,来构建文档搜索引擎索引.You should build in the templates directory,也就是在
templatesCreate a new template in the folder,search/indexes/项目名/模型名_text.txt,And put the following content in ittxt文件中:
#在目录“templates/search/indexes/应用名称/”下创建“模型类名称_text.txt”文件
{
    {
     object.title }}
{
    {
     object.desc }}
{
    {
     object.content }}
The role of this data template is rightNote.title, Note.user.get_full_name,Note.body这三个字段建立索引,当检索的时候会对这三个字段做全文检索匹配.
六,Edit search templates
The search template defaults to search/search.html中,The code below is enough to get your search running:
<!DOCTYPE html>
<html>
<head>
<title></title>
<style> span.highlighted {
color: red; } </style>
</head>
<body>
{% load highlight %}
{% if query %}
<h3>搜索结果如下:</h3>
{% for result in page.object_list %}
{# <a href="/{
{ result.object.id }}/">{
{ result.object.title }}</a><br/>#}
<a href="/{
{ result.object.id }}/">{% highlight result.object.title with query max_length 2%}</a><br/>
<p>{
{ result.object.content|safe }}</p>
<p>{% highlight result.content with query %}</p>
{% empty %}
<p>啥也没找到</p>
{% endfor %}
{% if page.has_previous or page.has_next %}
<div>
{% if page.has_previous %}
<a href="?q={
{ query }}&page={
{ page.previous_page_number }}">{% endif %}« 上一页
{% if page.has_previous %}</a>{% endif %}
|
{% if page.has_next %}<a href="?q={
{ query }}&page={
{ page.next_page_number }}">{% endif %}下一页 »
{% if page.has_next %}</a>{% endif %}
</div>
{% endif %}
{% endif %}
</body>
</html>
注意:page.object_list实际上是SearchResult对象的列表.这些对象返回索引的所有数据.他们可以通过{ { result.object }}来访问,
所以{ { result.object.title}}实际使用的是数据库中Article对象来访问title字段的.
七,重建索引
配置完成之后,Next, the data in the database should be put into the index.HaystackIt comes with a command tool:
python manage.py rebuild_index
八,使用jieba分词
新建一个ChineseAnalyzer.py文件:
import jieba
from whoosh.analysis import Tokenizer, Token

class ChineseTokenizer(Tokenizer):
    def __call__(self, value, positions=False, chars=False,
                 keeporiginal=False, removestops=True,
                 start_pos=0, start_char=0, mode='', **kwargs):
        t = Token(positions, chars, removestops=removestops, mode=mode,
                  **kwargs)
        seglist = jieba.cut(value, cut_all=True)
        for w in seglist:
            t.original = t.text = w
            t.boost = 1.0
            if positions:
                t.pos = start_pos + value.find(w)
            if chars:
                t.startchar = start_char + value.find(w)
                t.endchar = start_char + value.find(w) + len(w)
            yield t


def ChineseAnalyzer():
    return ChineseTokenizer()
保存在python安装路径的backends文件夹中(例如:D:\python3\Lib\site-packages\haystack\backends)
Then find one in that folderwhoosh_backend.py文件,改名为whoosh_cn_backend.py
在内部添加:
from .ChineseAnalyzer import ChineseAnalyzer
Then find this line of code:
analyzer=StemmingAnalyzer()
修改为:
analyzer=ChineseAnalyzer()
九,Create a search bar in template search
<form method='get' action="/search/" target="_blank">
    <input type="text" name="q">
    <input type="submit" value="查询">
</form>
边栏推荐
猜你喜欢
window10 lower semi-automatic labeling
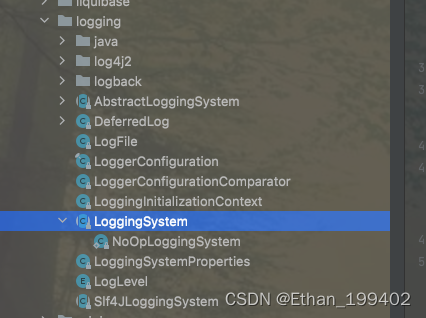
动态刷新日志级别
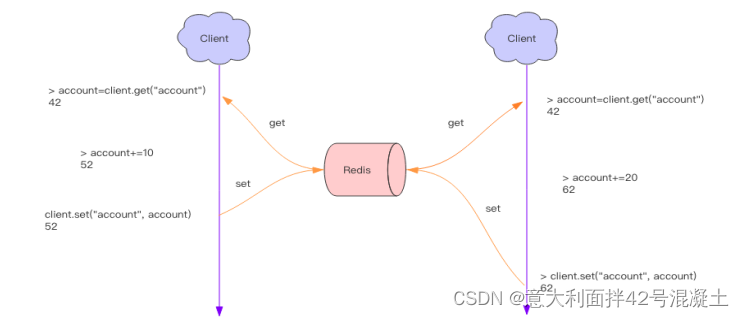
Implementation of redis distributed lock and watchdog
Linux: CentOS 7 install MySQL5.7
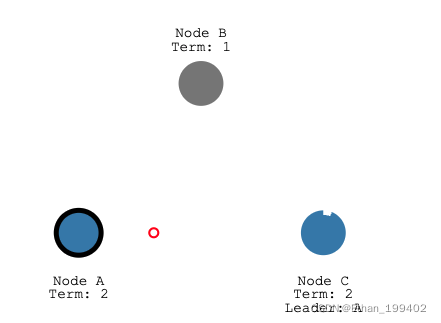
Raft协议图解,缺陷以及优化
![[ROS]roscd和cd的区别](/img/a8/a1347568170821e8f186091b93e52a.png)
[ROS]roscd和cd的区别
第十五单元 分页、过滤
![[ROS] (06) ROS Communication - Topic Communication](/img/21/d79f2c4e246eb9ea39df9c7435bb36.png)
[ROS] (06) ROS Communication - Topic Communication
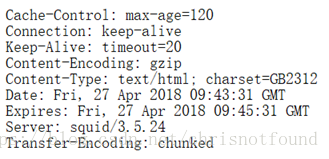
理解TCP长连接(Keepalive)
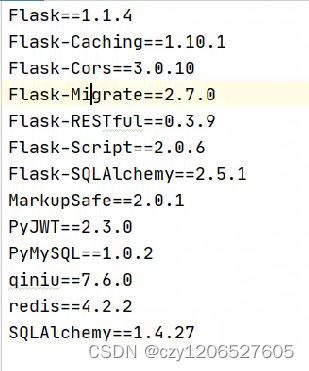
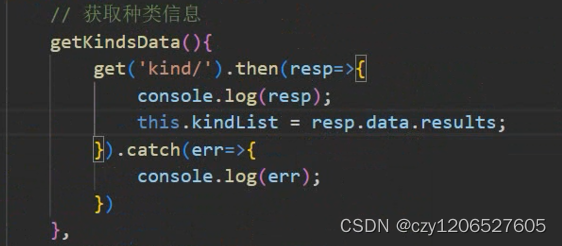
Creating seven NiuYun Flask project complete and let cloud
随机推荐
Flask-RESTful request response and SQLAlchemy foundation
Sentinel源码(三)slot解析
Basic operations of 8583 sequential stack
verilog学习|《Verilog数字系统设计教程》夏宇闻 第三版思考题答案(第十四章)
瑞吉外卖笔记——第05讲Redis入门
The language of initial
第十三单元 混入视图基类
Flask-SQLAlchemy
verilog学习|《Verilog数字系统设计教程》夏宇闻 第三版思考题答案(第十章)
Flask-RESTful请求响应与SQLAlchemy基础
Caused by: org.gradle.api.internal.plugins.PluginApplicationException: Failed to apply plugin [id ‘c
8580 合并链表
Programming Specifications - LiteOS
Flask框架深入一
Creating seven NiuYun Flask project complete and let cloud
replay视频播放器_怎么让手机音乐跟视频一起放
What's wrong with running yolov5 (1) p, r, map are all 0
8580 Merge linked list
verilog学习|《Verilog数字系统设计教程》夏宇闻 第三版思考题答案(第十二章)
[ROS](04)package.xml详解