当前位置:网站首页>Pytoch LSTM implementation process (visual version)
Pytoch LSTM implementation process (visual version)
2022-07-06 10:25:00 【How about a song without trace】
# Model 1:Pytorch LSTM Implementation process
# Load data set
# Make the data set iteratable ( Read one at a time Batch)
# Create model classes
# Initialize the model class
# Initialize loss class
# Training models
# 1. Load data set
import torch
import torch.nn as nn
import torchvision.transforms as transforms
import torchvision.datasets as datasets
import torchvision
import numpy as np
import pandas as pd
import matplotlib.pyplot as plt
# 2、 Download datasets
trainsets = datasets.MNIST(root = './data2',train = True,download = True,transform = transforms.ToTensor())
testsets = datasets.MNIST(root = './data2',train = False,transform=transforms.ToTensor())
class_names = trainsets.classes # View category labels
print(class_names)
# 3、 Look at the dataset size shape
print(trainsets.data.shape)
print(trainsets.targets.shape)
#4、 Define super parameters
BASH_SIZE = 32 # The size of data read in each batch
EPOCHS = 10 # Ten rounds of training
# Create an iteratable object for the dataset , That is to say a batch One batch Read data from
train_loader = torch.utils.data.DataLoader(dataset = trainsets, batch_size = BASH_SIZE,shuffle = True)
test_loader = torch.utils.data.DataLoader(dataset = testsets, batch_size = BASH_SIZE,shuffle = True)
# View a batch of batch The data of
images, labels = next(iter(test_loader))
print(images.shape)
#6、 Defined function , Display a batch of data
def imshow(inp, title=None):
inp = inp.numpy().transpose((1, 2, 0))
mean = np.array([0.485, 0.456, 0.406]) # mean value
std = np.array([0.229, 0.224, 0.225]) # Standard deviation
inp = std * inp + mean
inp = np.clip(inp, 0, 1) # The speed limit is limited to 0-1 Between
plt.imshow(inp)
if title is not None:
plt.title(title)
plt.pause(0.001)
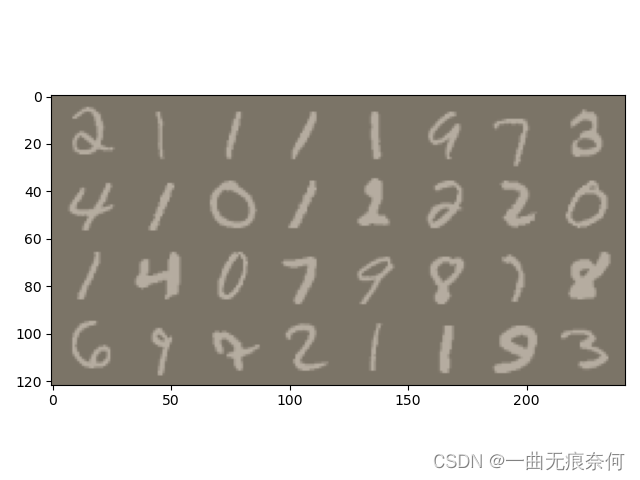
# Grid display
out = torchvision.utils.make_grid(images)
imshow(out)
# 7. Definition RNN Model
class LSTM_Model(nn.Module):
def __init__(self, input_dim, hidden_dim, layer_dim, output_dim):
super(LSTM_Model, self).__init__() # Initializes the constructor in the parent class
self.hidden_dim = hidden_dim
self.layer_dim = layer_dim
# structure LSTM Model
self.lstm = nn.LSTM(input_dim, hidden_dim, layer_dim, batch_first = True)
# Fully connected layer :
self.fc = nn.Linear(hidden_dim,output_dim)
def forward(self, x):
# The initialization hidden layer is installed in 0
# (layer_dim, batch_size, hidden_dim)
h0 = torch.zeros(self.layer_dim, x.size(0), self.hidden_dim).requires_grad_().to(device)
# initialization cell state
c0 = torch.zeros(self.layer_dim, x.size(0), self.hidden_dim).requires_grad_().to(device)
# Detach hidden state , To avoid gradient explosion
out, (hn, cn) = self.lstm(x, (h0.detach(), c0.detach()))
# Only the state of the last hidden layer is needed
out = self.fc(out[:, -1, :])
return out
# 8. Initialize model
input_dim = 28 # Input dimensions
hidden_dim = 100 # Hidden dimensions
layer_dim = 1 # 1 layer
output_dim = 10 # Output dimension
# Instantiate the model and pass in parameters
model = LSTM_Model(input_dim, hidden_dim, layer_dim,output_dim)
# To determine if there is GPU
device = torch.device('cuda:()' if torch.cuda.is_available() else 'cpu')
#9、 Define the loss function
criterion = nn.CrossEntropyLoss()
#10、 Define optimization functions
learning_rate = 0.01
optimizer = torch.optim.SGD(model.parameters(), lr = learning_rate)
#11、 Output model parameters
length = len(list(model.parameters()))
#12、 Cycle print model parameters
for i in range(length):
print(' Parameters : %d' % (i+1))
print(list(model.parameters())[i].size())
# 13 、 model training
sequence_dim = 28 # Sequence length
loss_list = [] # preservation loss
accuracy_list = [] # preservation accuracy
iteration_list = [] # Number of save cycles
iter = 0
for epoch in range(EPOCHS):
for i, (images, labels) in enumerate(train_loader):
model.train() # Declare training
# One batch The data is converted to LSTM The input dimension of
images = images.view(-1, sequence_dim, input_dim).requires_grad_().to(device)
labels = labels.to(device)
# Gradient clear ( Otherwise, it will continue to increase )
optimizer.zero_grad()
# Forward propagation
outputs = model(images)
# Calculate the loss
loss = criterion(outputs, labels)
# Back propagation
loss.backward()
# Update parameters
optimizer.step()
# The count is automatically incremented by one
iter += 1
# Model validation
if iter % 500 == 0:
model.eval() # Statement
# Calculate and verify accuracy
correct = 0.0
total = 0.0
# Iterative test set 、 get data 、 forecast
for images, labels in test_loader:
images = images.view(-1, sequence_dim, input_dim).to(device)
# Model to predict
outputs = model(images)
# Get the subscript of the maximum value of the prediction probability
predict = torch.max(outputs.data,1)[1]
# Count the size of the test set
total += labels.size(0)
# Statistical judgment / Predict the correct quantity
if torch.cuda.is_available():
correct += (predict.gpu() == labels.gpu()).sum()
else:
correct += (predict == labels).sum()
# Calculation accuracy
accuracy = (correct / total)/ 100 * 100
# preservation accuracy, loss iteration
loss_list.append(loss.data)
accuracy_list.append(accuracy)
iteration_list.append(iter)
# Print information
print("epoch : {}, Loss : {}, Accuracy : {}".format(iter, loss.item(), accuracy))
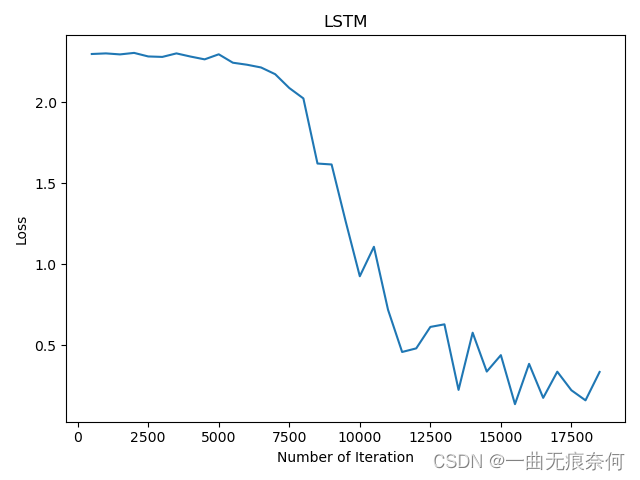
# visualization loss
plt.plot(iteration_list, loss_list)
plt.xlabel('Number of Iteration')
plt.ylabel('Loss')
plt.title('LSTM')
plt.show()
# visualization accuracy
plt.plot(iteration_list, accuracy_list, color = 'r')
plt.xlabel('Number of Iteration')
plt.ylabel('Accuracy')
plt.title('LSTM')
plt.savefig('LSTM_accuracy.png')
plt.show()

边栏推荐
- [unity] simulate jelly effect (with collision) -- tutorial on using jellysprites plug-in
- MySQL combat optimization expert 09 production experience: how to deploy a monitoring system for a database in a production environment?
- MySQL实战优化高手05 生产经验:真实生产环境下的数据库机器配置如何规划?
- Write your own CPU Chapter 10 - learning notes
- PyTorch RNN 实战案例_MNIST手写字体识别
- Retention policy of RMAN backup
- MySQL combat optimization expert 03 uses a data update process to preliminarily understand the architecture design of InnoDB storage engine
- ZABBIX introduction and installation
- 用于实时端到端文本识别的自适应Bezier曲线网络
- Upload vulnerability
猜你喜欢
15 医疗挂号系统_【预约挂号】

AI的路线和资源
14 医疗挂号系统_【阿里云OSS、用户认证与就诊人】
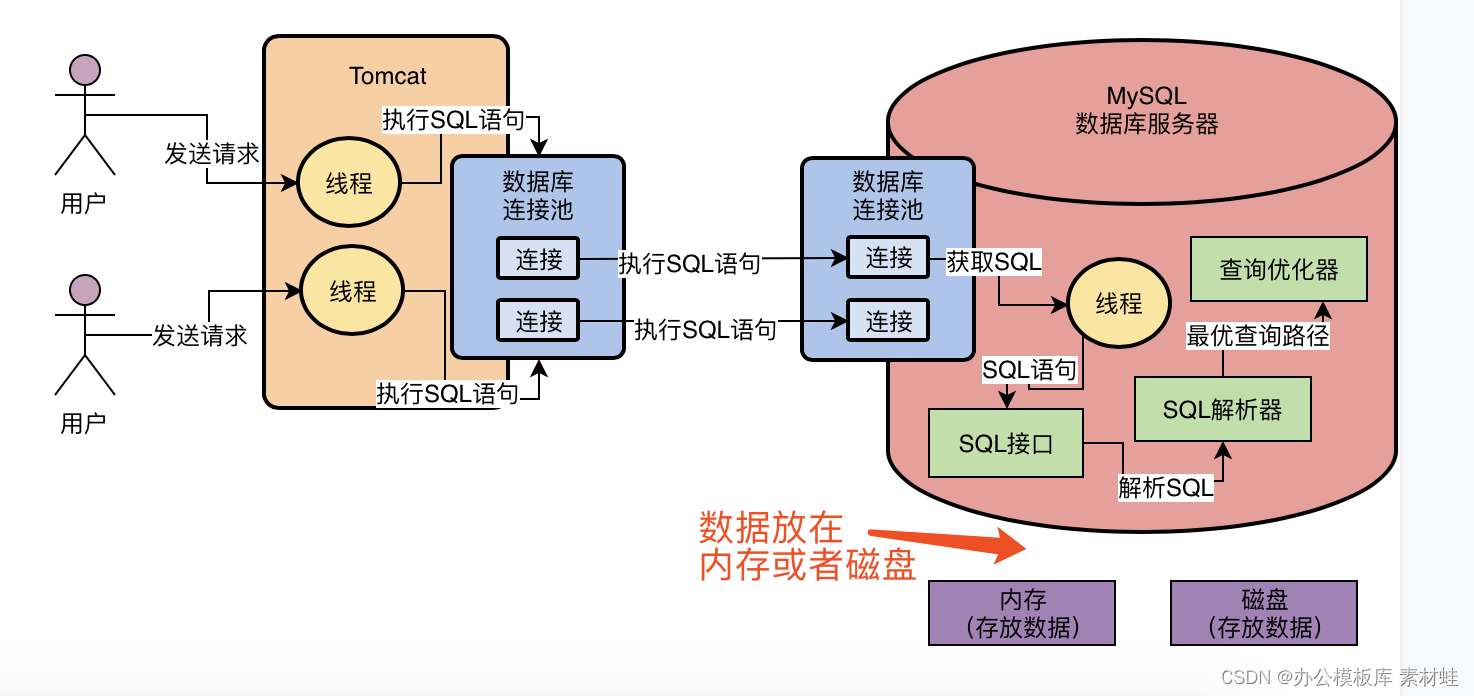
MySQL combat optimization expert 02 in order to execute SQL statements, do you know what kind of architectural design MySQL uses?
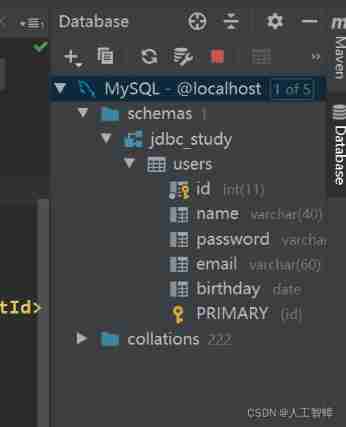
Record the first JDBC
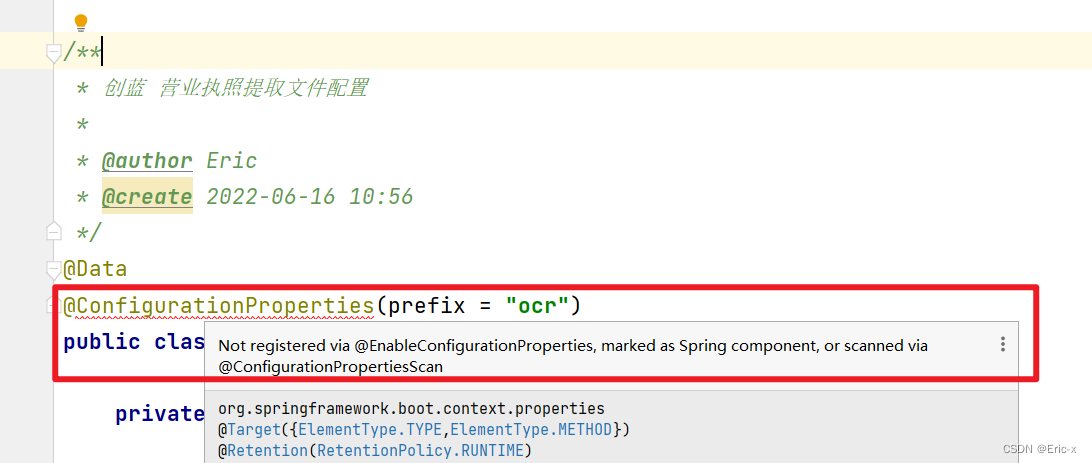
Not registered via @enableconfigurationproperties, marked (@configurationproperties use)

Introduction tutorial of typescript (dark horse programmer of station B)
15 medical registration system_ [appointment registration]
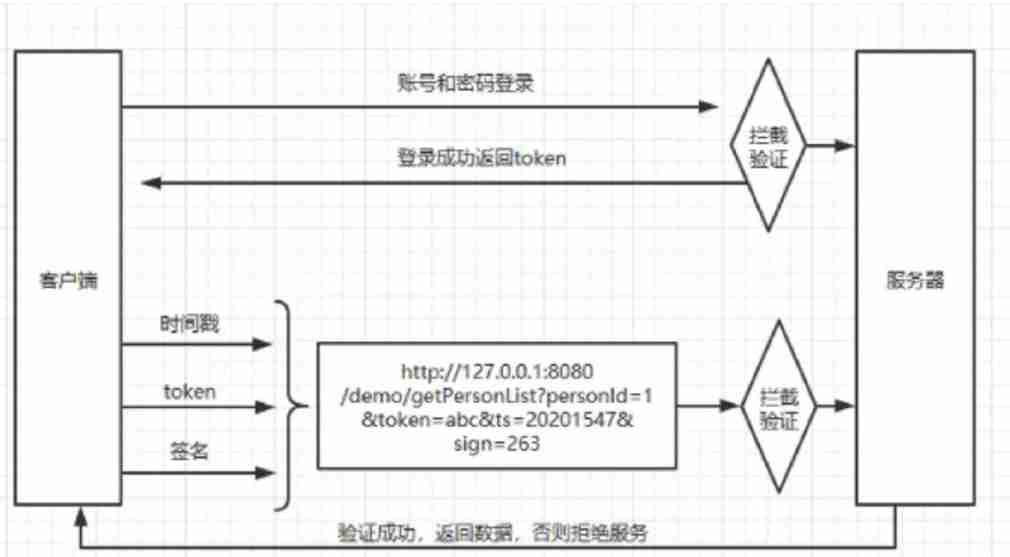
Security design verification of API interface: ticket, signature, timestamp

Jar runs with error no main manifest attribute
随机推荐
软件测试工程师必备之软技能:结构化思维
text 文本数据增强方法 data argumentation
A necessary soft skill for Software Test Engineers: structured thinking
MySQL實戰優化高手08 生產經驗:在數據庫的壓測過程中,如何360度無死角觀察機器性能?
实现以form-data参数发送post请求
Software test engineer development planning route
基于Pytorch肺部感染识别案例(采用ResNet网络结构)
Flash operation and maintenance script (running for a long time)
Simple solution to phpjm encryption problem free phpjm decryption tool
Anaconda3 installation CV2
Zsh configuration file
C miscellaneous shallow copy and deep copy
百度百科数据爬取及内容分类识别
Typescript入门教程(B站黑马程序员)
14 medical registration system_ [Alibaba cloud OSS, user authentication and patient]
UnicodeDecodeError: ‘utf-8‘ codec can‘t decode byte 0xd0 in position 0成功解决
oracle sys_ Context() function
16 医疗挂号系统_【预约下单】
Sed text processing
The 32 year old programmer left and was admitted by pinduoduo and foreign enterprises. After drying out his annual salary, he sighed: it's hard to choose