当前位置:网站首页>CONDA common command summary
CONDA common command summary
2022-07-02 12:00:00 【raelum】
Catalog
One 、conda command
conda Commands can be used to :
- Create a new conda Environmental Science .
- In the existing conda Installation in the environment / Upgrade package .
- Inquire about / Search for Anaconda The index of the package and the current Anaconda Installation .
Tip: We can put the front with two short lines (
--) Of Commonly used Commands are abbreviated ( Not all can be abbreviated ), The method is to take a short line and the initial of the option . for example--nameCan be abbreviated to-n,--envsCan be abbreviated to-e.
Use conda -V To view the current conda edition .
We can ask for help from the command line , namely
conda --help
Of course, abbreviations can also be used
conda -h
If we want to take a closer look install How to use the command , Just execute
conda install -h
Two 、conda info
conda info Can be used to view relevant information , The format is as follows :
conda info [-a] [--base] [-e] [-s] [--unsafe-channels]
-a, -all: View all information ( Not commonly used ).
–base: View the path of the base environment .
conda info --base
-e, --envs: List all the current conda Environmental Science .
conda info -e
-s, --system: List all environment variables ( Not commonly used ).
–unsafe-channels: View the channel exposed by the token .
conda info --unsafe-channels
3、 ... and 、conda create
conda create Can be used to create new conda Environmental Science , The format is as follows :
conda create [-n env_name | -p path] [--clone env_name] [-c channel_address]
             [packages]
-n, --name: We can use Name of the environment To create a conda Environmental Science , Suppose our environment name is my_env
conda create -n my_env
After creation , We use the following command to enter the environment
conda activate my_env
At this time, there is one more in front of the command line (my_env), This is where we entered the environment sign .
Use conda list Command to see which packages are installed in this environment .
Because we didn't install the package when creating the environment , So the natural result is Nothing there? .
If you want to exit the environment , Just execute
conda deactivate
Be careful : We can only retreat to the base environment , Continue to exit in the base environment, still in the base environment .
-p, --prefix: In addition to creating an environment by name , We can also create... Based on the address conda Environmental Science .
In the example above , We created my_env The address of the environment is :G:\anaconda3\envs\my_env. in fact , If you don't specify an address , Then all environments will be created in ...\anaconda3\envs\ Next .
To create based on address , Just execute
conda create -p G:\anaconda3\envs\my_env
–clone:--clone Mainly for clone ( Copy ) The existing environment .
We can clone according to the name of the existing environment , Suppose the name of the existing environment is original_env, The name of the new environment is new_env, Then just execute
conda create -n new_env --clone original_env
Of course, we can also clone according to the address of the existing environment :
conda create -n new_env --clone G:\anaconda3\envs\original_env
-c, --channel: First of all, let's introduce what is conda channel .
conda Channels are stored package The location of , install package when conda Will search for existing Channel collection , And select one of the channels to install package .
conda The default channel is https://repo.anaconda.com/pkgs/, But the channel needs to pay , We usually use conda-forge This channel to install , It's free .
The channel settings are omitted here , Subsequent chapters will refer to .
packages: Our newly created environment cannot be used without installing the necessary packages , Packages that need to be installed Space off , namely
conda create -n my_env python numpy flask
We used this command to create a file called my_env Environment , Three packages are installed at the same time python、numpy、flask.
After installation , have access to conda list Command to view installed packages .
Besides , our python The latest version is installed , Of course, we can also specify the version for installation :
conda create -n my_env python=3.9.7 numpy flask
Four 、conda install
conda install Can be used in conda Install the corresponding package in the environment , The specific format is as follows :
conda install [-n env_name | -p path] [-c channel_address] [packages]
The options already introduced will not be introduced here .
for example , We will be having my_env Lower installation 3.9.7 Version of python. We can enter the environment first , Then install :
conda activate my_env
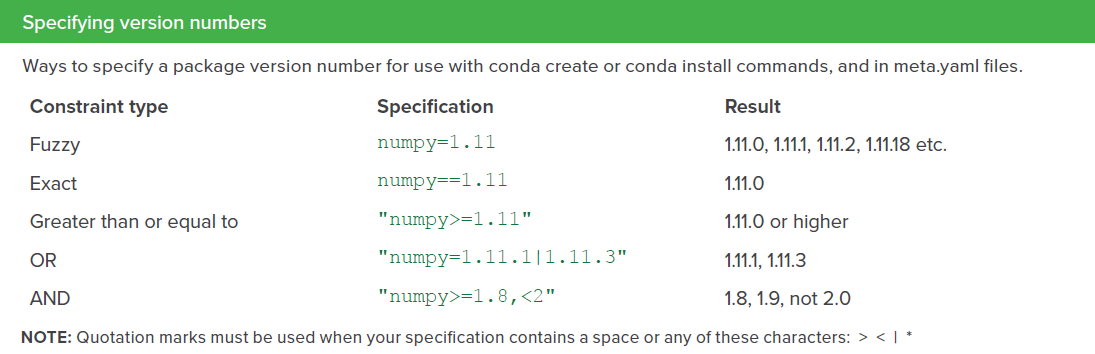
conda install python=3.9.7
Be careful , there = It's actually a fuzzy constraint , See the figure below for details :
You can also directly specify the installation environment :
conda install -n my_env python=3.9.7 #  By name
conda install -p G:\anaconda3\envs\my_env python=3.9.7 #  According to the address
Another example is , install cvxpy when , We can go from the designated channel (conda-forge) Installation
conda install -n my_env -c conda-forge cvxpy
5、 ... and 、conda remove
conda remove Can be used to remove conda Some packages in the environment , You can also remove the entire environment , The specific format is as follows :
conda remove [-n env_name | -p path] [packages] [--all]
for example , If we need to remove my_env Under the numpy, Just execute
conda remove -n my_env numpy
Of course, we can also remove all packages ( The whole conda Environmental Science )
conda remove -n my_env --all
It should be noted that ,conda No command was provided to rename the environment , We can only clone an original environment first , Then delete the original environment , The specific operation is as follows ( For example, the environment a Rename to b):
conda create -n b --clone a
conda remove -n a --all
conda uninstall yes conda remove Of Alias , We can also use conda uninstall To remove the package , The method is the same .
6、 ... and 、conda list
conda list Used to list conda Packages in the environment , The specific format is as follows :
conda list [-n env_name | -p path] [package]
conda list Only list all packages in the current environment , To list packages for other environments , For example, list my_env All the packages under , Just execute :
conda list -n my_env
To list my_env China and numpy Related to the package ( To be exact, it contains numpy The bag of words ), Just execute :
conda list -n my_env numpy
Based on this , We can use conda list To check whether the corresponding package is installed in the current environment ( Only one... Can be queried at a time ), If the final result is not listed , That means that... Is not installed .
7、 ... and 、conda search
conda search Used to search the specified package , The specific format is as follows :
conda search [-c channel_address] [-f] [packages]
We can specify in conda-forge Mid search numpy:
conda search -c conda-forge numpy
in fact , The above command will search for all that contain numpy The bag of words , If we just want to search numpy This package , Need to add -f(--full-name Abbreviation ), namely
conda search -c conda-forge -f numpy
8、 ... and 、conda update
conda update Used to upgrade a series of packages to the latest version , The specific format is as follows :
conda update [-n env_name | -p path] [packages] [--all]
for example , If we want to upgrade my_env Under the numpy and scipy, Just execute
conda update -n my_env numpy scipy
If we want to update my_env All packages in , Then we need to carry out
conda update -n my_env --all
If you want to update conda In itself , Then we need to carry out
conda update conda
If you want to update anaconda , Then we need to carry out
conda update anaconda
notes : upgrade
AnacondaNeed to upgrade beforeconda.
Nine 、conda config
conda config Used to configure conda Channel , Relevant information will be stored in C:\Users\ Your username \.condarc In file .
The format of adding a channel is :
conda config --add channels [channel]
for example , To add conda-forge This channel , Just execute
conda config --add channels conda-forge
Because the speed of foreign channels is generally unstable , We usually consider using domestic channels , for example Tsinghua mirror .
in consideration of Windows The user cannot directly create a file named .condarc The file of , We can do it first
conda config --set show_channel_urls yes
Then modify the file directly .
The contents are as follows :
channels:
  - defaults
show_channel_urls: true
default_channels:
  - https://mirrors.tuna.tsinghua.edu.cn/anaconda/pkgs/main
  - https://mirrors.tuna.tsinghua.edu.cn/anaconda/pkgs/r
  - https://mirrors.tuna.tsinghua.edu.cn/anaconda/pkgs/msys2
custom_channels:
  conda-forge: https://mirrors.tuna.tsinghua.edu.cn/anaconda/cloud
  msys2: https://mirrors.tuna.tsinghua.edu.cn/anaconda/cloud
  bioconda: https://mirrors.tuna.tsinghua.edu.cn/anaconda/cloud
  menpo: https://mirrors.tuna.tsinghua.edu.cn/anaconda/cloud
  pytorch: https://mirrors.tuna.tsinghua.edu.cn/anaconda/cloud
  pytorch-lts: https://mirrors.tuna.tsinghua.edu.cn/anaconda/cloud
  simpleitk: https://mirrors.tuna.tsinghua.edu.cn/anaconda/cloud
After modification , perform conda clean -i Clear index cache , Make sure you use the index provided by the mirror station .
After setting up , We can execute
conda config --get channels
To view the added channels .
边栏推荐
- 基于Arduino和ESP8266的连接手机热点实验(成功)
- Dynamic debugging of multi file program x32dbg
- PHP query distance according to longitude and latitude
- Develop scalable contracts based on hardhat and openzeppelin (II)
- [visual studio 2019] create MFC desktop program (install MFC development components | create MFC application | edit MFC application window | add click event for button | Modify button text | open appl
- Dynamic memory (advanced 4)
- GGPUBR: HOW TO ADD ADJUSTED P-VALUES TO A MULTI-PANEL GGPLOT
- XSS labs master shooting range environment construction and 1-6 problem solving ideas
- HOW TO CREATE A BEAUTIFUL INTERACTIVE HEATMAP IN R
- Esp32 stores the distribution network information +led displays the distribution network status + press the key to clear the distribution network information (source code attached)
猜你喜欢

HOW TO ADD P-VALUES ONTO A GROUPED GGPLOT USING THE GGPUBR R PACKAGE

Read the Flink source code and join Alibaba cloud Flink group..
How to Visualize Missing Data in R using a Heatmap

HOW TO CREATE A BEAUTIFUL INTERACTIVE HEATMAP IN R
How to Visualize Missing Data in R using a Heatmap

GGPlot Examples Best Reference
The selected cells in Excel form have the selection effect of cross shading

文件操作(详解!)
Depth filter of SvO2 series

Cluster Analysis in R Simplified and Enhanced
随机推荐
How to Easily Create Barplots with Error Bars in R
[QT] Qt development environment installation (QT version 5.14.2 | QT download | QT installation)
Uniapp uni list item @click, uniapp uni list item jump with parameters
This article takes you to understand the operation of vim
YYGH-BUG-05
Small guide for rapid formation of manipulator (VII): description method of position and posture of manipulator
HOW TO EASILY CREATE BARPLOTS WITH ERROR BARS IN R
Research on and off the Oracle chain
easyExcel和lombok注解以及swagger常用注解
MySQL stored procedure cursor traversal result set
Yygh-10-wechat payment
Cmake cross compilation
Dynamic memory (advanced 4)
Log4j2
HOW TO CREATE AN INTERACTIVE CORRELATION MATRIX HEATMAP IN R
QT meter custom control
史上最易懂的f-string教程,收藏这一篇就够了
SCM power supply
PgSQL string is converted to array and associated with other tables, which are displayed in the original order after matching and splicing
How to Visualize Missing Data in R using a Heatmap