abp(net core)+easyui+efcore Realize the inventory management system
In the last article, we have implemented the controller code , Today we're going to implement the front page code .
Nine 、 Use EasyUI Create delivery order management page
1. stay Visual Studio 2017 Of “ Solution explorer ” in , Right click on the domain layer “ABP.TPLMS.Web.Mvc” In the project Views Catalog . choice “ add to ” > “ New folder ”. And rename to “OutStock”.
2. stay Visual Studio 2017 Of “ Solution explorer ” in , Right click “OutStock” Folder , And then choose “ add to ” > “ New item …”. stay “ Add a new item -ABP.TPLMS.Web.Mvc” In the dialog box , choice “Razor View ”, And name it Index.cshmtl.
3. stay Startup Found in the directory PageNames.cs file , Add... To this file OutStock Definition . The code is as follows .
namespace ABP.TPLMS.Web.Startup
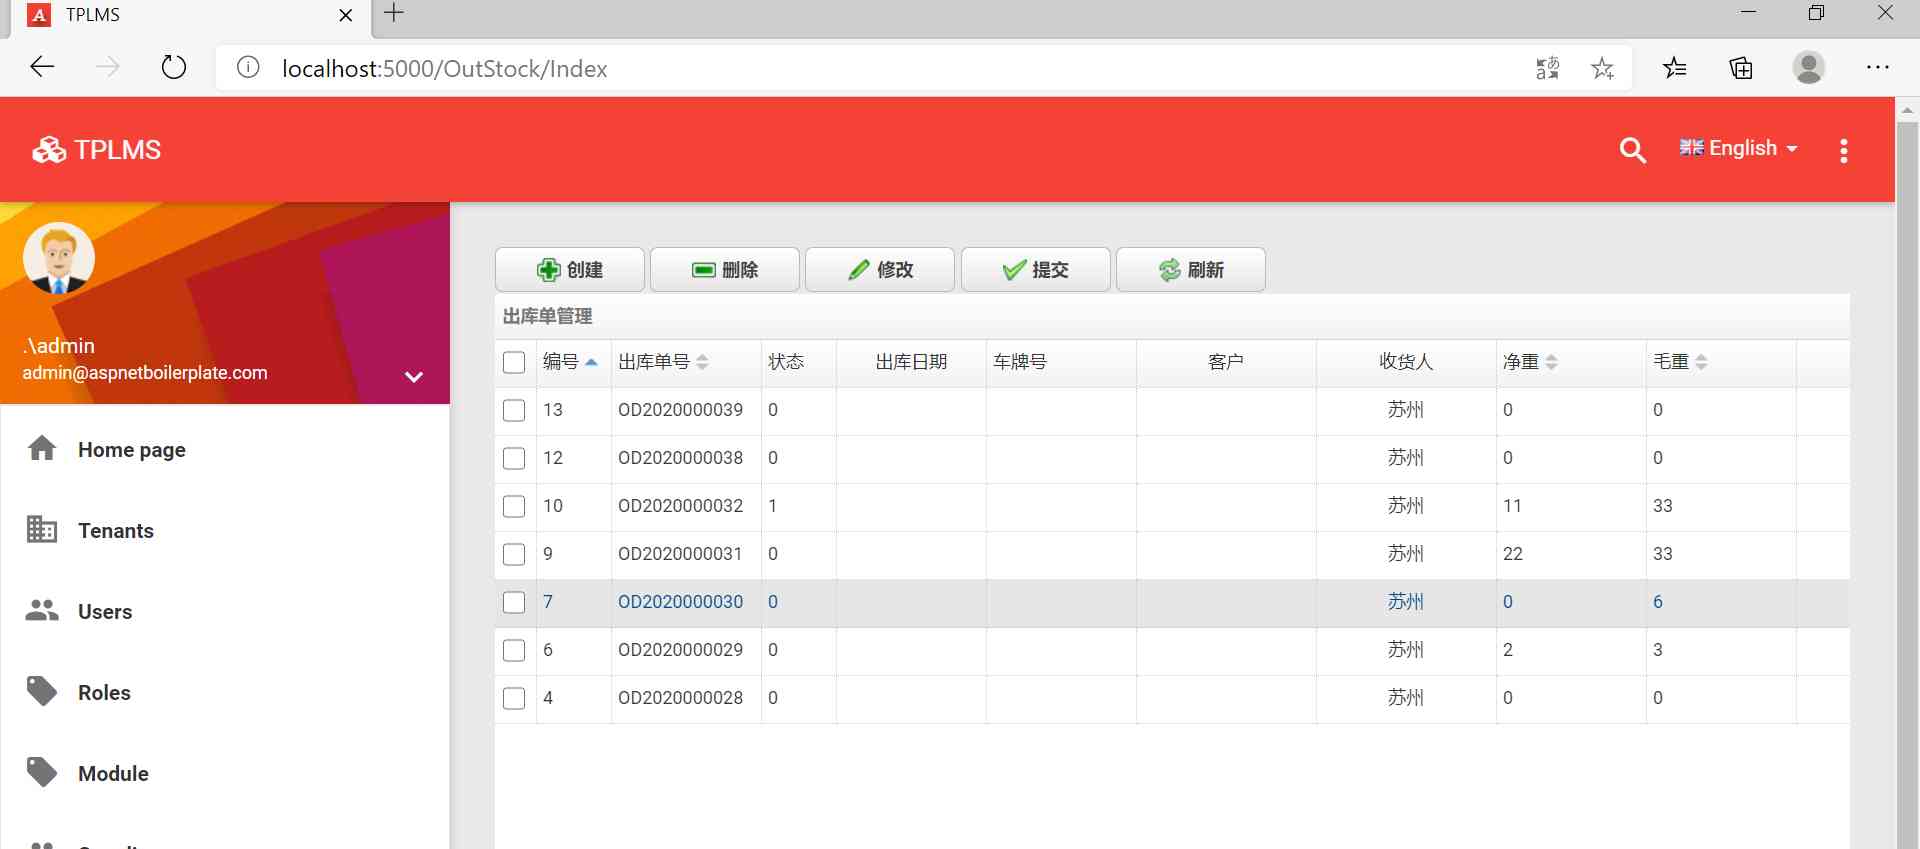
{

    public class PageNames
    {

        public const string Home = "Home";
        public const string About = "About";

        public const string Tenants = "Tenants";
        public const string Users = "Users";

        public const string Roles = "Roles";
        public const string Module = "Module";

        public const string Supplier = "Supplier";
        public const string Cargo = "Cargo";

        public const string Org = "Organization";
        public const string InStock = "InStockOrder";

        public const string OutStock = "OutStockOrder";
    }
}
4. In what we just created Index.cshmtl In file , Write the following code :
@using ABP.TPLMS.Web.Startu
@{

    ViewData["Title"] = PageNames.OutStock;

}


@section scripts{
  <script src="~/view-resources/Views/OutStock/Index.js" asp-append-version="true"></script>
  <script src="~/lib/easyui-1.8/datagrid-detailview.js" asp-append-version="true"></script>

    <script type="text/javascript">
          $(function () {
            initable();
            init();
             reloaded();
           updOutSOInfo();
           showOutOdDialog();

           deleteOutSO();

              $('#box').tabs({
                width: 780,      // Tab container width
                height: 465,      // Tab container height
                onSelect: function (title, index) {
                    var rcv = $("#RcvUpdate").val();

                }
            });

        });

    </script>

    }

    <div data-options="region:'center'" style="overflow: hidden;">

        <div id="containter" style="width: 1000px; height: auto; margin: 0px auto;">
            <!--toolbar-->
            <div style="margin-bottom:1px;font-weight:bold;">
                <a href="#" id="add" class="easyui-linkbutton" data-options="iconCls:'icon-add'"
style="width:100px; height:30px; "> establish </a>
                <a href="#" id="del" class="easyui-linkbutton" data-options="iconCls:'icon-remove'"
style="width:100px; height:30px; "> Delete </a>
                <a href="#" id="edit" class="easyui-linkbutton" data-options="iconCls:'icon-edit'"
style="width:100px; height:30px; "> modify </a>
                <a href="#" id="submits" class="easyui-linkbutton" data-options="iconCls:'icon-ok'"
style="width:100px; height:30px; "> Submit </a>
                <a href="#" id="reload" class="easyui-linkbutton" data-options="iconCls:'icon-reload'"
style="width:100px; height:30px; "> Refresh </a>

            </div>
            <!--panel-->
            <div data-options="region:'center',split:false" style="height:500px;">
                <!-- form -->
                <table id="dgOutSO"></table>
            </div>
        </div>

    </div>

    <!--------------------------- Import cargo information pop up window ------------------------------------------->

    <div id="divImportCargo" class="easyui-dialog" closed="true" style="top:10px;" data-options="buttons: '#dlg-buttons-po'">

                <!--panel-->
                <div data-options="region:'center',split:false" style="height:460px;">
                    <!-- form -->
                    <table id="dgCargo"></table>
                </div>


    </div>
    <div id="dlg-buttons-po">

        <input type="submit" id="btnImportDO" value=" Import " class="btn btn-primary" />
        <input type="submit" id="btnCancleDO" value=" Cancel " class="btn btn-info" />
    </div>

    <!--------------------------- Add and modify delivery order information ------------------------------------------->

    <div id="divAddUpdINO" class="easyui-dialog" closed="true" style="top:10px;" data-options="buttons: '#dlg-buttons'">

        <div id="box">

            <div title=" Outbound order ">
                <table>
                    <tr>
                        <td><input type="hidden" name="ID" id="IDUpdate" /></td>
                    </tr>
                    <tr>
                        <td> Delivery order No :</td>
                        <td><input type="text" id="UpdNO" name="UNO" class="form-control input-sm" /></td>

                        <td> Expected delivery date :</td>
                        <td>
                            <input type="text" id="PreOutStockTimeUpd" name="UPreOutStockTime" class="form-control input-sm" />

                        </td>

                        <td>  state :</td>
                        <td><input type="text" id="StatusUpdate" name="UStatus" class="form-control input-sm" value="0" /></td>

                    </tr>
                      <tr>

                        <td>  consignor :</td>

                        <td><input type="text" id="ShipperCodeUpdate" name="UShipperCode" class="form-control input-sm" /></td>
                        <td colspan="2">

                            <input type="text" id="ShipperUpdate" name="UShipper" class="form-control input-sm" />
                        </td>

                        <td> Social Credit Code :</td>

                        <td>

                            <input type="text" id="ShipperSCCDUpdate" name="UShipperSCCD" class="form-control input-sm" />

                        </td>

                    </tr>
                    <tr>

                        <td>  Consignee :</td>

                        <td><input type="text" id="ConsigneeCodeUpdate" name="UConsigneeCode" class="form-control input-sm" /></td>

                        <td colspan="2">

                            <input type="text" id="ConsigneeUpdate" name="UConsignee" class="form-control input-sm" />

                        </td>

                        <td> Social Credit Code :</td>

                        <td>

                            <input type="text" id="ConsigneeSccdUpdate" name="UConsigneeSccd" class="form-control input-sm" />

                        </td>
                    </tr>
                     <tr>

                        <td>  Notified by :</td>

                        <td><input type="text" id="NotifyCodeUpdate" name="UNotifyCode" class="form-control input-sm" /></td>
                        <td colspan="2">

                            <input type="text" id="NotifyUpdate" name="UNotify" class="form-control input-sm" />
                        </td>

                        <td> Social Credit Code :</td>

                        <td>

                            <input type="text" id="NotifySCCDUpdate" name="UNotifySCCD" class="form-control input-sm" />

                        </td>

                    </tr>

                    <tr>

                        <td> Tallyman :</td>

                        <td> <input type="text" id="TallyClerkUpdate" name="UTallyClerk" class="form-control input-sm" /></td>

                        <td> Tally start time :</td>

                        <td>

                            <input type="text" id="TallyTimeUpdate" name="UTallyTime" class="form-control input-sm" />
                        </td>

                        <td> Tally end time :</td>

                        <td>

                            <input type="text" id="ETallyTimeUpdate" name="UETallyTime" class="form-control input-sm" />

                        </td>

                    </tr>

                    <tr>

                        <td> Net weight :</td>

                        <td> <input type="text" id="NwtUpdate" name="UNwt" class="form-control input-sm" value="0" /></td>

                        <td> Gross weight :</td>

                        <td>

                            <input type="text" id="GwtUpdate" name="UGwt" class="form-control input-sm" value="0" />
                        </td>

                         <td> number :</td>

                        <td>
                            <input type="text" id="PackageQtyUpdate" name="UPackageQty" class="form-control input-sm" value="0" />

                        </td>
                    </tr>

                    <tr>

                        <td> Warehouse number :</td>

                        <td>

                            <input type="text" id="WarehouseNoUpdate" name="UWarehouseNo" class="form-control input-sm" />

                        </td>
                         <td> license plate number :</td>

                        <td>

                            <input type="text" id="VehicleNoUpdate" name="UVehicleNo" class="form-control input-sm" />

                        </td>

                        <td> Verification time :</td>

                        <td>

                            <input type="text" id="CheckTimeUpdate" name="UCheckTime" class="form-control input-sm" />

                        </td>

                    </tr>
                    <tr>

                        <td>  Inspectors :</td>

                        <td>
                            <input type="text" id="CheckerUpdate" name="UChecker" class="form-control input-sm" />

                        </td>

                        <td> operator :</td>

                        <td>
                            <input type="text" id="OperUpdate" name="UOper" class="form-control input-sm" />

                        </td>

                        <td> Creation time :</td>

                        <td>

                            <input type="text" id="CreationTimeUpdate" name="UCreationTime" class="form-control input-sm" />

                        </td>

                    </tr>

                    <tr>

                        <td>  remarks :</td>

                        <td colspan="5"><input type="text" id="RemarkUpdate" name="URemark" class="form-control input-sm" /></td>

                    </tr>

                </table>

            </div>

            <div title=" Delivery order details ">
                <!--panel-->

                <div data-options="region:'center',split:false" style="height:400px;">

                    <!-- form -->

                    <table id="dgOutOD"></table>

                </div>

            </div>
        </div>
    </div>

    <div id="dlg-buttons">

        <input type="submit" id="btnSave" value=" preservation " class="btn btn-primary" />

        <input type="submit" id="btnSubmit" value=" Submit " class="btn btn-primary" />

        <input type="submit" id="btnCancle" value=" Cancel " class="btn btn-info" />

    </div>
4. stay Visual Studio 2017 Of “ Solution explorer ” in , Find the domain layer “ABP.TPLMS.Web.Mvc” In the project wwwroot In the catalog view-resources Catalog . Right click the directory , Select... From the pop-up menu “ add to ” > “ New folder ”. And rename to “OutStock”.
5. stay Visual Studio 2017 Of “ Solution explorer ” in , Right click “OutStock” Folder , And then choose “ add to ” > “ New item …”. stay “ Add a new item -ABP.TPLMS.Web.Mvc” In the dialog box , choice “javascript file ”, And name it Index.js.
6. stay Index.js In file , We write the following code .
//----------------------- System management --> Warehouse out order management ------------------------------//

// The refresh data

function initable() {

    $("#dgOutSO").datagrid({
        url: "/OutStock/List",
        title: " Warehouse out order management ",
        pagination: true,

        pageSize: 10,
        pageList: [10, 20, 30],
        fit: true,
        fitColumns: false,

        loadMsg: " Loading delivery order information ...",
        nowarp: false,
        border: false,
        idField: "Id",

        sortName: "Id",
        sortOrder: "asc",
        frozenColumns: [[// Freeze column

            { field: "ck", checkbox: true, align: "left", width: 50 }

        ]],

        columns: [[
            { title: " Number ", field: "Id", width: 50, sortable: true },
            { title: " Delivery order No ", field: "No", width: 100, sortable: true },
            {title: " state ", field: "Status", width: 50            },
            { title: ' Arrival date ', field: 'ReceiveTime',  width: 100, align: 'center' },
            { title: " Shipper ", field: "OwnerCode", width: 150, sortable: true },
            { title: " Expected arrival time ", field: "PreDeliveryTime", width: 150, sortable: false },
            { title: ' Customer ', field: 'CustomerName', width: 60, align: 'center' },
            { title: ' Consignee ',field: 'Oper', width: 100, align: 'center' },
            { title: ' Auditor ',field: 'Checker', width: 120, align: 'center' },
            { title: ' number ', field: 'PackageNum', width: 120, align: 'center' },
            { title: ' Creation time ', field: 'CreationTime', width: 100, align: 'center' }
        ]]

    });
}

function reloaded() {   //reload
    $("#reload").click(function () {
        //
        $('#dgOutSO').datagrid('reload');

    });}
7. stay Visual Studio 2017 Press F5 Running the application . After login , Click on “[ Warehouse out management ]” menu , We can see the list page of delivery order management . Here's the picture .


