当前位置:网站首页>在jupyter NoteBook使用Pytorch进行MNIST实现
在jupyter NoteBook使用Pytorch进行MNIST实现
2022-07-06 09:11:00 【一曲无痕奈何】
"流程   "
#1、加载必要的库
import torch.nn as nn
import torch.nn.functional as F
import torch
import  torch.optim as optim
from torchvision import datasets , transforms
#2、定义超参数
BATCH_SIZE = 16 #每批处理的数据
DEVICE = torch.device("cuda" if torch.cuda.is_available() else "cpu")
EPOCHS = 10 #训练数据的轮次

#3、构建pipline,对图像做处理
pipline = transforms.Compose({
    transforms.ToTensor(),#将图片转换为tensor
    transforms.Normalize((0.1307),(0.3081)) #正则化,当模型过拟合时,降低模型复杂度


})


#4、下载加载数据
from torch.utils.data import DataLoader

train_set = datasets.MNIST("data2",train=True,download=True,transform=pipline)
test_set = datasets.MNIST("data2",train=False,download=True,transform=pipline)

#加载训练数据集
train_loader = DataLoader(train_set,batch_size=BATCH_SIZE,shuffle=True)
#加载测试数据集
test_loader = DataLoader(test_set,batch_size=BATCH_SIZE,shuffle=True)

#显示其中的图片
with open("./data2/MNIST/raw/train-images-idx3-ubyte","rb") as f:
    file = f.read()

image1 = [int(str(item).encode("ascii") ,16) for item in file[16:16+784]]
print(image1)

import cv2
import numpy as np
image1_np = np.array(image1,dtype = np.uint8).reshape(28,28,1)
print(image1_np.shape)
#保存图片
cv2.imwrite('digit.jpg',image1_np)

#5、构建网络模型
class Digit(nn.Module):
    def __init__(self): #构造方法
        super().__init__() #调用父类的构造方法,继承父类的属性
        self.conv1 = nn.Conv2d(1,10,5) #输入通道为1,输出通道为10,卷积核为5(这是5*5的)
        self.conv2 = nn.Conv2d(10,20,3) #上一层的出是下一层的输入
        self.fc1 = nn.Linear(20*10*10,500) #20*10*10 整体的输入通道数, 500输出通道
        self.fc2 = nn.Linear(500,10) #10总共10个类别的概率
    def forward(self,x):
        input_size = x.size(0)  #整个图片的张量形式就是  batch_size*1*28*28 ,所以直接拿到batch_size
        x = self.conv1(x) #输入:batch_size*1*28*28 输出:batch_size*10*24*24 这个10是第一个卷积层的输出通道数,24 = 28-5+1
        x = F.relu(x)   #保持shape不变,输出 batch_size*10*24*24
        x = F.max_pool2d(x,2,2)  #输入batch_size*10*24*24    输出:batch_size*10*12(减半)*12 #池化层:对图片进行压缩(降采样)  提取最显著的特征

        x = self.conv2(x) #输入:batch_size*10*12*12  输出:batch_size*20*10*10(12-3+1)
        x = F.relu(x)
        x = x.view(input_size,-1)  #拉伸,或者是拉平,这个-1自动计算维度 这个-1其实他的值为 20*10*10=2000的维度
        x = self.fc1(x) #输入 batch_size*2000 输出batch_size*500
        x = F.relu(x) #保持shape不变
        x = self.fc2(x) #输入:batch_size*500 输出:batch_size*10
        output = F.log_softmax(x,dim=1) #损失函数 计算分类后,每个数字的概率值
        return output
#6、定义优化器
model =Digit().to(DEVICE)
optimizer = optim.Adam(model.parameters())
#7、定义训练方法
def train_model(model,device,train_loader,optimizer,epoch):
    #模型训练
    model.train()
    for batch_index,(data,target) in enumerate(train_loader):
        #部署到DEVICE上去
        data,target = data.to(device),target.to(device)
        #梯度初始化为0
        optimizer.zero_grad()
        #训练后的结果
        output = model(data)
        #计算损失
        loss = F.cross_entropy(output, target) #交叉熵损失函数适用多分类任务
        #找到概率值最大的下标
        pred = output.max(1,keepdim = True) #1表示横轴 也可以这样写 pred = output.argmax(dim=1)
        #反向传播
        loss.backward()
        #参数优化,也就是每一次的参数的更新
        optimizer.step()
        if batch_index % 3000 == 0: #每处理3000张图片就打印一次
            print("Train Epoch :{}\tLOSS : {:.6f}".format(epoch,loss.item())) #这个loss后面必须加item(),拿到数值
#8、定义测试方法
def test_model(model,device,test_loader):
    #模型验证
    model.eval()
    #正确率
    correct = 0.0
    #测试损失
    test_loss = 0.0
    with torch.no_grad(): #不进行梯度计算,也不会进行反向传播
        for data, target in test_loader:
            #部署到device上去
            data,target = data.to(device),target.to(device)
            #测试数据
            output = model(data)
            #计算测试损失
            test_loss += F.cross_entropy(output, target).item()
            #找到概率最大值的下标
            pred = output.argmax(dim = 1)
            #累计正确的值
            correct += pred.eq(target.view_as(pred)).sum().item()
        test_loss /= len(test_loader.dataset)
        print("Test-- Average loss {:.4f},Accuracy : {:.3f}\n".format(
            test_loss, 100.0 *correct / len(test_loader.dataset)
        ))
# 9、调用训练和测试方法
for epoch in range(1,EPOCHS + 1):
    train_model(model,DEVICE,train_loader,optimizer,epoch)
test_model(model,DEVICE,test_loader)边栏推荐
- Technology | diverse substrate formats
- [after reading the series] how to realize app automation without programming (automatically start Kwai APP)
- Retention policy of RMAN backup
- Super detailed steps to implement Wechat public number H5 Message push
- CAPL script printing functions write, writeex, writelineex, writetolog, writetologex, writedbglevel do you really know which one to use under what circumstances?
- Security design verification of API interface: ticket, signature, timestamp
- The 32-year-old fitness coach turned to a programmer and got an offer of 760000 a year. The experience of this older coder caused heated discussion
- MySQL storage engine
- MySQL combat optimization expert 07 production experience: how to conduct 360 degree dead angle pressure test on the database in the production environment?
- 实现微信公众号H5消息推送的超级详细步骤
猜你喜欢

The 32-year-old fitness coach turned to a programmer and got an offer of 760000 a year. The experience of this older coder caused heated discussion
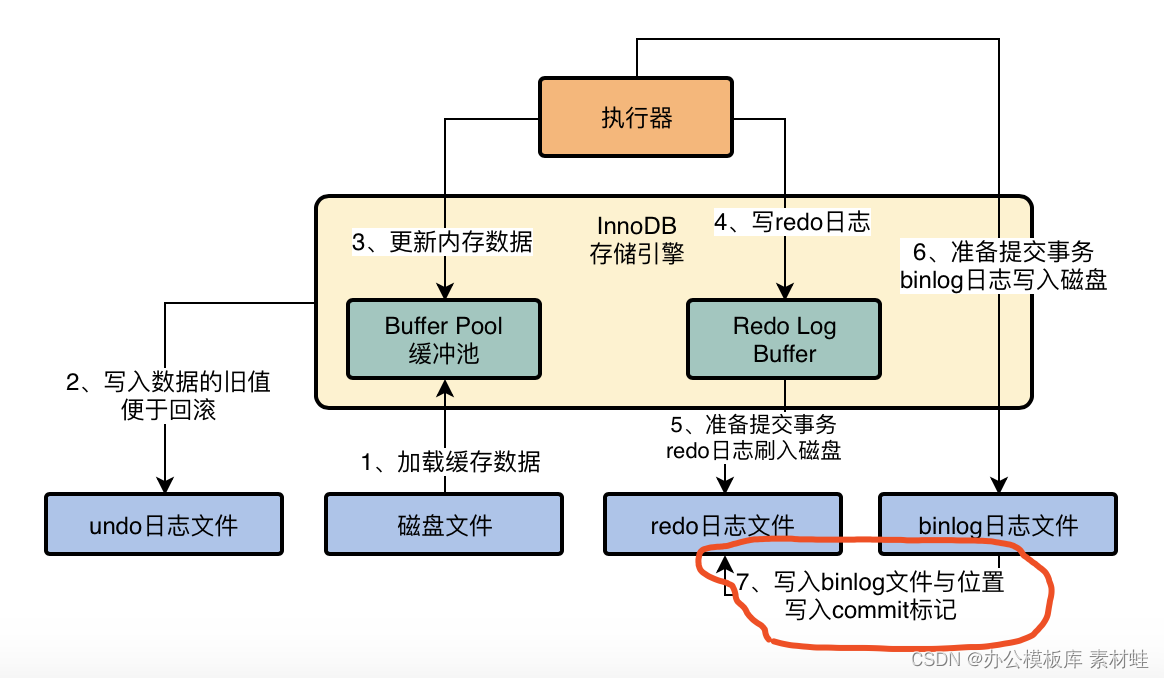
MySQL实战优化高手04 借着更新语句在InnoDB存储引擎中的执行流程,聊聊binlog是什么?
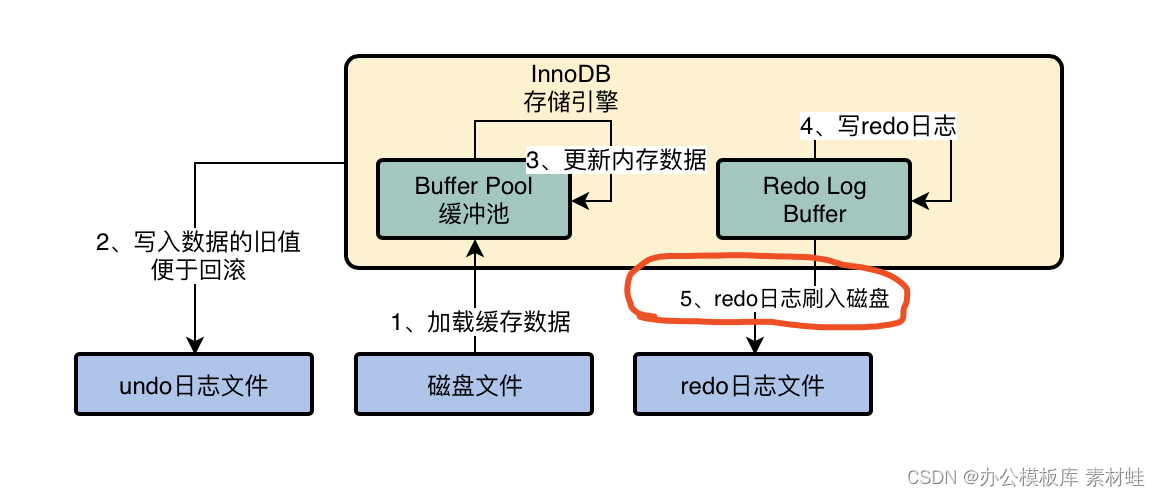
MySQL实战优化高手03 用一次数据更新流程,初步了解InnoDB存储引擎的架构设计
Redis集群方案应该怎么做?都有哪些方案?
CAPL script pair High level operation of INI configuration file
C杂讲 浅拷贝 与 深拷贝
C miscellaneous shallow copy and deep copy

How to make shell script executable

ZABBIX introduction and installation
MySQL combat optimization expert 12 what does the memory data structure buffer pool look like?
随机推荐
MySQL ERROR 1040: Too many connections
软件测试工程师必备之软技能:结构化思维
Not registered via @enableconfigurationproperties, marked (@configurationproperties use)
Typescript入门教程(B站黑马程序员)
实现微信公众号H5消息推送的超级详细步骤
Safety notes
简单解决phpjm加密问题 免费phpjm解密工具
17 medical registration system_ [wechat Payment]
MySQL实战优化高手07 生产经验:如何对生产环境中的数据库进行360度无死角压测?
The governor of New Jersey signed seven bills to improve gun safety
Security design verification of API interface: ticket, signature, timestamp
Solve the problem of remote connection to MySQL under Linux in Windows
C杂讲 双向循环链表
Not registered via @EnableConfigurationProperties, marked(@ConfigurationProperties的使用)
MySQL learning diary (II)
MySQL实战优化高手05 生产经验:真实生产环境下的数据库机器配置如何规划?
Zsh configuration file
Upload vulnerability
17 医疗挂号系统_【微信支付】
高并发系统的限流方案研究,其实限流实现也不复杂