当前位置:网站首页>10. CNN applied to handwritten digit recognition
10. CNN applied to handwritten digit recognition
2022-07-08 01:02:00 【booze-J】
The code running platform is jupyter-notebook, Code blocks in the article , According to jupyter-notebook Written in the order of division in , Run article code , Glue directly into jupyter-notebook that will do . The comments given by the overall code are quite simple .
1. Import third-party library
import numpy as np
from keras.datasets import mnist
from keras.utils import np_utils
from keras.models import Sequential
from keras.layers import Dense,Dropout,Convolution2D,MaxPooling2D,Flatten
from tensorflow.keras.optimizers import Adam
2. Loading data and data preprocessing
#  Load data
(x_train,y_train),(x_test,y_test) = mnist.load_data()
# (60000, 28, 28)
print("x_shape:\n",x_train.shape)
# (60000,)  Not yet one-hot code   You need to operate by yourself later
print("y_shape:\n",y_train.shape)
# (60000, 28, 28) -> (60000,28,28,1)=( Number of pictures , Picture height , Image width , The number of channels in the picture ) reshape() Middle parameter filling -1 Parameter results can be calculated automatically   Divide 255.0 To normalize
#  Normalization is critical , It can greatly reduce the amount of calculation
x_train = x_train.reshape(-1,28,28,1)/255.0
x_test = x_test.reshape(-1,28,28,1)/255.0
#  in one hot Format
y_train = np_utils.to_categorical(y_train,num_classes=10)
y_test = np_utils.to_categorical(y_test,num_classes=10)
3. Training models
#  Define sequential model
model = Sequential()

#  The first convolution layer   Note that the first layer should write the size of the input image   Later layers can be ignored
# input_shape  Input plane
# filters  Convolution kernel / Number of filters
# kernel_size  Convolution window size
# strides  step
# padding padding The way  same/valid
# activation  Activation function
model.add(Convolution2D(
    input_shape=(28,28,1),
    filters=32,
    kernel_size=5,
    strides=1,
    padding="same",
    activation="relu"
))

#  The first pool
model.add(MaxPooling2D(
    pool_size=2,
    strides=2,
    padding="same"
))
#  The second pooling layer
model.add(Convolution2D(filters=64,kernel_size=5,strides=1,padding="same",activation="relu"))
#  The second pooling layer
model.add(MaxPooling2D(pool_size=2,strides=2,padding="same"))
#  Flatten the output of the second pool layer into 1 dimension
model.add(Flatten())
#  The first full connection layer
model.add(Dense(units=1024,activation="relu"))
# Dropout  Random selection 50% Neurons are trained
model.add(Dropout(0.5))
#  The second full connection layer
model.add(Dense(units=10,activation="softmax"))

#  Define optimizer   Set the learning rate to 1e-4
adam = Adam(lr=1e-4)

#  Define optimizer ,loss function, The accuracy of calculation during training
model.compile(optimizer=adam,loss="categorical_crossentropy",metrics=["accuracy"])

#  Training models
model.fit(x_train,y_train,batch_size=64,epochs=10)

#  Evaluation model
loss,accuracy=model.evaluate(x_test,y_test)

print("test loss:",loss)
print("test accuracy:",accuracy)
Code run results :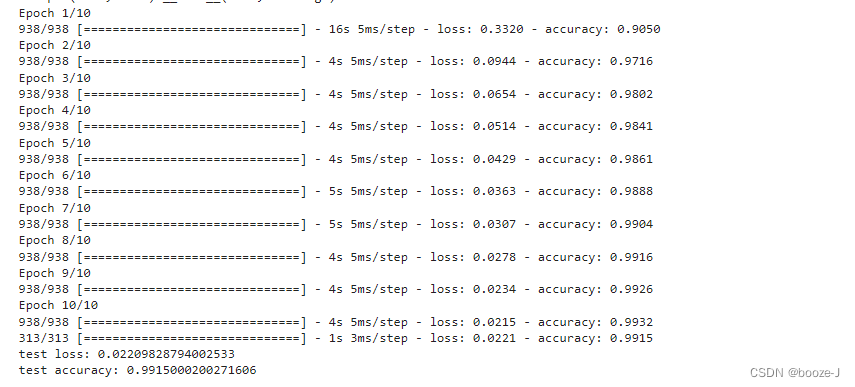
Some points needing attention in the code , Explanations and reminders are also given in the code comments .
Be careful
- The first layer of neural network is to write the size of the input image Later layers can be ignored
边栏推荐
- [go record] start go language from scratch -- make an oscilloscope with go language (I) go language foundation
- Reentrantlock fair lock source code Chapter 0
- Kubernetes Static Pod (静态Pod)
- 取消select的默认样式的向下箭头和设置select默认字样
- DNS series (I): why does the updated DNS record not take effect?
- Lecture 1: the entry node of the link in the linked list
- Cve-2022-28346: Django SQL injection vulnerability
- Su embedded training - Day7
- Malware detection method based on convolutional neural network
- Hotel
猜你喜欢

![[deep learning] AI one click to change the sky](/img/74/f2e854b9f24129bcd9376733c2369f.png)
随机推荐
语义分割模型库segmentation_models_pytorch的详细使用介绍
Image data preprocessing
From starfish OS' continued deflationary consumption of SFO, the value of SFO in the long run
[go record] start go language from scratch -- make an oscilloscope with go language (I) go language foundation
ThinkPHP kernel work order system source code commercial open source version multi user + multi customer service + SMS + email notification
Introduction to ML regression analysis of AI zhetianchuan
基于卷积神经网络的恶意软件检测方法
【obs】Impossible to find entrance point CreateDirect3D11DeviceFromDXGIDevice
ReentrantLock 公平锁源码 第0篇
第四期SFO销毁,Starfish OS如何对SFO价值赋能?
They gathered at the 2022 ecug con just for "China's technological power"
[deep learning] AI one click to change the sky
2.非线性回归
Where is the big data open source project, one-stop fully automated full life cycle operation and maintenance steward Chengying (background)?
Implementation of adjacency table of SQLite database storage directory structure 2-construction of directory tree
德总理称乌不会获得“北约式”安全保障
网络模型的保存与读取
12. RNN is applied to handwritten digit recognition
How does starfish OS enable the value of SFO in the fourth phase of SFO destruction?
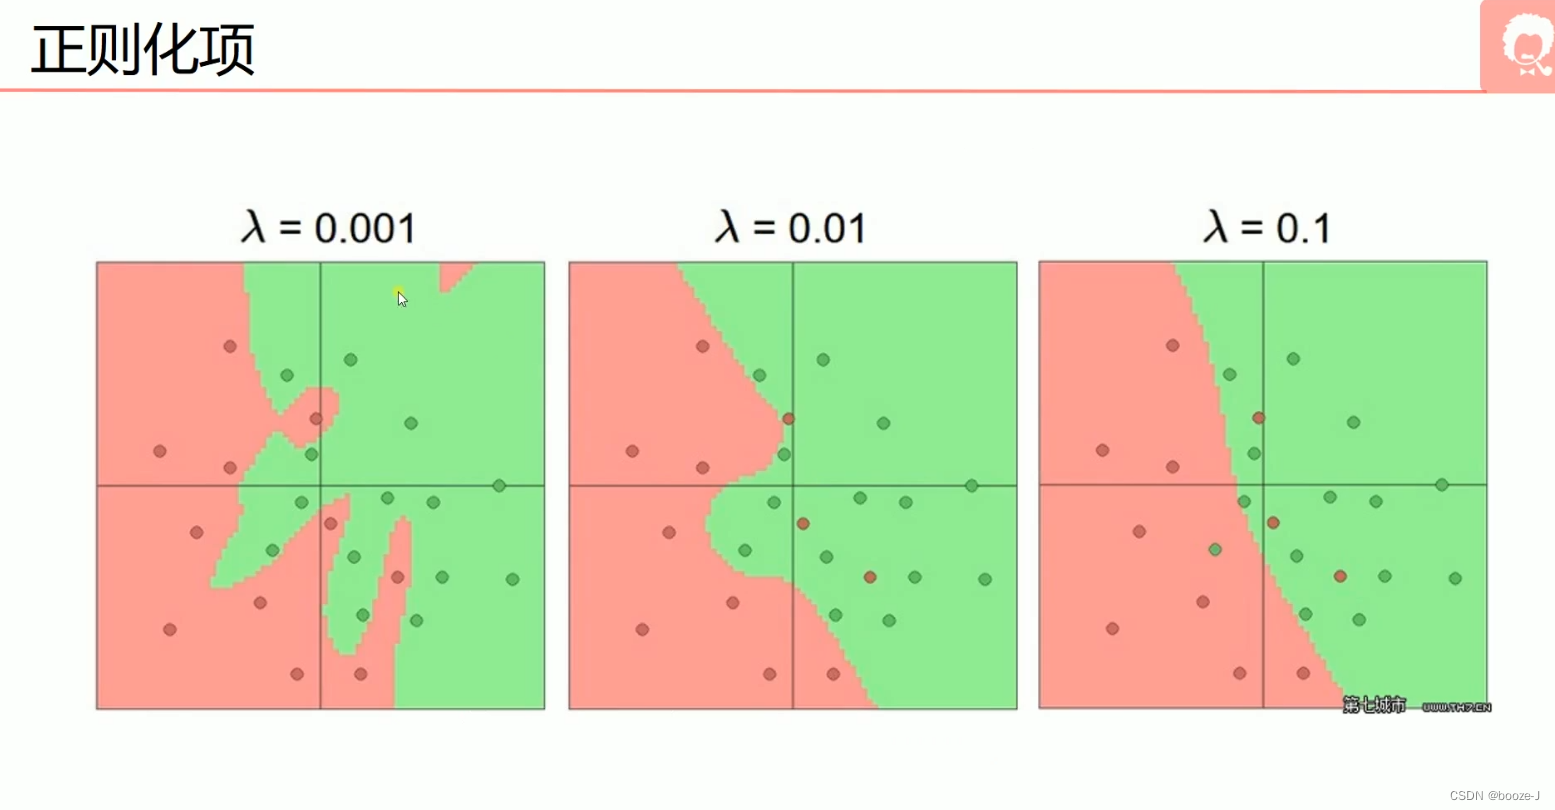
5.过拟合,dropout,正则化