当前位置:网站首页>Ros2 - node (VII)
Ros2 - node (VII)
2022-07-05 06:50:00 【Me and nano】
ROS2 Robot operating system
List of articles
Preface
Robot is a synthesis of various functions , Each function is like a working cell of a robot , Many cells are connected by some mechanism , Become a robot as a whole .
stay ROS in , We give these “ cells ” Took a name , That is the node .
One 、 Communication model
A complete robot system may not be a physical whole , For example, such a robot :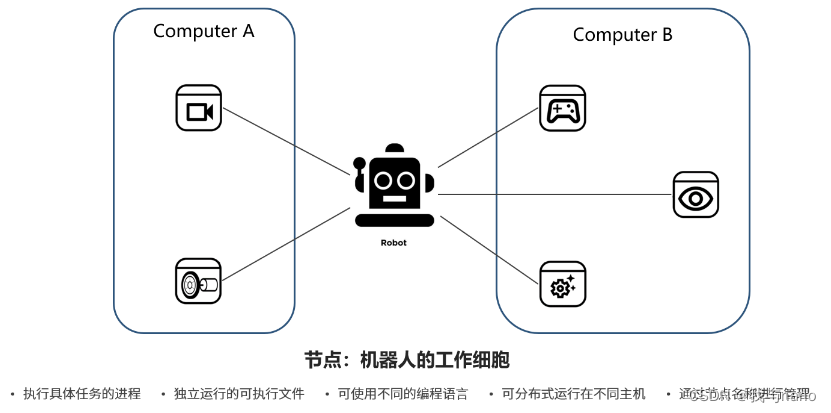
The responsibility of the node in the robot system is to perform some specific tasks , From the perspective of computer operating system , Also called process ;
Each node is an executable file that can run independently , For example, execute a python Program , Or perform C++ Compile the generated results , All of them are running a node ;
Since each node is an independent execution file , Naturally, you can think of , The programming language that gets this execution file can be different , such as C++、Python, Even Java、Ruby Wait for more language .
These nodes are cells with different functions , According to the different system design , It may be located on the computer A, It may also be located on the computer B, It may also run in the cloud , This is called distributed , That is, it can be distributed on different hardware carriers ;
Each node needs to have a unique name , When we want to find a node , Or when you want to query the status of a node , You can query by the name of the node .
Nodes can also be compared to workers one by one , Do different tasks separately , Some of them work in front-line factories , Some provide support in the logistics department , They may not know each other , But together they push the robot “ factory ”, Complete more complex tasks .
Two 、 Specific use
1.Hello World node ( Process oriented )
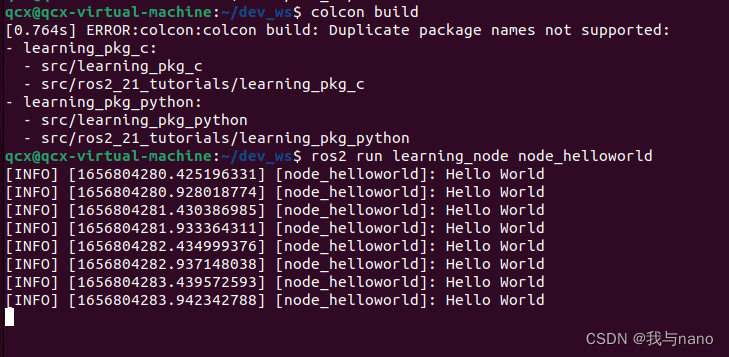
ROS2 Of course, the implementation of the node in the needs to write a program , We from Hello World Routine starts , First, let's implement the simplest node , The function is not complicated , It's a cycle of printing “Hello World” String to the terminal .
ros2 run learning_node node_helloworld
Code parsing :
import rclpy                                   # ROS2 Python Interface library
from rclpy.node import Node                    # ROS2  Node class
import time

def main(args=None):                           # ROS2 Node main entrance main function
    rclpy.init(args=args)                      # ROS2 Python Interface initialization   ** Fixed programming **
    node = Node("node_helloworld")             #  establish ROS2 Node object and initialize  ** You need to create a class as an object to use **

    while rclpy.ok():                          # ROS2 Whether the system operates normally
        node.get_logger().info("Hello World")  # ROS2 Log output    similar print
        time.sleep(0.5)                        #  Sleep control cycle time

    node.destroy_node()                        #  Destroy the node object
    rclpy.shutdown()                           #  close ROS2 Python Interface

After writing the code, you need to set the compilation options of the function package , Let the system know Python Program entry , To open a feature pack setup.py file , Add the following entry point configuration :
    entry_points={

        'console_scripts': [
         'node_helloworld  = learning_node.node_helloworld:main', node . Code file name .main
        ],
Create node process
Programming interface initialization
Create nodes and initialize
Realize node functions
Destroy the node and close the interface
2.Hello World node ( object-oriented )
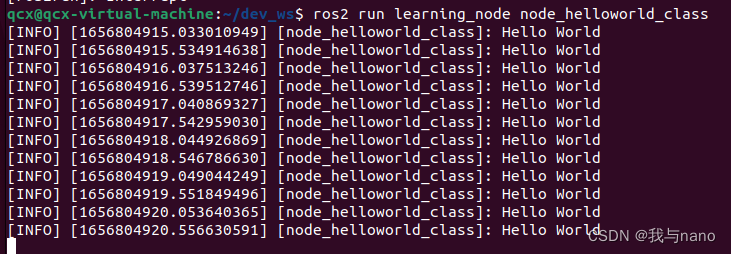
So in ROS2 The development of , We recommend that you use object-oriented programming , For example, the code just now can be changed to this , Although it looks a little complicated , But the code will be more readable and portable , Debugging will also be more convenient .
ros2 run learning_node node_helloworld_class
Code parsing :
import rclpy                                     # ROS2 Python Interface library
from rclpy.node import Node                      # ROS2  Node class
import time

"""
 Create a HelloWorld node ,  Output during initialization “hello world” journal
"""
class HelloWorldNode(Node):
    def __init__(self, name):
        super().__init__(name)                     # ROS2 Node parent class initialization
        while rclpy.ok():                          # ROS2 Whether the system operates normally
            self.get_logger().info("Hello World")  # ROS2 Log output
            time.sleep(0.5)                        #  Sleep control cycle time

def main(args=None):                               # ROS2 Node main entrance main function
    rclpy.init(args=args)                          # ROS2 Python Interface initialization
    node = HelloWorldNode("node_helloworld_class") #  establish ROS2 Node object and initialize
    rclpy.spin(node)                               #  Loop waiting for ROS2 sign out
    node.destroy_node()                            #  Destroy the node object
    rclpy.shutdown()                               #  close ROS2 Python Interface
After writing the code, you need to set the compilation options of the function package , Let the system know Python Program entry , To open a feature pack setup.py file , Add the following entry point configuration :
    entry_points={

        'console_scripts': [
         'node_helloworld       = learning_node.node_helloworld:main',
         'node_helloworld_class = learning_node.node_helloworld_class:main',
        ],
Compile a piece of code before you run it , After compilation, the code will be copied to install In the folder , Each run ros run It's all about install Documents in , If you don't compile, you will run the old code .
Programming interface initialization
Create nodes and initialize
Realize node functions
Destroy the node and close the interface
3. Object recognition node
you 're right , Next, let's take the task of machine vision as an example , Simulate the implementation process of nodes in the actual robot .
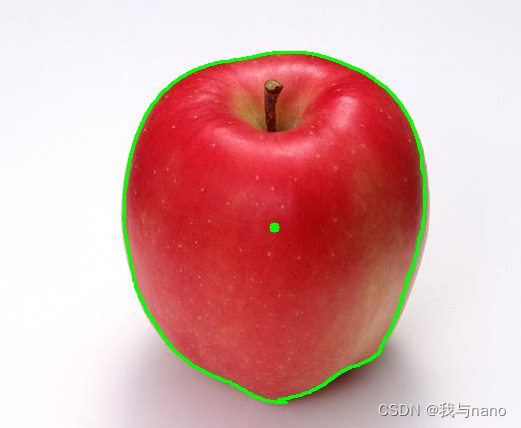
We first find a picture of apple on the Internet , By writing a node to identify the apple in the picture .
First install opencv
sudo apt install python3-opencv
The probability of using this instruction cannot be used , I followed Gu Yue Jude's course , Then stepped on many pits , You can use the following two lines of code to install .
pip3 install numpy
pip3 install opencv-python
Then you can run the routine :
ros2 run learning_node node_object # Pay attention to recompile after modifying the image path
Before operation, you need to learning_node/node_object.py The image path in the code , Change to actual path , Recompile and run after modification :
image = cv2.imread('/home/qcx/dev_ws/src/ros2_21_tutorials/learning_node/learning_node/apple.jpg')
After the routine runs successfully , A visualization window will pop up , You can see that Apple has been successfully recognized , A green box will outline the apple , The green dot in the middle indicates the central point .
Code parsing :
import rclpy                            # ROS2 Python Interface library
from rclpy.node import Node             # ROS2  Node class

import cv2                              # OpenCV Image processing library
import numpy as np                      # Python Numerical calculation library

lower_red = np.array([0, 90, 128])     #  Red HSV Lower threshold
upper_red = np.array([180, 255, 255])  #  Red HSV Upper threshold

def object_detect(image):
    hsv_img = cv2.cvtColor(image, cv2.COLOR_BGR2HSV)      #  Images from BGR The color model is converted to HSV Model
    mask_red = cv2.inRange(hsv_img, lower_red, upper_red) #  Image binarization

    contours, hierarchy = cv2.findContours(mask_red, cv2.RETR_LIST, cv2.CHAIN_APPROX_NONE) #  Contour detection in image

    for cnt in contours:                                  #  Remove some noise with too small contour area
        if cnt.shape[0] < 150:
            continue

        (x, y, w, h) = cv2.boundingRect(cnt)              #  Get the upper left corner of the outline of the apple xy Pixel coordinates and the width and height of the contour range
        cv2.drawContours(image, [cnt], -1, (0, 255, 0), 2)#  Outline the apple
        cv2.circle(image, (int(x+w/2), int(y+h/2)), 5, (0, 255, 0), -1)#  Draw the center point of the apple image

    cv2.imshow("object", image)                           #  Use OpenCV Display the processed image effect
    cv2.waitKey(0)
    cv2.destroyAllWindows()

def main(args=None):                                      # ROS2 Node main entrance main function
    rclpy.init(args=args)                                 # ROS2 Python Interface initialization
    node = Node("node_object")                            #  establish ROS2 Node object and initialize
    node.get_logger().info("ROS2 Node example : Detect the apple in the picture ")

    image = cv2.imread('/home/qcx/dev_ws/src/ros2_21_tutorials/learning_node/learning_node/apple.jpg')  #  Read images
    object_detect(image)                                   #  Apple detection
    rclpy.spin(node)                                       #  Loop waiting for ROS2 sign out
    node.destroy_node()                                    #  Destroy the node object
    rclpy.shutdown()                                       #  close ROS2 Python Interface
After writing the code, you need to set the compilation options of the function package , Let the system know Python Program entry , To open a feature pack setup.py file , Add the following entry point configuration :
entry_points={

    'console_scripts': [
     'node_helloworld       = learning_node.node_helloworld:main',
     'node_helloworld_class = learning_node.node_helloworld_class:main',
     'node_object           = learning_node.node_object:main',
    ],
Call camera recognition
ros2 run learning_node node_object_webcam
If you are operating in a virtual machine , The following settings are required : 1. Set the virtual machine to be compatible USB3.1; 2. Connect the camera to the virtual machine on the mobile device .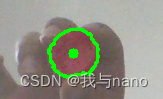
I am calling the camera of the computer , The effect is OK
Compared with the previous procedure , The biggest change here is to modify the source of the image , Use OpenCV Medium VideoCapture() To drive the camera , And cycle read Camera information , And identify .
import rclpy                            # ROS2 Python Interface library
from rclpy.node import Node             # ROS2  Node class

import cv2                              # OpenCV Image processing library
import numpy as np                      # Python Numerical calculation library

lower_red = np.array([0, 90, 128])     #  Red HSV Lower threshold
upper_red = np.array([180, 255, 255])  #  Red HSV Upper threshold

def object_detect(image):
    hsv_img = cv2.cvtColor(image, cv2.COLOR_BGR2HSV)       #  Images from BGR The color model is converted to HSV Model
    mask_red = cv2.inRange(hsv_img, lower_red, upper_red)  #  Image binarization

    contours, hierarchy = cv2.findContours(mask_red, cv2.RETR_LIST, cv2.CHAIN_APPROX_NONE) #  Contour detection in image

    for cnt in contours:                                   #  Remove some noise with too small contour area
        if cnt.shape[0] < 150:
            continue

        (x, y, w, h) = cv2.boundingRect(cnt)               #  Get the upper left corner of the outline of the apple xy Pixel coordinates and the width and height of the contour range
        cv2.drawContours(image, [cnt], -1, (0, 255, 0), 2) #  Outline the apple
        cv2.circle(image, (int(x+w/2), int(y+h/2)), 5, (0, 255, 0), -1)    #  Draw the center point of the apple image

    cv2.imshow("object", image)                            #  Use OpenCV Display the processed image effect
    cv2.waitKey(50)

def main(args=None):                                       # ROS2 Node main entrance main function
    rclpy.init(args=args)                                  # ROS2 Python Interface initialization
    node = Node("node_object_webcam")                      #  establish ROS2 Node object and initialize
    node.get_logger().info("ROS2 Node example : Detect the apple in the picture ")

    cap = cv2.VideoCapture(0)


    while rclpy.ok():
        ret, image = cap.read()          #  Read a frame of image

        if ret == True:
            object_detect(image)         #  Apple detection

    node.destroy_node()                  #  Destroy the node object
    rclpy.shutdown()                     #  close ROS2 Python Interface
3、 ... and 、 Instruction Introduction
ls /dev/video*                 # Check the model of the camera
ros2 node list               #  View the list of nodes
ros2 node info <node_name>   #  View node information
summary
In a ROS In the robot system , Nodes are not isolated , There are many mechanisms between them to keep in touch , The connection between them will be introduced below .
边栏推荐
- Ret2xx---- common CTF template proposition in PWN
- Find the combination number acwing 888 Find the combination number IV
- [MySQL 8.0 does not support capitalization of table names - corresponding scheme]
- 'mongoexport 'is not an internal or external command, nor is it a runnable program or batch file.
- LSA Type Explanation - lsa-1 [type 1 LSA - router LSA] detailed explanation
- Xavier CPU & GPU high load power consumption test
- PHY驱动调试之 --- MDIO/MDC接口22号和45号条款(一)
- The route of wechat applet jumps again without triggering onload
- Game theory acwing 893 Set Nim game
- Pycahrm reports an error: indentation error: unindent does not match any outer indentation
猜你喜欢
数据库Mysql全部
SRE核心体系了解
![[algorithm post interview] interview questions of a small factory](/img/62/6e330b1eba38f2dc67b21a10f0e2a8.jpg)
[algorithm post interview] interview questions of a small factory
ethtool 原理介绍和解决网卡丢包排查思路(附ethtool源码下载)
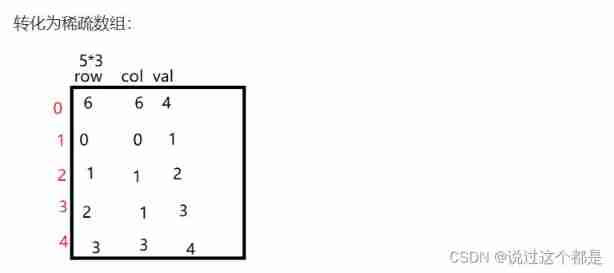
Mutual transformation between two-dimensional array and sparse array (sparse matrix)

confidential! Netease employee data analysis internal training course, white whoring! (attach a data package worth 399 yuan)
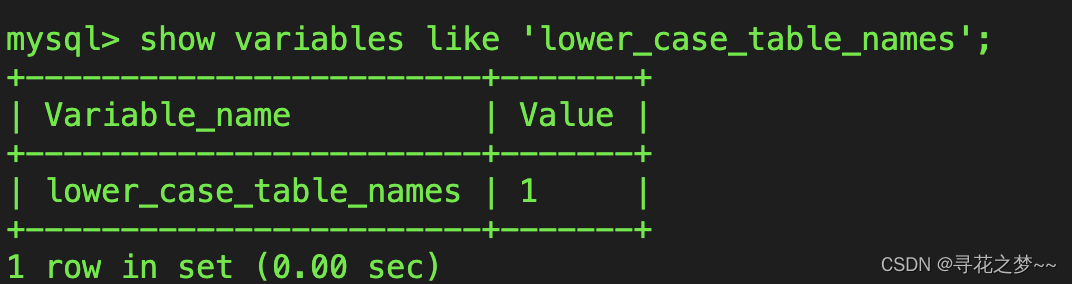
【MySQL8.0不支持表名大写-对应方案】
C语言数组专题训练
ROS2——node节点(七)
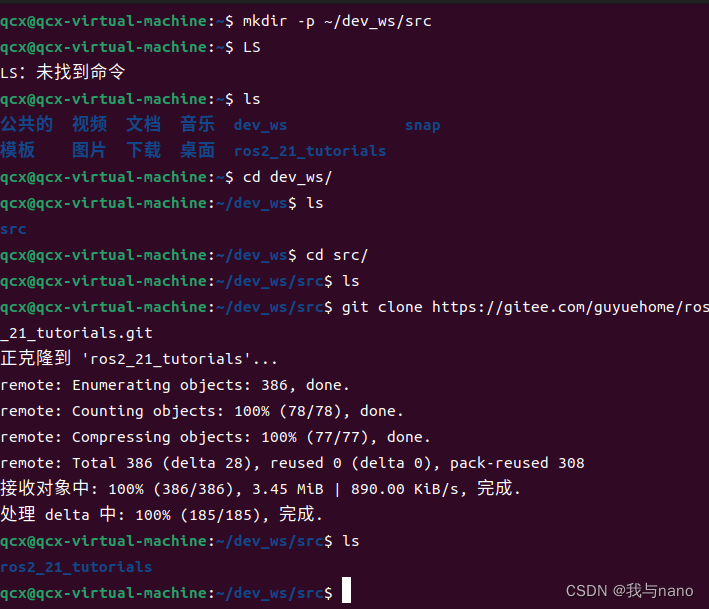
ROS2——工作空间(五)
随机推荐
LSA Type Explanation - detailed explanation of lsa-2 (type II LSA network LSA) and lsa-3 (type III LSA network Summary LSA)
Error: "mountvolume.setup failed for volume PVC fault handling
A brief introduction to heading/pitch/roll and omega/phi/kappa
Instruction execution time
时间很快,请多做有意义的事情
Cloud native related technology learning
Vant Weapp SwipeCell设置多个按钮
Log4qt usage of logbase in QT project
inux摄像头(mipi接口)简要说明
mingling
La redirection de l'applet Wechat ne déclenche pas onload
Configuration method and configuration file of SolidWorks GB profile library
SolidWorks template and design library are convenient for designers to call
Unity 之 ExecuteAlways正在取代ExecuteInEditMode
将webApp或者H5页面打包成App
ROS2——topic话题(八)
数据库Mysql全部
摄像头的MIPI接口、DVP接口和CSI接口
Use ffmpeg to rotate, flip up and down, and flip horizontally
代码中的英语全部