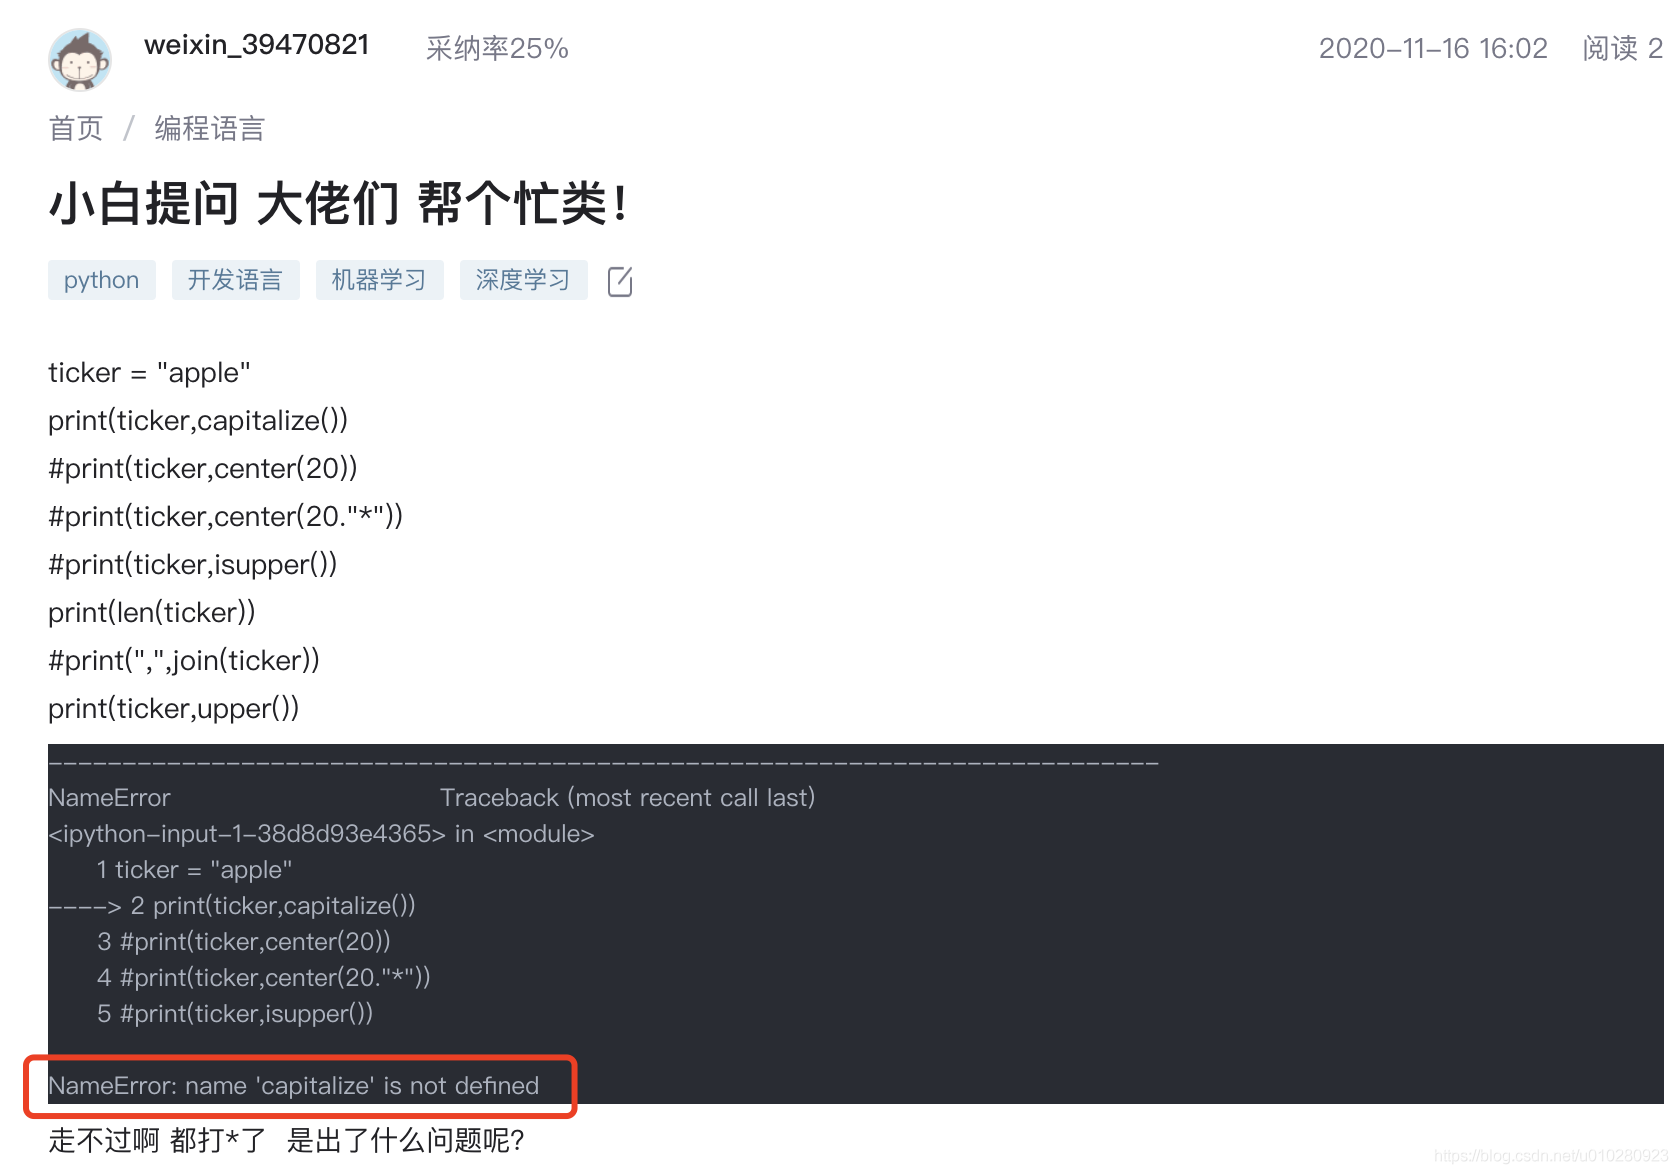
当前位置:网站首页>自动机器学习框架介绍与使用(flaml、h2o)
自动机器学习框架介绍与使用(flaml、h2o)
2022-07-06 09:13:00 【zkkkkkkkkkkkkk】
一、介绍
自动机器学习(Automl),是一种将传统机器学习变成自动化,start—end全自动实现。目前市场流行的自动机器学习框架有:Flaml、H20等等。本章记录这两个框架的使用方式。
二、数据介绍
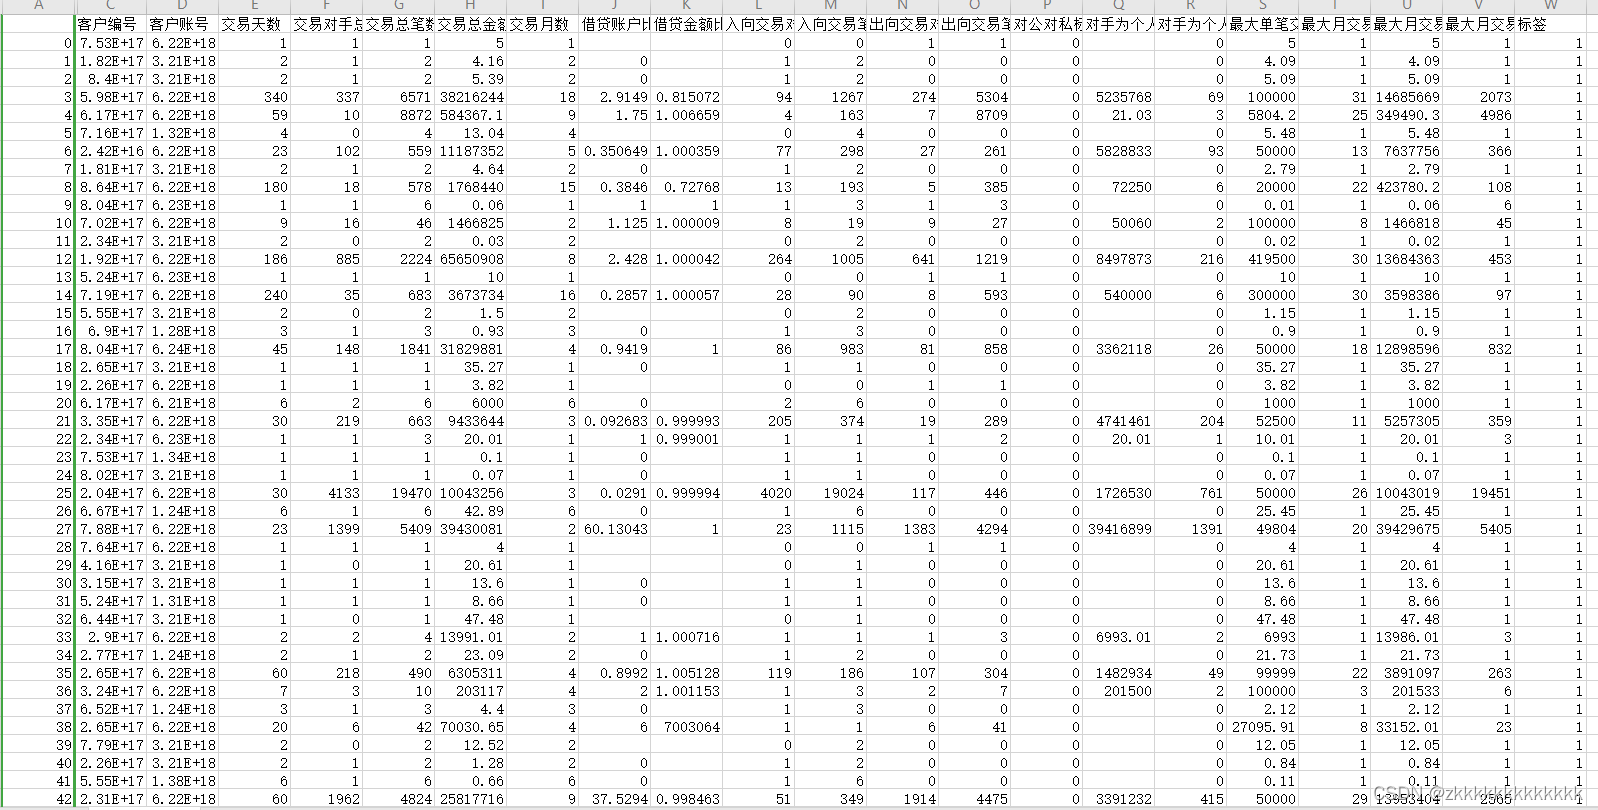
数据为自己造的银行交易流水指。共有23列数据,其中有18列特征数据,1列标签数据,4列用户信息数据。
三、flaml框架
3.1、flaml简介
Flaml是微软推出的一款自动机器学习框架,支持自定义学习器及参数,并提供了一种快速的自动调整工具。flaml可以在自定义的学习器中找到具有低计算资源的准确 ML 模型。它将用户从选择学习者和超参数中解放出来。使用起来非常方便。
3.2、使用flaml
3.2.1、下载flaml库
pip install flaml3.2.2、导入相关库
from flaml import AutoML
from sklearn.datasets import load_iris
from sklearn.datasets import load_boston
import pandas as pd
import sys,logging
from sklearn.metrics import confusion_matrix,classification_report,recall_score,accuracy_score,f1_score,precision_score
from sklearn.preprocessing import MinMaxScaler
from imblearn.over_sampling import RandomOverSampler
import time
3.2.3、数据处理
# 数据所在路径
data_path = r"source/data_jianhang.csv"
input_data_all = pd.read_csv(data_path,encoding="gbk",index_col=0)
# 提取预测客户信息  【客户名称、客户编号、客户账号】
customer_info = input_data_all.iloc[:,:3]
print(customer_info)

# 特征
input_data_target = input_data_all["标签"]
input_data_feature = input_data_all.iloc[:, 3:-1]
# 选取input_data_all的所有行,第三列到最后一列(包头不包尾)
input_data = input_data_all.iloc[:, 3:]
# 将空值补为0
input_data.fillna(0, inplace=True)
# 输出前五行查看
print(input_data.head())


# 针对正负样本不平衡情况进行随机过采样
f = RandomOverSampler(random_state=0)
data, target = f.fit_resample(input_data.iloc[:,:-1], input_data.iloc[:,-1])
# 数据最大最小归一化
data = MinMaxScaler().fit_transform(data)
# 输出样本数量情况
print(target.to_frame().value_counts())

# 切分数据  X:特征集  y:标签
X,y = input_data.iloc[:,:-1],input_data.iloc[:,-1]
X = MinMaxScaler().fit_transform(X)
3.2.4、调用flaml
查看程序打印的日志我们可以发现,通过参数estimator_list,在调用flaml的过程中,flaml自动为我们比较lgbm、rf、xgboost分类器的效果,最后打印并使用最优的分类器以及参数去训练模型。整个过程都是自动化,完全不需要人为的操作比较。这也是自动化机器学习的一个特点。
t1 = time.time()
# 初始化flaml自动化建模框架
flaml_automl = AutoML()
# 传入训练数据x和y进行fit训练
flaml_automl.fit(data,target,task='classification',log_file_name="xxx.log",metric="f1",estimator_list = ['lgbm', 'rf', 'xgboost'])
# fit常用参数介绍
'''
    #  X_train=None,   训练数据特征集合
    #  y_train=None,   训练数据标签集合
    #  estimator_list = ['lgbm', 'rf', 'xgboost', 'extra_tree', 'xgb_limitdepth', 'lrl1']
    #  metric: 'accuracy', 'roc_auc', 'roc_auc_ovr', 'roc_auc_ovo','f1', 'micro_f1', 'macro_f1', 'log_loss', 'mae', 'mse', 'r2','mape'.
    #  n_jobs:传入整数,开启多线程
    #  n_splits:传入整数,交叉验证的折叠数
    #  log_file_name:日志输出,如果不想输出日志,传入空字符串 ’’ 即可
    #  estimator_list:模型列表,可选【‘lgbm’,’xgboot’,’xgb_limitdepth’,’catboost’,’rf’,’extra_tree’】,最终会输出best模型。
    #  time_budget:时间限制,以秒为单位。若限制10s,则在十秒的时候输出最优模型。不限制时间传入-1
    #  sample:布尔值,默认False。是否对传入的数据进行采样。
    #  early_stop:布尔值,默认False。若模型搜索收敛,则提前停止。
'''


# flaml打印的最优模型及参数
'''
[flaml.automl: 03-09 14:52:24] {2694} INFO - retrain lgbm for 1.3s
[flaml.automl: 03-09 14:52:24] {2699} INFO - retrained model: LGBMClassifier(colsample_bytree=0.5716563773446997,
               global_max_steps=9223372036854775807,
               learning_rate=0.7886932330930241, max_bin=511,
               min_child_samples=7, n_estimators=181, num_leaves=1006,
               reg_alpha=0.007095760722363662, reg_lambda=0.3005614400342159,
               verbose=-1)
[flaml.automl: 03-09 14:52:24] {2077} INFO - fit succeeded
[flaml.automl: 03-09 14:52:24] {2079} INFO - Time taken to find the best model: 23.60042953491211
'''


# 打印一些结果
print("消耗时间: ",time.time()-t1)
print(flaml_automl.estimator_list)
print("最优模型",flaml_automl.model)
print("最优参数",flaml_automl.best_config)
print("训练时间",flaml_automl.best_config_train_time)
print("分类器",flaml_automl.best_estimator)
print("损失",flaml_automl.best_loss)

# 调用predict预测X
y_pred = flaml_automl.predict(X)
# 输出预测结果
print(y_pred)

# 打印指标、分类效果
print("混淆矩阵:\n",confusion_matrix(y,y_pred))
print("分类报告:\n",classification_report(y,y_pred))
print("召回率:",recall_score(y,y_pred))
print("准确率:",accuracy_score(y,y_pred))
print("f1分值:",f1_score(y,y_pred))
print("精确率:",precision_score(y,y_pred))
print("总消耗时间: ",time.time()-t1)
四、h2o框架
4.1、h2o简介
h2o框架是一个开源,分布式的基于java的机器学习框架。h2o是由(h2o.AI)公司开发并发布。他们公司的网址 :H2O.ai | AI Cloud Platform。h20还支持用户任务进行可视化分析。
4.2、h2o使用
4.2.1、下载h2o
pip install h204.2.2、导入相关库
import h2o
from h2o.automl import H2OAutoML
from h2o.estimators.random_forest import H2ORandomForestEstimator
from h2o.estimators.gbm import H2OGradientBoostingEstimator
from h2o.estimators.stackedensemble import H2OStackedEnsembleEstimator
from h2o.grid.grid_search import H2OGridSearch
import numpy as np
import pandas as pd
import time
from sklearn.preprocessing import MinMaxScaler
from sklearn.metrics import confusion_matrix,classification_report,recall_score,accuracy_score,f1_score,precision_score
from imblearn.over_sampling import RandomOverSampler
4.2.3、数据处理
同3.2.3章节完全一样,这里不在赘述,直接复制3.2.3章节数据处理代码即可。
4.2.4、启动h2o的jar包
1)下载免费:自动化机器学习h2o启动jar包-机器学习文档类
2)打开cmd,输入java -jar h2o.jar 启动
3)访问web页面: http://localhost:54321
4.2.5、调用h2o
##``"DRF"``,``"GLM"``,``"XGBoost"``,``"GBM"``,``"DeepLearning"``,``"StackedEnsemble"``.
# 初始化
automl_estimator = H2OAutoML(max_runtime_secs=50,balance_classes=True,exclude_algos=["DeepLearning"],stopping_metric="auc",sort_metric="auc")
# 训练
automl_estimator.train(x=train_data_h2o.names[0:-1],y="target",training_frame=train_data_h2o)
print("时间2:",time.time()-t1)
# predict进行预测,并输出预测结果
h2o_result = automl_estimator.predict(test_data_h2o[:-1])[:,0]
print(h2o_result)

#打印指标
print("混淆矩阵:\n",confusion_matrix(test_data_h2o[:,-1].as_data_frame(),h2o_result.as_data_frame()))
print("分类报告:\n",classification_report(test_data_h2o[:,-1].as_data_frame(),h2o_result.as_data_frame()))
print("召回率:",recall_score(test_data_h2o[:,-1].as_data_frame(),h2o_result.as_data_frame()))
print("准确率:",accuracy_score(test_data_h2o[:,-1].as_data_frame(),h2o_result.as_data_frame()))
print("f1分值:",f1_score(test_data_h2o[:,-1].as_data_frame(),h2o_result.as_data_frame()))
print("精确率:",precision_score(test_data_h2o[:,-1].as_data_frame(),h2o_result.as_data_frame()))
print("时间3:",time.time()-t1)
五、总结
因为对h2o理解比较少,所以关于h2o框架方面的代码没有过多的解释。我个人还是比较倾向于使用flaml做自动化机器学习。至于效果还是挺好的,这里就不贴效果截图了。有兴趣的可以自己线下实践实践。
边栏推荐
- MySQL主從複制、讀寫分離
- Global and Chinese market for intravenous catheter sets and accessories 2022-2028: Research Report on technology, participants, trends, market size and share
- Other new features of mysql18-mysql8
- Kubesphere - deploy the actual combat with the deployment file (3)
- Water and rain condition monitoring reservoir water and rain condition online monitoring
- Solution: log4j:warn please initialize the log4j system properly
- There are three iPhone se 2022 models in the Eurasian Economic Commission database
- Csdn-nlp: difficulty level classification of blog posts based on skill tree and weak supervised learning (I)
- [C language foundation] 04 judgment and circulation
- Mysql22 logical architecture
猜你喜欢
Mysql22 logical architecture
Generate PDM file from Navicat export table

Copie maître - esclave MySQL, séparation lecture - écriture
连接MySQL数据库出现错误:2059 - authentication plugin ‘caching_sha2_password‘的解决方法
MySQL主从复制、读写分离

Mysql21 user and permission management
Water and rain condition monitoring reservoir water and rain condition online monitoring
CSDN博文摘要(一) —— 一个简单的初版实现
Postman Interface Association
CSDN question and answer module Title Recommendation task (II) -- effect optimization
随机推荐
Ansible practical Series II_ Getting started with Playbook
windows下同时安装mysql5.5和mysql8.0
Copy constructor template and copy assignment operator template
【博主推荐】asp.net WebService 后台数据API JSON(附源码)
JDBC principle
Other new features of mysql18-mysql8
February 13, 2022-3-middle order traversal of binary tree
记一次某公司面试题:合并有序数组
MySQL21-用戶與權限管理
A trip to Macao - > see the world from a non line city to Macao
[recommended by bloggers] asp Net WebService background data API JSON (with source code)
MySQL27-索引優化與查詢優化
虚拟机Ping通主机,主机Ping不通虚拟机
csdn-Markdown编辑器
Install mysql5.5 and mysql8.0 under windows at the same time
Mysql 其他主机无法连接本地数据库
MySQL25-索引的创建与设计原则
CSDN博文摘要(一) —— 一个简单的初版实现
Install MySQL for Ubuntu 20.04
Solve the problem that XML, YML and properties file configurations cannot be scanned