当前位置:网站首页>Database middleware_ MYCAT summary
Database middleware_ MYCAT summary
2022-07-06 10:30:00 【Protect our party a Yao】
One . Introduction
1.1. Mycat What is it?
Mycat It's database middleware .
1.1.1. database middleware
middleware : It's a kind of computer software that connects software components and applications , In order to facilitate the communication between software components .
Example :Tomcat,web middleware .
database middleware : Connect java Applications and databases .
1.1.2. Why use Mycat?
① Java Tightly coupled with database .
② High access and high concurrency pressure on the database .
③ Read write request data inconsistent .
1.1.3. Database middleware comparison
database middleware ( The idea of flying in the sky , The realization of landing on the ground )
| middleware | Realization |
|---|---|
| Cobar | Alibaba team development , There has been no maintenance update for many years |
| Mycat | be based on Cobar Secondary development , Open source community maintenance |
| OneProxy | Non open source commercial middleware |
| Kingshard | go Language development , In continuous improvement |
| vitess | Youtube Production is in use , I won't support it Mysql Native protocol |
| Atlas | 360 be based on MysqlProxy rewrite , High and unstable |
| MaxScale | MaxScale yes mariadb R & D middleware |
| MysqlRoute | MysqlRoute yes Mysql official oracle Middleware released by the company |
1.1.4. Mycat Its official website
1.2. Mycat What for?
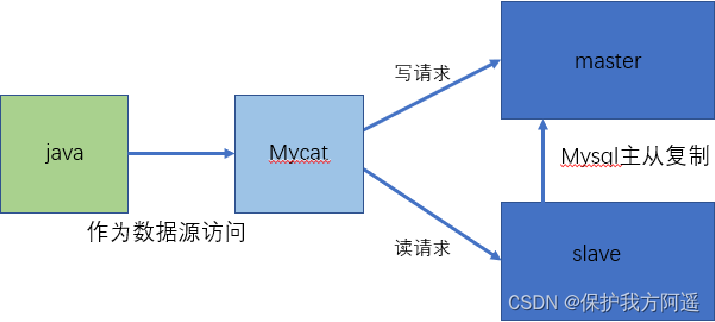
1.2.1. Read / write separation
1.2.2. Data fragmentation
Split Vertically ( sub-treasury )、 Horizontal split ( table )、 vertical + Horizontal split ( Sub database and sub table )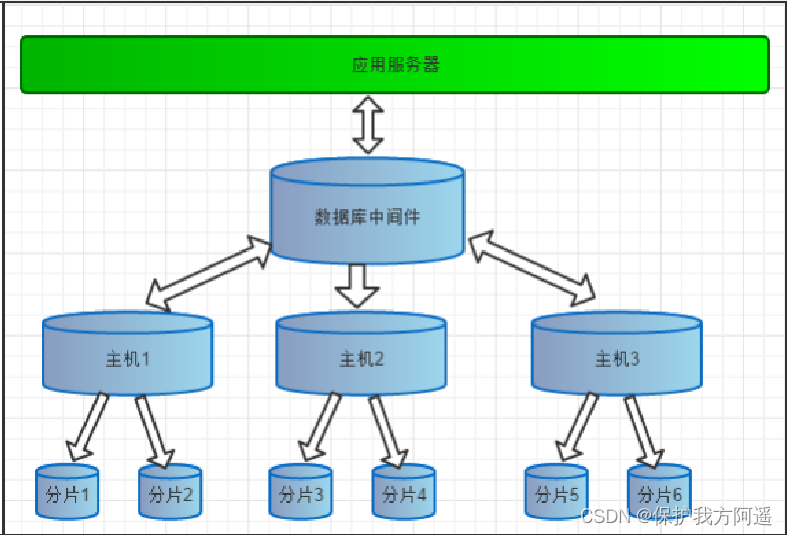
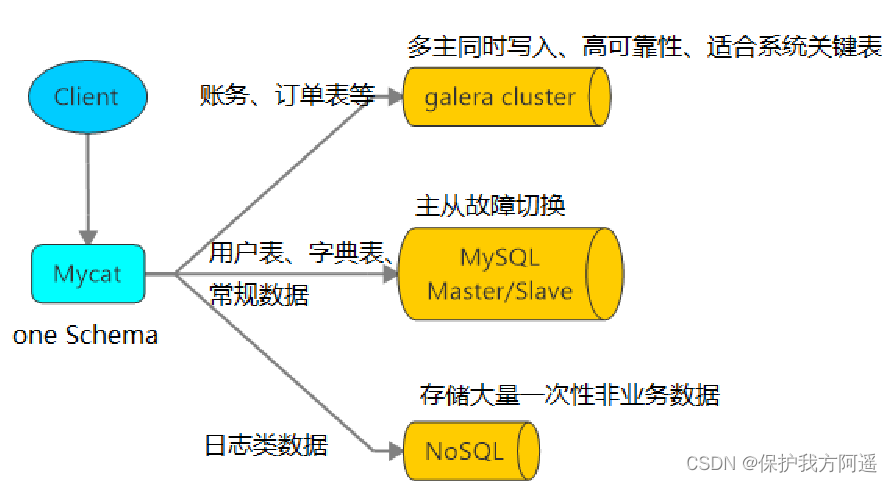
1.2.3. Multiple data source integration
1.3. principle
Mycat The most important verb in the principle of is “ Intercept ”, It intercepts what the user sent SQL sentence , First of all, SQL The statement does some specific analysis : Such as fragment analysis 、 Route analysis 、 Read write separation analysis 、 Cache analysis, etc , And then put this SQL Real database sent to the back end , And will return the results to do the appropriate processing , And finally back to the user .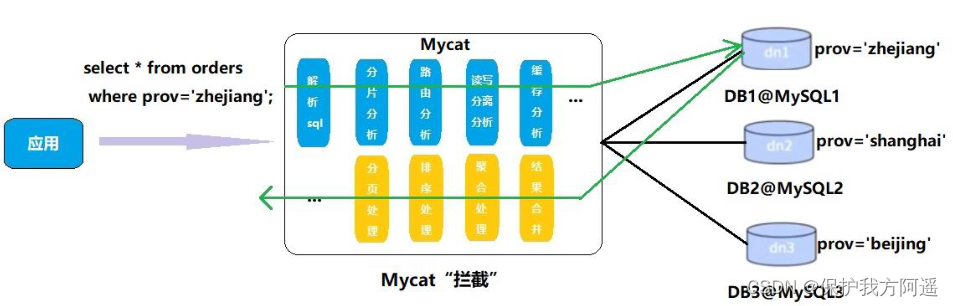
In this way, the distributed database is decoupled from the code , The programmer doesn't notice that it's used in the background Mycat still MySQL.
Two . Installing the
2.1. install
2.1.1. After decompression, you can use
Unzip the file and copy it to linux Next /usr/local/
tar -zxvf Mycat-server-1.6.7.6-release-20210303094759-linux.tar.gz
cp -r mycat /usr/local
2.1.2. Three configuration files
①schema.xml: Define logical library , surface 、 Fragment node and so on
②rule.xml: Define fragmentation rules
③server.xml: Define user and system related variables , Such as port, etc
2.2. start-up
2.2.1. Modify the configuration file server.xml
 <user name="mycat" defaultAccount="true">
                <property name="password">123456</property>
                <property name="schemas">TESTDB</property>
        </user>
2.2.2. Modify the configuration file schema.xml
Delete table information between tags , There's only one label left , There's only one label left , Only one pair left
<?xml version="1.0"?>
<!DOCTYPE mycat:schema SYSTEM "schema.dtd">
<mycat:schema xmlns:mycat="http://io.mycat/">
        <schema name="TESTDB" checkSQLschema="false" sqlMaxLimit="100" dataNode="dn1">
        </schema>
        <dataNode name="dn1" dataHost="host1" database="MYSQLTEST" />
        <dataHost name="host1" maxCon="1000" minCon="10" balance="0"
                          writeType="0" dbType="mysql" dbDriver="native" switchType="1"  slaveThreshold="100">
                <heartbeat>select user()</heartbeat>
                <!-- can have multi write hosts -->
                <writeHost host="hostM1" url="192.168.201.128:3306" user="root"
                                   password="123456">
                                   <readHost host="hostS1" url="192.168.201.129:3306" user="root"
                                password="123456" />
                </writeHost>
         </dataHost>
</mycat:schema>
2.2.3. Verify database access
Mycat As database middleware, it should be deployed on different machines with database , So verify remote access .
mysql -uroot -p123456 -h 192.168.201.128 -P 3306
mysql -uroot -p123456 -h 192.168.201.129 -P 3306
# If remote access reports an error , Please create corresponding user
grant all privileges on *.* to [email protected]' lack of host' identified by '123456';
2.2.4. Start the program
① Console launch : Go to mycat/bin Execute under directory ./mycat console
② Background start : Go to mycat/bin Under the table of contents ./mycat start
In order to see the startup log for the first time , Easy to locate problems , We choose ① Console launch .
2.2.5. An error may occur during startup
If the operating system is CentOS6.8, The domain name resolution failure error may occur , Here's the picture  It can be solved by following the steps below :
① use vim modify /etc/hosts file , stay 127.0.0.1 Add your machine name later
② Restart network service after modification
Be careful : start-up Mycat Must install JDK
2.3. Sign in
2.3.1. Log in to the background management window
This login method is used for management and maintenance Mycat
mysql -umycat -p123456 -P 9066 -h 192.168.201.128
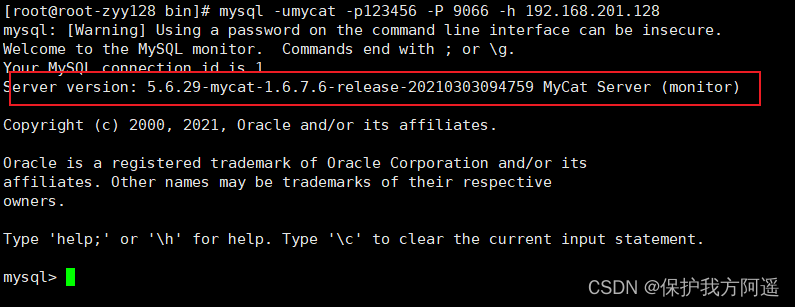
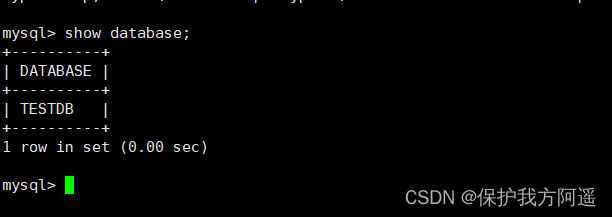
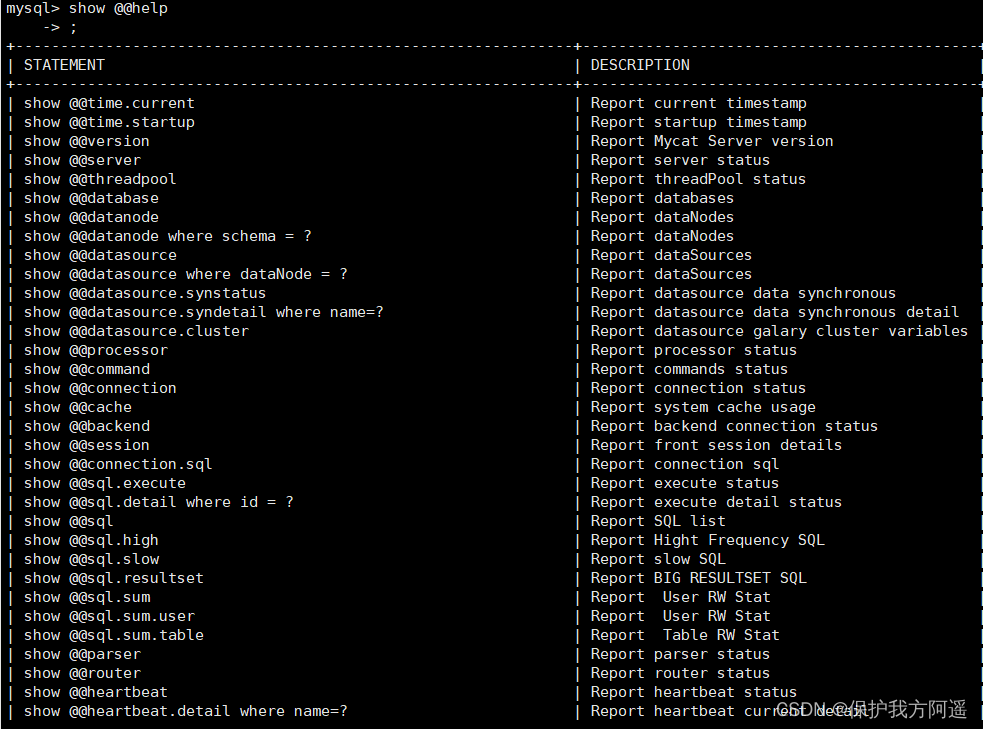
# Common commands are as follows :
show database;
show @@help;
2.3.2. Log in to the data window
This login method is used to log in through Mycat Query data , We choose this way to access Mycat
mysql -umycat -p123456 -P 8066 -h 192.168.201.128
3、 ... and . Set up read-write separation
We go through Mycat and MySQL The master-slave replication of the database is combined with the read-write separation of the database , Realization MySQL High availability . We're going to build : A master from 、 Dual master and dual slave read / write separation modes .
3.1. Build a master and a slave
One host is used to handle all write requests , A slave is responsible for all read requests , The architecture is as follows 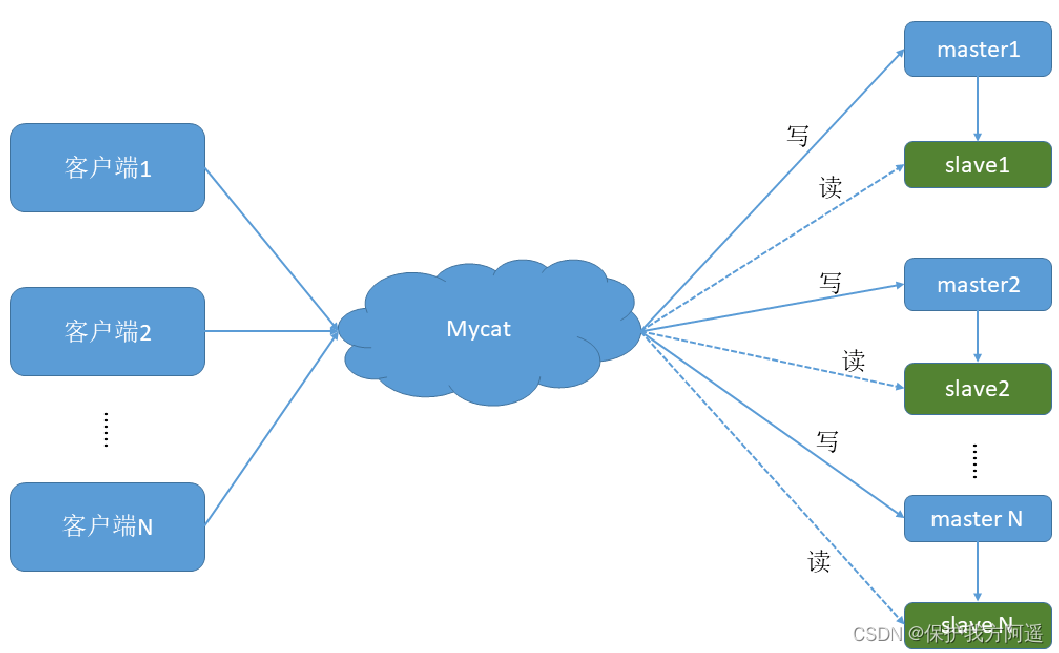
3.1.1. build MySQL Master slave replication of database
stay MySQL35- Master slave copy It says .
3.1.2. modify Mycat Configuration file for schema.xml
The previous configuration has assigned a read-write host , Whether the read-write separation has been realized ?
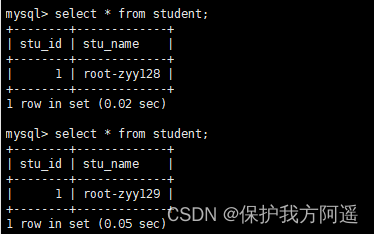
Verify read-write separation :
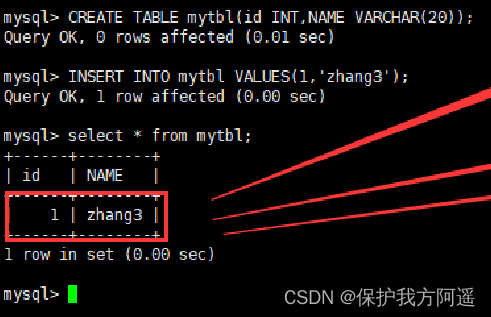
(1) Insert... In the write host :insert into mytbl values (1,@@hostname);
 The master-slave host data is inconsistent
(2) stay Mycat Look in :select * from mytbl;
Modified balance attribute , Use this property to configure the type of read-write separation
 Load balancing type , The current values are 4  Kind of :
(1)balance="0",  Do not turn on the read-write separation mechanism , All read operations are sent to the currently available  writeHost  On .
(2)balance="1", All of the  readHost  And  stand by writeHost  Participate in  select  Statement load balancing , To put it simply , When two masters and two slaves
 Pattern (M1->S1,M2->S2, also  M1  And  M2  Prepare for each other ), Under normal circumstances ,M2,S1,S2  All involved  select  Statement load balancing .
(3)balance="2", All the reading operations are random in  writeHost、readhost  To distribute .
(4)balance="3", All read requests are randomly distributed to  readhost  perform ,writerHost  No pressure to read
In order to see the effect of read-write separation , hold balance Set to 2, The query will be switched between the two hosts
<dataHost name="host1" maxCon="1000" minCon="10" balance="2"
writeType="0" dbType="mysql" dbDriver="native" switchType="1"
slaveThreshold="100">

3.1.3. start-up Mycat
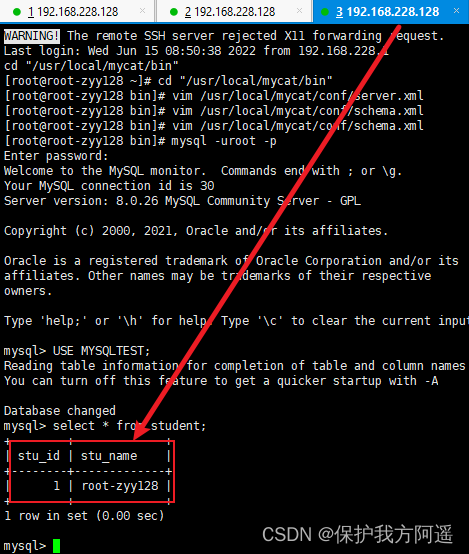
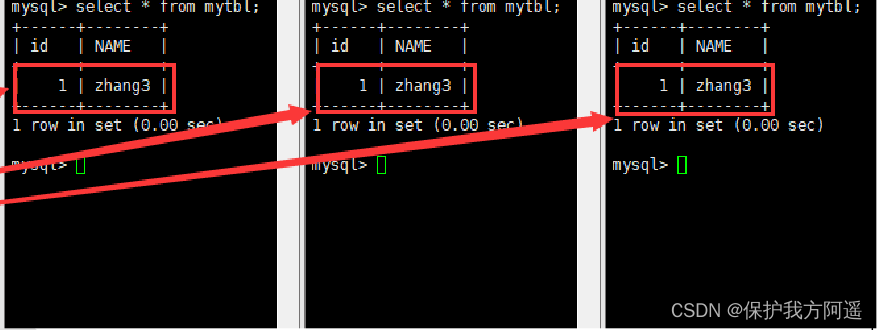
3.1.4. Verify read-write separation
#(1) Writing host database table mytbl Insert data with system variables into , Cause inconsistency between master and slave data
INSERT INTO mytbl VALUES(2,@@hostname);
#(2) stay Mycat Look in mytbl surface , You can see that the query statement switches between the master and slave hosts
3.2. Build double master and double slave
A mainframe m1 Used to handle all write requests , Its slaves s1 And another host m2 And its slaves s2 Responsible for all read requests . When m1 After the host goes down ,m2 The host is responsible for writing requests ,m1、m2 Stand by each other . The architecture is as follows 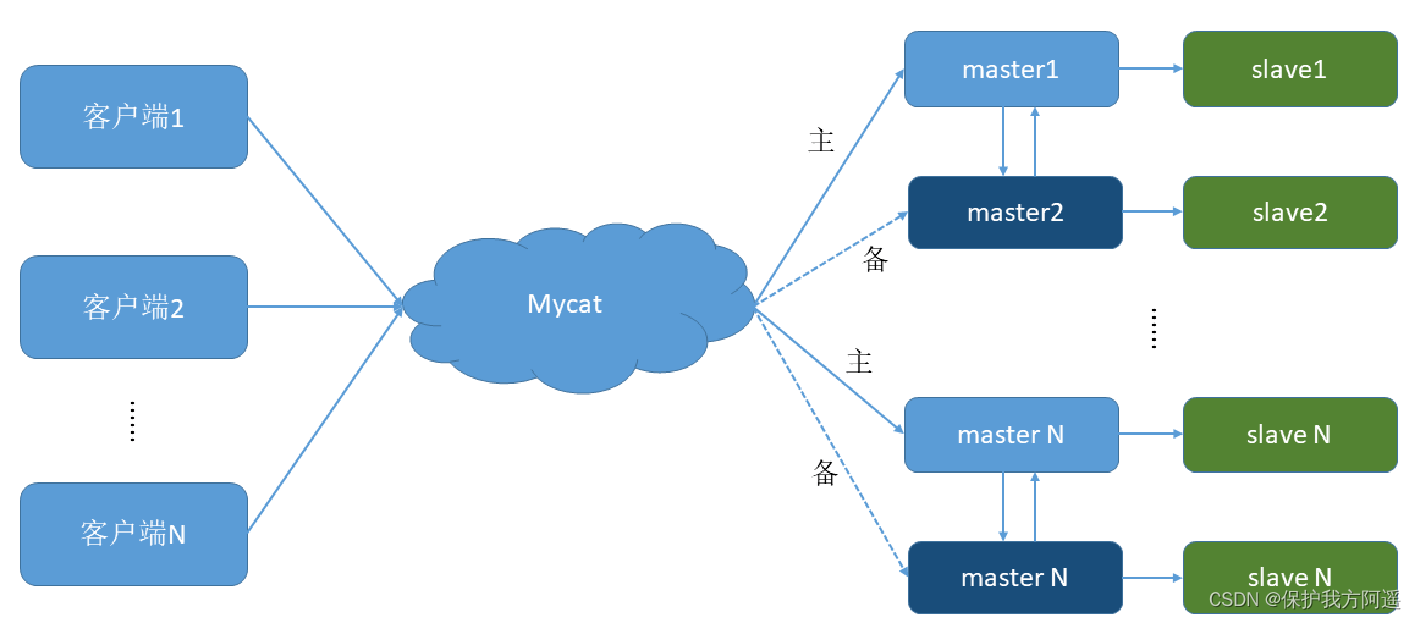
| Number | role | IP Address | machine name |
|---|---|---|---|
| 1 | Master1 | 192.168.201.128 | root-zyy128 |
| 2 | Slave1 | 192.168.201.129 | root-zyy129 |
| 3 | Master2 | 192.168.201.130 | root-zyy130 |
| 4 | Slave2 | 192.168.201.131 | root-zyy131 |
3.2.1. build MySQL Master slave replication of database ( Two masters and two slaves )
① Dual host configuration
Master1 To configure
Modify the configuration file :vim /etc/my.cnf
[mysqld]
#[ Optional ] 0( Default ) Read and write ( host ),1 Indicates read-only ( Slave )
#read-only=0
#[ must ] The primary server is unique ID
server-id=1
#[ must ] Enable binary logging , Named path . such as : My own local path /log/mysqlbin
log-bin="/var/lib/mysql/binlog/zyy128-bin"
# Control the size of a single binary log . The maximum and default values for this parameter are 1GB
max_binlog_size=200M
#[ Optional ] Set up the database not to be copied
binlog-ignore-db=test
#[ Optional ] Set up binlog Format
binlog_format=STATEMENT
#[ Optional ] Set up the database to be copied , Default all records . such as :binlog-do-db=atguigu_master_slave
binlog-do-db=MYSQLTEST
# As a slave database , If there is a write operation, it is also necessary to update the binary log file
log-slave-updates
# Represents the amount of each increment of the self growing field , Refers to the starting value of self growth , The default value is 1, The value range is 1 To 65535
auto-increment-increment=2
# Indicates the number from which the self growing field starts , Refers to how many fields are incremented at a time , The value range is 1 To 65535
auto-increment-offset=1
Master2 To configure
Modify the configuration file :vim /etc/my.cnf
[mysqld]
#[ Optional ] 0( Default ) Read and write ( host ),1 Indicates read-only ( Slave )
#read-only=0
#[ must ] The primary server is unique ID
server-id=3
#[ must ] Enable binary logging , Named path . such as : My own local path /log/mysqlbin
log-bin="/var/lib/mysql/binlog/zyy130-bin"
# Control the size of a single binary log . The maximum and default values for this parameter are 1GB
max_binlog_size=200M
#[ Optional ] Set up the database not to be copied
binlog-ignore-db=test
#[ Optional ] Set up binlog Format
binlog_format=STATEMENT
#[ Optional ] Set up the database to be copied , Default all records . such as :binlog-do-db=atguigu_master_slave
binlog-do-db=MYSQLTEST
# As a slave database , If there is a write operation, it is also necessary to update the binary log file
log-slave-updates
## Represents the amount of each increment of the self growing field , Refers to the starting value of self growth , The default value is 1, The value range is 1 To 65535
auto-increment-increment=2
## Indicates the number from which the self growing field starts , Refers to how many fields are incremented at a time , The value range is 1 To 65535
auto-increment-offset=2
② Dual slave configuration
Slave1 To configure
Modify the configuration file :vim /etc/my.cnf
# From the server only ID
server-id=2
# Enable relay logging
relay-log=mysql-relay
Slave2 To configure
Modify the configuration file :vim /etc/my.cnf
# From the server only ID
server-id=4
# Enable relay logging
relay-log=mysql-relay
③ Dual host 、 Double slave restart mysql service
④ The host and slave turn off the firewall
⑤ Set up accounts on both hosts and authorize mcyat
# Host computer MySQL To carry out the authorization order in the library
GRANT REPLICATION SLAVE ON *.* TO 'mycat'@'%' IDENTIFIED BY '123123';
# Inquire about Master1 The state of
show master status;

# Inquire about Master2 The state of
show master status;

# Record separately File and Position Value
# Do not operate the master server after this step MYSQL, Prevent the state value of the primary server from changing
⑥ Configure the master to be replicated on the slave
Slava1 Copy Master1,Slava2 Copy Master2
# Command to copy host
CHANGE MASTER TO MASTER_HOST=' The host IP Address ',
MASTER_USER='mycat',
MASTER_PASSWORD='123456',
MASTER_LOG_FILE='mysql-bin. Specific figures ',MASTER_LOG_POS= Specific value ;
# Start the replication function of two slave servers
start slave;
# View the status of the slave server
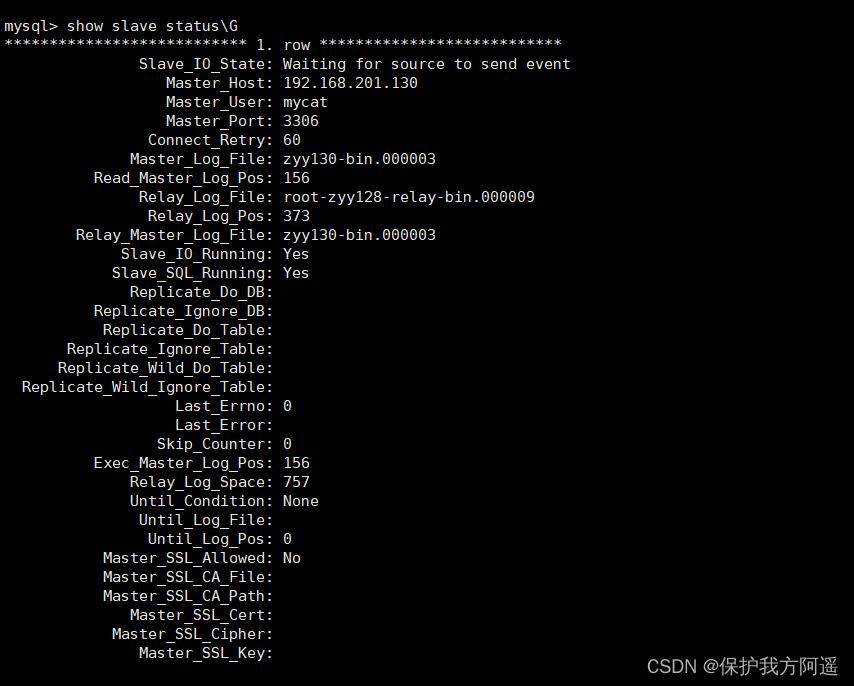
show slave status\G;
# The following two parameters are Yes, The master-slave configuration is successful !
# Slave_IO_Running: Yes
# Slave_SQL_Running: Yes
⑦ Two hosts copy each other
Master2 Copy Master1,Master1 Copy Master2
# Master2 Copy command of
CHANGE MASTER TO MASTER_HOST='192.168.201.128',MASTER_USER='mycat',MASTER_PASSWORD='123456',MASTER_LOG_FILE='zyy130-bin.000002',MASTER_LOG_POS=156;
# Master1 Copy command of
CHANGE MASTER TO MASTER_HOST='192.168.201.128',MASTER_USER='mycat',MASTER_PASSWORD='123456',MASTER_LOG_FILE='zyy128-bin.000001',MASTER_LOG_POS=156;
# Start the replication function of two master servers
start slave;
# View the status of the slave server
show slave status\G;
⑧ Master1 Host new library 、 new table 、insert Record ,Master2 And slave copy
USE MYSQLTEST;
⑨ How to stop replication from the service
stop slave;
⑩ How to reconfigure master-slave
stop slave;
reset master;
3.3. modify Mycat Configuration file for schema.xml
Modified balance attribute , Use this property to configure the type of read-write separation
 Load balancing type , The current values are 4  Kind of :
(1)balance="0",  Do not turn on the read-write separation mechanism , All read operations are sent to the currently available  writeHost  On .
(2)balance="1", All of the  readHost  And  stand by writeHost  Participate in  select  Statement load balancing , To put it simply , When two masters and two slaves
 Pattern (M1->S1,M2->S2, also  M1  And  M2  Prepare for each other ), Under normal circumstances ,M2,S1,S2  All involved  select  Statement load balancing .
(3)balance="2", All the reading operations are random in  writeHost、readhost  To distribute .
(4)balance="3", All read requests are randomly distributed to  readhost  perform ,writerHost  No pressure to read
For dual master and dual slave read-write separation balance Set to 1
...

<?xml version="1.0"?>
<!DOCTYPE mycat:schema SYSTEM "schema.dtd">
<mycat:schema xmlns:mycat="http://io.mycat/">
        <schema name="TESTDB" checkSQLschema="false" sqlMaxLimit="100" dataNode="dn1">
        </schema>
        <dataNode name="dn1" dataHost="host1" database="MYSQLTEST" />
        <dataHost name="host1" maxCon="1000" minCon="10" balance="2"
                          writeType="0" dbType="mysql" dbDriver="native" switchType="1"  slaveThreshold="100">
                <heartbeat>select user()</heartbeat>
                <!-- can have multi write hosts -->
                <writeHost host="hostM1" url="192.168.228.128:3306" user="root"
                                   password="123456">
                                   <readHost host="hostS1" url="192.168.228.129:3306" user="root"
                                password="123456" />
                </writeHost>
         </dataHost>
</mycat:schema>

...
#balance="1":  All of the readHost And stand by writeHost Participate in select Statement load balancing .
#writeType="0":  All writes are sent to the first of the configuration writeHost, The first one is cut to the second one that still exists
#writeType="1", All writes are sent randomly to the configured  writeHost,1.5  It is not recommended to discard it later
#writeHost, After restart, the one after switching shall prevail , The switch is recorded in the configuration file :dnindex.properties .
#switchType="1": 1  The default value is , Automatic switch .
# -1  Does not automatically switch
# 2  be based on  MySQL  The state of master-slave synchronization determines whether to switch .
3.4. start-up Mycat
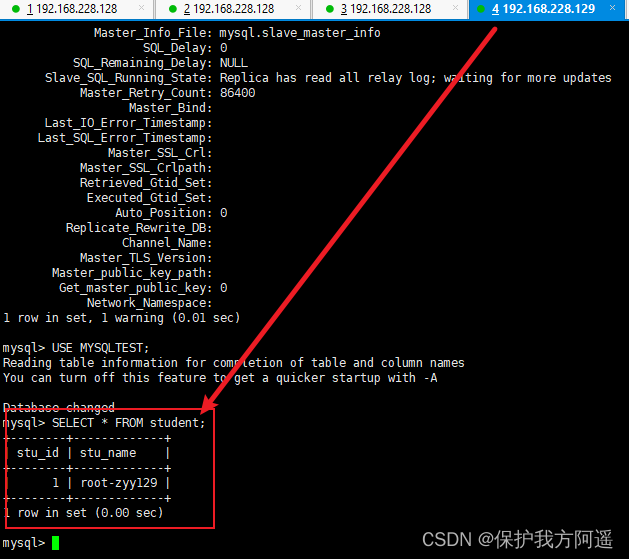
3.5. Verify read-write separation
# Writing to host Master1 Database table mytbl Insert data with system variables into , Cause inconsistency between master and slave data
INSERT INTO mytbl VALUES(3,@@hostname);
# stay Mycat Look in mytbl surface , You can see the query statement in Master2(host130)、Slava1(host129)、Slava2(host131) Switching between master and slave hosts
3.5. Resistance to risk
# Stop database Master1
systemctl stop mysqld
# stay Mycat Inserting data into the is still successful ,Master2 Automatically switch to write host
INSERT INTO mytbl VALUES(3,@@hostname);
# Start database Master1
systemctl start mysqld
# stay Mycat Look in mytbl surface , You can see the query statement in Master1(host128)、Slava1(host129)、Slava2(host131) Switching between master and slave hosts
Master1、Master2 Mutual standby , The host responsible for writing is down , The standby switch is responsible for writing , Ensure the separation of database reading and writing and high availability .
Four . Split Vertically —— sub-treasury
A database is made up of many tables , Each table corresponds to a different business , Vertical segmentation refers to the classification of tables according to business , Distributed to different The database above , In this way, data or pressure will be shared among different databases , Here's the picture :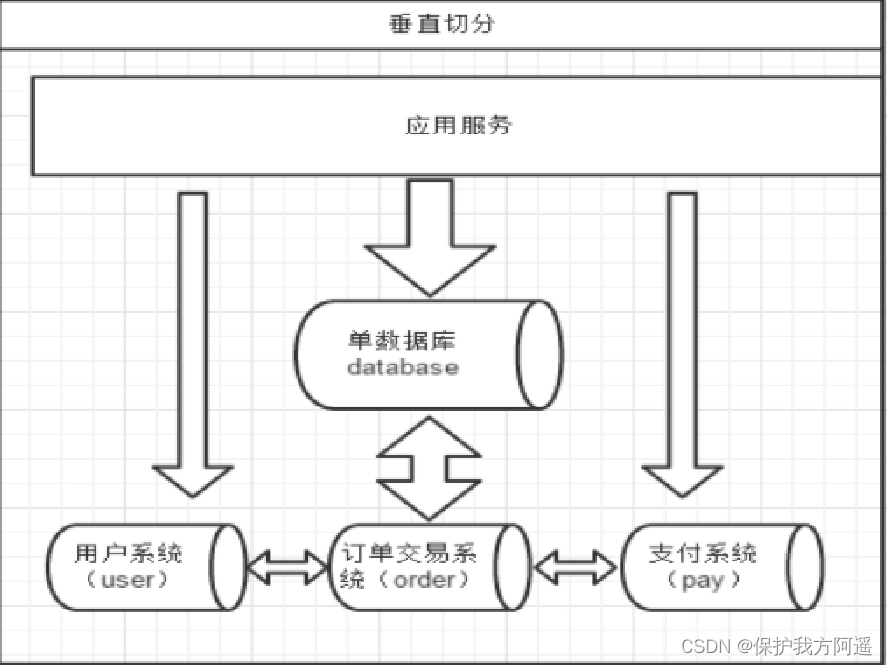
The system is divided into , user , Order transaction , Pay for several modules .
4.1. How to divide tables
A problem : Tables in two databases on two hosts , Can the query be associated ?
answer : It is not allowed to associate queries .
The principle of sub database : Closely related tables should be in a library , Tables that are not related to each other can be divided into different libraries .
# Customer list  rows:20 ten thousand
CREATE TABLE customer(
id INT AUTO_INCREMENT,
NAME VARCHAR(200),
PRIMARY KEY(id)
);
# The order sheet  rows:600 ten thousand
CREATE TABLE orders(
id INT AUTO_INCREMENT,
order_type INT,
customer_id INT,
amount DECIMAL(10,2),
PRIMARY KEY(id));

# Order details  rows:600 ten thousand
CREATE TABLE orders_detail(
id INT AUTO_INCREMENT,
detail VARCHAR(2000),
order_id INT,
PRIMARY KEY(id)
);
# Order status dictionary table  rows:20
CREATE TABLE dict_order_type(
id INT AUTO_INCREMENT,
order_type VARCHAR(200),
PRIMARY KEY(id)
);
How to divide the above four tables ? The customer table is divided into a database , The other three need to be associated with the query , In another database .
4.2. Realize the sub library
4.2.1. modify schema The configuration file
<mycat:schema xmlns:mycat="http://io.mycat/">

        <schema name="TESTDB" checkSQLschema="false" sqlMaxLimit="100" dataNode="dn1">
                <table name="customer" dataNode="dn2"></table>
        </schema>
        <dataNode name="dn1" dataHost="host1" database="orders" />
        <dataNode name="dn2" dataHost="host2" database="orders" />
        <dataHost name="host1" maxCon="1000" minCon="10" balance="0"
                          writeType="0" dbType="mysql" dbDriver="native" switchType="1"  slaveThreshold="100">
                <heartbeat>select user()</heartbeat>
                <!-- can have multi write hosts -->
                <writeHost host="hostM1" url="192.168.201.128:3306" user="mycat"
                                   password="123456">
                </writeHost>
         </dataHost>
        <dataHost name="host2" maxCon="1000" minCon="10" balance="0"
                          writeType="0" dbType="mysql" dbDriver="native" switchType="1"  slaveThreshold="100">
                <heartbeat>select user()</heartbeat>
                <!-- can have multi write hosts -->
                <writeHost host="hostM1" url="192.168.201.130:3306" user="mycat"
                                   password="123456">
                </writeHost>
        </dataHost>
</mycat:schema>
4.2.2. Add two blank Libraries
Sub database operation is not in the original old database operation , Two machines need to be prepared to install the new database
# At the data node dn1、dn2 Create databases separately on orders
CREATE DATABASE orders;
4.2.3. start-up Mycat
./mycat console

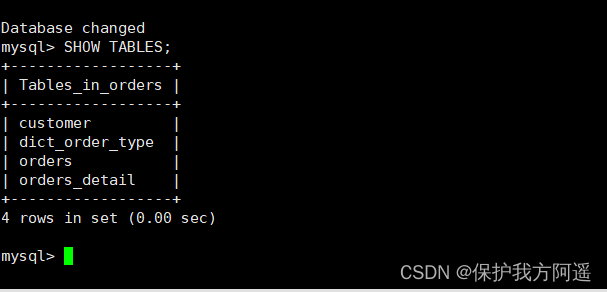
4.2.4. visit Mycat Carry out the sub Library
# visit Mycat
mysql -umycat -p123456 -h 192.168.201.128 -P 8066
# Switch to TESTDB
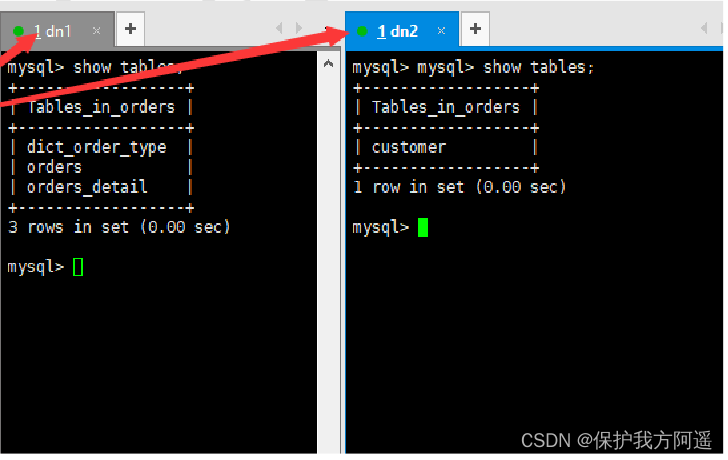
# establish 4 A watch
# View table information , You can see the successful sub database
5、 ... and . Horizontal split —— table
Split relative to vertical , Horizontal splitting is not about classifying tables , But according to a certain rule of a certain field, it is scattered into multiple libraries , In each table Contains some data . Simply speaking , We can understand the horizontal segmentation of data as the segmentation of data lines , It is to split some rows in a table To a database , And some of the other rows are split into other databases , Pictured :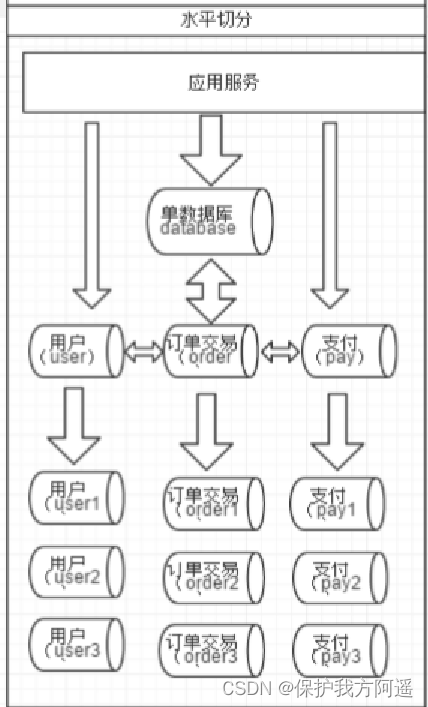
5.1. Realize the sub table
5.1.1. Select the table to split
MySQL There is a bottleneck in the number of data stored in a single table , A single table achieves 1000 Ten thousand pieces of data have reached the bottleneck , It will affect the query efficiency , It needs to be split horizontally ( table ) To optimize .
for example : In the example orders、orders_detail Have reached 600 Ten thousand rows of data , We need to optimize the sub table .
5.1.2. Sub table field
With orders Table as an example , You can divide tables according to different self fields
| Number | Sub table field | effect |
|---|---|---|
| 1 | id( Primary key 、 Or creation time ) | Order query focuses on timeliness , Historical orders are queried less often , Such fragmentation will cause one node to access multiple nodes , One question less , Uneven . |
| 2 | customer_id( Customer id) | According to the customer id Disjunction , The average number of accesses between the two nodes , All orders of a customer are in the same node |
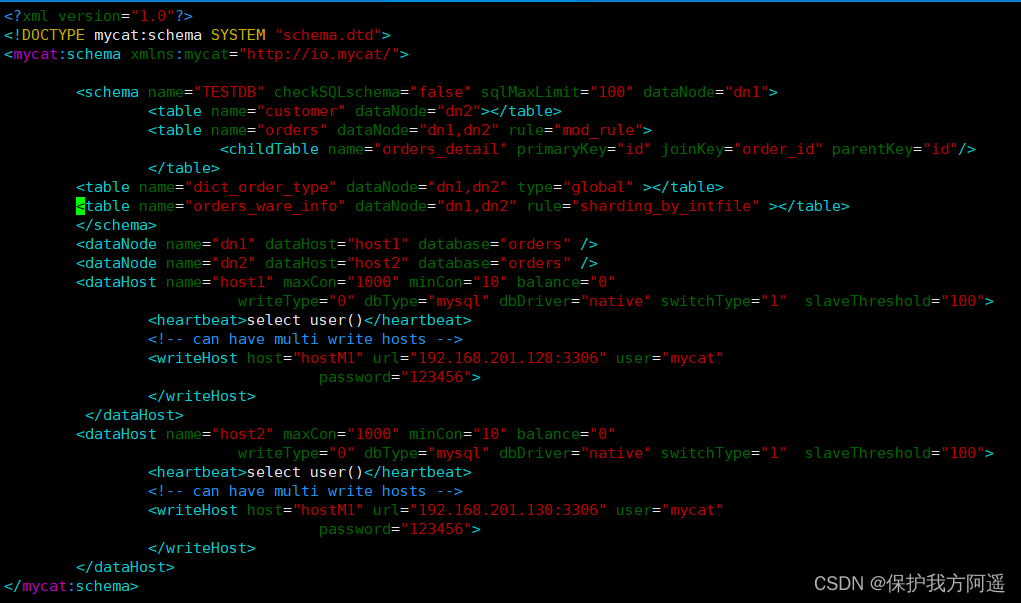
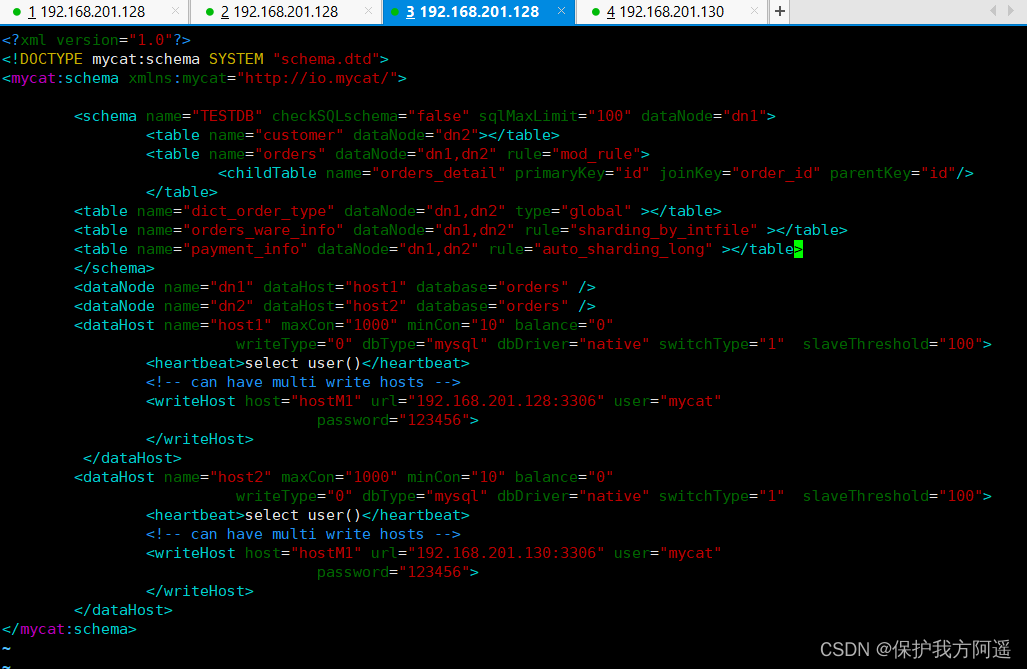
5.1.3. Modify the configuration file schema.xml
# by orders Table set the data node to dn1、dn2, And specify the partition rule as mod_rule( Custom name )
<table name="orders" dataNode="dn1,dn2" rule="mod_rule" ></table>
# Here's the picture 
5.1.4. Modify the configuration file rule.xml
# stay  rule  Add fragmentation rules to the configuration file  mod_rule, And specify the rule for the field  customer_id,
# There are also selective slicing algorithms  mod-long( Moduling fields ),customer_id  Moduling two nodes , Slice according to the results
# Configuration algorithm  mod-long  Parameters  count  by  2, Two nodes
<tableRule name="mod_rule">
<rule>
<columns>customer_id</columns>
<algorithm>mod-long</algorithm>
</rule>
</tableRule>
<function name="mod-long" class="io.mycat.route.function.PartitionByMod">
<!-- how many data nodes -->
<property name="count">2</property>
</function>
# Here's the picture :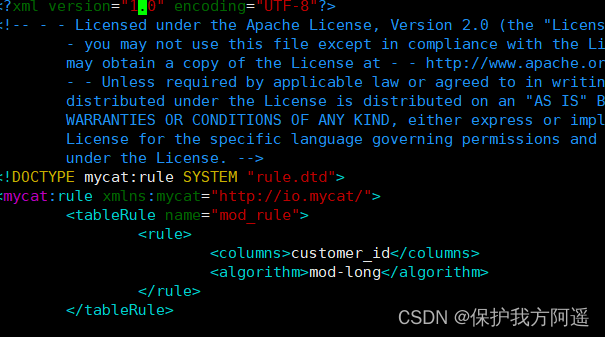

5.1.5. At the data node dn2 Shangjian orders surface
5.1.6. restart Mycat, Make the configuration work
5.1.7. visit Mycat Realize fragmentation
# stay  mycat  Inward  orders  Table insert data ,INSERT  Fields cannot be omitted
INSERT INTO orders(id,order_type,customer_id,amount) VALUES (1,101,100,100100);
INSERT INTO orders(id,order_type,customer_id,amount) VALUES(2,101,100,100300);
INSERT INTO orders(id,order_type,customer_id,amount) VALUES(3,101,101,120000);
INSERT INTO orders(id,order_type,customer_id,amount) VALUES(4,101,101,103000);
INSERT INTO orders(id,order_type,customer_id,amount) VALUES(5,102,101,100400);
INSERT INTO orders(id,order_type,customer_id,amount) VALUES(6,102,100,100020);
# stay mycat、dn1、dn2 View in orders Table data , Sub table success 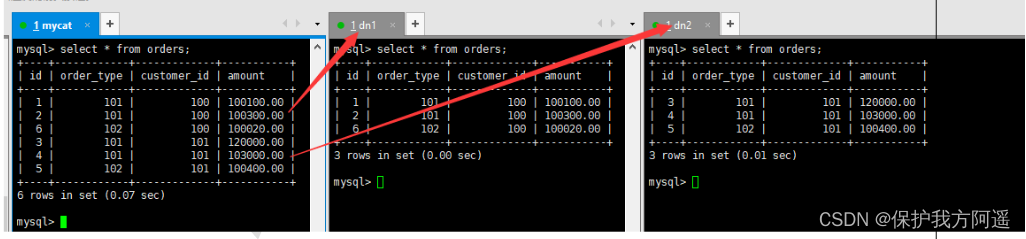
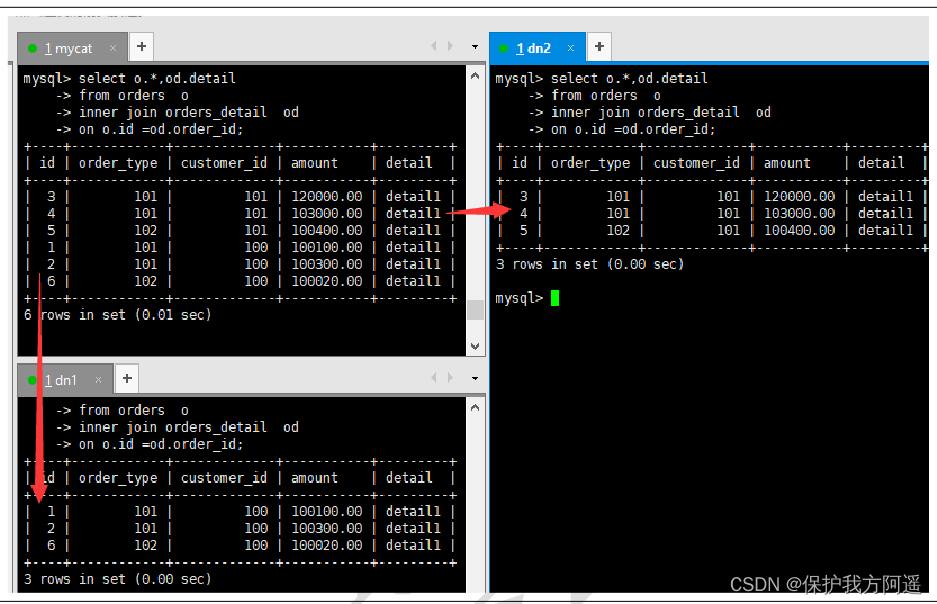
5.2. Mycat The fragmentation of “join”
Orders The order table has been divided into different tables , It's associated with orders_detail How to proceed with the order details form join Inquire about .
We need to orders_detail We also need to do slicing .Join The principle is shown in the figure below :
5.2.1. ER surface
Mycat Learn from it NewSQL A rookie in the field Foundation DB Design idea ,Foundation DB Innovatively put forward Table Group The concept of , It depends on the storage location of the child table on the main table , And physically close to each other , So it completely solved JION The efficiency and performance of topic , According to this idea , Based on E-R Data fragmentation strategy for relationships , The records of the child table and the associated parent table are stored in the same data fragment .
# modify schema.xml The configuration file
<table name="orders" dataNode="dn1,dn2" rule="mod_rule" >
<childTable name="orders_detail" primaryKey="id" joinKey="order_id" parentKey="id" />
</table>

# stay  dn2  establish  orders_detail  surface
# restart  Mycat
# visit  Mycat  towards  orders_detail  Table insert data
INSERT INTO orders_detail(id,detail,order_id) values(1,'detail1',1);
INSERT INTO orders_detail(id,detail,order_id) VALUES(2,'detail1',2);
INSERT INTO orders_detail(id,detail,order_id) VALUES(3,'detail1',3);
INSERT INTO orders_detail(id,detail,order_id) VALUES(4,'detail1',4);
INSERT INTO orders_detail(id,detail,order_id) VALUES(5,'detail1',5);
INSERT INTO orders_detail(id,detail,order_id) VALUES(6,'detail1',6);
# stay mycat、dn1、dn2 Run two tables in join sentence
Select o.*,od.detail from orders o inner join orders_detail od on o.id=od.order_id;
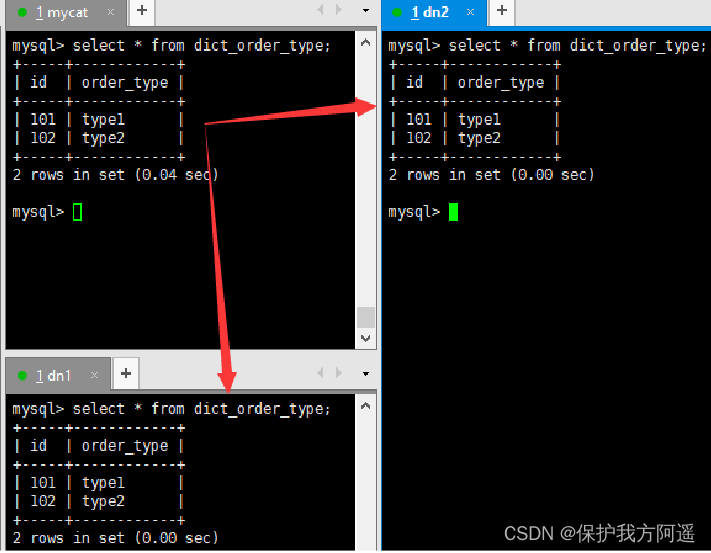
5.2.2. Global table
In the case of fragmentation , When the business table is fragmented due to its size , The association between business tables and these attached dictionary tables , It becomes a comparison A tricky question , Consider the following features of a dictionary table :
① Changes are not frequent .
② The total amount of data has not changed much .
③ The data is not big , There are rarely more than a hundred thousand records .
In view of this ,Mycat A special table is defined , be called “ Global table ”, The global table has the following properties :
① Insert global table 、 The update operation will be performed on all nodes in real time , Keep the data consistency of each segment .
② Query operation of global table , Get... From only one node .
③ The global table can follow any table JOIN operation .
Define a dictionary table or some tables that conform to the characteristics of a dictionary table as a global table , On the other hand , Well solved the data JOIN The problem of . Through the global table + be based on E-R The segmentation strategy of relationship ,Mycat You can meet 80% The above enterprise application development .
# modify schema.xml The configuration file
<table name="orders" dataNode="dn1,dn2" rule="mod_rule" >
<childTable name="orders_detail" primaryKey="id" joinKey="order_id" parentKey="id" />
</table>
<table name="dict_order_type" dataNode="dn1,dn2" type="global" ></table>

# stay  dn2  establish  dict_order_type  surface
# restart  Mycat
# visit  Mycat  towards  dict_order_type  Table insert data
INSERT INTO dict_order_type(id,order_type) VALUES(101,'type1');
INSERT INTO dict_order_type(id,order_type) VALUES(102,'type2');
# stay Mycat、dn1、dn2 Query table data in
select * from dict_order_type;
5.3. Commonly used fragmentation rules
5.3.1. modulus
This rule is for the calculation of segmented fields . It is also the most commonly used rule of horizontal sub table .5.1 In the configuration sub table ,orders Table applies this rule .
5.3.2. Piecewise enumeration
By configuring possible enumerations in the configuration file id, Make your own configuration , This rule applies to specific scenarios , For example, some businesses need to be preserved according to provinces or districts , And all the provinces and counties in China have fixed , This kind of business uses this rule .
(1) modify schema.xml The configuration file
<table name="orders_ware_info" dataNode="dn1,dn2" rule="sharding_by_intfile" ></table>
(2) modify rule.xml The configuration file
<tableRule name="sharding_by_intfile">
	<rule>
			<columns>areacode</columns>
			<algorithm>hash-int</algorithm>
	</rule>
</tableRule>

<function name="hash-int"
		class="io.mycat.route.function.PartitionByFileMap">
		<property name="mapFile">partition-hash-int.txt</property>
		<property name="type">1</property>
		<property name="defaultNode">0</property>
</function>
# columns: Fragment field ,algorithm: Piecewise functions
# mapFile: Identify the profile name ,type:0 by int type 、 Not 0 by String,
#defaultNode: Default node : Less than  0  Indicates that the default node is not set , Greater than or equal to  0  Indicates setting the default node ,
#  Set the default node if it encounters an unrecognized enumeration value , Just route it to the default node , If it is not set, an error will be reported
(3) modify partition-hash-int.txt The configuration file
110=0
120=1
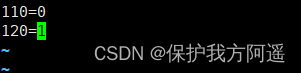
(4) restart Mycat
(5) visit Mycat Create table
# Information table of the region where the order belongs
CREATE TABLE orders_ware_info
(
`id` INT AUTO_INCREMENT comment ' Number ',
`order_id` INT comment ' The order no. ',
`address` VARCHAR(200) comment ' Address ',
`areacode` VARCHAR(20) comment ' Area number ',
PRIMARY KEY(id)
);

(6) insert data
INSERT INTO ORDERS_WARE_INFO(id, order_id,address,areacode) VALUES (1,1,' Beijing ','110');
INSERT INTO ORDERS_WARE_INFO(id, order_id,address,areacode) VALUES (2,2,' tianjin ','120');
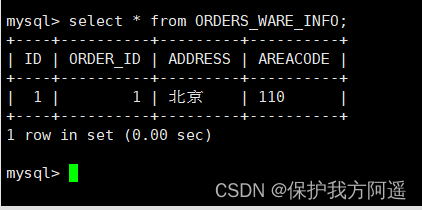
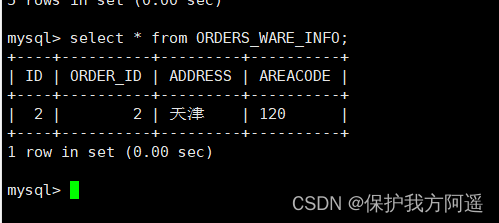
(7) Inquire about Mycat、dn1、dn2 You can see the effect of data fragmentation 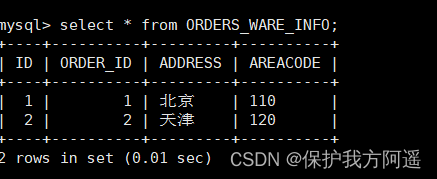
5.3.3. Scope agreement
This partition is applicable to , Plan in advance which partition field belongs to .
(1) modify schema.xml The configuration file
<table name="payment_info" dataNode="dn1,dn2" rule="auto_sharding_long" ></table>
(2) modify rule.xml The configuration file
<tableRule name="auto_sharding_long">
<rule>
<columns>order_id</columns>
<algorithm>rang-long</algorithm>
</rule>
</tableRule>
...
<function name="rang-long"
class="io.mycat.route.function.AutoPartitionByLong">
<property name="mapFile">autopartition-long.txt</property>
<property name="defaultNode">0</property>
</function>
# columns: Fragment field ,algorithm: Piecewise functions
# mapFile: Identify the profile name
#defaultNode: Default node : Less than  0  Indicates that the default node is not set , Greater than or equal to  0  Indicates setting the default node ,
#  Set the default node if it encounters an unrecognized enumeration value , Just route it to the default node , If you don't set no recognition
 Report errors
(3) modify autopartition-long.txt The configuration file
vim conf/autopartition-long.txt

0-102=0
103-200=1
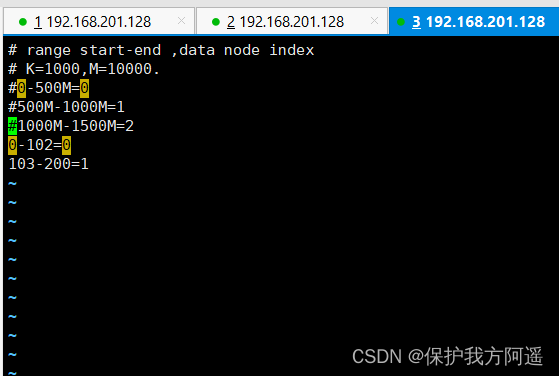
notes : Need to put mycat Take out the three lines that come with you , Otherwise, it will report a mistake !!!
(4) restart Mycat
(5) visit Mycat Create table
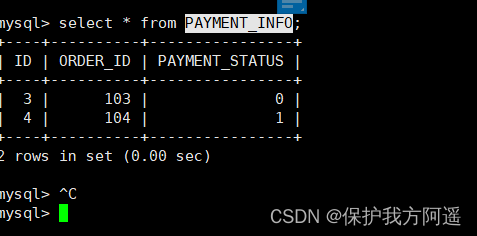
CREATE TABLE payment_info
(
`id` INT AUTO_INCREMENT comment ' Number ',
`order_id` INT comment ' The order no. ',
`payment_status` INT comment ' Payment status ',
PRIMARY KEY(id)
);
(6) insert data
INSERT INTO PAYMENT_INFO(id,order_id,payment_status) VALUES (1,101,0);
INSERT INTO PAYMENT_INFO(id,order_id,payment_status) VALUES (2,102,1);
INSERT INTO PAYMENT_INFO(id,order_id ,payment_status) VALUES (3,103,0);
INSERT INTO PAYMENT_INFO(id,order_id,payment_status) VALUES (4,104,1);
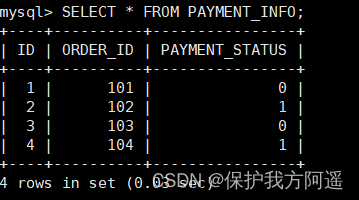
(7) Inquire about Mycat、dn1、dn2 You can see the effect of data fragmentation 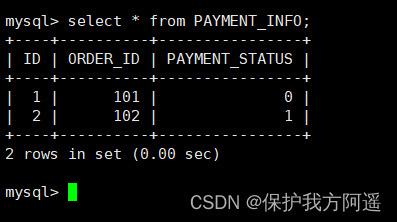
5.3.4. By date ( God ) Fragmentation
This rule is divided by day . Set the time format 、 Range
(1) modify schema.xml The configuration file
<table name="login_info" dataNode="dn1,dn2" rule="sharding_by_date" ></table>
(2) modify rule.xml The configuration file
<tableRule name="sharding_by_date">
<rule>
<columns>login_date</columns>
<algorithm>shardingByDate</algorithm>
</rule>
</tableRule>
...
<function name="shardingByDate" class="io.mycat.route.function.PartitionByDate">
<property name="dateFormat">yyyy-MM-dd</property>
<property name="sBeginDate">2019-01-01</property>
<property name="sEndDate">2019-01-04</property>
<property name="sPartionDay">2</property>
</function>
# columns: Fragment field ,algorithm: Piecewise functions
#dateFormat : Date format
#sBeginDate : Start date
#sEndDate: End date , Then it represents that the data reaches the partition of the date, and then the loop starts from the partition insertion
#sPartionDay : Partition days , From the start date by default , Separate  2  Day one division
(3) restart Mycat
(4) visit Mycat Create table
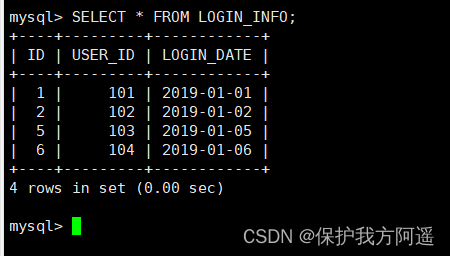
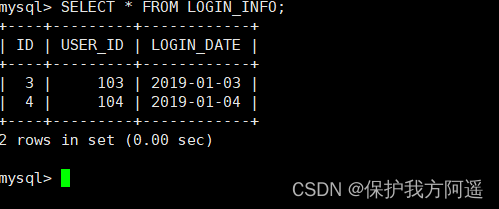
CREATE TABLE LOGIN_INFO
(
`id` INT AUTO_INCREMENT comment ' Number ',
`user_id` INT comment ' The user id ',
`login_date` date comment ' Login date ',
PRIMARY KEY(id)
);
(6) insert data
INSERT INTO LOGIN_INFO(id,user_id,login_date) VALUES (1,101,'2019-01-01');
INSERT INTO LOGIN_INFO(id,user_id,login_date) VALUES (2,102,'2019-01-02');
INSERT INTO LOGIN_INFO(id,user_id,login_date) VALUES (3,103,'2019-01-03');
INSERT INTO LOGIN_INFO(id,user_id,login_date) VALUES (4,104,'2019-01-04');
INSERT INTO LOGIN_INFO(id,user_id,login_date) VALUES (5,103,'2019-01-05');
INSERT INTO LOGIN_INFO(id,user_id,login_date) VALUES (6,104,'2019-01-06');
(7) Inquire about Mycat、dn1、dn2 You can see the effect of data fragmentation 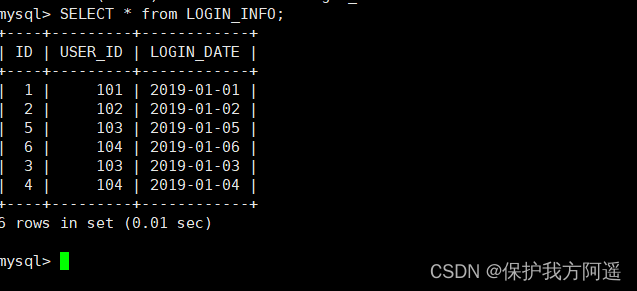
5.4. Global sequence
In the case of implementing sub database and sub table , Database auto increment primary key can't guarantee the global uniqueness of auto increment primary key . So ,Mycat Provides the overall picture sequence, And provides a variety of implementation methods including local configuration and database configuration .
5.4.1. Local files
This way Mycat take sequence Configure to a file , When used to sequence After configuration in ,Mycat It will be worse classpath Medium sequence_conf.properties In file sequence The current value .
① advantage : Local load , Read faster
② shortcoming : Poor risk resistance ,Mycat After the host machine goes down , Unable to read local file .
5.4.2. Database mode
Using a table in a database To count and accumulate . But not every time a sequence is generated it reads and writes to the database , That's inefficient .Mycat Some segments will be preloaded to Mycat The memory of the , In this way, most of the read and write sequences are completed in memory . If you run out of segments in memory Mycat Will ask the database again .
ask : Then if Mycat collapsed , The sequence in the memory is not gone ?
Yes . If so , that Mycat After startup, it will apply to the database for a new segment , The original segment will be discarded .
That is to say if Mycat restart , Then the loss is the number of the current segment that has not been used up , So the primary key doesn't repeat
① Library creation sequence script
# stay dn1 Create a global sequence table on
CREATE TABLE MYCAT_SEQUENCE (NAME VARCHAR(50) NOT NULL,current_value INT NOT
NULL,increment INT NOT NULL DEFAULT 100, PRIMARY KEY(NAME)) ENGINE=INNODB;
# The function required to create a global sequence
DELIMITER $$
CREATE FUNCTION mycat_seq_currval(seq_name VARCHAR(50)) RETURNS VARCHAR(64)
DETERMINISTIC
BEGIN
DECLARE retval VARCHAR(64);
SET retval="-999999999,null";
SELECT CONCAT(CAST(current_value AS CHAR),",",CAST(increment AS CHAR)) INTO retval FROM
MYCAT_SEQUENCE WHERE NAME = seq_name;
RETURN retval;
END $$
DELIMITER ;
DELIMITER $$
CREATE FUNCTION mycat_seq_setval(seq_name VARCHAR(50),VALUE INTEGER) RETURNS
VARCHAR(64)
DETERMINISTIC
BEGIN
UPDATE MYCAT_SEQUENCE
SET current_value = VALUE
WHERE NAME = seq_name;
RETURN mycat_seq_currval(seq_name);
END $$
DELIMITER ;
DELIMITER $$
CREATE FUNCTION mycat_seq_nextval(seq_name VARCHAR(50)) RETURNS VARCHAR(64)
DETERMINISTIC
BEGIN
UPDATE MYCAT_SEQUENCE
SET current_value = current_value + increment WHERE NAME = seq_name;
RETURN mycat_seq_currval(seq_name);
END $$
DELIMITER ;
# Initialize sequence table record
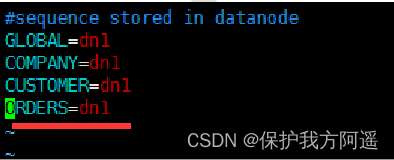
INSERT INTO MYCAT_SEQUENCE(NAME,current_value,increment) VALUES ('ORDERS', 400000,100);
② modify Mycat To configure
# modify sequence_db_conf.properties
vim sequence_db_conf.properties
# intend  ORDERS This sequence is in dn1 On this node , Specifically dn1 Which machine is the node , Please refer to schema.xml
# modify server.xml
vim server.xml
# Global sequence type :0- Local files ,1- Database mode ,2- Time stamp method . This should be changed to 1.

③ restart Mycat
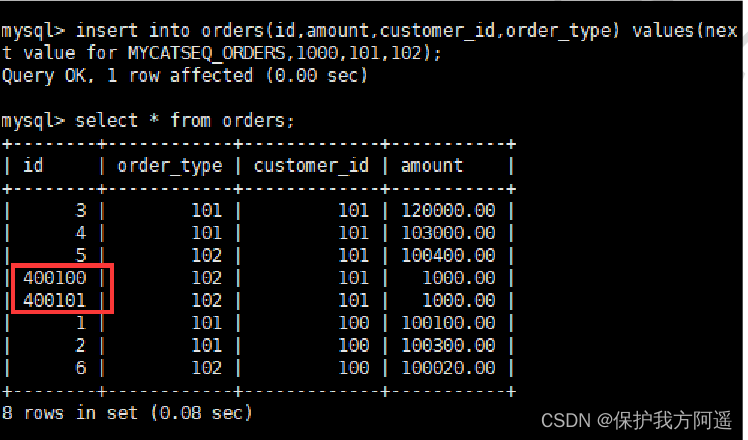
④ Verify the global sequence
# Sign in  Mycat, insert data
insert into orders(id,amount,customer_id,order_type) values(next value for
MYCATSEQ_ORDERS,1000,101,102);
# Query data
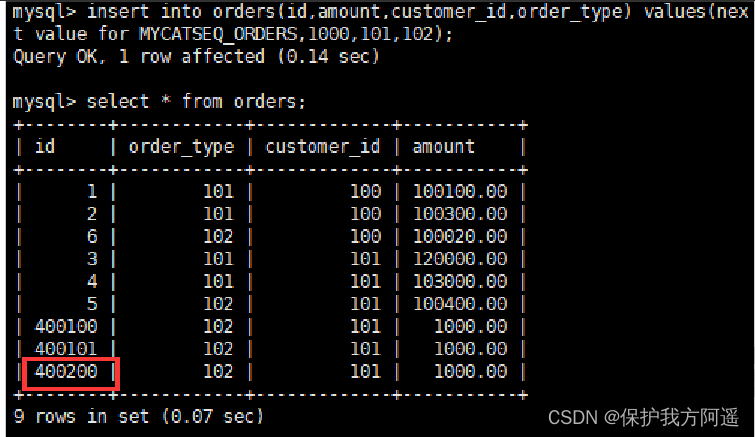
# restart Mycat after , Insert data again , The query again
5.4.3. Time stamp method
Global sequence ID= 64 Bit binary (42( millisecond )+5( machine ID)+5( Business coding )+12( Add up again and again ) Convert to decimal to 18 In figures long type , Every millisecond can be concurrent 12 The accumulation of bits and bits .
① advantage : Simple configuration
② shortcoming :18 position ID Too long
5.4.4. Self generated global sequence
Can be found in java Generate the global sequence in the project , as follows :
① According to the business logic
② You can use redis Single thread atomicity of incr To generate a sequence , But autonomous generation needs to be used separately in the project java Code implementation , Still recommended Mycat With its own global sequence .
6、 ... and . be based on HA The mechanism Mycat High availability
In the actual project ,Mycat Services also need to consider high availability , If Mycat The server is down , or Mycat Service failure , A standby machine is needed to provide services , You need to consider Mycat colony .
6.1. High availability solution
We can use HAProxy + Keepalived With two Mycat Set up Mycat colony , Achieve high availability .HAProxy Realized MyCat Multi node cluster high availability and load balancing , and HAProxy Its high availability can be achieved through Keepalived To achieve .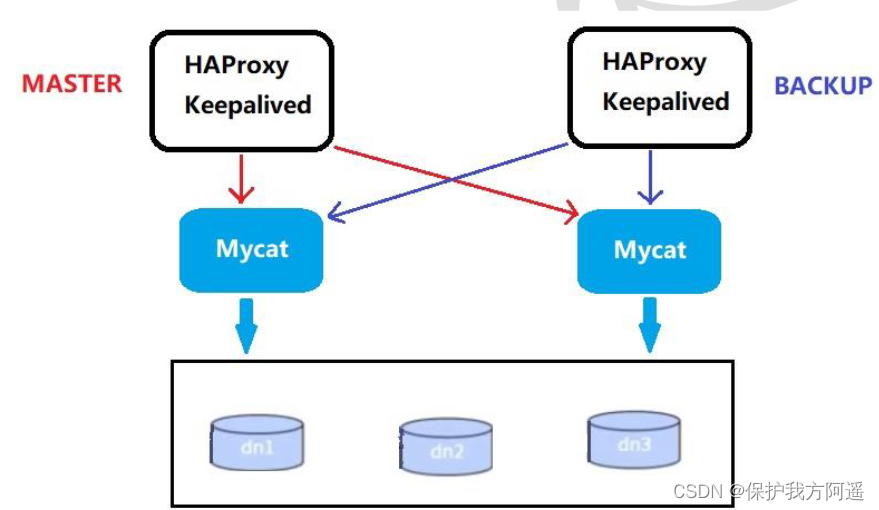
| Number | role | IP Address | machine name |
|---|---|---|---|
| 1 | Mycat1 | 192.168.201.128 | root-zyy128 |
| 2 | Mycat2 | 192.168.201.130 | root-zyy130 |
| 3 | HAProxy(master) | 192.168.201.129 | root-zyy129 |
| 4 | Keepalived(master) | 192.168.201.129 | root-zyy129 |
| 5 | HAProxy(backup) | 192.168.201.131 | root-zyy131 |
| 6 | Keepalived(backup) | 192.168.201.131 | root-zyy131 |
6.2. Installation configuration HAProxy
6.2.1. install HAProxy
Get ready HAProxy Installation package , to /opt Under the table of contents .
Download address :https://src.fedoraproject.org/repo/pkgs/haproxy/Unzip to /usr/local/src
tar -zxvf haproxy-2.4.8.tar.gz
cp -r haproxy-2.4.8 /usr/local/src/
- Enter the unzipped directory , View kernel version , Compile
cd /usr/local/src/haproxy-2.4.8/
uname -r
make TARGET=linux310 PREFIX=/usr/local/haproxy ARCH=x86_64

# ARGET=linux310, Kernel version , Use uname -r View kernel , Such as :3.10.0-514.el7, At this point, the parameter is linux310;
#ARCH=x86_64, System digits ;
#PREFIX=/usr/local/haprpxy #/usr/local/haprpxy, by haprpxy The installation path .

If you make a mistake :
sudo yum -y install gcc gcc-c++ libstdc++-devel
- After compilation , Installation
make install PREFIX=/usr/local/haproxy
- After installation , Create directory 、 establish HAProxy The configuration file
mkdir -p /usr/data/haproxy/
vim /usr/local/haproxy/haproxy.conf
- Insert the following configuration information into the configuration file , And save
global
log 127.0.0.1 local0
#log 127.0.0.1 local1 notice
#log loghost local0 info
maxconn 4096
chroot /usr/local/haproxy
pidfile /usr/data/haproxy/haproxy.pid
uid 99
gid 99
daemon
#debug
#quiet
defaults
log global
mode tcp
option abortonclose
option redispatch
retries 3
maxconn 2000
timeout connect 5000
timeout client 50000
timeout server 50000
listen proxy_status
bind :48066
mode tcp
balance roundrobin
server mycat_1 192.168.201.128:8066 check inter 10s
server mycat_2 192.168.201.130:8066 check inter 10s
frontend admin_stats
bind :7777
mode http
stats enable
option httplog
maxconn 10
stats refresh 30s
stats uri /admin
stats auth admin:123123
stats hide-version
stats admin if TRUE
6.2.2. Start validation
- start-up HAProxy
/usr/local/haproxy/sbin/haproxy -f /usr/local/haproxy/haproxy.conf
- see HAProxy process
ps -ef|grep haproxy
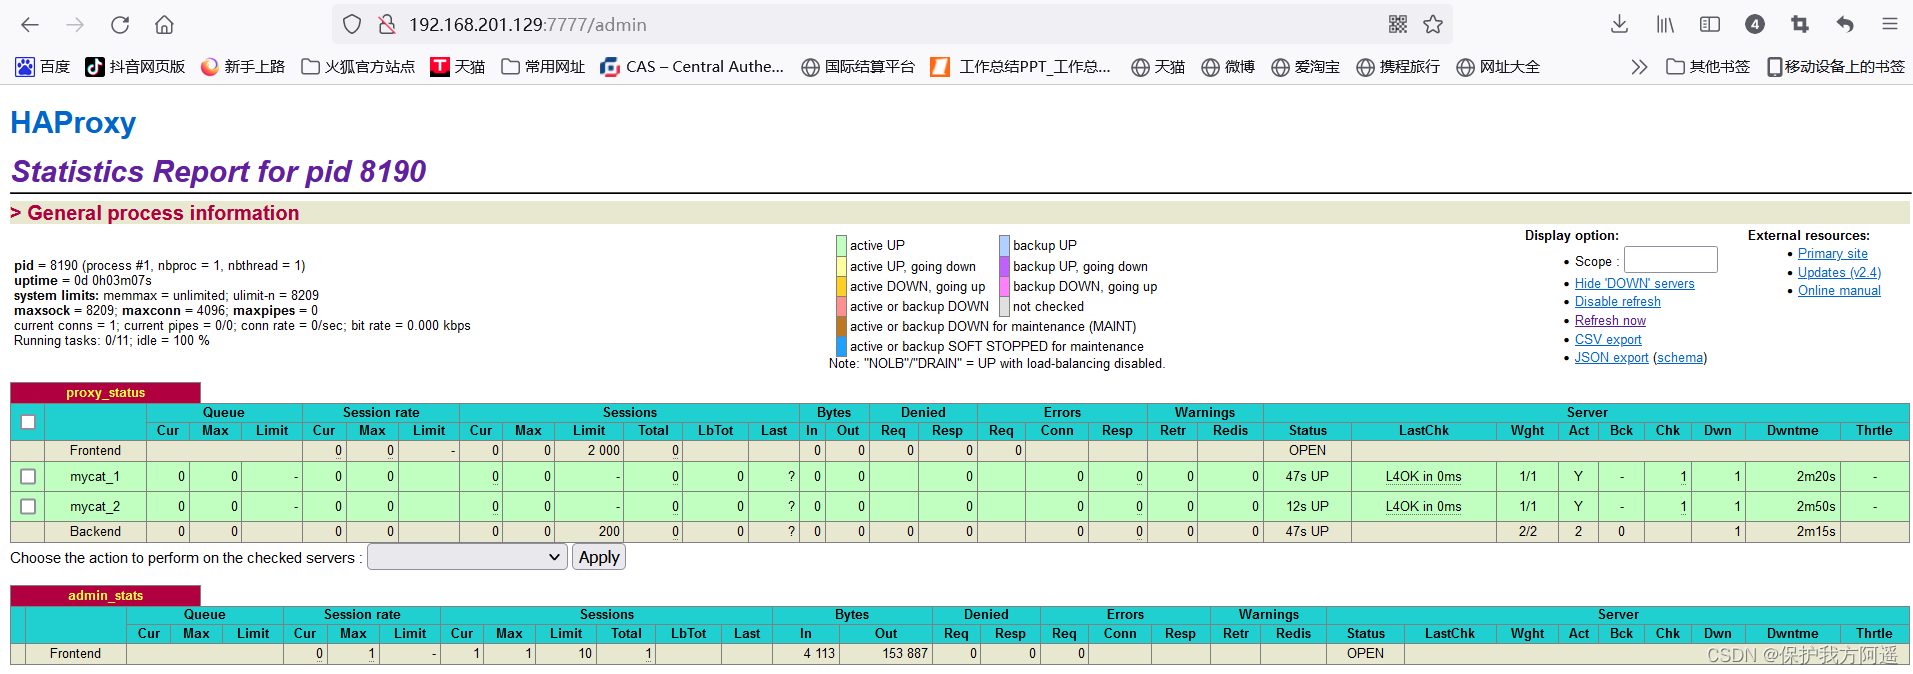
- Open browser access
http://192.168.201.129:7777/admin
# Enter the user name in the pop-up box :admin password :123123

- Verify load balancing , adopt HAProxy visit Mycat
mysql -umycat -p123456 -h 192.168.201.129 -P 48066
6.3. To configure Keepalived
6.3.1. install Keepalived
- Get ready Keepalived Installation package , to /opt Under the table of contents
Download address :https://www.keepalived.org/download.html - Unzip to /usr/local/src
tar -zxvf keepalived-2.0.20.tar.gz
mv -i keepalived-2.0.20 /usr/local/src/
- Enter the unzipped directory , To configure , Compile
cd /usr/local/src/keepalived-2.0.20/
./configure --prefix=/usr/local/keepalived
- Compile , Install after completion
yum install -y gcc openssl-devel popt-devel
make
make install
- Configuration before operation
cp /usr/local/src/keepalived-2.0.20/keepalived/etc/init.d/keepalived /etc/init.d/
mkdir /etc/keepalived
cp /usr/local/keepalived/etc/keepalived/keepalived.conf /etc/keepalived/
cp /usr/local/src/keepalived-2.0.20/keepalived/etc/sysconfig/keepalived /etc/sysconfig/
cp /usr/local/keepalived/sbin/keepalived /usr/sbin/
- Modify the configuration file
vim /etc/keepalived/keepalived.conf
! Configuration File for keepalived
global_defs {
notification_email {
[email protected]
}
notification_email_from [email protected]
smtp_server 127.0.0.1
smtp_connect_timeout 30
router_id LVS_DEVEL
vrrp_skip_check_adv_addr
vrrp_garp_interval 0
vrrp_gna_interval 0
}
vrrp_instance VI_1 {
# The main engine is equipped with MASTER, Spare parts BACKUP
state MASTER
# Network card of the machine
interface ens33
virtual_router_id 51
# The higher the value, the higher the priority
priority 100
advert_int 1
authentication {
auth_type PASS
auth_pass 1111
}
virtual_ipaddress {
# fictitious IP
192.168.201.200
}
}
virtual_server 192.168.201.200 48066 {
delay_loop 6
lb_algo rr
lb_kind NAT
persistence_timeout 50
protocol TCP
real_server 192.168.201.129 48066 {
weight 1
TCP_CHECK {
connect_timeout 3
retry 3
delay_before_retry 3
}
}
real_server 192.168.201.131 48600 {
weight 1
TCP_CHECK {
connect_timeout 3
nb_get_retry 3
delay_before_retry 3
}
}
}
6.3.2. Start validation
- start-up Keepalived
service keepalived start
- validate logon
mysql -umycat -p123456 -h 192.168.201.200 -P 48066
6.4. Test high availability
- testing procedure
#1 close mycat
#2 Through virtual ip Query data
mysql -umycat -p123456 -h 192.168.201.200 -P 48066
7、 ... and . Mycat Security Settings
7.1. Access configuration
7.1.1. user Tag permission control
at present Mycat The connection control of middleware is not too complex , At present, it only controls the read and write permissions at the level of middleware logical library . It's through server.xml Of user Label to configure .
#server.xml The configuration file user part
<user name="mycat">
<property name="password">123456</property>
<property name="schemas">TESTDB</property>
</user>
<user name="user">
<property name="password">user</property>
<property name="schemas">TESTDB</property>
<property name="readOnly">true</property>
</user>
Here's the picture :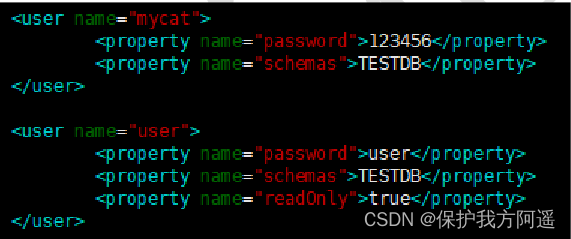
Configuration instructions
| Tag attributes | explain |
|---|---|
| name | Logical connection of user name application middleware |
| password | The password of the user |
| TESTDB | Apply the corresponding logical table in the logical library of the current connection .schemas You can configure one or more |
| readOnly | The permissions of application connection middleware logical library .true As read-only ,false For both reading and writing , The default is false |
Test cases
# Test case 1
#  Use user user , Permission is read-only (readOnly:true)
#  Verify whether the data can be queried , Verify that data can be written
- use user The user login , Run the command as follows :
mysql -uuser -puser -h 192.168.201.128 -P8066
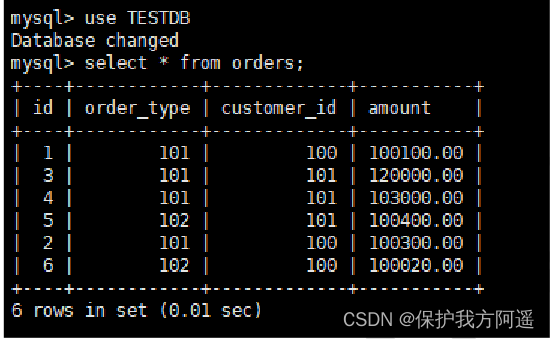
- Switch to TESTDB database , Inquire about orders Table data , as follows :
use TESTDB
select * from orders;
- You can query the data , Here's the picture
- Perform insert data sql, as follows :
insert into orders(id,order_type,customer_id,amount) values(7,101,101,10000);
- You can see the running results , Insert the failure , Read only permission only , Here's the picture :

Test case 2
#  Use mycat user , Permissions are read and write (readOnly:false)
#  Verify whether the data can be queried , Verify that data can be written
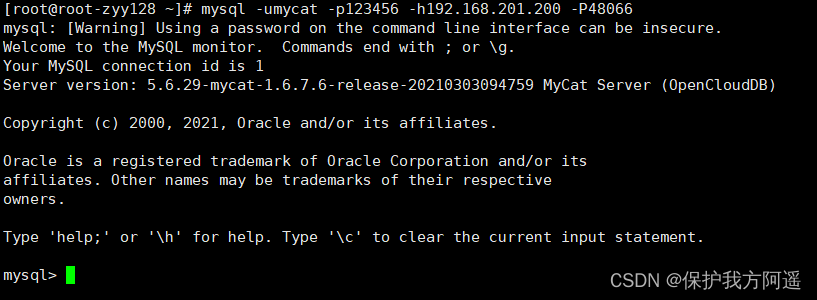
- use mycat The user login , Run the command as follows :
mysql -umycat -p123456 -h 192.168.201.128 -P8066
- Switch to TESTDB database , Inquire about orders Table data , as follows :
use TESTDB
select * from orders;
- You can query the data , Here's the picture
- Perform insert data sql, as follows :
insert into orders(id,order_type,customer_id,amount) values(7,101,101,10000);
- You can see the running results , Insert the success , Here's the picture :

7.1.2. privileges Tag permission control
stay user Label under privileges Tags can be used for logical Libraries (schema)、 surface (table) To refine DML Access control .
privileges Label under check attribute , If true Turn on permission check , by false Don't open , The default is false.
because Mycat One user's schemas Property to configure multiple logical Libraries (schema) , therefore privileges The child nodes of schema Nodes can also be configured with multiple , Fine grained... For multiple databases and tables DML Access control .
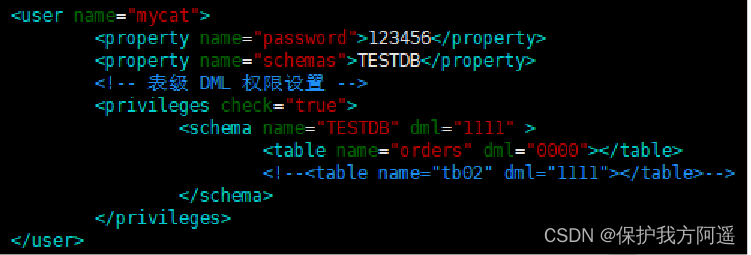
#server.xml The configuration file privileges part
# To configure orders The table does not have the authority to add, delete, modify and search
<user name="mycat">
		<property name="password">123456</property>
		<property name="schemas">TESTDB</property>
		<!--  Table level  DML  permissions  -->
		<privileges check="true">
				<schema name="TESTDB" dml="1111" >
						<table name="orders" dml="0000"></table>
						<!--<table name="tb02" dml="1111"></table>-->
				</schema>
		</privileges>
</user>
Configuration instructions :
| DML jurisdiction | increase (insert) | to update (update) | Inquire about (select) | Delete (select) |
|---|---|---|---|---|
| 0000 | prohibit | prohibit | prohibit | prohibit |
| 0010 | prohibit | prohibit | Sure | prohibit |
| 1110 | Sure | prohibit | prohibit | prohibit |
| 1111 | Sure | Sure | Sure | Sure |
Test case 1
#  Use mycat user ,privileges To configure orders The table permission is to prohibit addition, deletion, modification and query (dml="0000")
#  Verify whether the data can be queried , Verify that data can be written
#1、 restart mycat, use mycat The user login , Run the command as follows :
mysql -umycat -p123456 -h 192.168.201.128 -P8066
#2、 Switch to TESTDB database , Inquire about orders Table data , as follows :
use TESTDB
select * from orders;
#3、 Prohibit the user from querying data , Here's the picture

#4、 Perform insert data sql, as follows :
insert into orders(id,order_type,customer_id,amount) values(8,101,101,10000);
#5、 You can see the running results , Prohibit the user from inserting data , Here's the picture :

Test case 2
# Use mycat user ,privileges To configure orders The table permission is that you can add, delete, modify and query (dml="1111")
# Verify whether the data can be queried , Verify that data can be written
#1、 restart mycat, use mycat The user login , Run the command as follows :
mysql -umycat -p123456 -h 192.168.201.128 -P8066
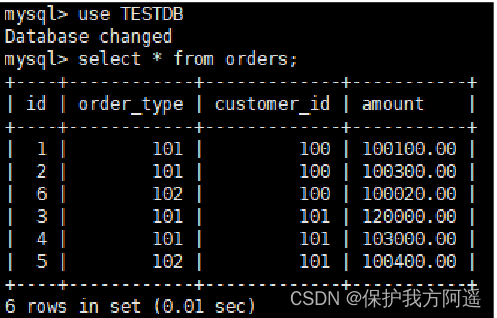
#2、 Switch to TESTDB database , Inquire about orders Table data , as follows :
use TESTDB
select * from orders;
#3、 You can query the data , Here's the picture

#4、 Perform insert data sql, as follows :
insert into orders(id,order_type,customer_id,amount) values(8,101,101,10000);
#5、 You can see the running results , Insert the success , Here's the picture :

#4、 Perform insert data sql, as follows :
delete from orders where id in (7,8);
#5、 You can see the running results , Insert the success , Here's the picture :

7.2. SQL Intercept
firewall Tags are used to define firewalls ;firewall Next whitehost Labels are used to define IP White list ,blacklist Used to define SQL The blacklist .
7.2.1. White list
You can set the white list , Realize that a host and a user can access Mycat, Other host users are forbidden to access .
# Set the whitelist
#server.xml The configuration file firewall label
# Configuration only 192.168.140.128 The host can go through mycat User access
<firewall>
<whitehost>
<host host="192.168.140.128" user="mycat"/>
</whitehost>
</firewall>
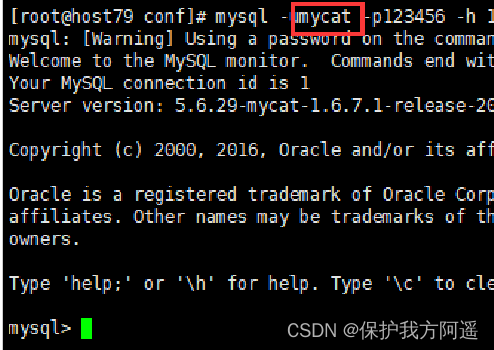
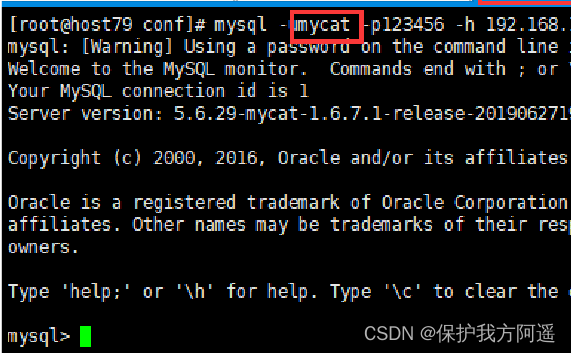
# restart Mycat after ,192.168.201.128 Host use mycat User access
mysql -umycat -p123456 -h 192.168.201.128 -P 8066
# Normal access , Here's the picture
# Change the host here user User access , Blocking access

7.2.2. The blacklist
You can set up a blacklist , Realization Mycat To be specific SQL Operational interception , Such as adding, deleting, modifying, checking, etc .
# Set a blacklist
#server.xml The configuration file firewall label
# Configuration inhibit mycat Users delete
<firewall>
		<whitehost>
				<host host="192.168.201.128" user="mycat"/>
		</whitehost>
		<blacklist check="true">
				<property name="deleteAllow">false</property>
		</blacklist>
</firewall>

# restart Mycat after ,192.168.201.128 Host use mycat User access
mysql -umycat -p123456 -h 192.168.201.128 -P 8066
# Normal access , Here's the picture
# Switch TESTDB After the database , Execute delete data statement
delete from orders where id=7;
# After running, it is found that deleting data has been prohibited , Here's the picture

Blacklist that can be set SQL List of interception functions
| Configuration item | The default value | describe |
|---|---|---|
| selelctAllow | true | No allow execution SELECT sentence |
| deleteAllow | true | No allow execution DELETE sentence |
| updateAllow | true | No allow execution UPDATE sentence |
| insertAllow | true | No allow execution INSERT sentence |
| createTableAllow | true | Allow table creation |
| setAllow | true | Is it allowed to use SET grammar |
| alterTableAllow | true | Whether to allow execution Alter Table sentence |
| dropTableAllow | true | Is it allowed to modify the table |
| commitAllow | true | Whether to allow execution commit operation |
| rollbackAllow | true | Whether to allow execution roll back operation |
8、 ... and . Mycat Monitoring tools
8.1. Mycat-web brief introduction
Mycat-web yes Mycat Visual operation and maintenance management and monitoring platform , Make up for Mycat There's a gap in monitoring . help Mycat Share statistical and configuration management tasks .Mycat-web Introduced ZooKeeper As configuration center , You can manage multiple nodes .Mycat-web Main management and monitoring Mycat Of traffic 、 Connect 、 Active threads and memory, etc , Have IP White list 、 E-mail alarm module , You can count SQL And analyze slow SQL And high frequency SQL etc. . To optimize SQL Provide evidence .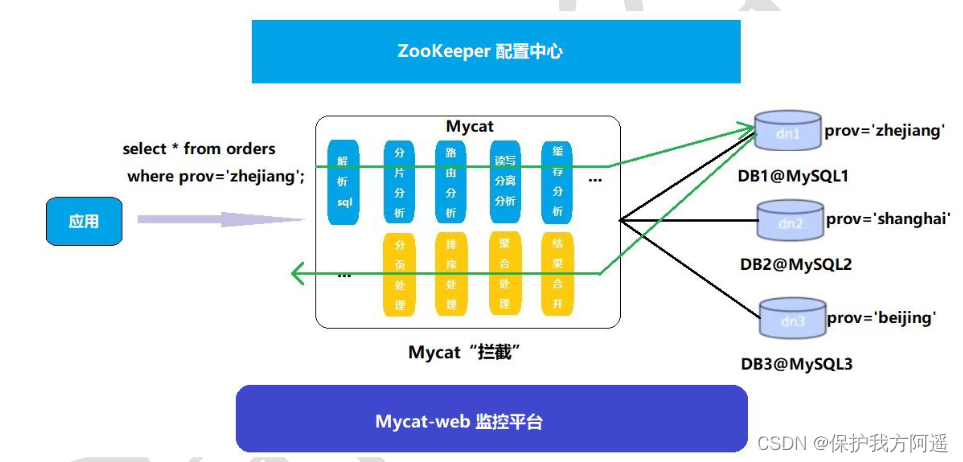
8.2. Mycat-web Configuration and use
8.2.1. ZooKeeper install
- Download installation package http://zookeeper.apache.org/
- Install package copy to Linux System /opt Under the table of contents , And extract the
tar -zxvf zookeeper-3.4.11.tar.gz
- Get into ZooKeeper Unzipped configuration directory (conf), Copy the configuration file and rename it
cd /opt/zookeeper-3.4.11/conf
cp zoo_sample.cfg zoo.cfg
- Get into ZooKeeper Command directory for (bin), Run the start command
./zkServer.sh start
- ZooKeeper The service port is 2181, The view service has been started
netstat -ant | grep 2181

8.2.2. Mycat-web install
- Download installation package http://www.mycat.io/
- Install package copy to Linux System /opt Under the table of contents , And extract the
tar -zxvf Mycat-web-1.0-SNAPSHOT-20170102153329-linux.tar.gz
- Copy mycat-web Folder to /usr/local Under the table of contents
cp -r mycat-web /usr/local
- Get into mycat-web Run the start command under the directory of
cd /usr/local/mycat-web/
./start.sh &
- Mycat-web The service port is 8082, The view service has been started
netstat -ant | grep 8082

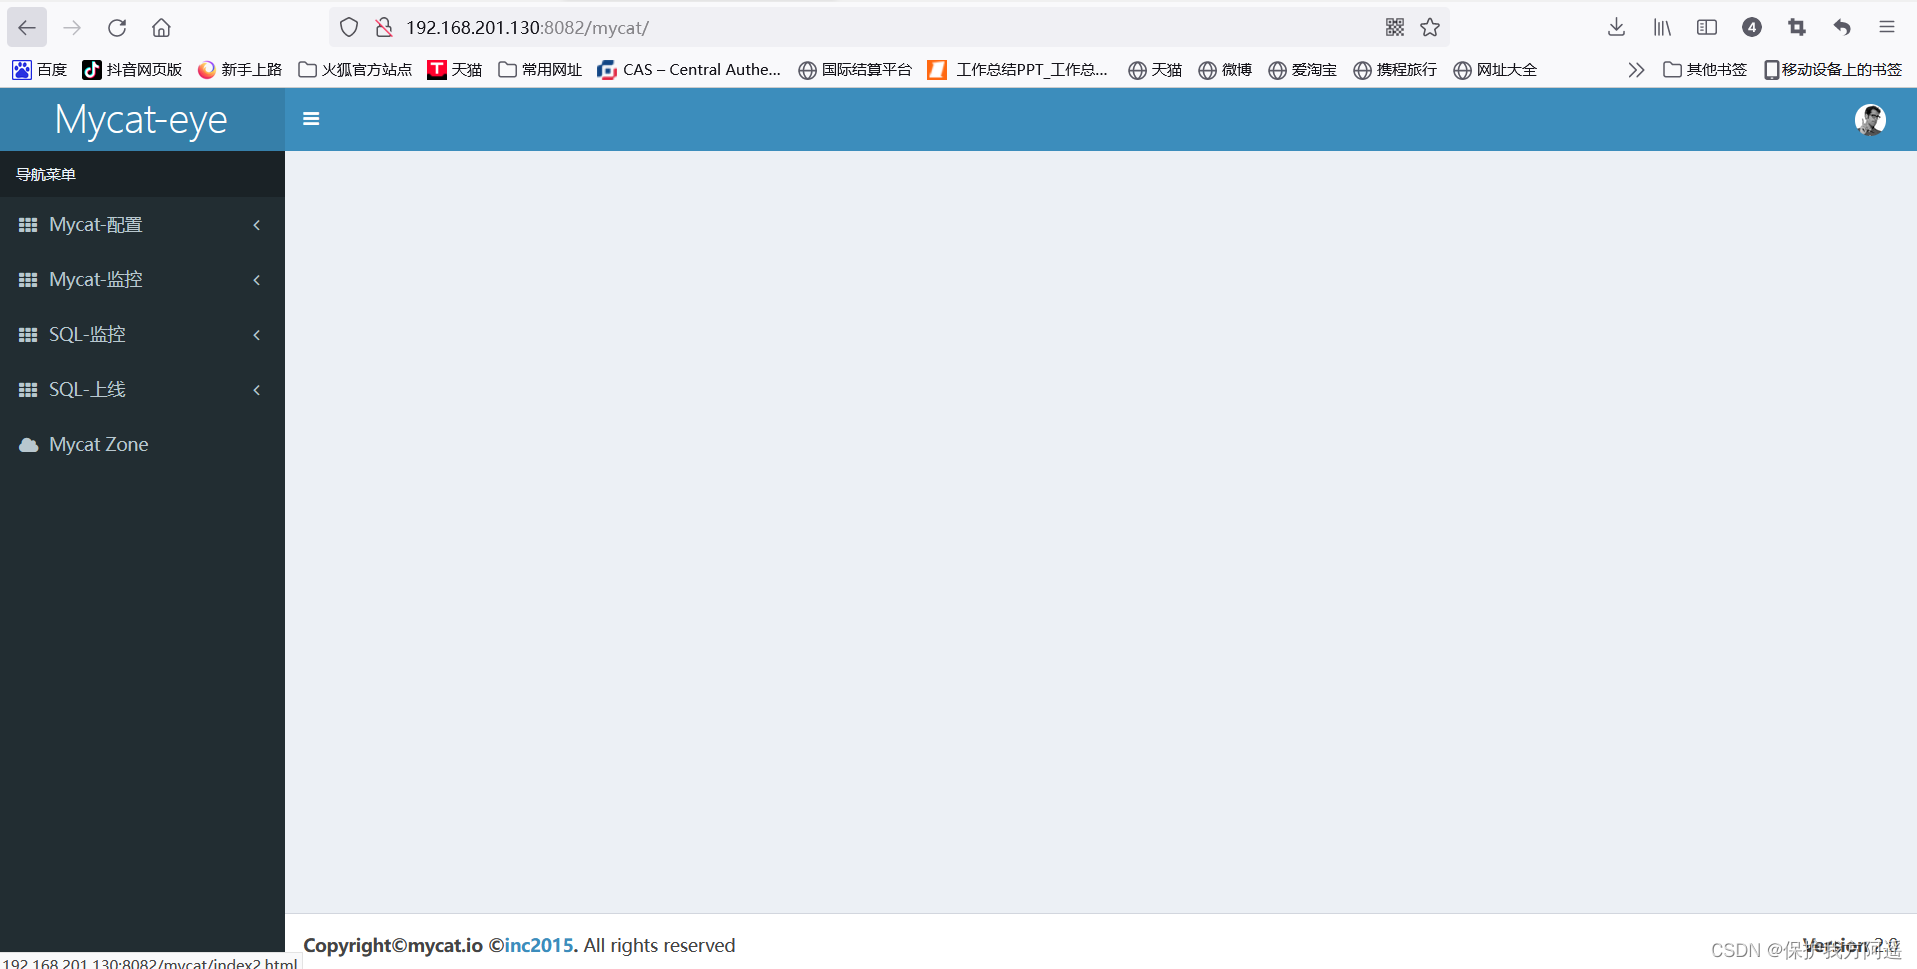
- Access the service through an address
http://192.168.201.130:8082/mycat/
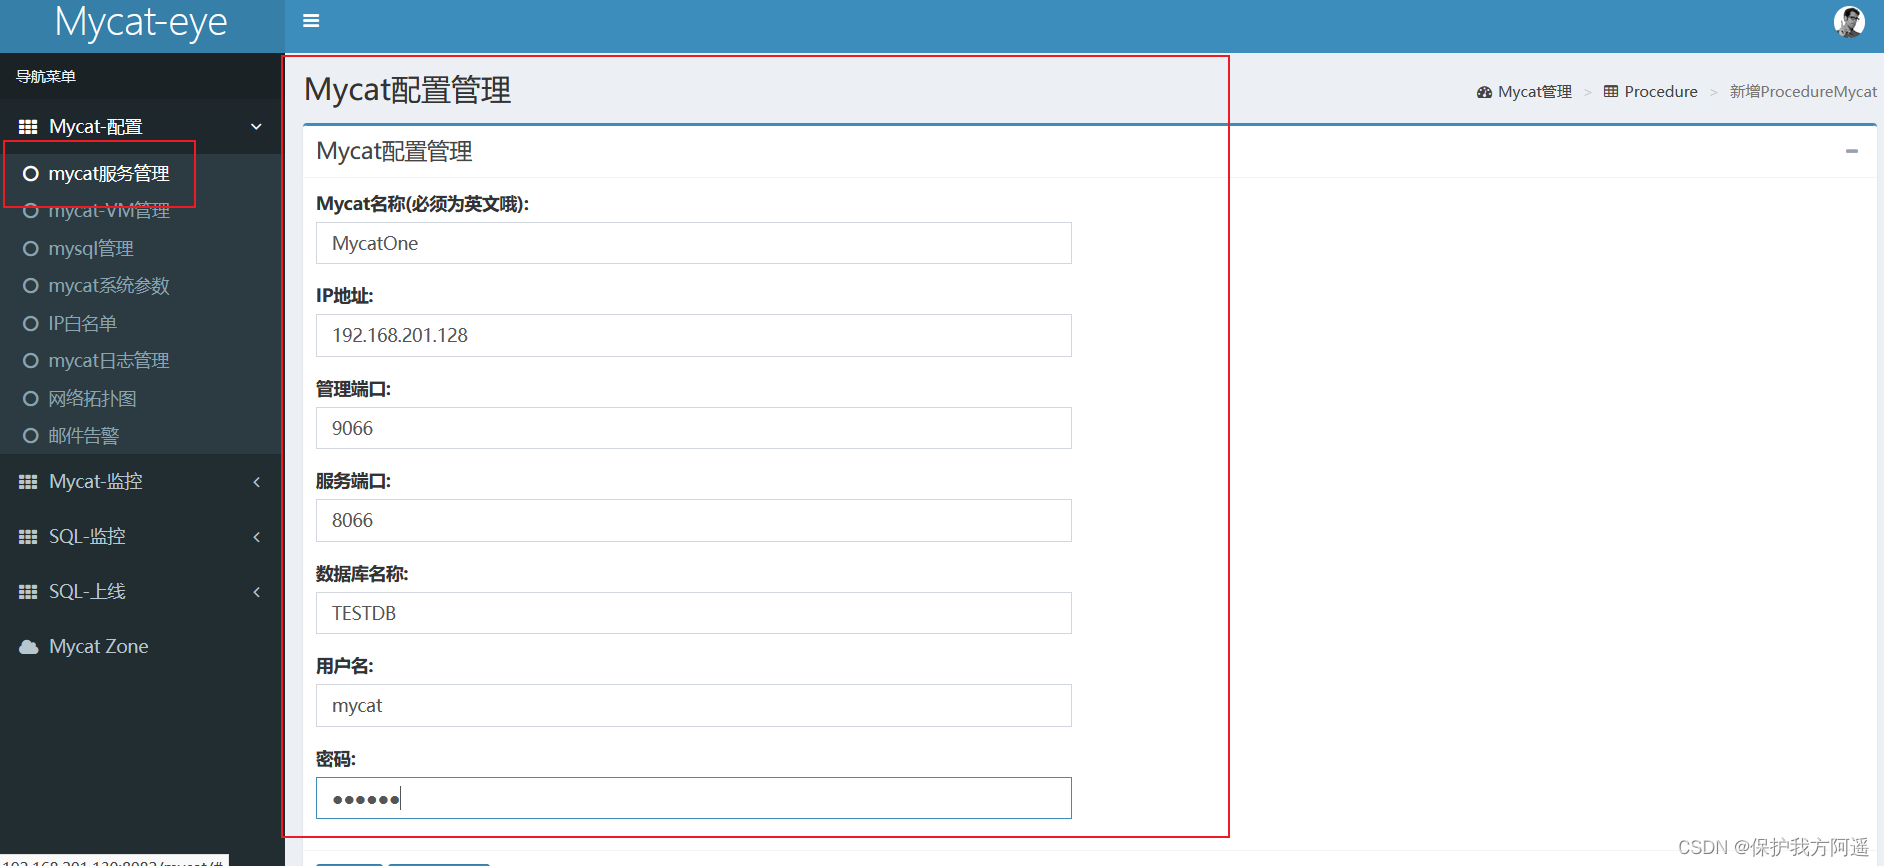
8.2.3. Mycat-web To configure
The installation steps are as follows :
- First configure... In the registry ZooKeeper Address , Refresh the page after configuration , so
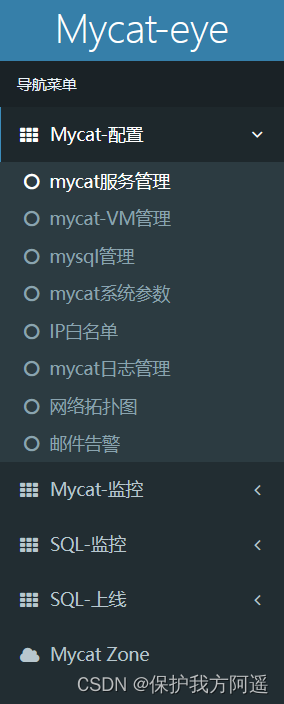
- newly added Mycat Monitoring instance
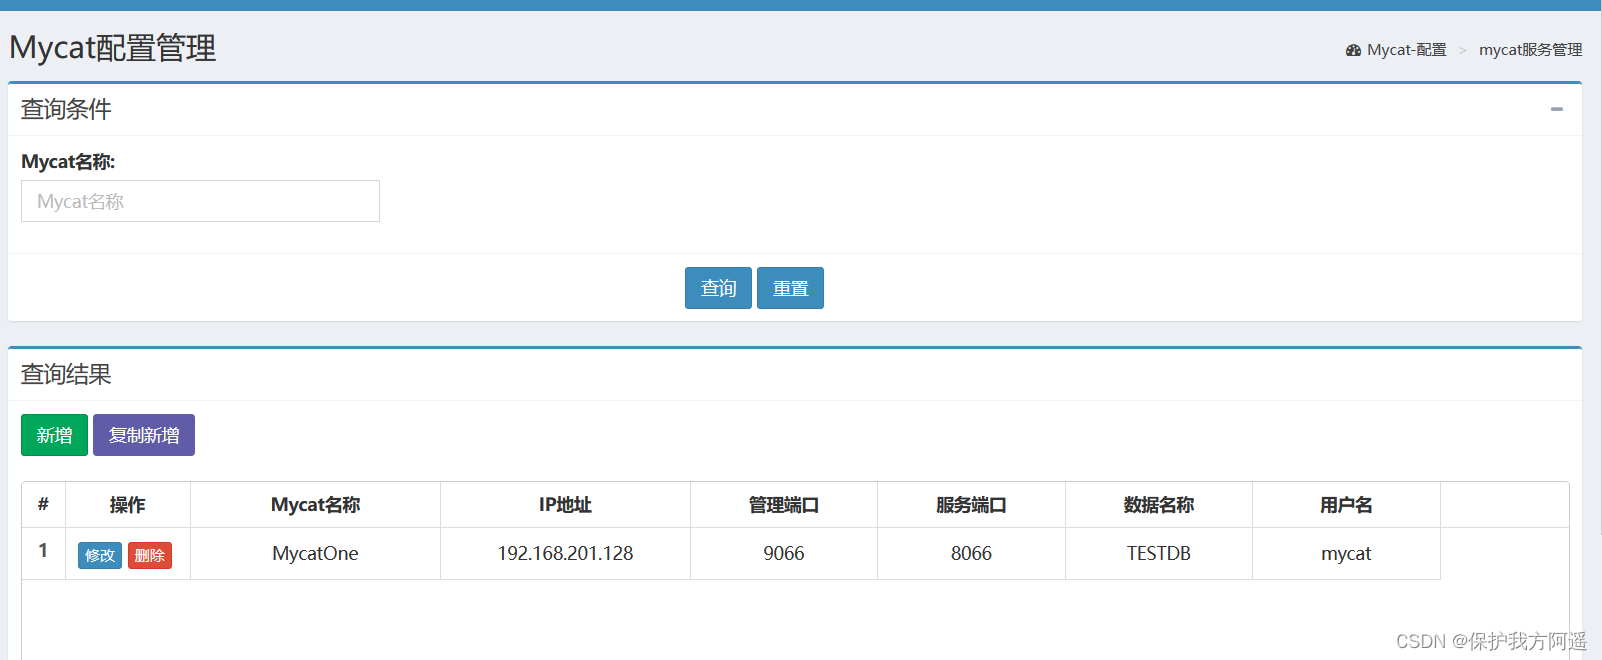
8.3. Mycat Performance monitoring indicators
Mycat-web It can be done on the Internet Mycat Performance monitoring , for example : Memory sharing 、 Flow analysis 、 Connection analysis 、 Active thread analysis, etc .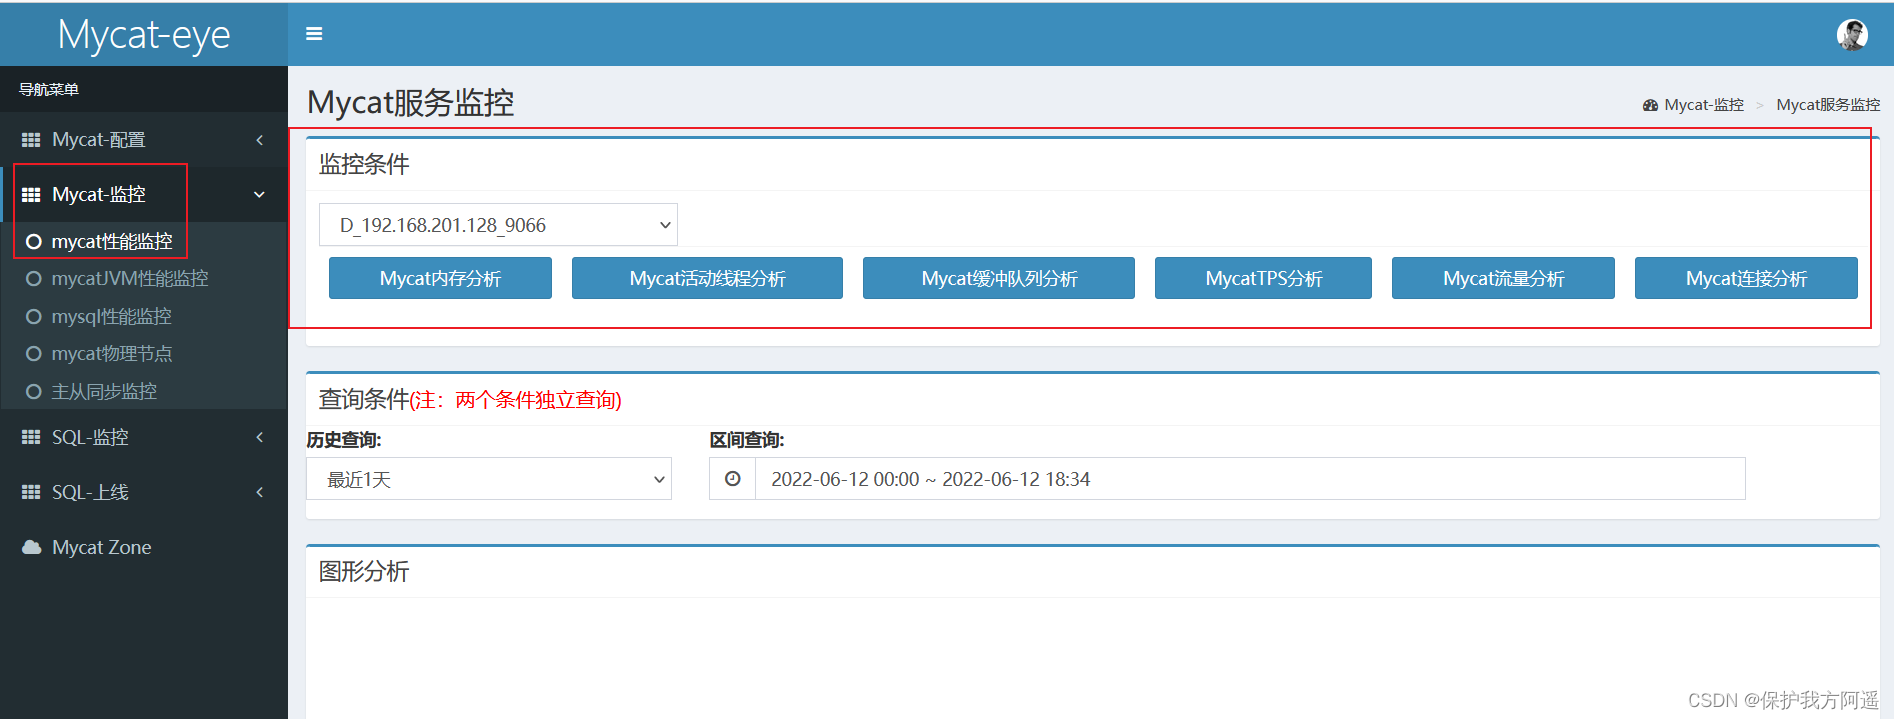
边栏推荐
- Introduction tutorial of typescript (dark horse programmer of station B)
- MySQL實戰優化高手04 借著更新語句在InnoDB存儲引擎中的執行流程,聊聊binlog是什麼?
- 用于实时端到端文本识别的自适应Bezier曲线网络
- [after reading the series] how to realize app automation without programming (automatically start Kwai APP)
- C miscellaneous dynamic linked list operation
- C miscellaneous shallow copy and deep copy
- 评估方法的优缺点
- 软件测试工程师必备之软技能:结构化思维
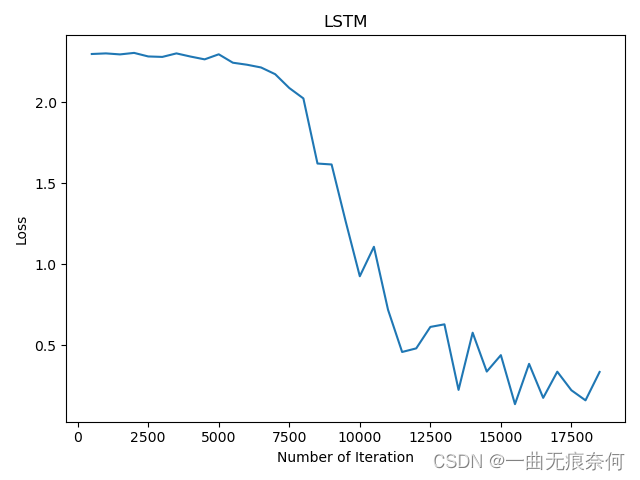
- Emotional classification of 1.6 million comments on LSTM based on pytoch
- 14 医疗挂号系统_【阿里云OSS、用户认证与就诊人】
猜你喜欢
Installation of pagoda and deployment of flask project
Pytorch LSTM实现流程(可视化版本)
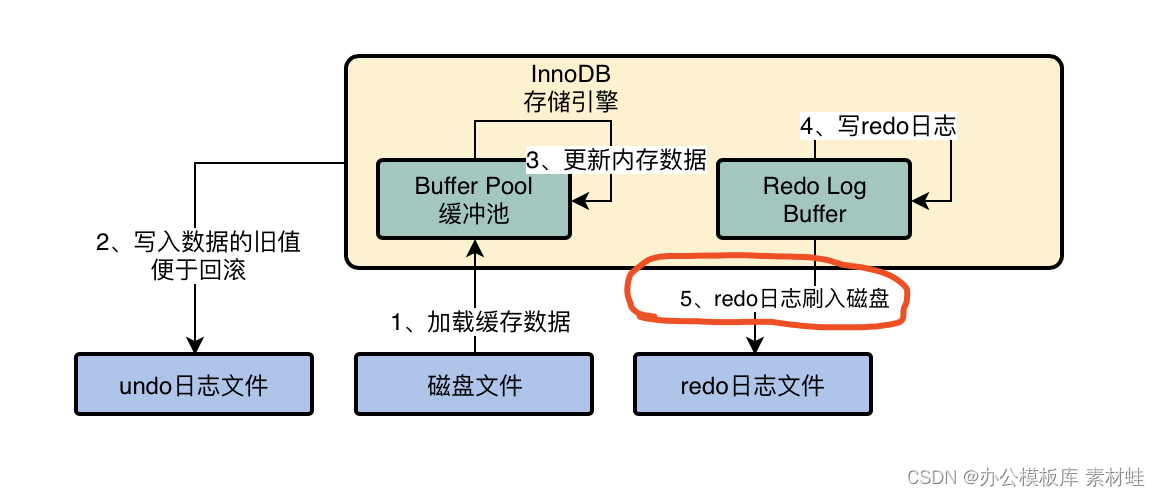
MySQL实战优化高手03 用一次数据更新流程,初步了解InnoDB存储引擎的架构设计

Mysql27 - Optimisation des index et des requêtes

实现微信公众号H5消息推送的超级详细步骤
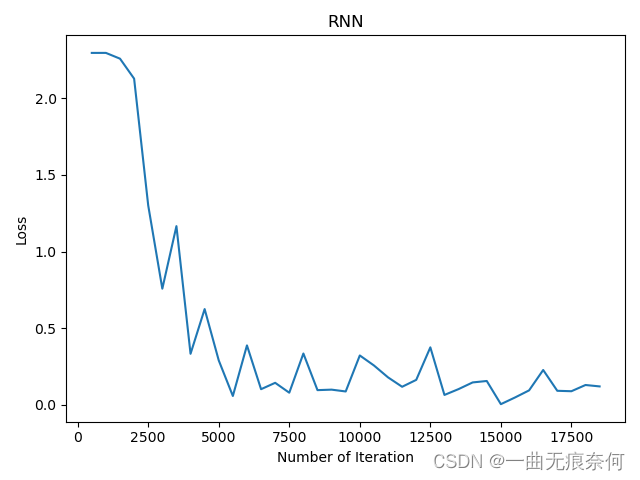
PyTorch RNN 实战案例_MNIST手写字体识别
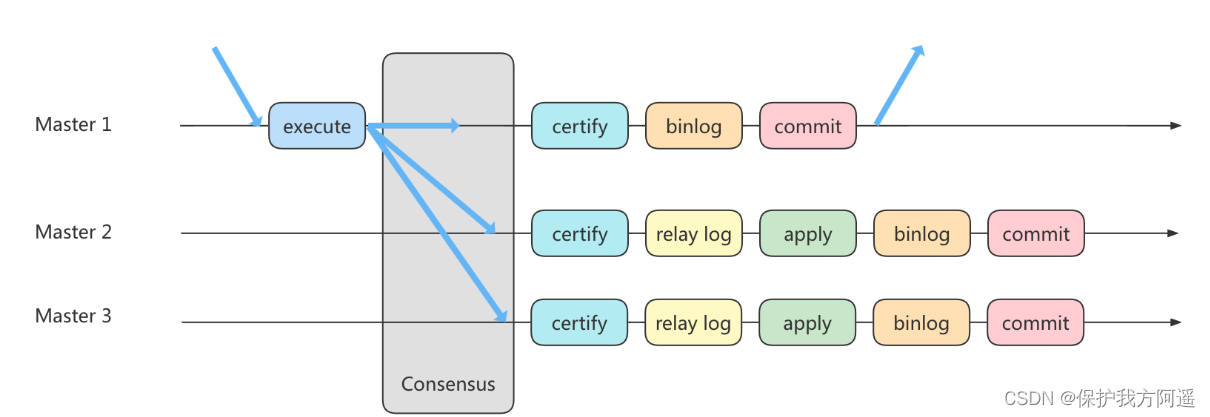
MySQL35-主从复制
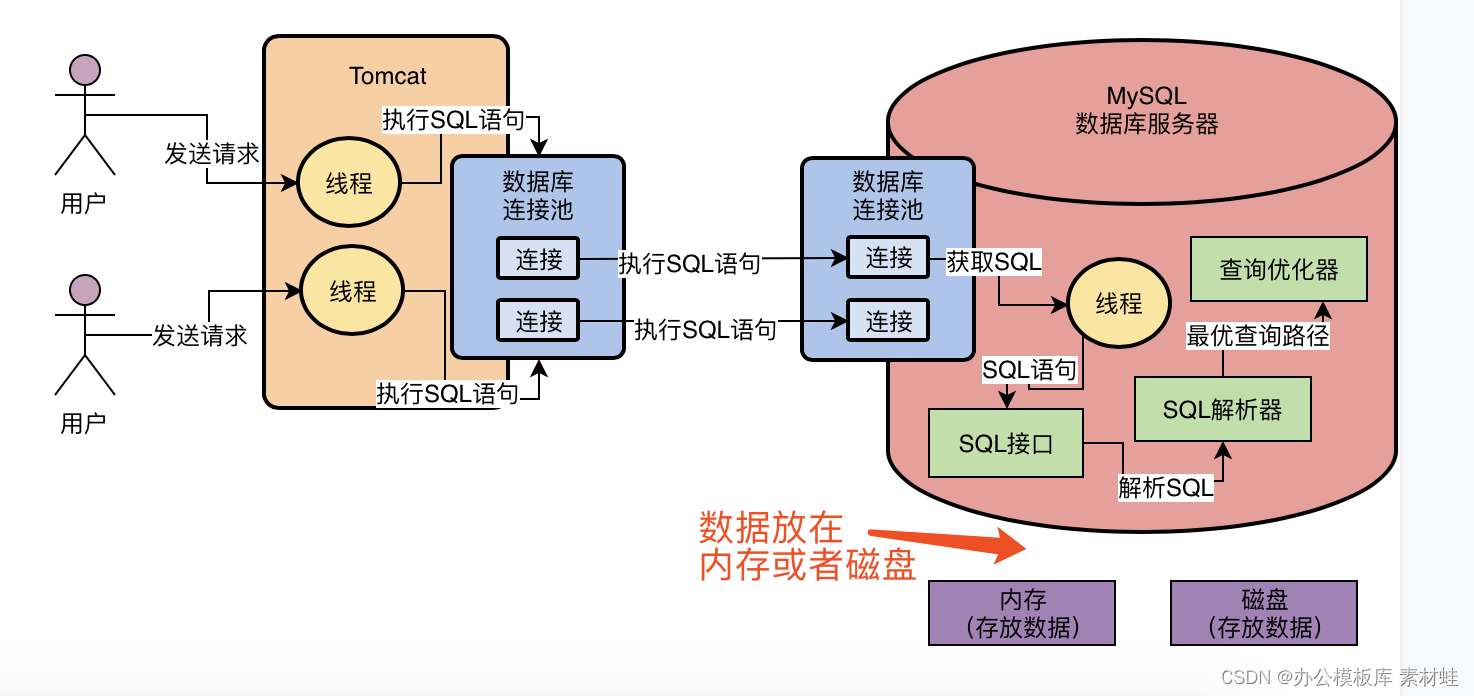
MySQL combat optimization expert 02 in order to execute SQL statements, do you know what kind of architectural design MySQL uses?
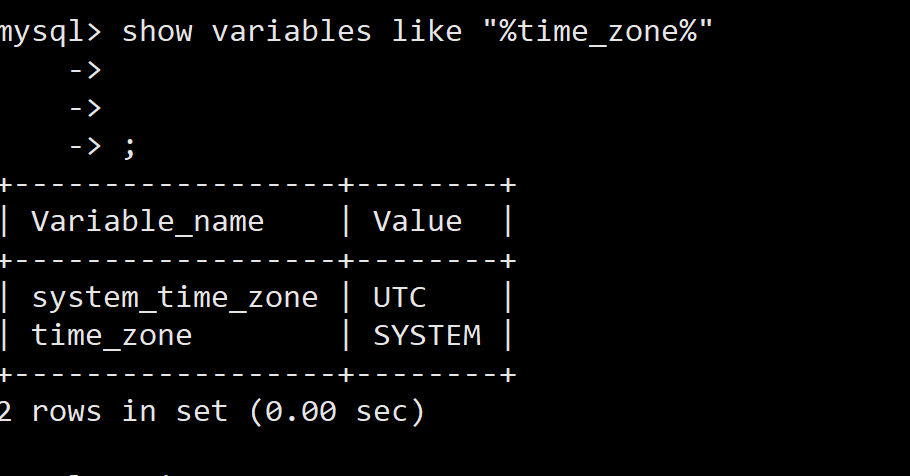
Docker MySQL solves time zone problems
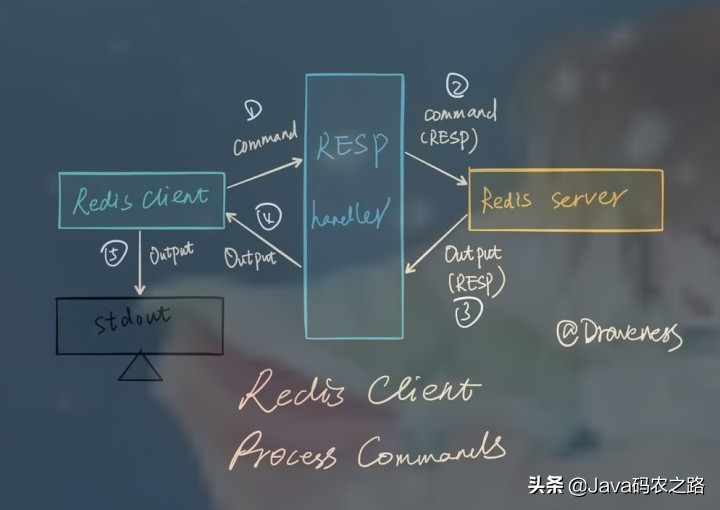
Redis集群方案应该怎么做?都有哪些方案?
随机推荐
Installation of pagoda and deployment of flask project
评估方法的优缺点
A necessary soft skill for Software Test Engineers: structured thinking
Time in TCP state_ The role of wait?
The 32-year-old fitness coach turned to a programmer and got an offer of 760000 a year. The experience of this older coder caused heated discussion
颜值爆表,推荐两款JSON可视化工具,配合Swagger使用真香
Anaconda3 安装cv2
In fact, the implementation of current limiting is not complicated
MySQL combat optimization expert 03 uses a data update process to preliminarily understand the architecture design of InnoDB storage engine
MySQL combat optimization expert 12 what does the memory data structure buffer pool look like?
MySQL实战优化高手06 生产经验:互联网公司的生产环境数据库是如何进行性能测试的?
docker MySQL解决时区问题
[Julia] exit notes - Serial
text 文本数据增强方法 data argumentation
17 medical registration system_ [wechat Payment]
[C language] deeply analyze the underlying principle of data storage
Docker MySQL solves time zone problems
Installation de la pagode et déploiement du projet flask
The governor of New Jersey signed seven bills to improve gun safety
Software test engineer development planning route