当前位置:网站首页>Introduction and use of automatic machine learning framework (flaml, H2O)
Introduction and use of automatic machine learning framework (flaml, H2O)
2022-07-06 11:06:00 【zkkkkkkkkkkkkk】
3.2.2、 Import related libraries
4.2.2、 Import related libraries
4.2.4、 start-up h2o Of jar package
One 、 Introduce
Automatic machine learning (Automl), It is a way to turn traditional machine learning into Automation ,start—end Fully automatic . At present, the popular automatic machine learning frameworks in the market include :Flaml、H20 wait . This chapter records how these two frameworks are used .
Two 、 Data is introduced
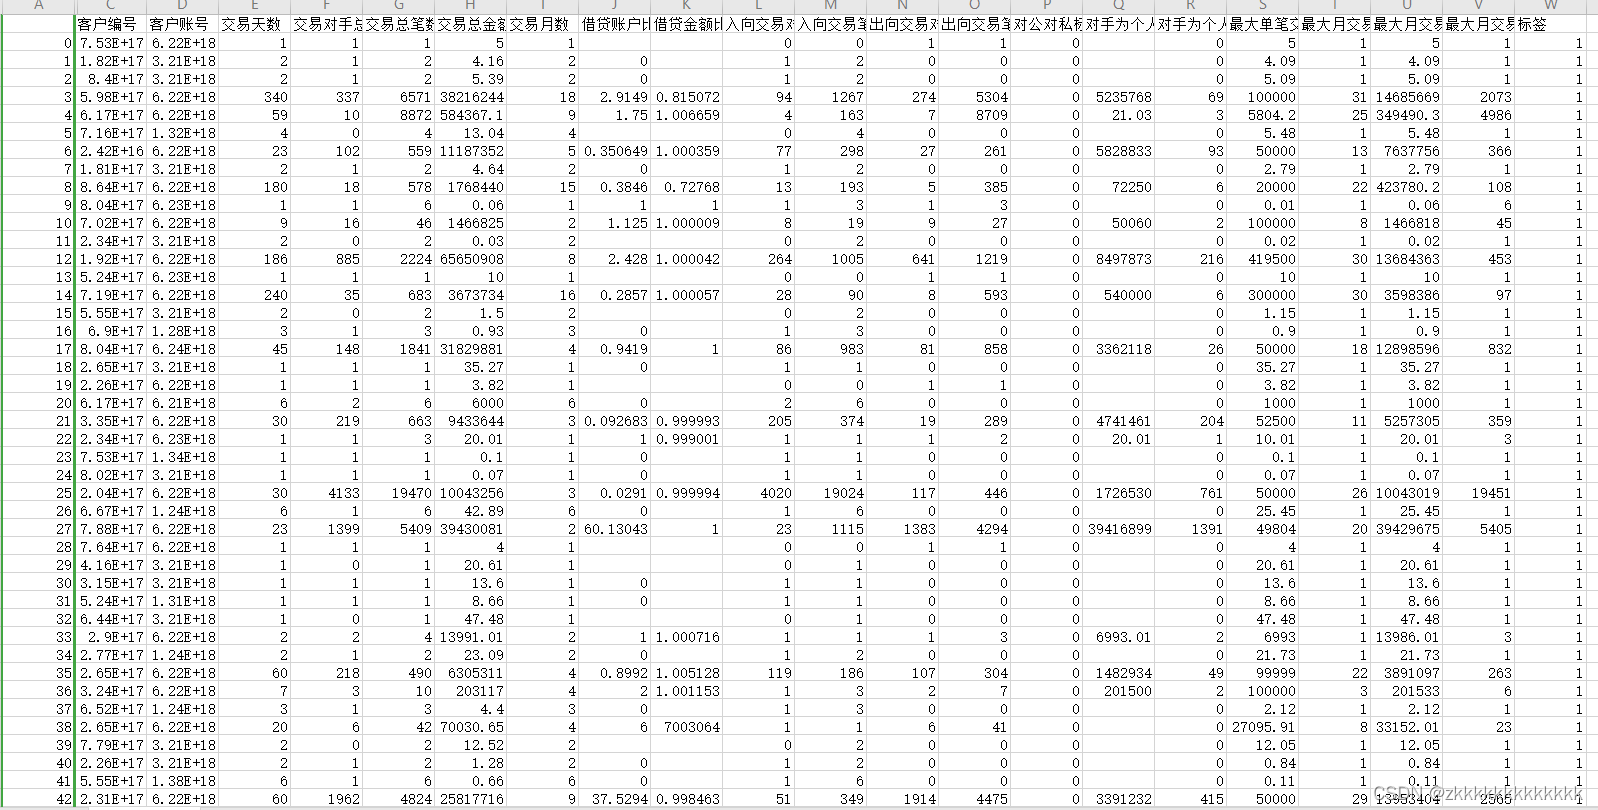
The bank transaction flow created by the data refers to . share 23 Column data , Among them is 18 Column characteristic data ,1 Column label data ,4 Column user information data .
3、 ... and 、flaml frame
3.1、flaml brief introduction
Flaml It is an automatic machine learning framework launched by Microsoft , Support custom learners and parameters , It also provides a fast automatic adjustment tool .flaml You can find the accuracy with low computational resources in the customized learner ML Model . It frees users from choosing learners and super parameters . It is very convenient to use .
3.2、 Use flaml
3.2.1、 download flaml library
pip install flaml3.2.2、 Import related libraries
from flaml import AutoML
from sklearn.datasets import load_iris
from sklearn.datasets import load_boston
import pandas as pd
import sys,logging
from sklearn.metrics import confusion_matrix,classification_report,recall_score,accuracy_score,f1_score,precision_score
from sklearn.preprocessing import MinMaxScaler
from imblearn.over_sampling import RandomOverSampler
import time
3.2.3、 Data processing
#  Data path
data_path = r"source/data_jianhang.csv"
input_data_all = pd.read_csv(data_path,encoding="gbk",index_col=0)
#  Extract forecast customer information   【 Customer name 、 Customer number 、 Customer account number 】
customer_info = input_data_all.iloc[:,:3]
print(customer_info)

#  features
input_data_target = input_data_all[" label "]
input_data_feature = input_data_all.iloc[:, 3:-1]
#  selection input_data_all All of the line , From the third column to the last column ( The head is not the tail )
input_data = input_data_all.iloc[:, 3:]
#  Fill the blank value with 0
input_data.fillna(0, inplace=True)
#  Output the first five lines to view
print(input_data.head())


#  Random oversampling for the imbalance of positive and negative samples
f = RandomOverSampler(random_state=0)
data, target = f.fit_resample(input_data.iloc[:,:-1], input_data.iloc[:,-1])
#  Data maximum and minimum normalization
data = MinMaxScaler().fit_transform(data)
#  Output sample quantity
print(target.to_frame().value_counts())

#  Segmentation data   X: Feature set   y: label
X,y = input_data.iloc[:,:-1],input_data.iloc[:,-1]
X = MinMaxScaler().fit_transform(X)
3.2.4、 call flaml
Looking at the log printed by the program, we can find , Through parameters estimator_list, Calling flaml In the process of ,flaml Automatically compare for us lgbm、rf、xgboost The effect of classifier , Finally, print and use the optimal classifier and parameters to train the model . The whole process is automated , There is no need for artificial operation comparison . This is also a feature of automated machine learning .
t1 = time.time()
#  initialization flaml Automated modeling framework
flaml_automl = AutoML()
#  Pass in training data x and y Conduct fit Training
flaml_automl.fit(data,target,task='classification',log_file_name="xxx.log",metric="f1",estimator_list = ['lgbm', 'rf', 'xgboost'])
# fit Introduction to common parameters
'''
    #  X_train=None,    Training data feature set
    #  y_train=None,    Training data tag set
    #  estimator_list = ['lgbm', 'rf', 'xgboost', 'extra_tree', 'xgb_limitdepth', 'lrl1']
    #  metric: 'accuracy', 'roc_auc', 'roc_auc_ovr', 'roc_auc_ovo','f1', 'micro_f1', 'macro_f1', 'log_loss', 'mae', 'mse', 'r2','mape'.
    #  n_jobs: Pass in an integer , Enable multithreading
    #  n_splits: Pass in an integer , Number of folds cross verified
    #  log_file_name: Log output , If you don't want to output logs , Pass in an empty string  ’’  that will do
    #  estimator_list: Model list , Optional 【‘lgbm’,’xgboot’,’xgb_limitdepth’,’catboost’,’rf’,’extra_tree’】, It will eventually output best Model .
    #  time_budget: The time limit , In seconds . If restricted 10s, Then the optimal model is output in ten seconds . There is no time limit for incoming -1
    #  sample: Boolean value , Default False. Whether to sample the incoming data .
    #  early_stop: Boolean value , Default False. If the model search converges , Stop ahead of time .
'''


# flaml Print the optimal model and parameters
'''
[flaml.automl: 03-09 14:52:24] {2694} INFO - retrain lgbm for 1.3s
[flaml.automl: 03-09 14:52:24] {2699} INFO - retrained model: LGBMClassifier(colsample_bytree=0.5716563773446997,
               global_max_steps=9223372036854775807,
               learning_rate=0.7886932330930241, max_bin=511,
               min_child_samples=7, n_estimators=181, num_leaves=1006,
               reg_alpha=0.007095760722363662, reg_lambda=0.3005614400342159,
               verbose=-1)
[flaml.automl: 03-09 14:52:24] {2077} INFO - fit succeeded
[flaml.automl: 03-09 14:52:24] {2079} INFO - Time taken to find the best model: 23.60042953491211
'''


#  Print some results
print(" Elapsed time : ",time.time()-t1)
print(flaml_automl.estimator_list)
print(" The optimal model ",flaml_automl.model)
print(" Optimal parameters ",flaml_automl.best_config)
print(" Training time ",flaml_automl.best_config_train_time)
print(" classifier ",flaml_automl.best_estimator)
print(" Loss ",flaml_automl.best_loss)

#  call predict forecast X
y_pred = flaml_automl.predict(X)
#  Output forecast results
print(y_pred)

#  Print indicators 、 Classification effect
print(" Confusion matrix :\n",confusion_matrix(y,y_pred))
print(" Classified reports :\n",classification_report(y,y_pred))
print(" Recall rate :",recall_score(y,y_pred))
print(" Accuracy rate :",accuracy_score(y,y_pred))
print("f1 The score is :",f1_score(y,y_pred))
print(" Accuracy :",precision_score(y,y_pred))
print(" Total time consumed : ",time.time()-t1)
Four 、h2o frame
4.1、h2o brief introduction
h2o The framework is an open source , Distributed based on java The framework of machine learning .h2o By (h2o.AI) The company developed and released . The website of their company :H2O.ai | AI Cloud Platform.h20 It also supports visual analysis of user tasks .
4.2、h2o Use
4.2.1、 download h2o
pip install h204.2.2、 Import related libraries
import h2o
from h2o.automl import H2OAutoML
from h2o.estimators.random_forest import H2ORandomForestEstimator
from h2o.estimators.gbm import H2OGradientBoostingEstimator
from h2o.estimators.stackedensemble import H2OStackedEnsembleEstimator
from h2o.grid.grid_search import H2OGridSearch
import numpy as np
import pandas as pd
import time
from sklearn.preprocessing import MinMaxScaler
from sklearn.metrics import confusion_matrix,classification_report,recall_score,accuracy_score,f1_score,precision_score
from imblearn.over_sampling import RandomOverSampler
4.2.3、 Data processing
Same as 3.2.3 The chapters are exactly the same , I'm not going to repeat it here , Direct copy 3.2.3 Chapter data processing code .
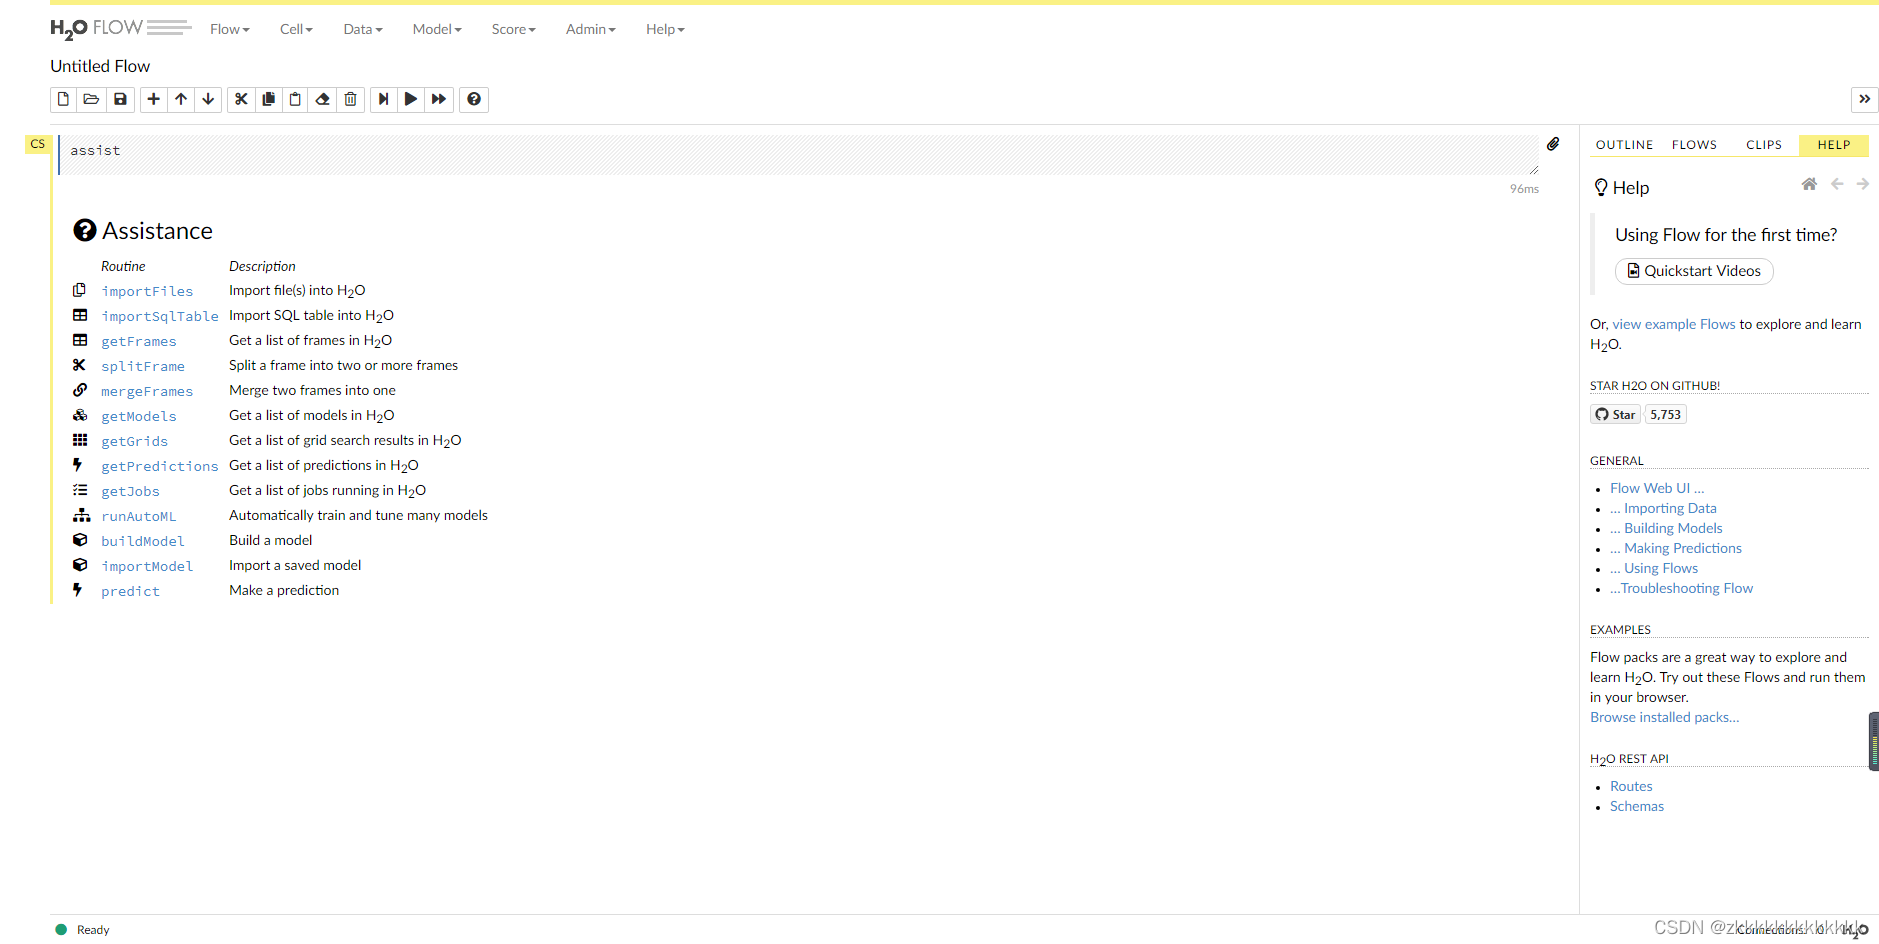
4.2.4、 start-up h2o Of jar package
1) Download free : Automatic machine learning h2o start-up jar package - Machine learning document class
2) open cmd, Input java -jar h2o.jar start-up
3) visit web page : http://localhost:54321
4.2.5、 call h2o
##``"DRF"``,``"GLM"``,``"XGBoost"``,``"GBM"``,``"DeepLearning"``,``"StackedEnsemble"``.
#  initialization
automl_estimator = H2OAutoML(max_runtime_secs=50,balance_classes=True,exclude_algos=["DeepLearning"],stopping_metric="auc",sort_metric="auc")
#  Training
automl_estimator.train(x=train_data_h2o.names[0:-1],y="target",training_frame=train_data_h2o)
print(" Time 2:",time.time()-t1)
# predict To make predictions , And output the prediction results
h2o_result = automl_estimator.predict(test_data_h2o[:-1])[:,0]
print(h2o_result)

# Print indicators
print(" Confusion matrix :\n",confusion_matrix(test_data_h2o[:,-1].as_data_frame(),h2o_result.as_data_frame()))
print(" Classified reports :\n",classification_report(test_data_h2o[:,-1].as_data_frame(),h2o_result.as_data_frame()))
print(" Recall rate :",recall_score(test_data_h2o[:,-1].as_data_frame(),h2o_result.as_data_frame()))
print(" Accuracy rate :",accuracy_score(test_data_h2o[:,-1].as_data_frame(),h2o_result.as_data_frame()))
print("f1 The score is :",f1_score(test_data_h2o[:,-1].as_data_frame(),h2o_result.as_data_frame()))
print(" Accuracy :",precision_score(test_data_h2o[:,-1].as_data_frame(),h2o_result.as_data_frame()))
print(" Time 3:",time.time()-t1)
5、 ... and 、 summary
Because of h2o Less understanding , And so on h2o The code of the framework is not explained too much . Personally, I prefer to use flaml Do automated machine learning . As for the effect, it's still very good , No screenshots are posted here . Those who are interested can practice offline .
边栏推荐
- Remember the interview algorithm of a company: find the number of times a number appears in an ordered array
- JDBC principle
- Global and Chinese market of thermal mixers 2022-2028: Research Report on technology, participants, trends, market size and share
- 02-项目实战之后台员工信息管理
- CSDN博文摘要(一) —— 一个简单的初版实现
- 基于apache-jena的知识问答
- QT creator shape
- MySQL主从复制、读写分离
- Install mysql5.5 and mysql8.0 under windows at the same time
- Mysql 其他主机无法连接本地数据库
猜你喜欢
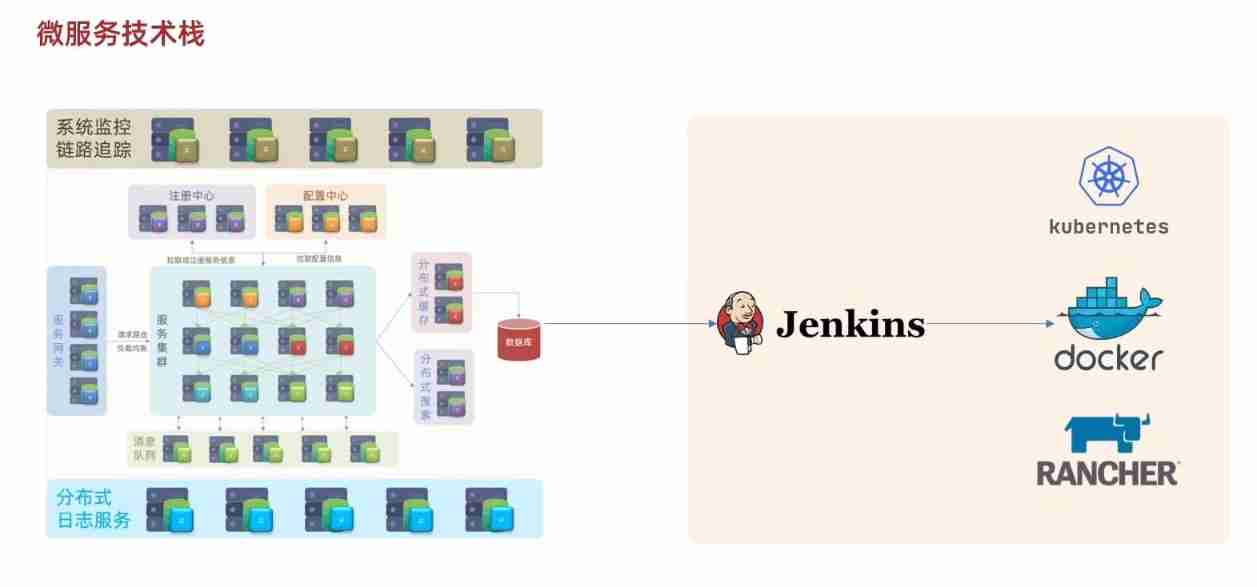
A brief introduction to the microservice technology stack, the introduction and use of Eureka and ribbon
CSDN博文摘要(一) —— 一个简单的初版实现
Mysql22 logical architecture
CSDN blog summary (I) -- a simple first edition implementation
Installation and use of MySQL under MySQL 19 Linux

Classes in C #
![[recommended by bloggers] C WinForm regularly sends email (with source code)](/img/5d/57f8599a4f02c569c6c3f4bcb8b739.png)
[recommended by bloggers] C WinForm regularly sends email (with source code)

引入了junit为什么还是用不了@Test注解
Install mysql5.5 and mysql8.0 under windows at the same time

C language advanced pointer Full Version (array pointer, pointer array discrimination, function pointer)
随机推荐
Ansible practical Series II_ Getting started with Playbook
Django运行报错:Error loading MySQLdb module解决方法
CSDN问答标签技能树(五) —— 云原生技能树
February 13, 2022-2-climbing stairs
02-项目实战之后台员工信息管理
LeetCode #461 汉明距离
Development of C language standard
CSDN问答模块标题推荐任务(一) —— 基本框架的搭建
Have you mastered the correct posture of golden three silver four job hopping?
Swagger、Yapi接口管理服务_SE
机器学习--人口普查数据分析
FRP intranet penetration
neo4j安装教程
QT creator specifies dependencies
Ubuntu 20.04 安装 MySQL
Global and Chinese markets of static transfer switches (STS) 2022-2028: Research Report on technology, participants, trends, market size and share
Use dapr to shorten software development cycle and improve production efficiency
++Implementation of I and i++
Copy constructor template and copy assignment operator template
API learning of OpenGL (2001) gltexgen