当前位置:网站首页>Talk about SOC startup (VII) uboot startup process III
Talk about SOC startup (VII) uboot startup process III
2022-07-07 11:27:00 【lgjjeff】
This paper is based on the following software and hardware assumptions :
framework :AARCH64
Software :Uboot 2021.10-rc1
1 Linux Start the underlying image
uboot It is mainly used to start the operating system , With armv8 Under the framework of linux For example , It needs to include kernel、dtb and rootfs In the third part of .uboot Images are based on them , So I'm introducing uboot Before the image format, we need to understand their composition .
1.1 Kernel image
1.1.1 vmlinux Mirror image
linux After the kernel is compiled, the original kernel file will be generated in the root directory as vmlinux, Use readelf The tool can see that it is elf File format :
[email protected]:~/work/linux$ readelf -h vmlinux
ELF Header:
  Magic:   7f 45 4c 46 02 01 01 00 00 00 00 00 00 00 00 00
  Class:                             ELF64
  Data:                              2's complement, little endian
  Version:                           1 (current)
  OS/ABI:                            UNIX - System V
  ABI Version:                       0
  Type:                              DYN (Shared object file)
  Machine:                           AArch64
  Version:                           0x1
  Entry point address:               0xffff800010000000
  Start of program headers:          64 (bytes into file)
  Start of section headers:          13681696 (bytes into file)
  Flags:                             0x0
  Size of this header:               64 (bytes)
  Size of program headers:           56 (bytes)
  Number of program headers:         3
  Size of section headers:           64 (bytes)
  Number of section headers:         29
  Section header string table index: 28
because uboot The boot image cannot contain elf head , Therefore, the image cannot be directly uboot Use .
1.1.2 Image and zImage Mirror image
Image The mirror is vlinux after objcopy The pure binary file generated after header removal , about armv8 Build its compiled Makefile as follows :
OBJCOPYFLAGS_Image := -O binary -R .note -R .note.gnu.build-id -R .comment –S    (1)
targets := Image Image.bz2 Image.gz Image.lz4 Image.lzma Image.lzo
$(obj)/Image: vmlinux FORCE
        $(call if_changed,objcopy)                                               (2)

$(obj)/Image.bz2: $(obj)/Image FORCE
        $(call if_changed,bzip2)                                                 (3)

$(obj)/Image.gz: $(obj)/Image FORCE
        $(call if_changed,gzip)                                                  (4)

$(obj)/Image.lz4: $(obj)/Image FORCE
        $(call if_changed,lz4)                                                   (5)

$(obj)/Image.lzma: $(obj)/Image FORCE
        $(call if_changed,lzma)                                                  (6)

$(obj)/Image.lzo: $(obj)/Image FORCE
        $(call if_changed,lzo)                                                   (7)
(1)objcopy Command to use flag Definition
(2) With vmlinux For the original file , adopt objcopy Command production Image Mirror image . Its commands can be extended as follows :
aarch64-linux-gnu-objcopy -O binary -R .note -R .note.gnu.build-id -R .comment -S vmlinux Image
This command will do the following
a –O binary: Output binary image , It will be removed elf head
b –R .note etc. :-R Option means to remove the specified in the image section, For example, it will be removed here .note、.note.gnu.build-id and .comment paragraph
c –S: Remove the symbol table and relocation information , It is associated with -R The function of the option is similar to , It's all about reducing the mirror image size
therefore , Generated after executing this command Image Mirror image is to remove elf head , Get rid of .note Wait for useless section, as well as strip Used binary image . It can be uboot Of booti The command starts directly . But if you want to use bootm start-up , It also needs to be further encapsulated into the following uimage or bootimg Mirror image
(3 – 7) With Image For source file , Call different compression algorithms , Compress the image . If called gzip command , Then it can be compressed into what we are familiar with zImage Mirror image . And Image equally , Compressed images can also be booti Direct start , And after being encapsulated, it can be bootm Starting up
1.2 Device tree
The device tree is the device tree dts The source file is generated after compilation , Its object file is in binary format dtb file . The example compilation commands are as follows :
dtc -I dts -O dtb -o example.dtb example.dts
(1) –I: Specify the input file format
(2)–O: Specify the output file format
(3)–o: Specify output file name
The device tree also supports dtb overlay Mechanism , That is, it can provide a foundation for the equipment dtb And multiple dtbo Mirror image , And before starting them merge For the final dtb. Here is an example to illustrate :
(1) Basics dts file base.dts The contents are as follows :
/dts-v1/;
		/ {

			foo: foonode {

				foo-property;
			};
		};
(2)dtbo Source file overlay.dts The contents are as follows :
/dts-v1/;
/plugin/;
/ {

			[email protected]1 {

				target = <&foo>;
				__overlay__ {

					overlay-1-property;
					bar: barnode {

						bar-property;
					};
				};
			};
			};
(3) Use the following commands to compile dtb and dtbo
dtc -@ -I dts -O dtb -o base.dtb base.dts
dtc -@ -I dts -O dtb -o overlay.dtbo overlay.dts
(4) take dtbo merge To base dtb On
a adopt fit The image contains and defines a overlay, This situation uboot Will resolve automatically fit Parameters and execute merge operation
b Manually load and apply overlay
(5) Manual merge technological process
a Set up base dtb and dtbo The address of
     setenv fdtaddr 0x87f00000
     setenv fdtovaddr 0x87fc0000
b load base dtb and dtbo
     load ${
    devtype} ${
    bootpart} ${
    fdtaddr} ${
    bootdir}/base.dtb
     load ${
    devtype} ${
    bootpart} ${
    fdtovaddr} ${
    bootdir}/overlay.dtbo
c take base dtb Set to work dtb
fdtaddr $fdtaddr
d increase dtb Of size, So that it can accommodate all overlay
fdt resize 8192
e apply dtb overlay
fdt apply $fdtovaddr
1.3 The root file system
linux It can support various forms of root file system , Such as initrd、initramfs、 Disk based root file system . From the perspective of starting the image, they are actually made file system images , The kernel can get and mount them from a specific location . Here are their basic features at startup :
(1)initrd
It is a memory file system , Need by bootloader Preload into memory , And pass its memory address to the kernel . Such as uboot take initrd Load to address $initrd_addr It's about , be bootm The parameters are as follows :
bootm $kernel_addr $initrd_addr $fdt_addr
(2)initramfs
initramfs It is also a memory file system , But with initrd Different , It is packaged with the kernel . Therefore, there is no need to pass additional parameters
(3) disk rootfs
The disk root file system will be written flash、mmc or disk Zoning , When the kernel starts, it can be in bootargs Add parameters in the following format , To specify the location of the root file system
root=/dev/xxx
therefore , All of these rootfs Only initrd Is the need to uboot Independently loaded , So only when rootfs by initrd when ,uboot The image packaging process needs to be considered separately when packaging images
2 Uboot Supported image formats
2.1 Legacy uimage Format
uboot First support legacy uimage Image of format , It is an addition to the kernel image 64 byte header Generated . The header Information is used to specify some attributes of the image , Such as the type of kernel 、 Compression algorithm type 、 Load address 、 Running address 、crc Integrity check value, etc . The format is as follows :
typedef struct image_header {

	uint32_t	ih_magic;	/* Image Header Magic Number */
	uint32_t	ih_hcrc;	/* Image Header CRC Checksum */
	uint32_t	ih_time;	/* Image Creation Timestamp */
	uint32_t	ih_size;	/* Image Data Size */
	uint32_t	ih_load;	/* Data Load Address */
	uint32_t	ih_ep;		/* Entry Point Address */
	uint32_t	ih_dcrc;	/* Image Data CRC Checksum */
	uint8_t		ih_os;		/* Operating System */
	uint8_t		ih_arch;	/* CPU architecture */
	uint8_t		ih_type;	/* Image Type */
	uint8_t		ih_comp;	/* Compression Type */
	uint8_t		ih_name[IH_NMLEN];	/* Image Name */
} image_header_t;
uboot Of bootm The command parses the information in the image header , And perform image verification according to this information 、 Decompression and startup processes . Here's how to create uImage Example of command :
mkimage -A arm64 -O linux -C none -T kernel -a 0x80008000 -e 0x80008040 -n Linux_Image -d zImage uImage
But it also has some disadvantages , Such as :
(1) The loading process is cumbersome , If you need to load the kernel separately 、initrd and dtb
(2) There are many startup parameters , The kernel needs to be developed separately 、initrd and dtb The address of
(3) In support of secure boot In the system of secure boot Insufficient support for
So ,uboot A new image format is defined fit uimage, Used to solve the above problems
2.2 Fit uimage Format
Fit uimage It's using devicetree Grammar to define uimage Image description information and various properties at startup , This information is written into a suffix named its In the source file . Here is one its Sample file
/dts-v1/;

/ {

	description = "Various kernels, ramdisks and FDT blobs";
	#address-cells = <1>;

	images {

		kernel-1 {

			description = "vanilla-2.6.23";             (1)
			data = /incbin/("./vmlinux.bin.gz");        (2)
			type = "kernel";                            (3)
			arch = "ppc";                               (4)
			os = "linux";                               (5)
			compression = "gzip";                       (6)
			load = <00000000>;                          (7)
			entry = <00000000>;                         (8)
			hash-1 {

				algo = "md5";                           (9)
			};
			hash-2 {

				algo = "sha1";
			};
		};

		kernel-2 {

			description = "2.6.23-denx";
			data = /incbin/("./2.6.23-denx.bin.gz");
			type = "kernel";
			arch = "ppc";
			os = "linux";
			compression = "gzip";
			load = <00000000>;
			entry = <00000000>;
			hash-1 {

				algo = "sha1";
			};
		};

		kernel-3 {

			description = "2.4.25-denx";
			data = /incbin/("./2.4.25-denx.bin.gz");
			type = "kernel";
			arch = "ppc";
			os = "linux";
			compression = "gzip";
			load = <00000000>;
			entry = <00000000>;
			hash-1 {

				algo = "md5";
			};
		};

		ramdisk-1 {

			description = "eldk-4.2-ramdisk";
			data = /incbin/("./eldk-4.2-ramdisk");
			type = "ramdisk";
			arch = "ppc";
			os = "linux";
			compression = "gzip";
			load = <00000000>;
			entry = <00000000>;
			hash-1 {

				algo = "sha1";
			};
		};

		ramdisk-2 {

			description = "eldk-3.1-ramdisk";
			data = /incbin/("./eldk-3.1-ramdisk");
			type = "ramdisk";
			arch = "ppc";
			os = "linux";
			compression = "gzip";
			load = <00000000>;
			entry = <00000000>;
			hash-1 {

				algo = "crc32";
			};
		};

		fdt-1 {

			description = "tqm5200-fdt";
			data = /incbin/("./tqm5200.dtb");
			type = "flat_dt";
			arch = "ppc";
			compression = "none";
			hash-1 {

				algo = "crc32";
			};
		};

		fdt-2 {

			description = "tqm5200s-fdt";
			data = /incbin/("./tqm5200s.dtb");
			type = "flat_dt";
			arch = "ppc";
			compression = "none";
			load = <00700000>;
			hash-1 {

				algo = "sha1";
			};
		};

	};

	configurations {

		default = "config-1";

		config-1 {

			description = "tqm5200 vanilla-2.6.23 configuration";
			kernel = "kernel-1";
			ramdisk = "ramdisk-1";
			fdt = "fdt-1";
		};

		config-2 {

			description = "tqm5200s denx-2.6.23 configuration";
			kernel = "kernel-2";
			ramdisk = "ramdisk-1";
			fdt = "fdt-2";
		};

		config-3 {

			description = "tqm5200s denx-2.4.25 configuration";
			kernel = "kernel-3";
			ramdisk = "ramdisk-2";
		};
	};
};
It contains images and configurations Two top-level nodes ,images Specify the its What images will the file contain , And the attribute information of these images .configurations Used to define a series of image combination information , For example, in this example config-1、config-2 and config-3 Three image combinations .Its Use default Property specifies the configuration information to be used by default at startup , If you do not want to use the default configuration at startup , You can dynamically specify the configuration sequence number in the startup parameters . So let's go through kernel-1 Take a look at image The meaning of attributes :
(1) Description of the image
(2) The path to the image file
(3) Image type , Such as kernel、ramdisk or fdt
(4) Supported Architecture
(5) Supported operating systems
(6) The compression algorithm it uses
(7) Load address
(8) Running address
(9) Integrity verification uses hash Algorithm
configurations The properties of are relatively simple , It is to specify which one to use under a certain configuration kernel、dtb and ramdisk Mirror image .Fit image In addition to supporting integrity verification , It can also support hash Algorithm + Asymmetric algorithm secure boot programme , For example: :
kernel {

			data = /incbin/("test-kernel.bin");
			type = "kernel_noload";
			arch = "sandbox";
			os = "linux";
			compression = "none";
			load = <0x4>;
			entry = <0x8>;
			kernel-version = <1>;
			signature {

				algo = "sha1,rsa2048";        (1)
				key-name-hint = "dev";       (2)
			};
		};
(1) Appoint sha1 by secure boot Signature used hash Algorithm ,rsa2048 The signature algorithm used for it
(2) Possible signature verification key names
Similar to the device tree ,its Documents can be passed through mkimage and dtc Compile the generated itb file . The image generation method is as follows :
mkimage -f xxx.its xxx.itb
xxx.itb Documents can be sent directly to uboot, And pass bootm Command execution , Such as xxx.itb Be loaded to 0x80000000, The order is as follows :
bootm 0x80000000
If you need to select a non default image configuration , Can be achieved by specifying the configuration sequence number , for example :
bootm 0x80000000#[email protected]2
2.3 Boot image Format
boot image yes android Defined startup image format , So far, three versions have been defined (v0 – v2), among v0 Version contains andr_img_hdr、kernel、ramdisk and second stage,v1 Version added recovery dtbo/acpio,v2 The version has added dtb. In these mirrors second stage It's optional , and recovery dtbo Only in use recovery Partition non AB Only in the system , And they all need page alignment ( Usually it is 2k). Here are boot image Basic format of image :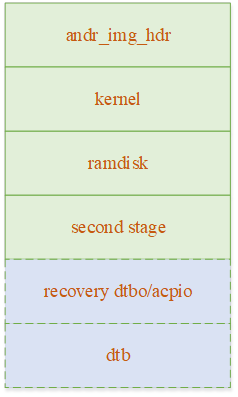
andr_img_hdr The image header is used to describe the information of these images , As long as 、 Load address, etc , Its definition is as follows :
struct andr_img_hdr {

    /* Must be ANDR_BOOT_MAGIC. */
    char magic[ANDR_BOOT_MAGIC_SIZE];

    u32 kernel_size; /* size in bytes */
    u32 kernel_addr; /* physical load addr */

    u32 ramdisk_size; /* size in bytes */
    u32 ramdisk_addr; /* physical load addr */

    u32 second_size; /* size in bytes */
    u32 second_addr; /* physical load addr */

    u32 tags_addr; /* physical addr for kernel tags */
    u32 page_size; /* flash page size we assume */

    u32 header_version;
    u32 os_version;

    char name[ANDR_BOOT_NAME_SIZE]; /* asciiz product name */

    char cmdline[ANDR_BOOT_ARGS_SIZE];

    u32 id[8]; /* timestamp / checksum / sha1 / etc */

    char extra_cmdline[ANDR_BOOT_EXTRA_ARGS_SIZE];

    u32 recovery_dtbo_size;   /* size in bytes for recovery DTBO/ACPIO image */
    u64 recovery_dtbo_offset; /* offset to recovery dtbo/acpio in boot image */
    u32 header_size;

    u32 dtb_size; /* size in bytes for DTB image */
    u64 dtb_addr; /* physical load address for DTB image */
} __attribute__((packed));
have access to mkbootimg.py Script making boot image Mirror image , The script parameters are relatively simple , It is to specify the relevant parameters defined in the image header . for example :
mkbootimg.py \
    	--base aaa \
        --kernel kernel/arch/arm64/boot/Image.gz \
        --kernel_offset bbb \
        --second kernel/arch/arm64/boot/ccc.dtb \
        --second_offset ddd \
        --board test_board \
        -o boot.img
3 bootm technological process
bootm yes uboot Commands for starting the operating system , Its main process includes obtaining image information according to the image header , Decompression mirror image , And start the operating system . The following is the main implementation process :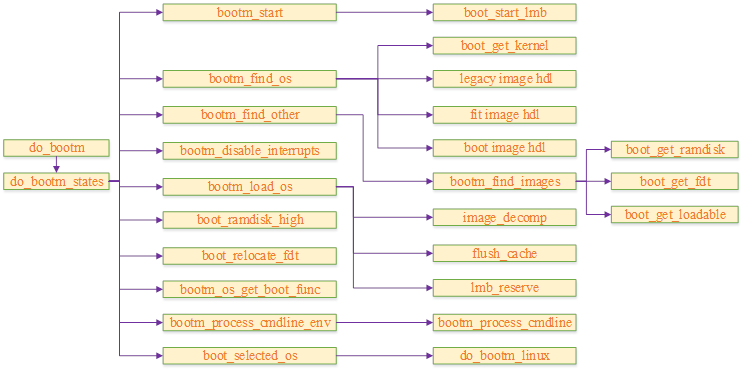
The above process will eventually call a specific os Start function of , For example, you need to start armv8 Architecturally linux, Then the interface it calls is arch/arm/lib/bootm.c Medium do_bootm_linux. The following is its implementation process :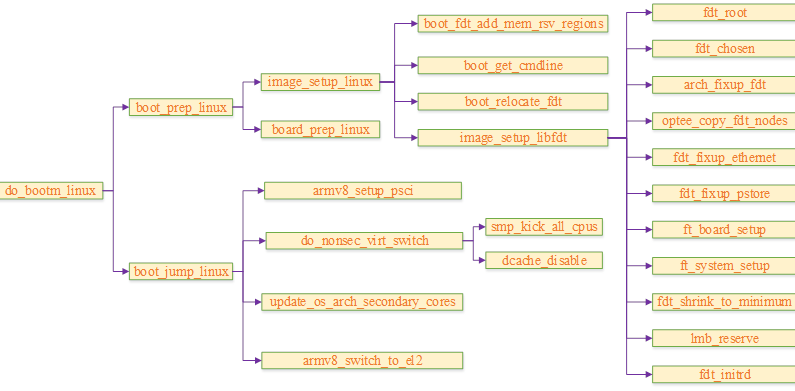
The above processes are relatively intuitive , Interested students can analyze the code by themselves
边栏推荐
- Still cannot find RPC dispatcher table failed to connect in virtual KD
- Network protocol concept
- Zhou Yajin, a top safety scholar of Zhejiang University, is a curiosity driven activist
- ‘module‘ object is not callable错误
- Electron adding SQLite database
- Qt 实现容器的DELETE的方式
- 自律,提升自制力原来也有方法
- MIF file format record
- electron添加SQLite数据库
- R语言使用magick包的image_mosaic函数和image_flatten函数把多张图片堆叠在一起形成堆叠组合图像(Stack layers on top of each other)
猜你喜欢

How to remove addition and subtraction from inputnumber input box

Use metersphere to keep your testing work efficient
通过 Play Integrity API 的 nonce 字段提高应用安全性
Array object sorting
![[untitled]](/img/f0/a34c116a793e844da46c7cd407224b.jpg)
[untitled]
![Verilog design responder [with source code]](/img/91/6359a2f3fa0045b4a88956a475488c.png)
Verilog design responder [with source code]
聊聊SOC启动(十一) 内核初始化
测试开发基础,教你做一个完整功能的Web平台之环境准备

【C#】WinForm运行缩放(变糊)的解决方法
![[untitled]](/img/c2/d70d052b7e9587dc81c622f62f8566.jpg)
[untitled]
随机推荐
Array object sorting
[untitled]
如何在博客中添加Aplayer音乐播放器
创意信息获2家机构调研:GreatDB 数据库已在9地部署
2021-05-21
R语言使用magick包的image_mosaic函数和image_flatten函数把多张图片堆叠在一起形成堆叠组合图像(Stack layers on top of each other)
Audit migration
基于Retrofit框架的金山API翻译功能案例
关于测试人生的一站式发展建议
Vscode 尝试在目标目录创建文件时发生一个错误:拒绝访问【已解决】
[untitled]
The concept, implementation and analysis of binary search tree (BST)
R language uses image of magick package_ Mosaic functions and images_ The flatten function stacks multiple pictures together to form a stack layers on top of each other
[untitled]
对比学习之 Unsupervised Learning of Visual Features by Contrasting Cluster Assignments
浙江大学周亚金:“又破又立”的顶尖安全学者,好奇心驱动的行动派
The use of list and Its Simulation Implementation
【问道】编译原理
STM32入门开发 编写DS18B20温度传感器驱动(读取环境温度、支持级联)
Debezium同步之Debezium架构详解