当前位置:网站首页>JMeter-接口自动化测试读取用例,执行并结果回写
JMeter-接口自动化测试读取用例,执行并结果回写
2022-07-07 21:50:00 【测试架构师北凡】
前言:
【文章末尾给大家准备了大量的福利】
一:环境准备
1.下载jxl.jar这个jar包
2.下载好之后,放到Jmeter的安装路径下的lib目录下
3.jxl.jar的作用:完成对Excel的读写以及修改操作
如何利用jmter操作excel的思路分析:
1,Excell一般有三个最重要的元素:workbook,sheet,cell
2,想要把结果储存到指定的单元格,那就必须依照这个三个元素来定位。
3,先获取excel的文件名称
4,获取表单名
5,获取单元格的坐标
6,获取结果,写入到对应的单元格去
7,需要利用beanshell写java代码,获取对应的数据写入到Excel里面去。
二:测试数据结构准备
准备的数据如下:(1)测试用例文件命名为user.csv (2)测试数据文件命名为num.csv
注意:先新建txt文件,然后将文件扩展名改为csv,不要新建xls再改为csv,不然会出现读取不到文件的情况
1.创建测试用例文件,并导入到CSV Data Set Config,命名为test_case,并设置相关属性(注意圈起来的部分)


2.创建测试数据文件,并导入到CSV Data Set Config,命名为test_data,并写入变量名为tel,pwd


三:(1)新建线程组,创建一个登录请求的http,并传入相关的参数

(2)新建一个正则表达式提取器,获取http请求返回的结果

四:代码准备,编写好代码后,导出jar包,命名为CWResultFile.jar,将导出的jar包放入放到Jmeter的安装路目录下的lib--ext目录下,然后记得重启Jmeter,不然不生效
import java.io.File;
import java.io.FileInputStream;
import java.io.IOException;
import java.io.InputStream;
import java.text.SimpleDateFormat;
import java.util.Date;
import jxl.Cell;
import jxl.Workbook;
import jxl.format.Alignment;
import jxl.format.Colour;
import jxl.format.VerticalAlignment;
import jxl.read.biff.BiffException;
import jxl.write.Label;
import jxl.write.WritableCellFormat;
import jxl.write.WritableFont;
import jxl.write.WritableSheet;
import jxl.write.WritableWorkbook;
import jxl.write.WriteException;
import jxl.write.biff.RowsExceededException;

/**导入jxl.jar;*后续扩充功能,sheet2增加测试报告展现;------待实现;*/
public class CWOutputFile {

    public static void main(String[] args) throws RowsExceededException, WriteException, BiffException, IOException{
        CWOutputFile t=new CWOutputFile();
        String File=t.cOutputFile("测试");
    }

    /** wOutputFile方法写结果文件* wOutputFile(文件路径,案例编号,测试验证点,预期结果,实际结果,错误码,状态码,响应结果)*/
    public void wOutputFile(String filepath, String caseNo,String testPoint, String preResult, String fresult, String errCode,String status, String respond) throws IOException,RowsExceededException, WriteException, BiffException
            {
                File output = new File(filepath);
                String result = "";
                InputStream instream = new FileInputStream(filepath);
                Workbook readwb = Workbook.getWorkbook(instream);
                WritableWorkbook wbook = Workbook.createWorkbook(output, readwb); // 根据文件创建一个操作对象
                WritableSheet readsheet = wbook.getSheet(0);
                //int rsColumns = readsheet.getColumns(); //获取Sheet表中所包含的总列数
                int rsRows = readsheet.getRows();
                // 获取Sheet表中所包含的总行数
                /********************************字体样式设置 ****************************/
                WritableFont font = new WritableFont(WritableFont.createFont("宋体"), 10,WritableFont.NO_BOLD);// 字体样式
                WritableCellFormat wcf = new WritableCellFormat(font);
                /***********************************************************************/
                Cell cell1 = readsheet.getCell(0, rsRows);
                if (cell1.getContents().equals("")) {
                    Label labetest1 = new Label(0, rsRows, caseNo);// 第1列--案例编号;
                    Label labetest2 = new Label(1, rsRows, testPoint); // 第2列--验证测试点;
                    Label labetest3 = new Label(2, rsRows, preResult); // 第3列--预期结果;
                    Label labetest4 = new Label(3, rsRows, fresult);// 第4列--实际结果;
                    Label labetest5 = new Label(4, rsRows, errCode);// 第5列--错误码;
                    if (preResult == fresult) {
                        result = "通过";wcf.setBackground(Colour.BRIGHT_GREEN); // 通过案例标注绿色
                        }
                    else {result = "不通过";wcf.setBackground(Colour.RED);// 不通过案例标注红色
                    }
                    Label labetest6 = new Label(5, rsRows, result, wcf); // 第6列--执行结果;
                    Label labetest7 = new Label(6, rsRows, status); // 第7列--状态码
                    Label labetest8 = new Label(7, rsRows, respond);// 第8列--响应结果
                    readsheet.addCell(labetest1);
                    readsheet.addCell(labetest2);
                    readsheet.addCell(labetest3);
                    readsheet.addCell(labetest4);
                    readsheet.addCell(labetest5);
                    readsheet.addCell(labetest6);
                    readsheet.addCell(labetest7);
                    readsheet.addCell(labetest8);
                    }
                wbook.write();
                wbook.close();
                }
    /** cOutputFile方法创建输出文件,传入参数为交易类型,如开户等;* cOutputFile方法返回文件路径,作为wOutputFile的入参;*/
    public String cOutputFile(String tradeType)
            throws IOException, WriteException {
                String temp_str = "";
                Date dt = new Date();
                SimpleDateFormat sdf = new SimpleDateFormat("yyyyMMddHHmmss");
                temp_str = sdf.format(dt); // 获取时间戳// 相对路径默认为 apache-jmeter-3.1\bin
                String filepath = "D:\\\\"+tradeType+"_output_" + "_" + temp_str + ".xls"; // 以时间戳命名结果文件,确保唯一
                File output = new File(filepath);
                if (!output.isFile()) {
                    output.createNewFile(); // 如果指定文件不存在,则新建该文件
                    WritableWorkbook writeBook = Workbook.createWorkbook(output);
                    WritableSheet Sheet = writeBook.createSheet("输出结果", 0); // createSheet(sheet名称,第几个sheet)
                    WritableFont headfont = new WritableFont(WritableFont.createFont("宋体"), 11, WritableFont.BOLD); // 字体样式
                    WritableCellFormat headwcf = new WritableCellFormat(headfont);
                    headwcf.setBackground(Colour.GRAY_25); // 灰色颜色
                    Sheet.setColumnView(0, 11); // 设置列宽度setColumnView(列号,宽度)
                    Sheet.setColumnView(1, 30);
                    Sheet.setColumnView(2, 35);
                    Sheet.setColumnView(3, 35);
                    Sheet.setColumnView(4, 18);
                    Sheet.setColumnView(5, 11);
                    Sheet.setColumnView(6, 11);
                    Sheet.setColumnView(7, 50);
                    headwcf.setAlignment(Alignment.CENTRE); // 设置文字居中对齐方式;
                    headwcf.setVerticalAlignment(VerticalAlignment.CENTRE); // 设置垂直居中;
                    Label labe00 = new Label(0, 0, "案例编号", headwcf); // Label(列号,行号, 内容)
                    Label labe10 = new Label(1, 0, "验证测试点", headwcf);
                    Label labe20 = new Label(2, 0, "预期结果", headwcf);
                    Label labe30 = new Label(3, 0, "实际结果", headwcf);
                    Label labe40 = new Label(4, 0, "错误码", headwcf);
                    Label labe50 = new Label(5, 0, "执行结果", headwcf);
                    Label labe60 = new Label(6, 0, "返回状态", headwcf);
                    Label labe70 = new Label(7, 0, "响应结果", headwcf);
                    Sheet.addCell(labe00);
                    Sheet.addCell(labe10);
                    Sheet.addCell(labe20);
                    Sheet.addCell(labe30);
                    Sheet.addCell(labe40);
                    Sheet.addCell(labe50);
                    Sheet.addCell(labe60);
                    Sheet.addCell(labe70);
                    writeBook.write();
                    writeBook.close();
                    }
                return filepath;
                }
    }
五:添加一个beanshell取样器调用代码,并且用到仅一次控制器(因为只需要导出一个Excel文件)
t=new CWOutputFile();
String filepath=t.cOutputFile("测试");
vars.put("filepath",filepath);//转为jMeter变量,方便后期获取。
六:再创建一个beanshell取样器调用代码,写入数据到Excel文件中
s=new CWOutputFile();
String testData="{"+"\"mobilephone\":\""+"${tel}\","+"\"pwd\":\""+"${pwd}\""+"}";
String preResult=vars.get("preResult");//用get方法可以确保获取到的是字符串,里面传递的是变量名,不需要用${变量名}这种方式咯!
String fresult=vars.get("fresult");
s.wOutputFile("${filepath}", "${caseNo}","${testPoint}",testData,preResult,fresult);
七:点击运行,在D盘找到测试结果文件即可

测试结果文件如下

重点:学习资料学习当然离不开资料,这里当然也给你们准备了600G的学习资料
需要的先关注再私我关键字【000】免费获取哦 注意关键字是:000
疑惑:为什么要先关注呢? 回:因为没关注的话私信回了你看不到
项目实战
app项目,银行项目,医药项目,电商,金融

大型电商项目

全套软件测试自动化测试教学视频

300G教程资料下载【视频教程+PPT+项目源码】

全套软件测试自动化测试大厂面经

python自动化测试++全套模板+性能测试


听说关注我并三连的铁汁都已经升职加薪暴富了哦!!!!
边栏推荐
- PCL .vtk文件与.pcd的相互转换
- Are the microorganisms in the intestines the same as those on the skin?
- U盘拷贝东西时,报错卷错误,请运行chkdsk
- Unity 动态合并网格纹理
- Digital transformation: five steps to promote enterprise progress
- Explain in detail the communication mode between arm A7 and risc-v e907 on Quanzhi v853
- Debezium series: set role statement supporting mysql8
- PCL . VTK files and Mutual conversion of PCD
- 嵌入式音频开发中的两种曲线
- 7-18 simple simulation of banking business queue
猜你喜欢
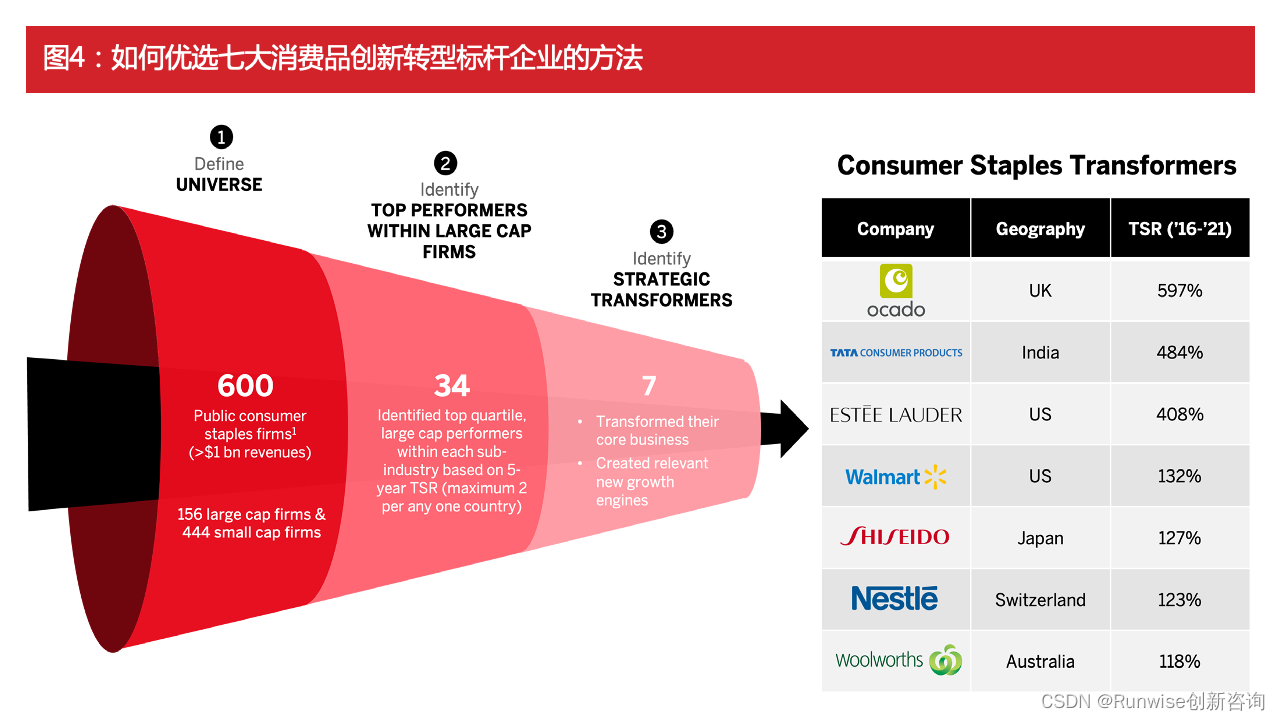
消费品企业敏捷创新转型案例
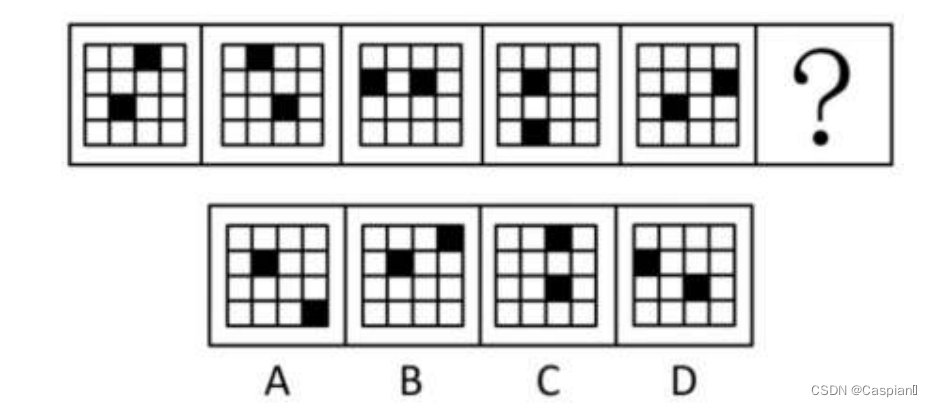
Line test - graphic reasoning - 2 - black and white lattice class

ASEMI整流桥KBPC1510的型号数字代表什么
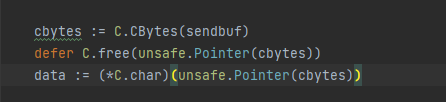
Develop those things: go plus c.free to free memory, and what are the reasons for compilation errors?
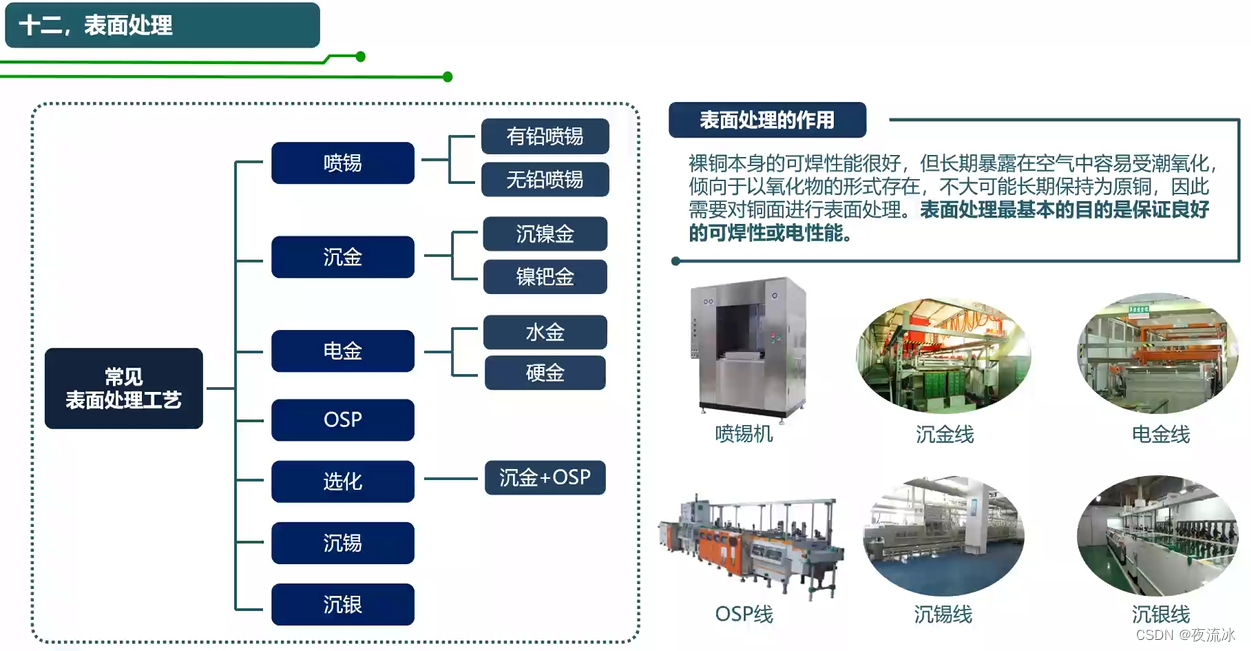
知识点滴 - PCB制造工艺流程
行测-图形推理-2-黑白格类

Personal statement of testers from Shuangfei large factory: is education important for testers?
一次搞明白 Session、Cookie、Token,面试问题全稿定
微信论坛交流小程序系统毕业设计毕设(7)中期检查报告

iNFTnews | Web5 vs Web3:未来是一个过程,而不是目的地
随机推荐
Installing vmtools is gray
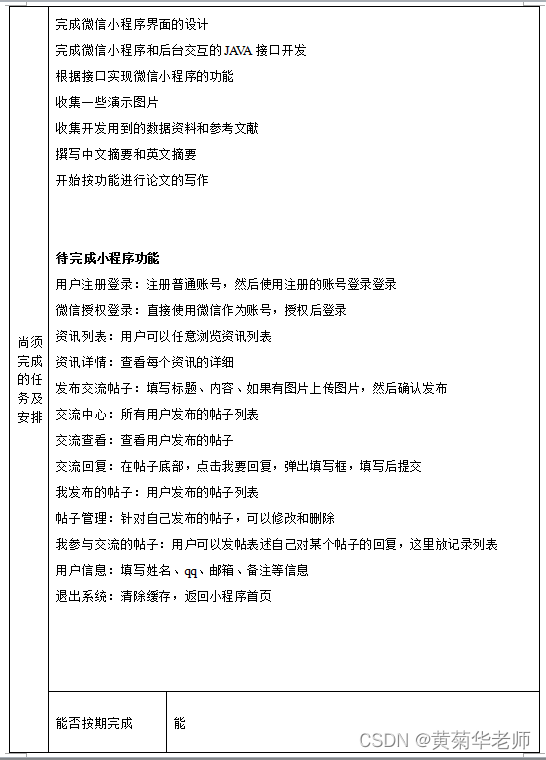
微信论坛交流小程序系统毕业设计毕设(2)小程序功能
Line test - graphic reasoning - 1 - Chinese character class
Clean C disk
Sword finger offer 27 Image of binary tree
Cases of agile innovation and transformation of consumer goods enterprises
网络安全-beef
[untitled] reprint melting ice - track icedid server with a few simple steps
Years of summary, some core suggestions for learning programming
网络安全-对操作系统进行信息查询
Debezium系列之:支持 mysql8 的 set role 语句
Brush question 6
The wonderful relationship between message queue and express cabinet
The author of LinkedList said he didn't use LinkedList himself
Line test - graphic reasoning -7- different graphic classes
ArcGIS:字段赋值_属性表字段计算器(Field Calculator)依据条件为字段赋值
Txt file virus
Some parameters of Haikang IPC
Line test - graphic reasoning -5- one stroke class
Microbial Health Network, How to restore Microbial Communities