当前位置:网站首页>. Net core - a queuing system for wechat official account
. Net core - a queuing system for wechat official account
2022-07-03 10:52:00 【Dotnet cross platform】
Part1 Preface
Wechat code scanning login , Wechat scanning code to obtain queuing information is very common , But you know how the principle is realized ? Today I'm going to solve your doubts !
Part2 Overall process
1 The browser requests the server to get the QR code image
The browser generates a unique value uuid
adopt uuid Get the QR code with parameters , take uuid As key Put in redis Cache server
Server generation uuid Back to the browser
adopt uuid Get the QR code with parameters , take uuid As key Put in redis Cache server
2 User scan code
Scan QR code by mobile phone , Then carry it with your mobile phone uuid And user information to send a request to the server of the mobile phone , The mobile server will carry it after receiving it uuid Go to redis The server queries the user .
Sweep the login code :
After querying the user successfully, a Token To web server , By parsing this Token You can take out the user's information , Then the browser successfully logged into wechat .
Push queue information Call the template message after querying the user successfully , Then the queue information push succeeds .
Part3 Development
Take wechat scanning code to obtain queuing information as an example
First step , obtain uuid
To simplify the process , And generated by the front end uuid.
The second step , obtain Access token
public async Task<string> GetAccessToken()
        {
            var accesstoken = await "https://api.weixin.qq.com/cgi-bin/token"
                    .SetQueryParams(new
                    {
                        grant_type = "client_credential",
                        appid = WeixinSetting.Appid,
                        secret = WeixinSetting.Appsecret
                    })
                 .GetJsonAsync<AccessToken>();
            return accesstoken.Access_Token;
        }
The third step , Use uuid Create QR code ticket
public async Task<string> GetTicket(string uuid, string token)
        {


            var accesstoken = await "https://api.weixin.qq.com/cgi-bin/qrcode/create"
                .SetQueryParams(new
                {
                    access_token = token
                })
                .PostJsonAsync(new
                {
                    expire_seconds = 604800,
                    action_name = "QR_STR_SCENE",
                    action_info = new
                    {
                        scene = new
                        {
                            scene_str = uuid
                        }
                    }
                }).ReceiveJson<TicketUrl>();


            return accesstoken.Ticket;


        }
Step four , adopt ticket In exchange for QR code
If you have passed ticket Requirements for generating QR code , It can be handled by itself , If there is no interface that can directly access wechat official account
public async Task<byte[]> GetQrCode(string ticket)
        {
            return await "https://mp.weixin.qq.com/cgi-bin/showqrcode"
             .SetQueryParams(new
             {
                 ticket = ticket
             })
          .GetBytesAsync();

        }
The complete code is as follows
[HttpGet("GetQrCode")]
        public async Task<IActionResult> GetQrCode(string uuid)
        {
            return new FileContentResult( await _qrCodeServices.ShowQrCode(uuid), "image/jpeg");
        }
public async Task<byte[]> ShowQrCode(string uuid)
{
string token = await GetAccessToken();
string ticket = await GetTicket(uuid, token);
return await GetQrCode(ticket);
}In this way, we will generate a QR code image with parameters

Step six , Wechat scanning code for callback
Handle the message template push logic in the callback method
[HttpPost]
        public async Task<string> post()
        {
            IHttpBodyControlFeature httpBodyControlFeature = Request.HttpContext.Features.Get<IHttpBodyControlFeature>();
            if (httpBodyControlFeature != null )
            {
                httpBodyControlFeature.AllowSynchronousIO = true;
            }
            string content = new StreamReader(Request.Body).ReadToEnd();

            await qrCodeServices.PushTemplateMessage(content);
            return "success";

        }
public async Task PushTemplateMessage(string content)
{
XmlDocument doc = new XmlDocument();
doc.LoadXml(content);
if (doc.DocumentElement["MsgType"].InnerText != "Event") return;
if (doc.DocumentElement["Event"].InnerText != "SCAN") return;
string value = doc.DocumentElement["FromUserName"].InnerText;
string token = await GetAccessToken();
var accesstoken = await "https://api.weixin.qq.com/cgi-bin/message/template/send"
.SetQueryParams(new
{
access_token = token
})
.PostJsonAsync(new
{
touser = value,
template_id = "i4h4yHvgMgIoJ8-Mr49XcpbhMxmRXFJ5EF5DoOTGOMc",
data = new
{
first = new
{
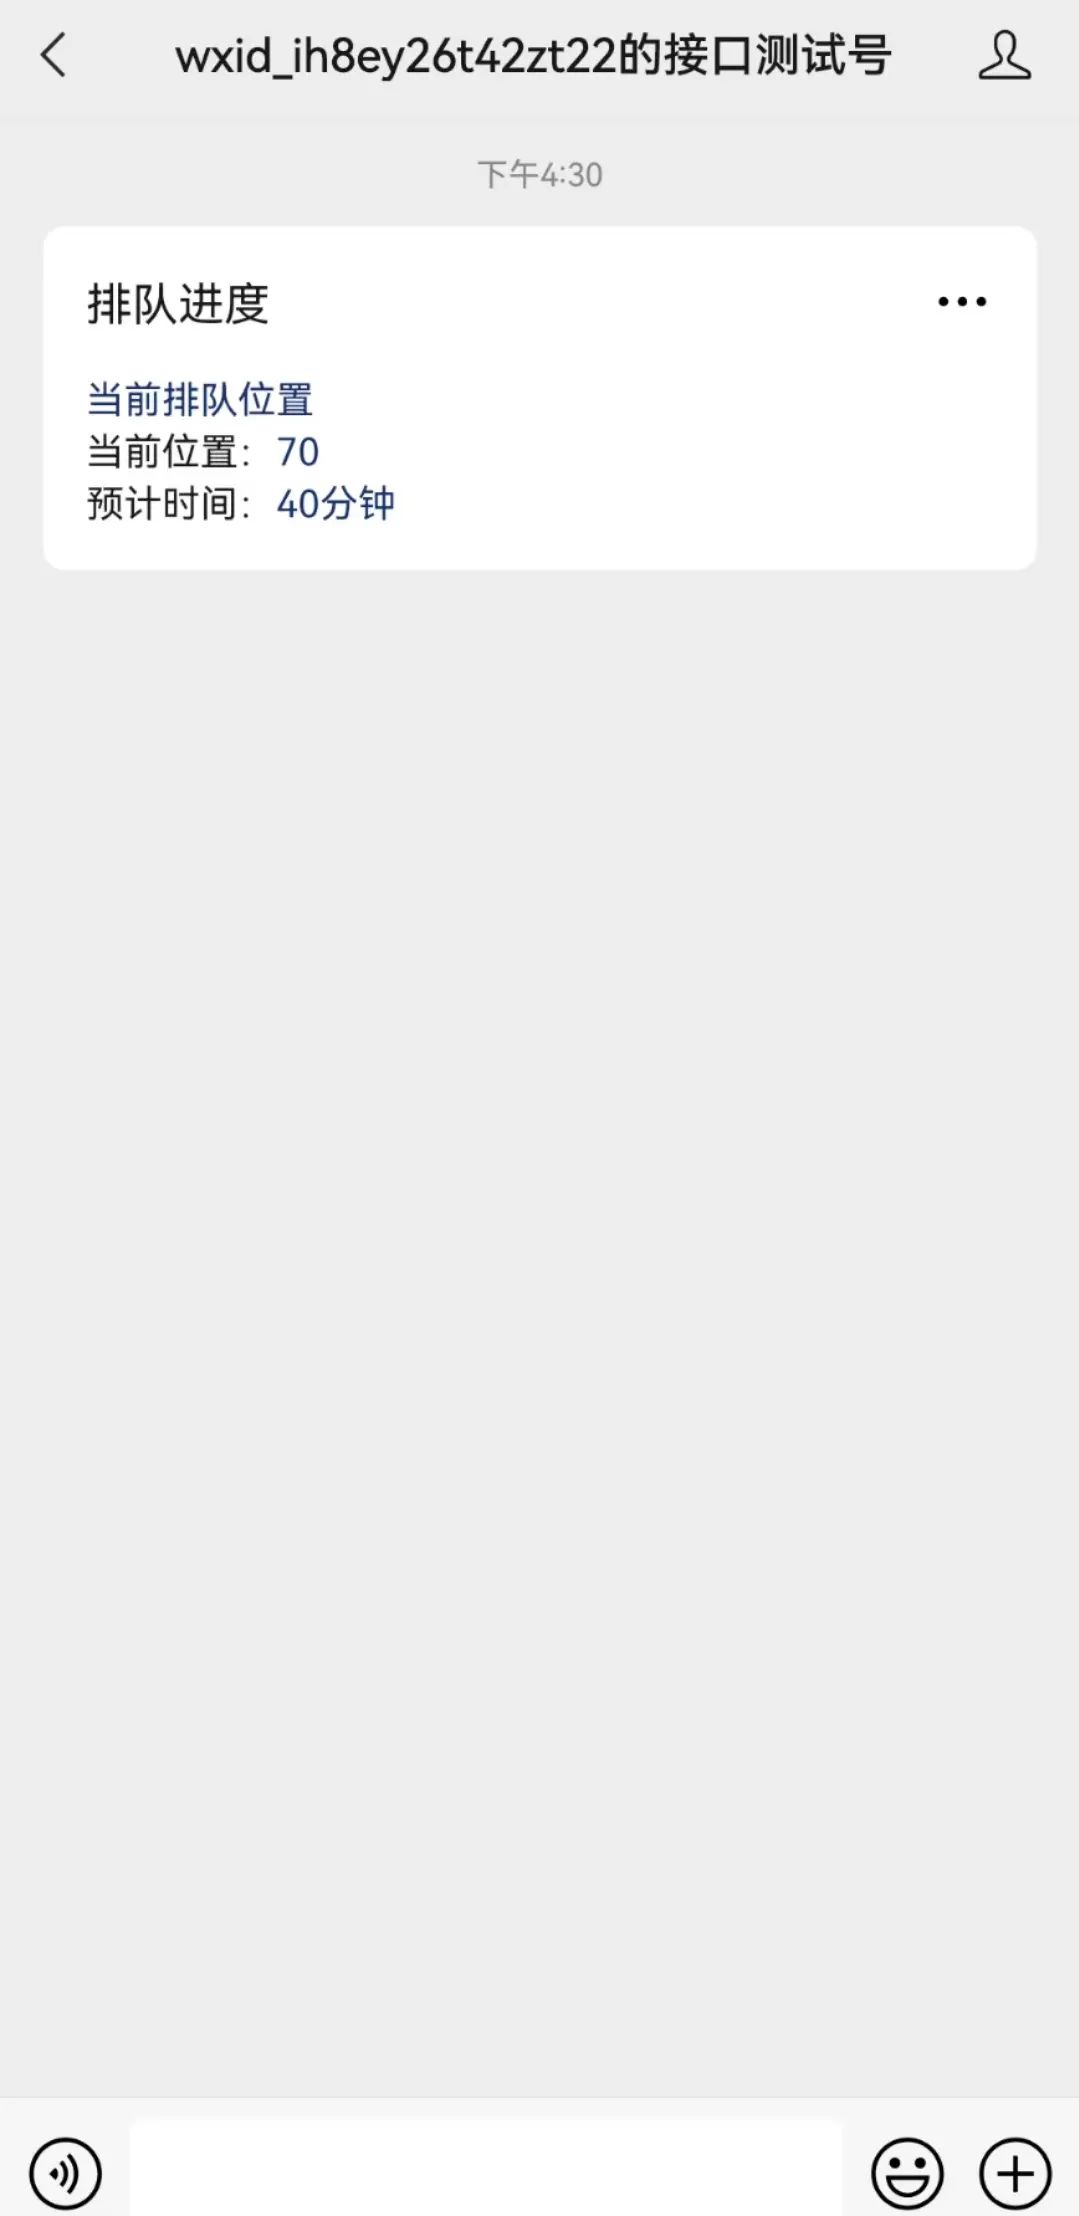
value = " Current queue location ",
color = "#173177"
},
keyword1 = new
{
value = "70",
color = "#173177"
},
keyword2 = new
{
value = "40 minute ",
color = "#173177"
}
}
});
}In this way, it is successful to scan wechat code to obtain queuing information
Part4 summary
The article comes from every bit of life , This is also my improvisation , If you have better skills , Welcome to exchange , It is much joyful to share the joy than enjoy alone. , That's all for this article , I hope it will help you .
边栏推荐
- Unity学习笔记:联网游戏Pixel Adventure 1学习过程&纠错心得
- snownlp情感分析
- Iterator iterator enhances for loop
- Chiyou (), a specific mythical image, is also gradually abstracted as a dramatic character type "Jing". "Jing", born in Dan Dynasty and ugly at the end, is the earliest "profession" in Chinese drama
- [combinatorial mathematics] pigeon nest principle (simple form examples of pigeon nest Principle 4 and 5)
- Strategic management of project organization
- 6、 Data definition language of MySQL (1)
- Leetcode skimming ---263
- Set ArrayList nested map set loop traversal
- A detailed explanation of vector derivative and matrix derivative
猜你喜欢
Weight decay (pytorch)

“测试人”,有哪些厉害之处?
软件测试必学基本理论知识——APP测试

帶你走進雲原生數據庫界扛把子Amazon Aurora

Model selection for neural network introduction (pytorch)

2021-09-22
Numpy quick start (II) -- Introduction to array (creation of array + basic operation of array)

7、 Data definition language of MySQL (2)
Entropy method to calculate weight

Pytoch has been installed, but vs code still displays no module named 'torch‘
随机推荐
帶你走進雲原生數據庫界扛把子Amazon Aurora
Flink chain conditional source code analysis
Leetcode skimming ---75
Mysql5.7 installation and configuration tutorial (Graphic ultra detailed version)
硬 货 | 一改测试步骤代码就全写?为什么不试试用 Yaml实现数据驱动?
软件测试——Redis数据库
Entropy method to calculate weight
测试Leader应该做哪些事
【蓝桥杯选拔赛真题44】Scratch消灭骷髅军团 少儿编程scratch蓝桥杯选拔赛真题讲解
Practical part: conversion of Oracle Database Standard Edition (SE) to Enterprise Edition (EE)
If you always feel that you need to persist in learning English
MySql 怎么查出符合条件的最新的数据行?
Unity学习笔记:个人学习项目《疯狂天才埃德加》纠错文档
Day 7 small exercise
Traversal of map set
Model selection for neural network introduction (pytorch)
How to make a blood bar in the game
Flink <-->JDBC的使用介绍+with参数
[combinatorial mathematics] pigeon nest principle (simple form examples of pigeon nest Principle 4 and 5)
Unity学习笔记:联网游戏Pixel Adventure 1学习过程&纠错心得