当前位置:网站首页>图像超分实验:SRCNN/FSRCNN
图像超分实验:SRCNN/FSRCNN
2022-07-05 12:03:00 【华为云】
图像超分即超分辨率,将图像从模糊的状态变清晰。本文对BSDS500数据集进行超分实验。完整的源码文件/数据集获取方式见文末
1.实验目标
输入大小为h×w的图像X,输出为一个sh×sw的图像 Y,s为放大倍数。
2.数据集简介
本次实验采用的是 BSDS500 数据集,其中训练集包含 200 张图像,验证集包含 100 张图像,测试集包含 200 张图像。
数据集来源:https://download.csdn.net/download/weixin_42028424/11045313
3.数据预处理
数据预处理包含两个步骤:
(1)将图片转换成YCbCr模式
由于RGB颜色模式色调、色度、饱和度三者混在一起难以分开,因此将其转换成 YcbCr 颜色模式,Y是指亮度分量,Cb表示 RGB输入信号蓝色部分与 RGB 信号亮度值之间的差异,Cr 表示 RGB 输入信号红色部分与 RGB 信号亮度值之间的差异。
(2)将图片裁剪成 300×300 的正方形
由于后面采用的神经网路输入图片要求长宽一致,而 BSDS500 数据集中的图片长宽并不一致,因此需要对其进行裁剪。这里采用的方式是先定位到每个图片中心,然后以图片中心为基准,向四个方向拓展 150 个像素,从而将图片裁剪成 300×300 的正方形。
相关代码:
def is_image_file(filename): return any(filename.endswith(extension) for extension in [".png", ".jpg", ".jpeg"])def load_img(filepath): img = Image.open(filepath).convert('YCbCr') y, _, _ = img.split() return yCROP_SIZE = 300class DatasetFromFolder(Dataset): def __init__(self, image_dir, zoom_factor): super(DatasetFromFolder, self).__init__() self.image_filenames = [join(image_dir, x) for x in listdir(image_dir) if is_image_file(x)] crop_size = CROP_SIZE - (CROP_SIZE % zoom_factor) # 从图片中心裁剪成300*300 self.input_transform = transforms.Compose([transforms.CenterCrop(crop_size), transforms.Resize( crop_size // zoom_factor), transforms.Resize( crop_size, interpolation=Image.BICUBIC), # BICUBIC 双三次插值 transforms.ToTensor()]) self.target_transform = transforms.Compose( [transforms.CenterCrop(crop_size), transforms.ToTensor()]) def __getitem__(self, index): input = load_img(self.image_filenames[index]) target = input.copy() input = self.input_transform(input) target = self.target_transform(target) return input, target def __len__(self): return len(self.image_filenames)4.网络结构
本次实验尝试了SRCNN和FSRCNN两个网络。
4.1 SRCNN
SRCNN 由 2014 年 Chao Dong 等人提出,是深度学习在图像超分领域的开篇之作。其网络结构如下图所示: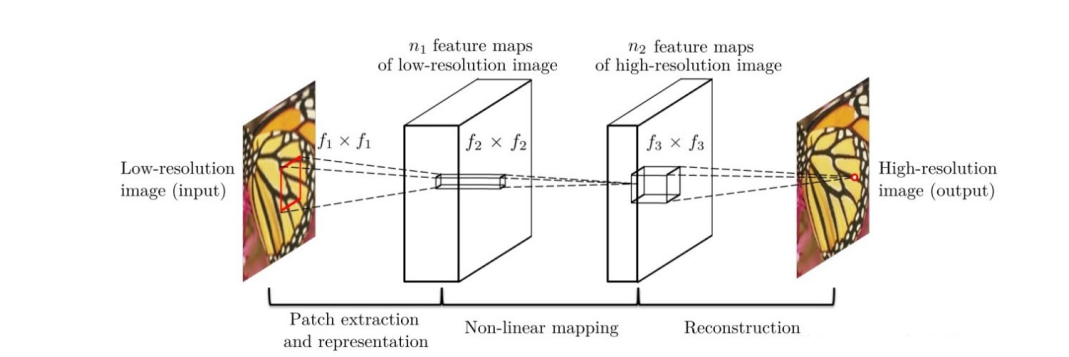
该网络对于一个低分辨率图像,先使用双三次插值将其放大到目标大小,再通过三层卷积网络做非线性映射,得到的结果作为高分辨率图像输出。
作者对于这三层卷积层的解释:
(1)特征块提取和表示:此操作从低分辨率图像Y中提取重叠特征块,并将每个特征块表示为一个高维向量。这些向量包括一组特征图,其数量等于向量的维数。
(2)非线性映射:该操作将每个高维向量非线性映射到另一个高维向量。每个映射向量在概念上都是高分辨率特征块的表示。这些向量同样包括另一组特征图。
(3)重建:该操作聚合上述高分辨率patch-wise(介于像素级别和图像级别的区域)表示,生成最终的高分辨率图像。
各层结构:
- 输入:处理后的低分辨率图像
- 卷积层 1:采用 9×9 的卷积核
- 卷积层 2:采用 1×1 的卷积核
- 卷积层 3:采用 5×5 的卷积核
- 输出:高分辨率图像
模型结构代码:
class SRCNN(nn.Module): def __init__(self, upscale_factor): super(SRCNN, self).__init__() self.relu = nn.ReLU() self.conv1 = nn.Conv2d(1, 64, kernel_size=5, stride=1, padding=2) self.conv2 = nn.Conv2d(64, 64, kernel_size=3, stride=1, padding=1) self.conv3 = nn.Conv2d(64, 32, kernel_size=3, stride=1, padding=1) self.conv4 = nn.Conv2d(32, upscale_factor ** 2, kernel_size=3, stride=1, padding=1) self.pixel_shuffle = nn.PixelShuffle(upscale_factor) self._initialize_weights() def _initialize_weights(self): init.orthogonal_(self.conv1.weight, init.calculate_gain('relu')) init.orthogonal_(self.conv2.weight, init.calculate_gain('relu')) init.orthogonal_(self.conv3.weight, init.calculate_gain('relu')) init.orthogonal_(self.conv4.weight) def forward(self, x): x = self.conv1(x) x = self.relu(x) x = self.conv2(x) x = self.relu(x) x = self.conv3(x) x = self.relu(x) x = self.conv4(x) x = self.pixel_shuffle(x) return x4.2 FSRCNN
FSRCNN 由 2016 年 Chao Dong 等人提出,与 SRCNN 是相同作者。其网络结构如下图所示: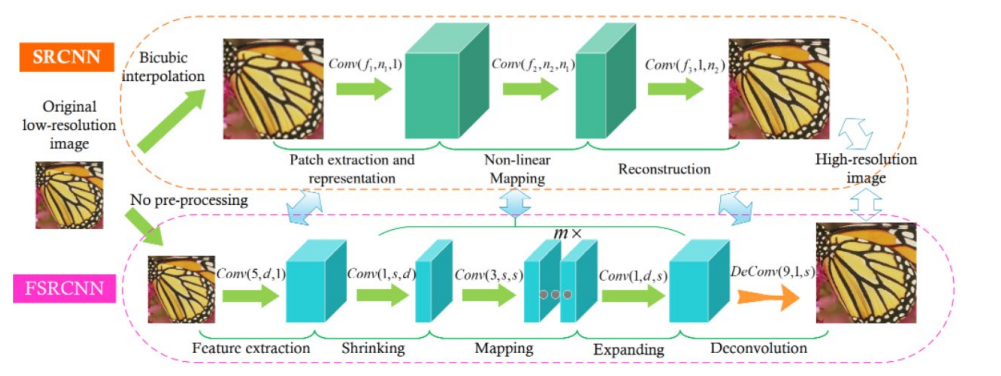
FSRCNN在SRCNN基础上做了如下改变:
1.FSRCNN直接采用低分辨的图像作为输入,不同于SRCNN需要先对低分辨率的图像进行双三次插值然后作为输入;
2.FSRCNN在网络的最后采用反卷积层实现上采样;
3.FSRCNN中没有非线性映射,相应地出现了收缩、映射和扩展;
4.FSRCNN选择更小尺寸的滤波器和更深的网络结构。
各层结构:
- 输入层:FSRCNN不使用bicubic插值来对输入图像做上采样,它直接进入特征提取层
- 特征提取层:采用1 × d × ( 5 × 5 )的卷积层提取
- 收缩层:采用d × s × ( 1 × 1 ) 的卷积层去减少通道数,来减少模型复杂度
- 映射层:采用s × s × ( 3 × 3 ) 卷积层去增加模型非线性度来实现LR → SR 的映射
- 扩张层:该层和收缩层是对称的,采用s × d × ( 1 × 1 ) 卷积层去增加重建的表现力
- 反卷积层:s × 1 × ( 9 × 9 )
- 输出层:输出HR图像
模型结构代码:
class FSRCNN(nn.Module): def __init__(self, scale_factor, num_channels=1, d=56, s=12, m=4): super(FSRCNN, self).__init__() self.first_part = nn.Sequential( nn.Conv2d(num_channels, d, kernel_size=5, padding=5//2), nn.PReLU(d) ) self.mid_part = [nn.Conv2d(d, s, kernel_size=1), nn.PReLU(s)] for _ in range(m): self.mid_part.extend([nn.Conv2d(s, s, kernel_size=3, padding=3//2), nn.PReLU(s)]) self.mid_part.extend([nn.Conv2d(s, d, kernel_size=1), nn.PReLU(d)]) self.mid_part = nn.Sequential(*self.mid_part) self.last_part = nn.ConvTranspose2d(d, num_channels, kernel_size=9, stride=scale_factor, padding=9//2, output_padding=scale_factor-1) self._initialize_weights() def _initialize_weights(self): for m in self.first_part: if isinstance(m, nn.Conv2d): nn.init.normal_(m.weight.data, mean=0.0, std=math.sqrt(2/(m.out_channels*m.weight.data[0][0].numel()))) nn.init.zeros_(m.bias.data) for m in self.mid_part: if isinstance(m, nn.Conv2d): nn.init.normal_(m.weight.data, mean=0.0, std=math.sqrt(2/(m.out_channels*m.weight.data[0][0].numel()))) nn.init.zeros_(m.bias.data) nn.init.normal_(self.last_part.weight.data, mean=0.0, std=0.001) nn.init.zeros_(self.last_part.bias.data) def forward(self, x): x = self.first_part(x) x = self.mid_part(x) x = self.last_part(x) return x5.评估指标
本次实验尝试了 PSNR 和 SSIM 两个指标。
5.1 PSNR
PSNR(Peak Signal to Noise Ratio)为峰值信噪比,计算公式如下: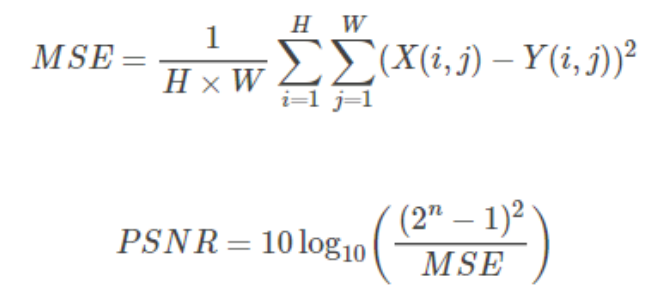
其中,n为每像素的比特数。
PSNR 的单位是dB,数值越大表示失真越小,一般认为 PSNR 在 38 以上的时候,人眼就无法区分两幅图片了。
相关代码:
def psnr(loss): return 10 * log10(1 / loss.item())5.2 SSIM
SSIM(Structural Similarity)为结构相似性,由三个对比模块组成:亮度、对比度、结构。
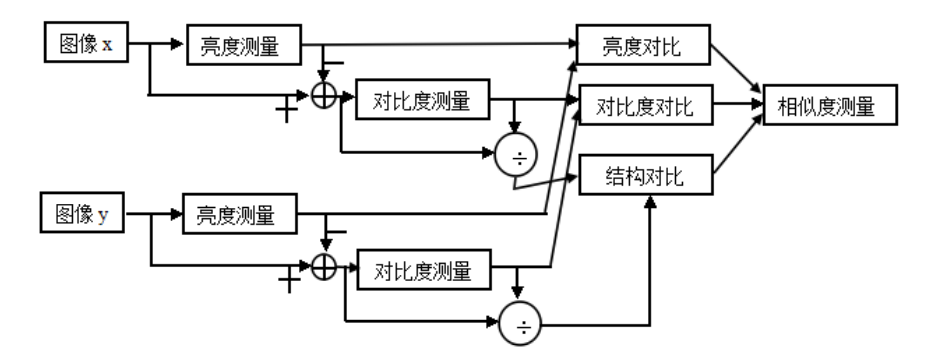
亮度对比函数
图像的平均灰度计算公式:
亮度对比函数计算公式:
对比度对比函数
图像的标准差计算公式:
对比度对比函数计算公式:
结构对比函数
结构对比函数计算公式: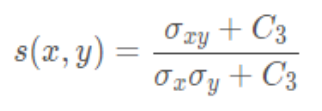
综合上述三个部分,得到 SSIM 计算公式:
其中,,, > 0,用来调整这三个模块的重要性。
SSIM 函数的值域为[0, 1], 值越大说明图像失真越小,两幅图像越相似。
相关代码:
由于pytorch没有类似tensorflow类似tf.image.ssim这样计算SSIM的接口,因此根据公式进行自定义函数用来计算
"""计算ssim函数"""# 计算一维的高斯分布向量def gaussian(window_size, sigma): gauss = torch.Tensor( [exp(-(x - window_size//2)**2/float(2*sigma**2)) for x in range(window_size)]) return gauss/gauss.sum()# 创建高斯核,通过两个一维高斯分布向量进行矩阵乘法得到# 可以设定channel参数拓展为3通道def create_window(window_size, channel=1): _1D_window = gaussian(window_size, 1.5).unsqueeze(1) _2D_window = _1D_window.mm( _1D_window.t()).float().unsqueeze(0).unsqueeze(0) window = _2D_window.expand( channel, 1, window_size, window_size).contiguous() return window# 计算SSIM# 直接使用SSIM的公式,但是在计算均值时,不是直接求像素平均值,而是采用归一化的高斯核卷积来代替。# 在计算方差和协方差时用到了公式Var(X)=E[X^2]-E[X]^2, cov(X,Y)=E[XY]-E[X]E[Y].def ssim(img1, img2, window_size=11, window=None, size_average=True, full=False, val_range=None): # Value range can be different from 255. Other common ranges are 1 (sigmoid) and 2 (tanh). if val_range is None: if torch.max(img1) > 128: max_val = 255 else: max_val = 1 if torch.min(img1) < -0.5: min_val = -1 else: min_val = 0 L = max_val - min_val else: L = val_range padd = 0 (_, channel, height, width) = img1.size() if window is None: real_size = min(window_size, height, width) window = create_window(real_size, channel=channel).to(img1.device) mu1 = F.conv2d(img1, window, padding=padd, groups=channel) mu2 = F.conv2d(img2, window, padding=padd, groups=channel) mu1_sq = mu1.pow(2) mu2_sq = mu2.pow(2) mu1_mu2 = mu1 * mu2 sigma1_sq = F.conv2d(img1 * img1, window, padding=padd, groups=channel) - mu1_sq sigma2_sq = F.conv2d(img2 * img2, window, padding=padd, groups=channel) - mu2_sq sigma12 = F.conv2d(img1 * img2, window, padding=padd, groups=channel) - mu1_mu2 C1 = (0.01 * L) ** 2 C2 = (0.03 * L) ** 2 v1 = 2.0 * sigma12 + C2 v2 = sigma1_sq + sigma2_sq + C2 cs = torch.mean(v1 / v2) # contrast sensitivity ssim_map = ((2 * mu1_mu2 + C1) * v1) / ((mu1_sq + mu2_sq + C1) * v2) if size_average: ret = ssim_map.mean() else: ret = ssim_map.mean(1).mean(1).mean(1) if full: return ret, cs return retclass SSIM(torch.nn.Module): def __init__(self, window_size=11, size_average=True, val_range=None): super(SSIM, self).__init__() self.window_size = window_size self.size_average = size_average self.val_range = val_range # Assume 1 channel for SSIM self.channel = 1 self.window = create_window(window_size) def forward(self, img1, img2): (_, channel, _, _) = img1.size() if channel == self.channel and self.window.dtype == img1.dtype: window = self.window else: window = create_window(self.window_size, channel).to( img1.device).type(img1.dtype) self.window = window self.channel = channel return ssim(img1, img2, window=window, window_size=self.window_size, size_average=self.size_average)6.模型训练/测试
设定 epoch 为 500 次,保存验证集上 PSNR 最高的模型。两个模型在测试集上的表现如下表所示:
从结果可以发现,FSRCNN 的 PSNR 比 SRCNN 低,但 FSRCNN 的 SSIM 比 SRCNN 高,说明 PSNR 和 SSIM 并不存在完全正相关的关系。
训练/验证代码:
model = FSRCNN(1).to(device)criterion = nn.MSELoss()optimizer = optim.Adam(model.parameters(), lr=1e-2)scheduler = MultiStepLR(optimizer, milestones=[50, 75, 100], gamma=0.1)best_psnr = 0.0for epoch in range(nb_epochs): # Train epoch_loss = 0 for iteration, batch in enumerate(trainloader): input, target = batch[0].to(device), batch[1].to(device) optimizer.zero_grad() out = model(input) loss = criterion(out, target) loss.backward() optimizer.step() epoch_loss += loss.item() print(f"Epoch {epoch}. Training loss: {epoch_loss / len(trainloader)}") # Val sum_psnr = 0.0 sum_ssim = 0.0 with torch.no_grad(): for batch in valloader: input, target = batch[0].to(device), batch[1].to(device) out = model(input) loss = criterion(out, target) pr = psnr(loss) sm = ssim(input, out) sum_psnr += pr sum_ssim += sm print(f"Average PSNR: {sum_psnr / len(valloader)} dB.") print(f"Average SSIM: {sum_ssim / len(valloader)} ") avg_psnr = sum_psnr / len(valloader) if avg_psnr >= best_psnr: best_psnr = avg_psnr torch.save(model, r"best_model_FSRCNN.pth") scheduler.step()测试代码:
BATCH_SIZE = 4model_path = "best_model_FSRCNN.pth"testset = DatasetFromFolder(r"./data/images/test", zoom_factor)testloader = DataLoader(dataset=testset, batch_size=BATCH_SIZE, shuffle=False, num_workers=NUM_WORKERS)sum_psnr = 0.0sum_ssim = 0.0model = torch.load(model_path).to(device)criterion = nn.MSELoss()with torch.no_grad(): for batch in testloader: input, target = batch[0].to(device), batch[1].to(device) out = model(input) loss = criterion(out, target) pr = psnr(loss) sm = ssim(input, out) sum_psnr += pr sum_ssim += smprint(f"Test Average PSNR: {sum_psnr / len(testloader)} dB")print(f"Test Average SSIM: {sum_ssim / len(testloader)} ")7.实图测试
为了直观感受两个模型的效果,我用自己拍摄的图进行实图测试,效果如下:
s=1(放大倍数=1)
当放大倍数=1时,SRCNN的超分结果比FSRCNN的超分效果要更好一些,这和两个模型平均 PSNR 的数值相吻合。
s=2(放大倍数=2)

当放大倍数=2时,SRCNN 的超分结果和 FSRCNN 的超分效果相差不大。
相关代码:
# 参数设置zoom_factor = 1model = "best_model_SRCNN.pth"model2 = "best_model_FSRCNN.pth"image = "tree.png"cuda = 'store_true'device = torch.device("cuda:0" if torch.cuda.is_available() else "cpu")# 读取图片img = Image.open(image).convert('YCbCr')img = img.resize((int(img.size[0] * zoom_factor), int(img.size[1] * zoom_factor)), Image.BICUBIC)y, cb, cr = img.split()img_to_tensor = transforms.ToTensor()input = img_to_tensor(y).view(1, -1, y.size[1], y.size[0]).to(device)# 输出图片model = torch.load(model).to(device)out = model(input).cpu()out_img_y = out[0].detach().numpy()out_img_y *= 255.0out_img_y = out_img_y.clip(0, 255)out_img_y = Image.fromarray(np.uint8(out_img_y[0]), mode='L')out_img = Image.merge('YCbCr', [out_img_y, cb, cr]).convert('RGB')model2 = torch.load(model2).to(device)out2 = model2(input).cpu()out_img_y2 = out2[0].detach().numpy()out_img_y2 *= 255.0out_img_y2 = out_img_y2.clip(0, 255)out_img_y2 = Image.fromarray(np.uint8(out_img_y2[0]), mode='L')out_img2 = Image.merge('YCbCr', [out_img_y2, cb, cr]).convert('RGB')# 绘图显示fig, ax = plt.subplots(1, 3, figsize=(20, 20))ax[0].imshow(img)ax[0].set_title("原图")ax[1].imshow(out_img)ax[1].set_title("SRCNN恢复结果")ax[2].imshow(out_img2)ax[2].set_title("FSRCNN恢复结果")plt.show()fig.savefig(r"tree2.png")源码获取
实验报告,完整的源码文件,数据集获取:
https://download.csdn.net/download/qq1198768105/85906814
边栏推荐
- JS for loop number exception
- [calculation of loss in yolov3]
- Liunx prohibit Ping explain the different usage of traceroute
- 【上采样方式-OpenCV插值】
- Thoughts and suggestions on the construction of intelligent management and control system platform for safe production in petrochemical enterprises
- Complete activity switching according to sliding
- [singleshotmultiboxdetector (SSD, single step multi frame target detection)]
- 1 plug-in to handle advertisements in web pages
- Matlab label2idx function (convert the label matrix into a cell array with linear index)
- Shell script file traversal STR to array string splicing
猜你喜欢
Mongodb replica set

《增长黑客》阅读笔记

【yolov5.yaml解析】

Error modulenotfounderror: no module named 'cv2 aruco‘

yolov5目標檢測神經網絡——損失函數計算原理
【SingleShotMultiBoxDetector(SSD,单步多框目标检测)】
Principle of persistence mechanism of redis
Matlab label2idx function (convert the label matrix into a cell array with linear index)

Reading notes of growth hacker

splunk配置163邮箱告警
随机推荐
【ijkplayer】when i compile file “compile-ffmpeg.sh“ ,it show error “No such file or directory“.
redis的持久化机制原理
【TFLite, ONNX, CoreML, TensorRT Export】
[loss functions of L1, L2 and smooth L1]
Network five whip
Seven ways to achieve vertical centering
查看rancher中debug端口信息,并做IDEA Remote Jvm Debug
《增长黑客》阅读笔记
Project summary notes series wstax kt session2 code analysis
Programmers are involved and maintain industry competitiveness
互联网公司实习岗位选择与简易版职业发展规划
【Win11 多用户同时登录远程桌面配置方法】
JS for loop number exception
一类恒等式的应用(范德蒙德卷积与超几何函数)
Recyclerview paging slide
【上采样方式-OpenCV插值】
Linux Installation and deployment lamp (apache+mysql+php)
【yolov5.yaml解析】
嵌入式软件架构设计-消息交互
How to make your products as expensive as possible