当前位置:网站首页>Getting started with Apache dolphin scheduler (one article is enough)
Getting started with Apache dolphin scheduler (one article is enough)
2022-07-05 09:51:00 【Yang Linwei】
List of articles
- 1. summary
- 2. System architecture
- 3. Deploy
- 3.1 Back end deployment
- 3.1.1 Basic software installation
- 3.1.2 Create deployment user
- 3.1.3 Download and unzip
- 3.1.4 in the light of escheduler user ssh No secret configuration
- 3.1.5 Database initialization
- 3.1.6 Modify the deployment directory permissions and operating parameters
- 3.1.7 Execute script one click deployment
- 3.1.8 Description of the backend service process
- 3.1.9 dolphinscheduler Back end services start and stop
- 3.2 Front end deployment
- 4. Quick start
- 5. Worker grouping
- 6. Add data sources
- 7. example
- 8. And Azkaban Comparison of
- 9. Summary
Statement : This article is about 《 Workflow task scheduling system :Apache DolphinScheduler》 Reading notes for , If there is any infringement , Please contact me to delete !
1. summary
Apache DolphinScheduler Official website address :https://dolphinscheduler.apache.org/
Apache DolphinScheduler It's a distribution 、 De centralization 、 Extensible visualization DAG Workflow task scheduling system , Its commitment Solve the complex dependency in the data processing process , Make the scheduling system in the data processing flow Open the box .
DolphinScheduler Provides many easy-to-use features , Speed up data ETL The efficiency of the work development process . Its main features are as follows :
- Drag to
DAGThe way the picture will beTaskLinked by task dependencies , It can monitor the running status of tasks in real time ; - Support rich task types ;
- Support workflow scheduling 、 Rely on scheduling 、 Manual scheduling 、 Manual pause / stop it / recovery , At the same time, it supports failure retry / The alarm 、 Recovery from the specified node failed 、
KillTasks, etc ; - Support workflow global parameters and node custom parameter settings ;
- Support clusters
HA, adoptZookeeperRealizationMasterClusters andWorkerCluster decentralization ; - Support workflow running history tree / Gantt chart shows 、 Support task status statistics 、 Process status statistics ;
- Support complement , Parallel or serial backfill data .
2. System architecture
2.1 A term is used to explain
- Process definition : Visualization by dragging and dropping task nodes and establishing Association of task nodes DAG
- Process instance : A process instance is an instance of a process definition , It can be generated by manual startup or scheduled scheduling , Every time the process definition runs , Generate a process instance ;
- Task instance : A task instance is an instance of a task node in a process definition , Indicates the specific task execution status ;
- Task type : At present, there are
SHELL、SQL、SUB_PROCESS( Sub process )、PROCEDURE、MR、SPARK、PYTHON、DEPENDENT( rely on ), Also plan to support dynamic plug-in extensions , Be careful : One of themSUB_PROCESSIt's also a separate process definition , It can be started separately ; - Dispatch mode : System support is based on
cronRegular scheduling and manual scheduling of expressions . Command types support : Start workflow 、 Execute from the current node 、 Restore the fault tolerant workflow 、 Resume the suspended process 、 Starting from the failed node 、 Complement number 、 timing 、 Heavy run 、 Pause 、 stop it 、 Thread recovery wait . among Restore the fault tolerant workflow and Thread recovery wait The two command types are used by the scheduling internal control , External cannot call - Timing schedule : System USES
quartzDistributed scheduler , And at the same time supportcronGeneration of expression visualization - rely on : The system doesn't just support
DAGSimple dependencies between predecessor and successor nodes , It also provides task dependent nodes , Support custom task dependencies between processes - priority : Support the priority of process instances and task instances , If the priority of process instance and task instance is not set , The default is FIFO
- Email alert : Support
SQLMission Query results are sent by email , Process instance running result email alarm and fault tolerance alarm notification - Failure strategy : For tasks that run in parallel , If a mission fails , Provides two ways to handle failure strategies , Continue means that regardless of the status of parallel running tasks , Until the process fails . End means that once a failed task is found , At the same time Kill Drop running parallel tasks , The process failed
- Complement number : Fill in historical data , Support interval parallel and serial complement methods
2.2 framework
For detailed explanation of the architecture, please refer to the official website documents :https://dolphinscheduler.apache.org/zh-cn/blog/architecture-design.html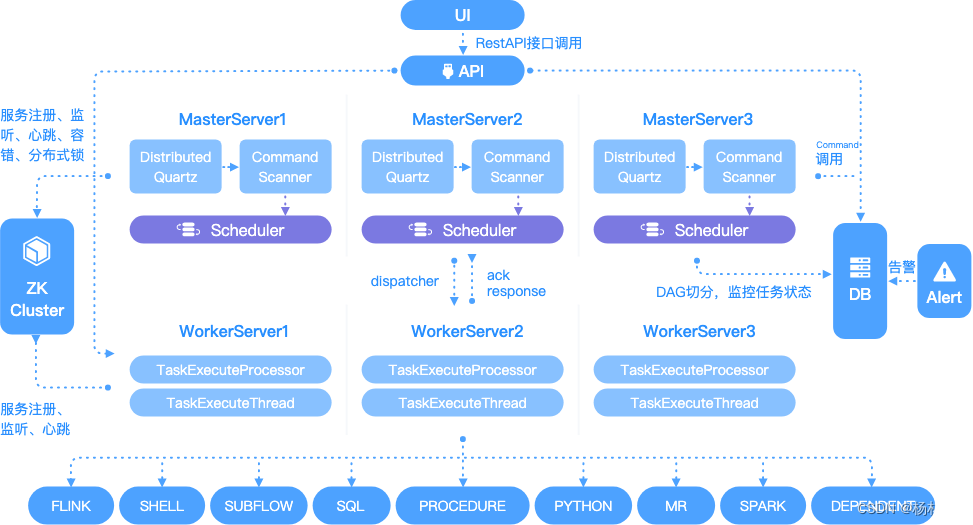
3. Deploy
3.1 Back end deployment
There are 2 There are two ways to deploy , They are automated deployment and compiled source deployment . The following mainly introduces how to download the compiled binary package and complete the one click automatic deployment DolphinScheduler Back end deployment .
3.1.1 Basic software installation
| Software | remarks |
|---|---|
| Mysql (5.5+) | Must install |
| JDK (1.8+) | Must install |
| ZooKeeper(3.4.6+) | Must install |
| Hadoop(2.6+) | Optional packaging , If you need to use the resource upload function ,MapReduce Task submission requires configuration Hadoop( The uploaded resource file is currently saved in Hdfs On ) |
| Hive(1.2.1) | Optional packaging ,hive Task submission requires installation |
| Spark(1.x,2.x) | Optional packaging ,Spark Task submission requires installation |
| PostgreSQL(8.2.15+) | Optional packaging ,PostgreSQL PostgreSQL Stored procedures need to be installed |
Compile time , If it is compiled source code :
- Node.js: Must install
- Maven: Must install ( best 3.6 edition )
Be careful :
EasySchedulerIt doesn't depend onHadoop、Hive、Spark、PostgreSQL, Just call themClient, Used to run the corresponding task .
3.1.2 Create deployment user
Create deployment users on all machines that need deployment scheduling ( This time with node2、node3 Node as an example ), because worker Service is based on sudo -u {linux-user} Way to perform the job , So deployment users need to have sudo jurisdiction , And it's Secret free .
# 1  Create user
useradd escheduler

# 2  Set up  escheduler  User password
passwd escheduler

# 3  give sudo jurisdiction . Editing system  sudoers  file
#  If you don't have edit permission , With root The user login , give w jurisdiction
# chmod 640 /etc/sudoers
vi /etc/sudoers

#  In about 100 That's ok , stay root Add the following below
escheduler  ALL=(ALL)       NOPASSWD: ALL

#  And it needs to be commented out  Default requiretty  a line . If yes, please note , No, no skipping
#Default requiretty

########### end ############

# 4  Switch to  escheduler  user
su escheduler
3.1.3 Download and unzip
# 1  Create installation directory
sudo mkdir /opt/DolphinScheduler

# 2  take DolphinScheduler Given to escheduler user
sudo chown -R escheduler:escheduler /opt/DolphinScheduler

# 3  Download backend . abbreviation escheduler-backend
cd /opt/DolphinScheduler
wget https://github.com/apache/incubator-dolphinscheduler/releases/download/1.1.0/escheduler-1.1.0-backend.tar.gz

# 4  decompression
mkdir escheduler-backend
mkdir escheduler
tar -zxf escheduler-1.1.0-backend.tar.gz -C escheduler
cd escheduler/

# 5  catalogue
 [[email protected] escheduler]$ tree -L 1
 .
 ├── bin           #  Basic service startup script
 ├── conf          #  Project profile
 ├── install.sh    #  One click deployment script
 ├── lib           #  Project dependence jar package , Including each module jar And the third party jar
 ├── script        #  Cluster start 、 Stop and service monitoring start stop script
 └── sql           #  Project dependence sql file
 5 directories, 1 file
3.1.4 in the light of escheduler user ssh No secret configuration
# 1  To configure SSH Unclassified
# 1.1 node2  Node execution
#  Enter directly when prompted
ssh-keygen -t rsa
#  copy to node2 and node3. When prompted for a password , Input  escheduler  User's password
ssh-copy-id -i ~/.ssh/id_rsa.pub [email protected]
ssh-copy-id -i ~/.ssh/id_rsa.pub [email protected]

# 1.2 node3  Node execution
#  Enter directly when prompted
ssh-keygen -t rsa
#  copy to node2 and node3. When prompted for a password , Input  escheduler  User's password
ssh-copy-id -i ~/.ssh/id_rsa.pub [email protected]
ssh-copy-id -i ~/.ssh/id_rsa.pub [email protected]
3.1.5 Database initialization
Execute the following command to create the database and account :
CREATE DATABASE escheduler DEFAULT CHARACTER SET utf8 DEFAULT COLLATE utf8_general_ci;
--  Set data user escheduler Your access password is  escheduler, And not accessible ip Make restrictions
--  The test environment sets access to all , If it's production , You can limit only subnet segments ip Ability to visit ('198.168.33.%')
GRANT ALL PRIVILEGES ON escheduler.* TO 'escheduler'@'%' IDENTIFIED BY 'escheduler';
flush privileges;
Create tables and import basic data modify vim /opt/DolphinScheduler/escheduler/conf/dao/data_source.properties The following properties in :
#  Probably in the  4  Line modification MySQL Database url
 spring.datasource.url=jdbc:mysql://node1:3306/escheduler?characterEncoding=UTF-8
#  user name .
spring.datasource.username=escheduler
#  password . Fill in the previous step IDENTIFIED BY  The password set later
spring.datasource.password=escheduler
Execute the script of creating tables and importing basic data :
#  The front has entered /opt/DolphinScheduler/escheduler-backend Under the table of contents , Then execute the data initialization script
#  Finally, I see  create escheduler success  Indicates that the database is initialized successfully
sh ./script/create_escheduler.sh
3.1.6 Modify the deployment directory permissions and operating parameters
# 1  modify conf/env/ In the catalog  .escheduler_env.sh  environment variable
vim conf/env/.escheduler_env.sh

#  Change the corresponding to the path of your own component or framework
export HADOOP_HOME=/opt/hadoop-3.1.2
export HADOOP_CONF_DIR=/opt/hadoop-3.1.2/etc/hadoop
export SPARK_HOME1=/opt/spark-2.3.4-bin-hadoop2.7
#export SPARK_HOME2=/opt/soft/spark2
#export PYTHON_HOME=/opt/soft/python
export JAVA_HOME=/usr/local/zulu8/
export HIVE_HOME=/opt/apache-hive-3.1.1-bin
#export PATH=$HADOOP_HOME/bin:$SPARK_HOME1/bin:$SPARK_HOME2/bin:$PYTHON_HOME:$JAVA_HOME/bin:$HIVE_HOME/bin:$PATH
export PATH=$HADOOP_HOME/bin:$SPARK_HOME1/bin:$JAVA_HOME/bin:$HIVE_HOME/bin:$PATH

# ==========
# CDH  edition
# ==========
#export HADOOP_HOME=/opt/cloudera/parcels/CDH/lib/hadoop
#export HADOOP_CONF_DIR=/etc/hadoop/conf.cloudera.yarn
#export SPARK_HOME1=/opt/cloudera/parcels/CDH/lib/spark
##export SPARK_HOME2=/opt/soft/spark2
##export PYTHON_HOME=/opt/soft/python
#export JAVA_HOME=/usr/local/zulu8/
#export HIVE_HOME=/opt/cloudera/parcels/CDH/lib/hive
##export PATH=$HADOOP_HOME/bin:$SPARK_HOME1/bin:$SPARK_HOME2/bin:$PYTHON_HOME:$JAVA_HOME/bin:$HIVE_HOME/bin:$PATH
#export PATH=$HADOOP_HOME/bin:$SPARK_HOME1/bin:$JAVA_HOME/bin:$HIVE_HOME/bin:$PATH
modify install.sh Parameters in , Replace with the value required by your own business , Only important modifications are listed here , Other defaults do not need to be changed .
# mysql To configure
# mysql  Address , port
mysqlHost="192.168.33.3:3306"

# mysql  Database name
mysqlDb="escheduler"

# mysql  user name
mysqlUserName="escheduler"

# mysql  password
#  Be careful : If there are special characters , Please use  \  Transfer with transfer symbol
mysqlPassword="escheduler"

# conf/config/install_config.conf To configure
#  Be careful : The installation path , Do not use the current path (pwd) equally . The installation path when the one click deployment script is distributed to other nodes
installPath="/opt/DolphinScheduler/escheduler-backend"

#  Deploy users
#  Be careful : Deployment users need to have sudo Authority and operation hdfs Authority , If open hdfs, The root directory needs to be created by itself
deployUser="escheduler"

# zk colony
zkQuorum="192.168.33.3:2181,192.168.33.6:2181,192.168.33.9:2181"

#  install hosts
#  Be careful : Install the dispatched machine hostname list , If it is pseudo distributed , Then just write a pseudo distributed hostname that will do
ips="192.168.33.6,192.168.33.9"

# conf/config/run_config.conf To configure
#  function Master Machine
#  Be careful : Deploy master Machine hostname list
masters="192.168.33.6"

#  function Worker Machine
#  Be careful : Deploy worker Machine hostname list
workers="192.168.33.6,192.168.33.9"

#  function Alert Machine
#  Be careful : Deploy alert server Machine hostname list
alertServer="192.168.33.6"

#  function Api Machine
#  Be careful : Deploy api server Machine hostname list
apiServers="192.168.33.6"

#  Be sure to configure the mail service when using the mailbox to send mail , Otherwise, failure will be prompted when sending the execution result
# cn.escheduler.server.worker.runner.TaskScheduleThread:[249] - task escheduler # failure : send mail failed!
java.lang.RuntimeException: send mail failed!
# alert To configure
#  Email protocol , The default is SMTP Email protocol
mailProtocol="SMTP"
#  The mail service host. Take Netease email as an example .QQ The service of mailbox is  smtp.qq.com
mailServerHost="smtp.163.com"
#  Mail service port .SSL Protocol port  465/994, Not SSL Protocol port  25
mailServerPort="465"
#  Give a person .
#  Netease email is   Client authorization password   obtain , See the figure below for details
mailSender="*******[email protected]"
#  Sender's password
mailPassword="yore***"

#  download Excel route
xlsFilePath="/home/escheduler/xls"

# Whether to start the monitoring self startup script
#  Switch variable , stay 1.0.3 Add... To the version , Controls whether self starting scripts are started ( monitor master,worker state , If the line drops, it will start automatically )
#  The default value is "false" Indicates that the self startup script is not started , If you need to start, change to "true"
monitorServerState="true"

#  Select the storage method for Resource Center upload :HDFS,S3,NONE
resUploadStartupType="HDFS"

#  If resUploadStartupType by HDFS,defaultFS Write namenode Address , Support HA, Need to put core-site.xml and hdfs-site.xml Put it in conf Under the table of contents
#  If it is S3, Then write S3 Address , for instance :s3a://escheduler, Be careful , Be sure to create a root directory /escheduler
defaultFS="hdfs://192.168.33.3:8020"

# resourcemanager HA To configure , If you are single resourcemanager, Here for yarnHaIps=""
yarnHaIps="192.168.33.3"

#  If you are single  resourcemanager, Just configure a host name , If it is resourcemanager HA, Then the default configuration is good
singleYarnIp="192.168.33.3"

# common  To configure
#  The program path
programPath="/opt/DolphinScheduler/escheduler-backend"

# Download path
downloadPath="/tmp/escheduler/download"

#  Task execution path
execPath="/tmp/escheduler/exec"

# SHELL Environment variable path
shellEnvPath="$installPath/conf/env/.escheduler_env.sh"

#  Suffix of resource file
resSuffixs="txt,log,sh,conf,cfg,py,java,sql,hql,xml"

# api  To configure
# api  Service port
apiServerPort="12345"
If you use hdfs Related functions , Need to copy hdfs-site.xml and core-site.xml To conf Under the table of contents :
cp $HADOOP_HOME/etc/hadoop/hdfs-site.xml conf/
cp $HADOOP_HOME/etc/hadoop/core-site.xml conf/
If DolphinScheduler Is already installed , You can set conf/alert.properties file :
#alert type is EMAIL/SMS
alert.type=EMAIL

# mail server configuration
mail.protocol=SMTP
#  Take Netease email as an example
mail.server.host=smtp.163.com
# SSL Protocol port  465/994, Not SSL Protocol port  25
mail.server.port=465
mail.sender=*******[email protected]
mail.passwd=yore***

# TLS
mail.smtp.starttls.enable=false
# SSL
mail.smtp.ssl.enable=true

#xls.file.path=/home/escheduler/xls
xls.file.path=/home/escheduler/xls

# Enterprise WeChat configuration
enterprise.wechat.corp.id=xxxxxxxxxx
enterprise.wechat.secret=xxxxxxxxxx
enterprise.wechat.agent.id=xxxxxxxxxx
enterprise.wechat.users=xxxxx,xxxxx
enterprise.wechat.token.url=https://qyapi.weixin.qq.com/cgi-bin/gettoken?corpid=$corpId&corpsecret=$secret
enterprise.wechat.push.url=https://qyapi.weixin.qq.com/cgi-bin/message/send?access_token=$token
enterprise.wechat.team.send.msg={
    \"toparty\":\"$toParty\",\"agentid\":\"$agentId\",\"msgtype\":\"text\",\"text\":{
    \"content\":\"$msg\"},\"safe\":\"0\"}
enterprise.wechat.user.send.msg={
    \"touser\":\"$toUser\",\"agentid\":\"$agentId\",\"msgtype\":\"markdown\",\"markdown\":{
    \"content\":\"$msg\"}}
3.1.7 Execute script one click deployment
# 1  One click deployment and launch
sh install.sh

# 2  Check the log
[[email protected] escheduler-backend]$ tree /opt/DolphinScheduler/escheduler-backend/logs
/opt/DolphinScheduler/escheduler-backend/logs
├── escheduler-alert.log
├── escheduler-alert-server-node-b.test.com.out
├── escheduler-alert-server.pid
├── escheduler-api-server-node-b.test.com.out
├── escheduler-api-server.log
├── escheduler-api-server.pid
├── escheduler-logger-server-node-b.test.com.out
├── escheduler-logger-server.pid
├── escheduler-master.log
├── escheduler-master-server-node-b.test.com.out
├── escheduler-master-server.pid
├── escheduler-worker.log
├── escheduler-worker-server-node-b.test.com.out
├── escheduler-worker-server.pid
└── {
    processDefinitionId}
    └── {
    processInstanceId}
        └── {
    taskInstanceId}.log


# 3  see Java process
# 3.1 node2
# jps -l | grep escheduler
[[email protected] escheduler-backend]$ jps
31651 WorkerServer              # worker service
31784 ApiApplicationServer      # api service
31609 MasterServer              # master service
31743 AlertServer               # alert service
31695 LoggerServer              # logger service

# 3.2 node3
[[email protected] DolphinScheduler]$ jps
26678 WorkerServer
26718 LoggerServer
error 1: If you look at /opt/DolphinScheduler/escheduler-backend/logs/escheduler-api-server-*.out The log reports the following error
nohup: failed to run command ‘/bin/java’: No such file or directory
solve : take JAVA_HOME/bin Under the java Soft connect to /bin Next .( Every dolphinscheduler All nodes execute )
ln -s $JAVA_HOME/bin/java /bin/java
3.1.8 Description of the backend service process
From the front we can see , After the back-end service starts normally , share 5 A process :WorkerServer、ApiApplicationServer、MasterServer、AlertServer、LoggerServer . There's another one UI, The details are as follows :
| service | explain |
|---|---|
| MasterServer | Mainly responsible for DAG Segmentation and task status monitoring |
| WorkerServer/LoggerServer | Mainly responsible for the submission of tasks 、 Update of execution and task status .LoggerServer be used for Rest Api adopt RPC Check the log |
| ApiServer | Provide Rest Api service , for UI To call |
| AlertServer | Provide alarm service |
| UI | Front page display |
3.1.9 dolphinscheduler Back end services start and stop
#  start-up
/opt/DolphinScheduler/escheduler-backend/script/start_all.sh

#  stop it
/opt/DolphinScheduler/escheduler-backend/script/stop_all.sh
3.2 Front end deployment
Front end has 3 There are two ways to deploy , They are automated deployment , Deploy and compile source code manually . Here we mainly use automated script deployment DolphinScheduler Front end services .
3.2.1 Download and unzip
# 1  download  UI  front end . abbreviation escheduler-ui
#  stay node2 Node under  /opt/DolphinScheduler
wget https://github.com/apache/incubator-dolphinscheduler/releases/download/1.1.0/escheduler-1.1.0-ui.tar.gz

# 2  decompression
mkdir escheduler-ui
tar -zxf escheduler-1.1.0-ui.tar.gz -C escheduler-ui
cd escheduler-ui
3.2.2 Execute automated deployment scripts
Execute automated deployment scripts . The script will prompt some parameters , Follow the prompts to complete the installation .
[[email protected] escheduler-ui]$ sudo ./install-escheduler-ui.sh
 Welcome to use easy scheduler Front end deployment script , Currently, the front-end deployment script only supports CentOS,Ubuntu
 Please be there.  escheduler-ui  Execute under directory
linux
 Please enter nginx The proxy port , No input , By default 8888 :8888
 Please enter api server agent ip, Must input , for example :192.168.xx.xx :192.168.33.6
 Please enter api server The proxy port , No input , By default 12345 :12345
=================================================
        1.CentOS6 install
        2.CentOS7 install
        3.Ubuntu install
        4. sign out
=================================================
 Please enter the installation number (1|2|3|4):2

……

Complete!
port option is needed for add
FirewallD is not running
setenforce: SELinux is disabled
 Please visit :http://192.168.33.6:8888
Using the automated deployment script will check whether the system environment is installed Nginx, If it is not installed, it will be downloaded automatically through the network Nginx Package installation , After boot setting Nginx The configuration file is /etc/nginx/conf.d/escheduler.conf. But the general method of production environment is to access the Internet , At this time, you can manually install offline Nginx, Then make some configuration .
# 1  download  Nginx  Offline installer
#  For example, download  Cento7 CPU Instructions for  x86 Version of
wget http://nginx.org/packages/mainline/centos/7/x86_64/RPMS/nginx-1.17.6-1.el7.ngx.x86_64.rpm

# 2  install
rpm -ivh nginx-1.17.6-1.el7.ngx.x86_64.rpm
Next, manually put it in Nginx Add a DolphinSchedule Service configuration . Because in /etc/nginx/nginx.conf(Nginx Default loaded configuration file ) There is include /etc/nginx/conf.d/*.conf ;, So we can /etc/nginx/conf.d/ Next create a conf Configuration file for suffix , The file name of the configuration file is arbitrary , For example, called escheduler.conf. What needs special attention here is that in /etc/nginx/nginx.conf There is a configuration in front of the configuration file user nginx If you start Nginx Is not nginx, Be sure to change it to start Nginx Users of , Otherwise, the agent's service will report 403 Error of .
Here we are /etc/nginx/conf.d/escheduler.conf Configure the following , A focus on server Middle configuration listen(DolphinSchedule Web UI The port of )、root ( Decompressed escheduler-ui Medium dist route )、proxy_pass (DolphinSchedule The address of the background interface ) Etc .
The last restart Nginx Carry out orders systemctl restart nginx.
server {

    listen       8888;  #  Access port
    server_name  localhost;
    #charset koi8-r;
    #access_log /var/log/nginx/host.access.log main;
    location / {

        root    /opt/DolphinScheduler/escheduler-ui/dist; #  The above front-end decompression dist Directory address ( Modify yourself )
        index  index.html index.html;
    }
    location /escheduler {

        proxy_pass http://192.168.33.6:12345; #  Address of the interface ( Modify yourself )
        proxy_set_header Host $host;
        proxy_set_header X-Real-IP $remote_addr;
        proxy_set_header x_real_ipP $remote_addr;
        proxy_set_header remote_addr $remote_addr;
        proxy_set_header X-Forwarded-For $proxy_add_x_forwarded_for;
        proxy_http_version 1.1;
        proxy_connect_timeout 4s;
        proxy_read_timeout 30s;
        proxy_send_timeout 12s;
        proxy_set_header Upgrade $http_upgrade;
        proxy_set_header Connection "upgrade";
    }
    #error_page 404 /404.html;
    # redirect server error pages to the static page /50x.html
    #
    error_page   500 502 503 504  /50x.html;
    location = /50x.html {

        root   /usr/share/nginx/html;
    }
}
problem 1: Upload file size limit
- Edit profile
vim /etc/nginx/nginx.conf
#  Change the upload size
client_max_body_size 1024m
3.2.3 dolphinscheduler Start and stop of front-end service
# 1  start-up
systemctl start nginx

# 2  state
systemctl status nginx

# 3  stop it
#nginx -s stop
systemctl stop nginx
4. Quick start
Video address :https://www.bilibili.com/video/BV1d64y1s7eZ
4.1 Sign in
Browser access http://192.168.33.6:8888, As shown in the figure below .
The default user name of the account on the above login page is admin The password for escheduler123, This account is also the default administrator account , After successful login, you can change your password . The main page of successful login is as follows 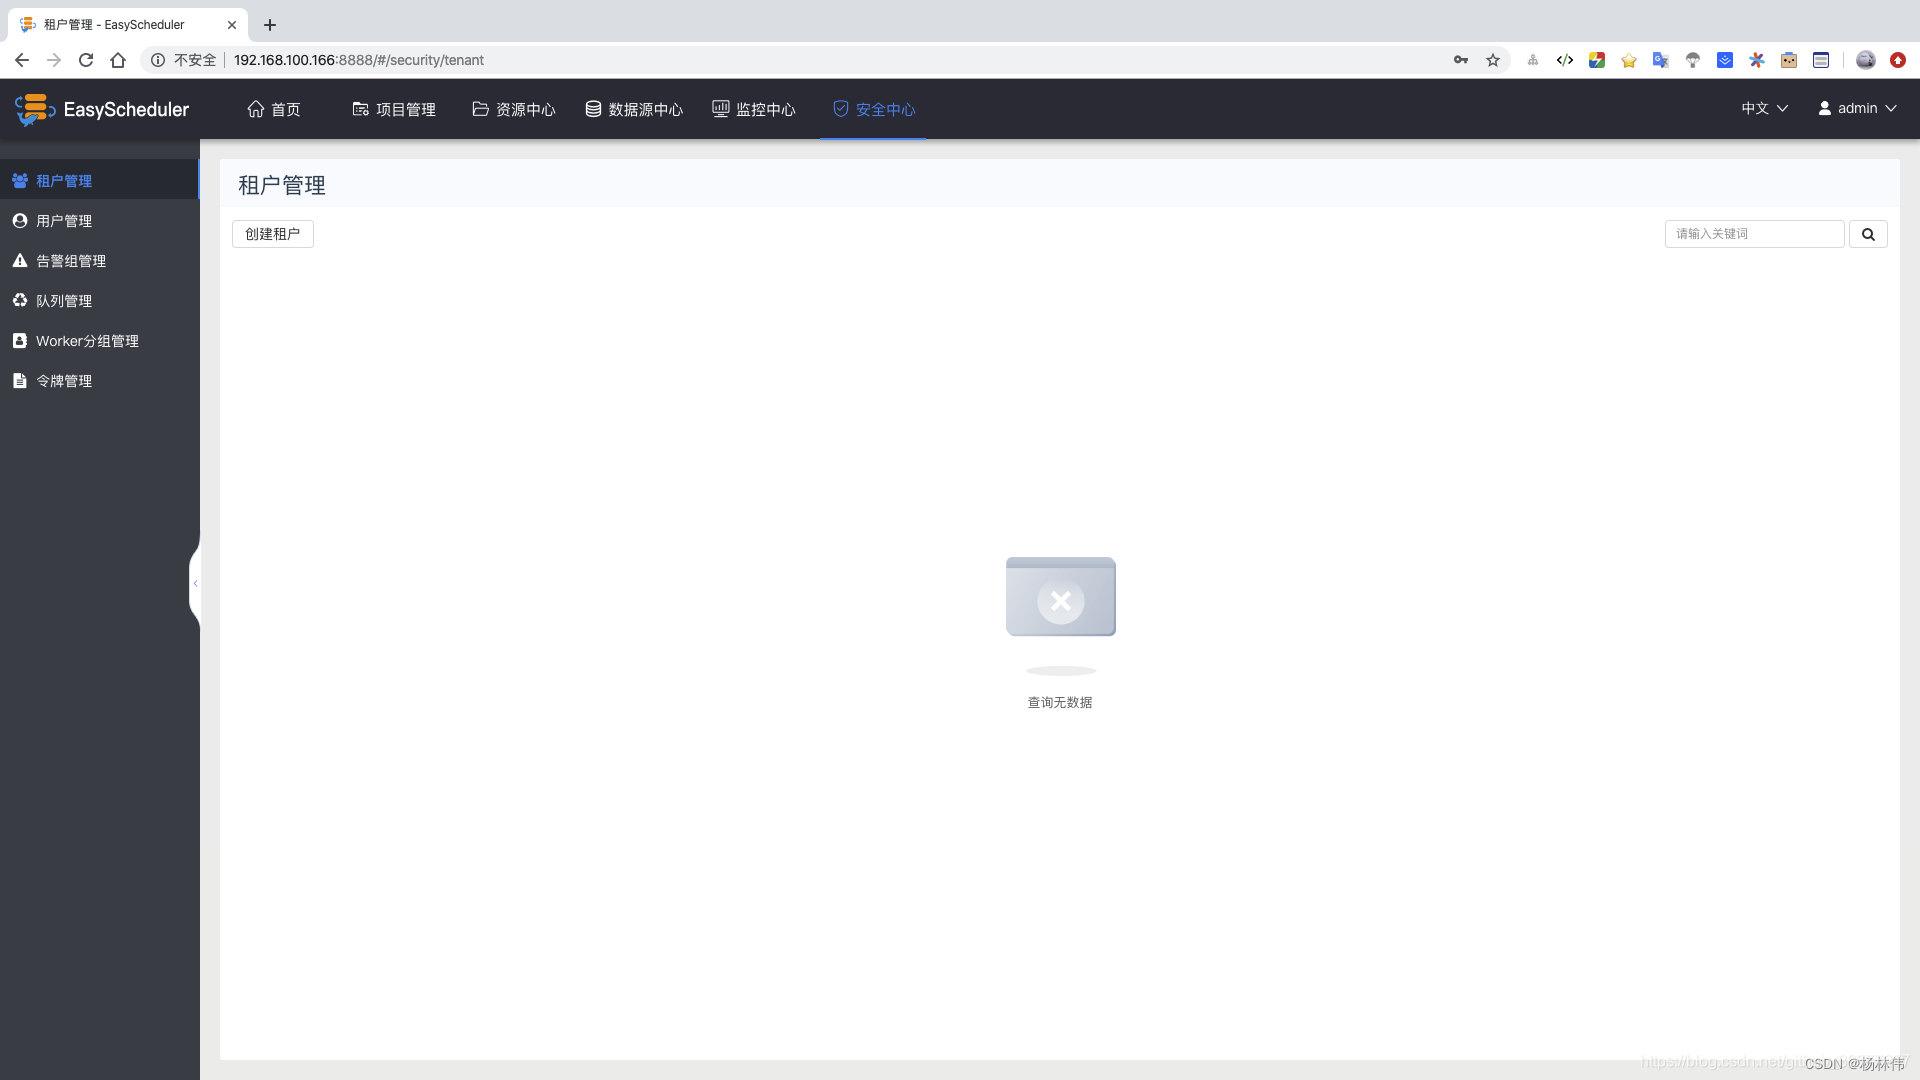
4.2 Created queues 、 Tenant
Create a queue : Queue management -> Create a queue -> Enter the name and queue value -> Submit .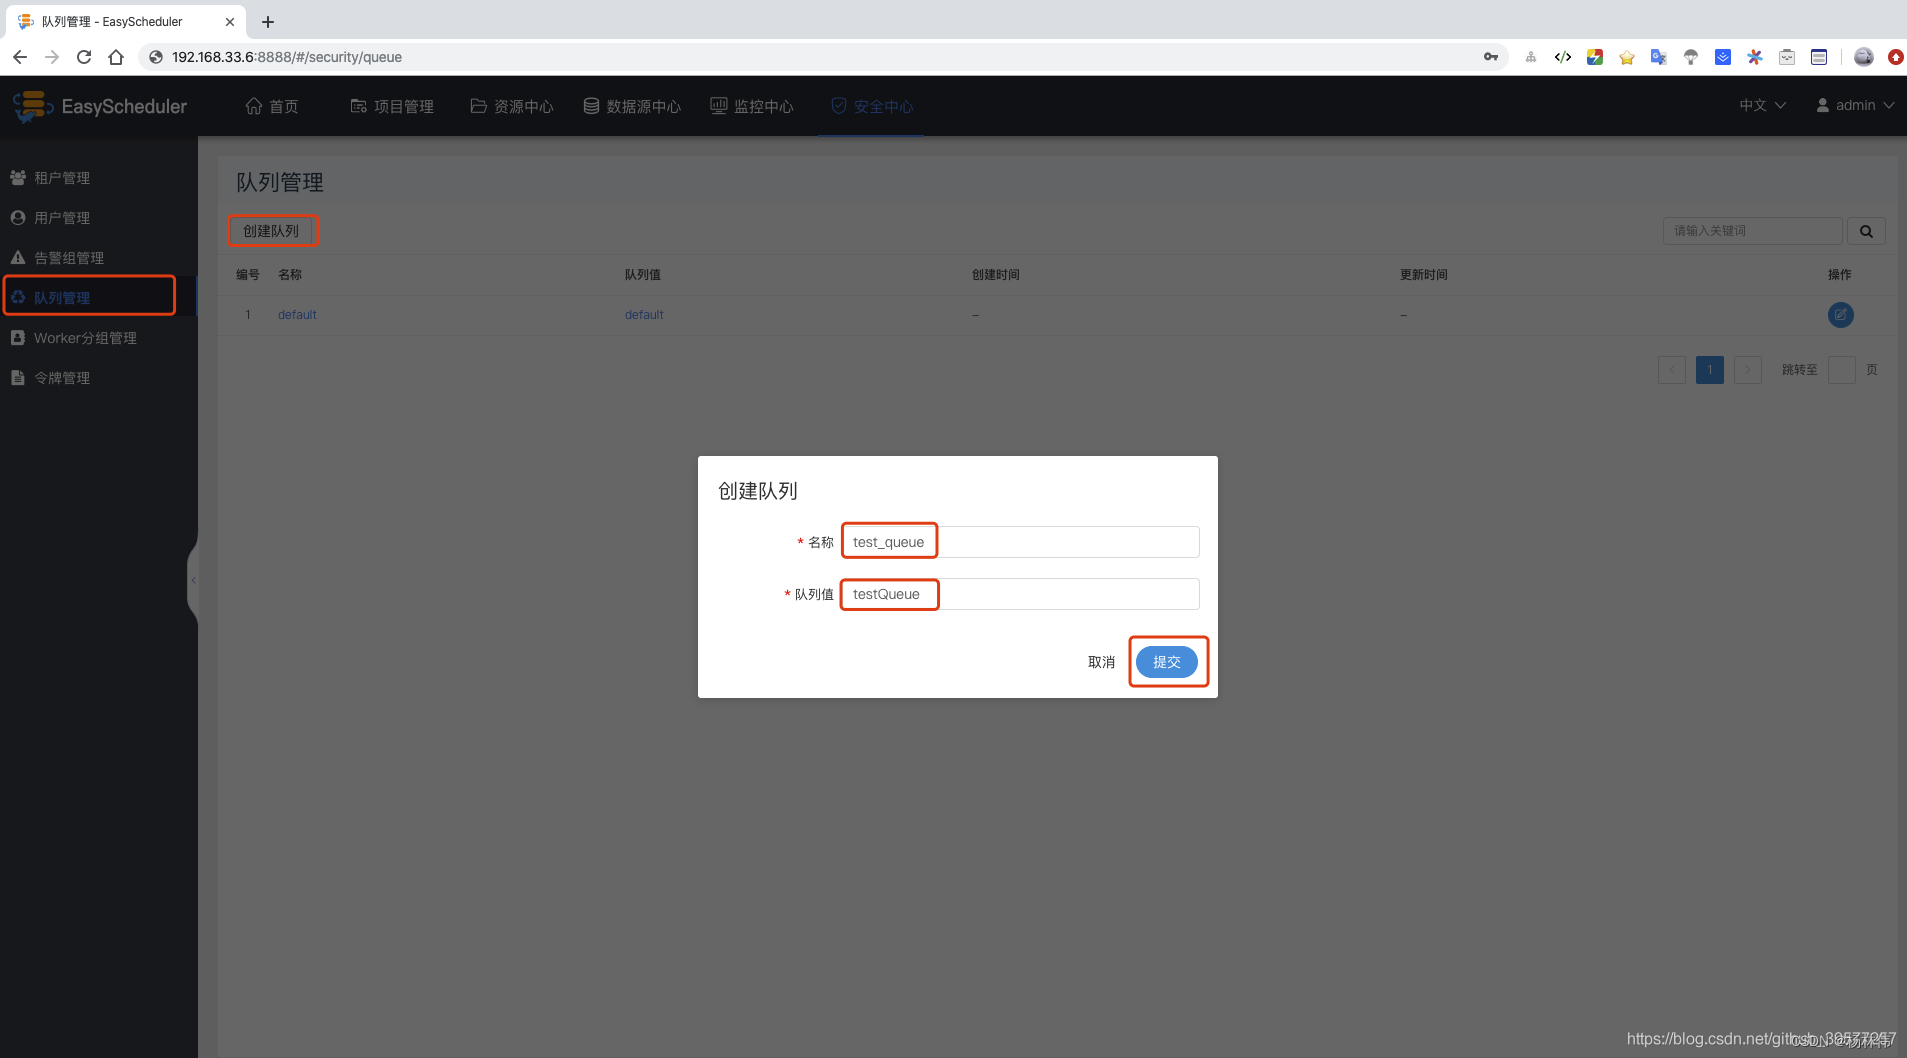
Create tenants : Tenant management -> Create tenants -> Enter tenant code 、 Tenant name and queue value -> Submit .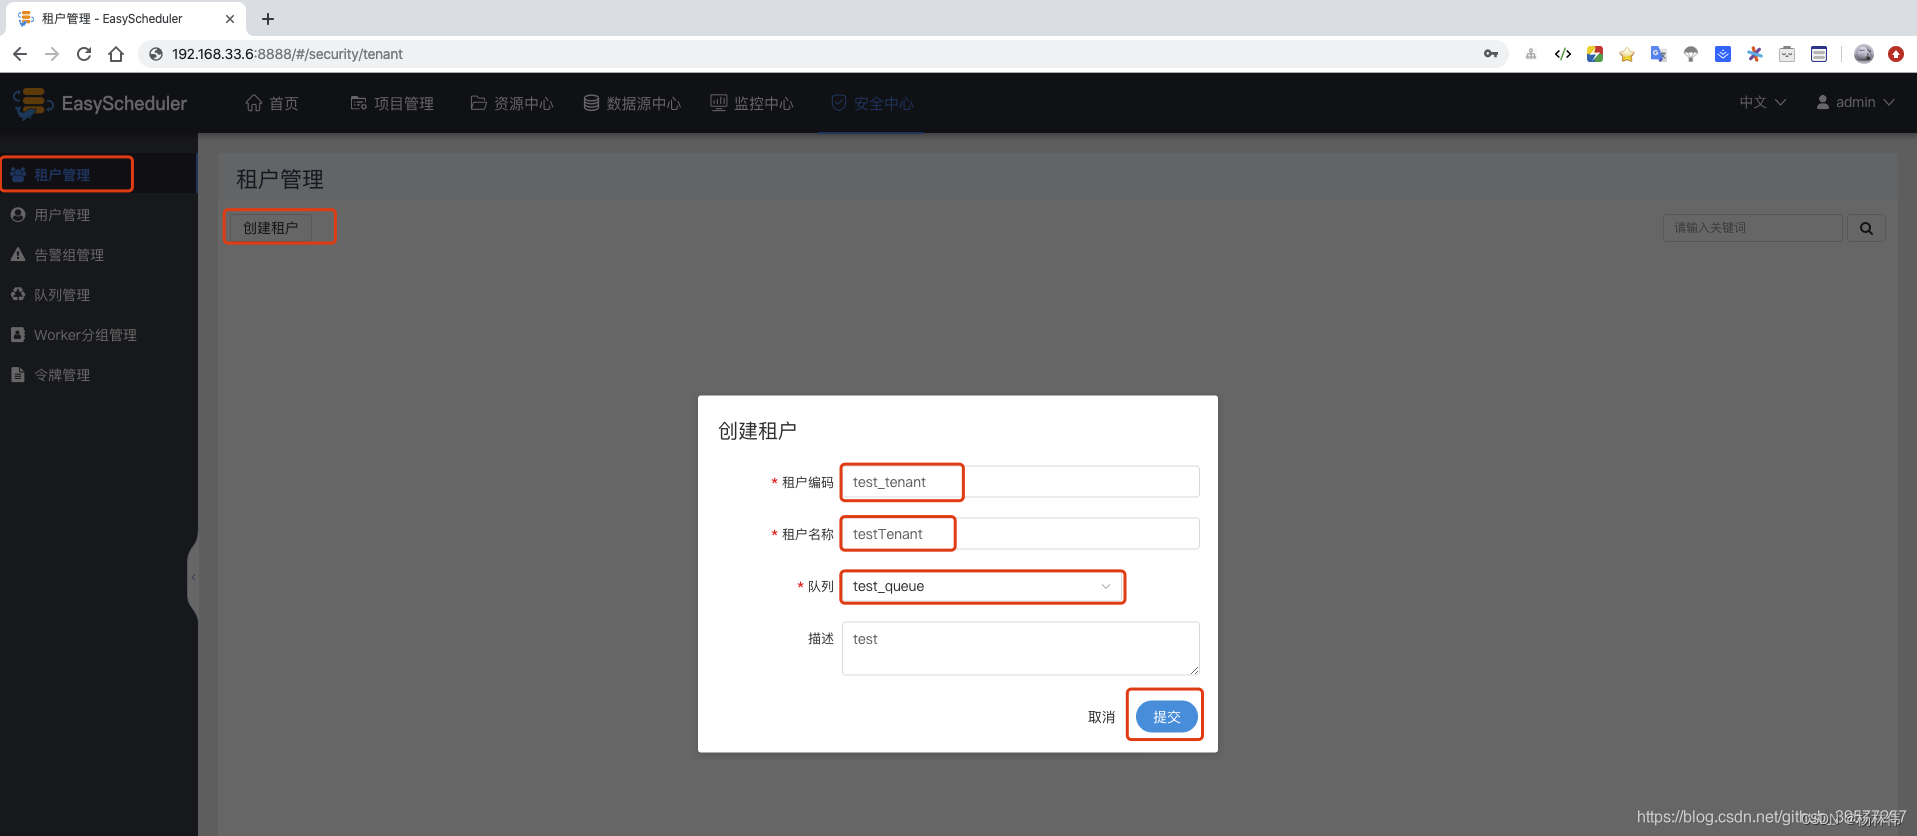
Create a normal user : User management -> Create user -> Enter the user name 、 password 、 Tenant name and email , Mobile phone number optional -> Submit .
Create a warning Group : Warning group management -> Create a warning Group -> Enter the group name 、 Group type ( mail 、 SMS )-> Submit . Log in as a normal user ( The username and password are both
 demo). Click the user name in the upper right corner “ sign out ”, Log back in as an ordinary user . The homepage of successful login is as follows .
4.3 Create project
Click Project Management at the head of the page , Go to the project page , Then click create project , Create a DolphinScheduler Task scheduling project , Enter the project name and description in the pop-up box , For example, create a hello_dolphinScheduler Name of the project , Finally, click Submit .
After the project is created , Click the project we created on the project management page , Enter the project management page .
- Click on Workflow definition -> Create workflow -> On the left toolbar, you can choose (
SHELL、USB_PROCESS、PROCEDURE、SQL、SPARK、MapReduce、PYTHON、DEPENDENT). - Drag and drop SHELL Node to canvas , Add a new one Shell Mission , Fill in The name of the node 、 describe 、 Script Field ; choice Task priority , High level tasks will be executed preferentially in the execution queue , Tasks with the same priority are executed in first in first out order ;
- Timeout alarm , Fill in the timeout duration , When the task execution time exceeds the timeout, an alarm can be given and the timeout fails .( Be careful : The node here is not the node of the machine , It should be the node of workflow )
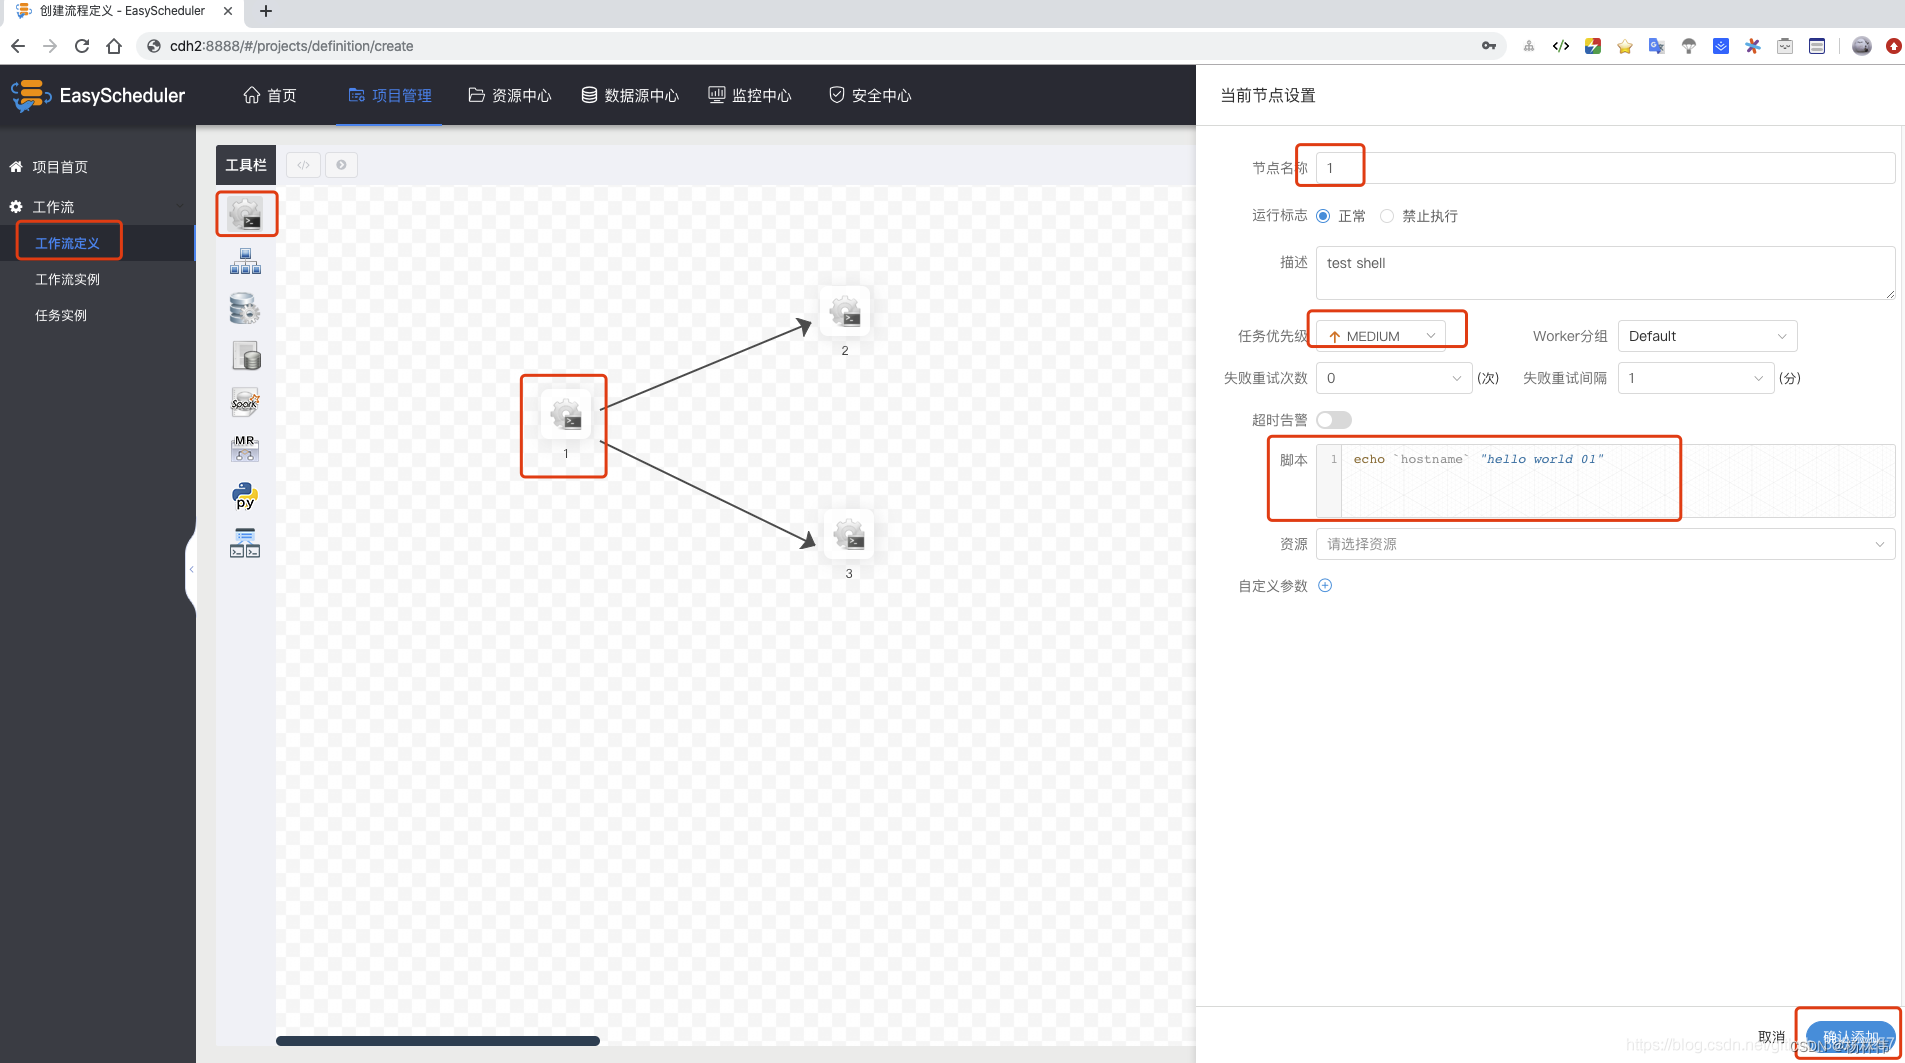
After confirming the modification , Click save , Now set DAG Figure name , Select group tenant , Final addition .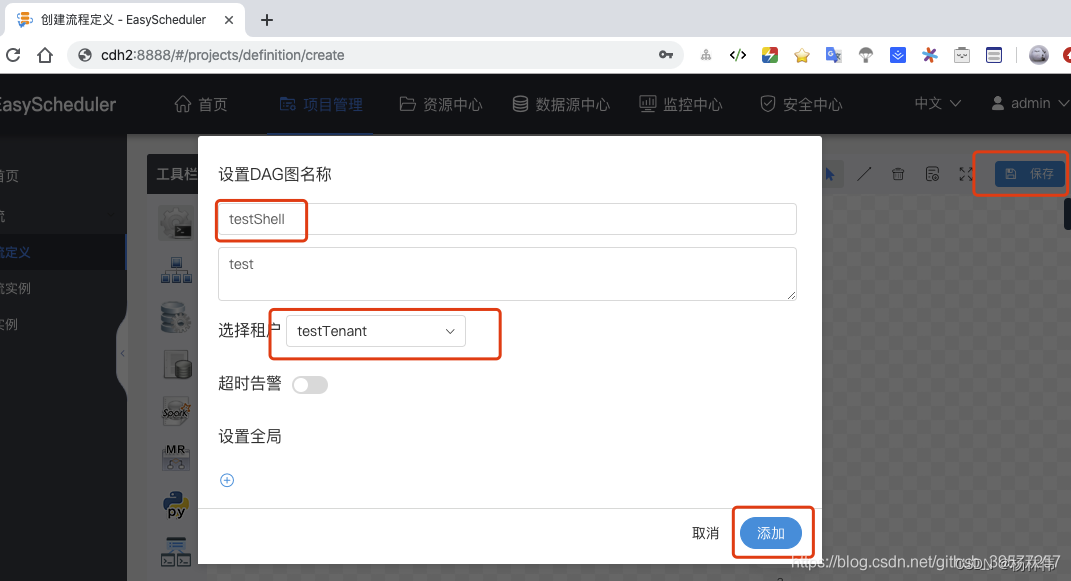
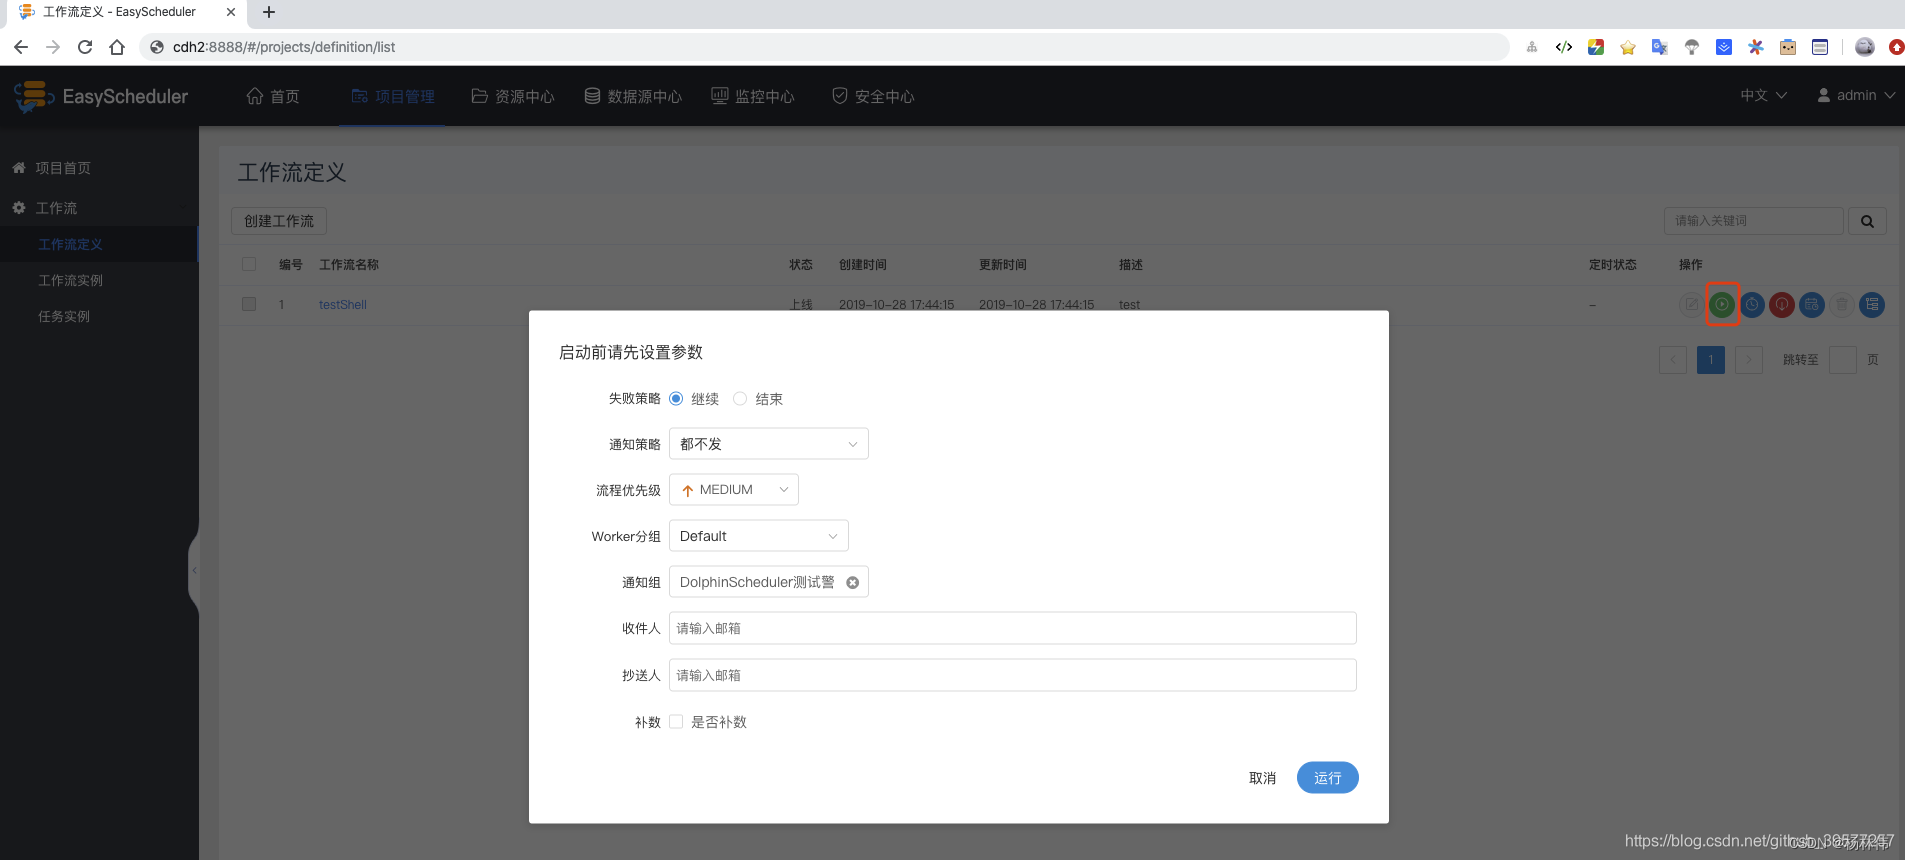
Workflow definitions that are not online can be edited , But it can't run , So we need to execute workflow , The workflow needs to be launched first 
Click on ” function “, Execute workflow .
4.4 Description of operation parameters
Description of operation parameters :
- Failure strategy : When a task node fails to execute , Strategies that other parallel task nodes need to execute .” continue “ Express : Other task nodes execute normally ,” end “ Express : Terminate all ongoing tasks , And stop the whole process .
- Notification strategy : When the process ends , Send email notification according to process execution status .
- Process priority : Priority of process operation , There are five levels : The highest (HIGHEST), high (HIGH), in (MEDIUM), low (LOW), The minimum (LOWEST). High level processes will be executed preferentially in the execution queue , Processes with the same priority are executed in first in first out order .
- worker grouping : This process can only be executed in the specified machine group . The default is Default, It can be in any one of worker On the implementation .
- Notification group : When the process ends , Or when fault tolerance occurs , The process information email will be sent to all members of the notification Group .
- The recipient : Enter the email and press enter to save . When the process ends 、 When fault tolerance occurs , An alarm email will be sent to the recipient list .
- Cc people : Enter the email and press enter to save . When the process ends 、 When fault tolerance occurs , The alarm email will be copied to the CC list .
Click the task instance to view the list information of each task , Click on the operation bar , You can see the log information of task execution .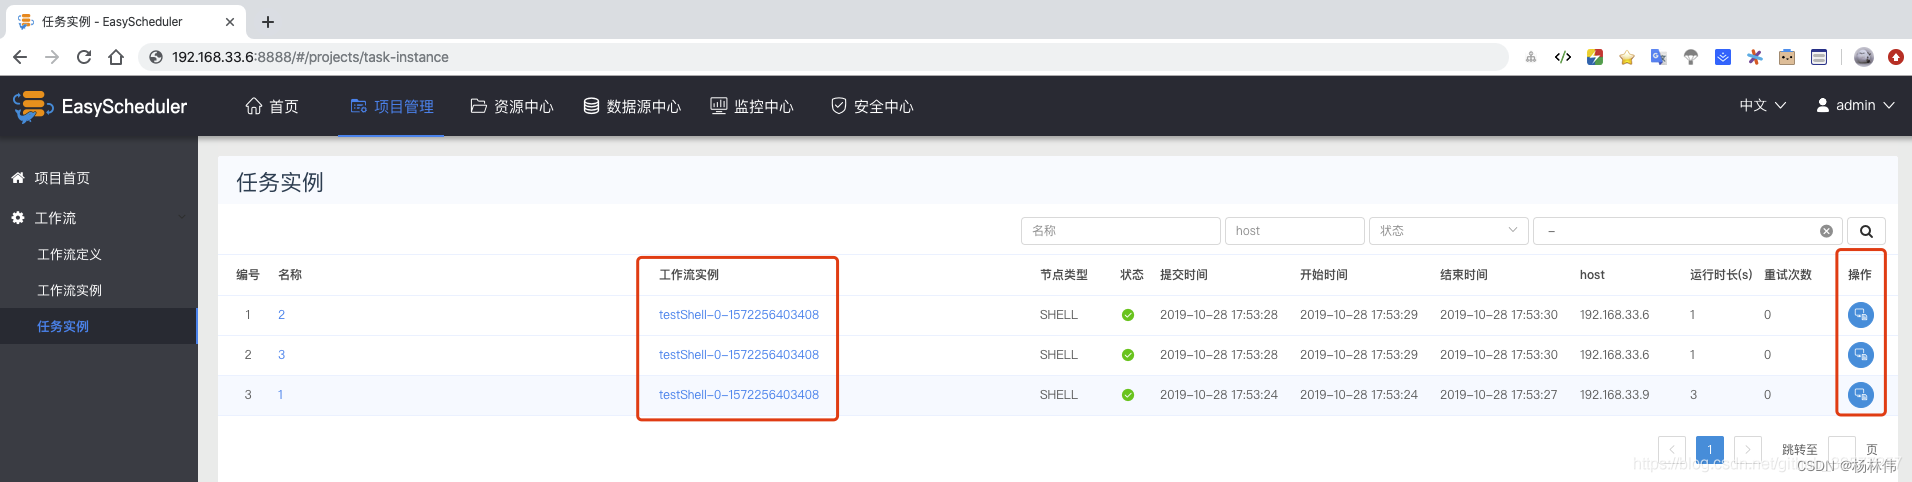
5. Worker grouping
worker grouping , It provides a way to make the task in the specified worker Mechanism running on . Administrators create worker grouping , In the task node and running parameter settings, you can specify the worker grouping , If the specified group is deleted or no group is specified , Then the task will worker Up operation .worker Multiple in the Group ip Address ( Cannot write alias ), Separated by commas .
Use administrator user (admin) land Web page , Click on Security Center -> Worker Group management , As shown in the figure below .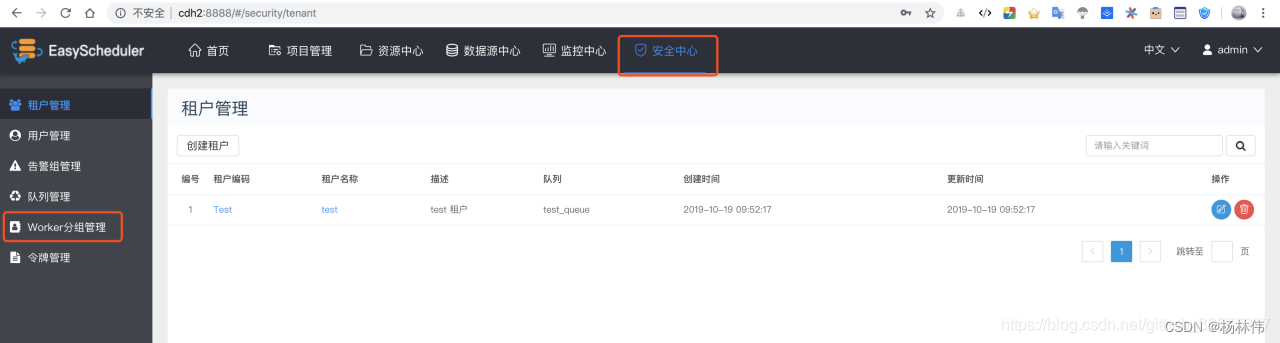
establish Worker grouping . Fill in the group name and IP,IP It can be more than one , It can be separated by English commas .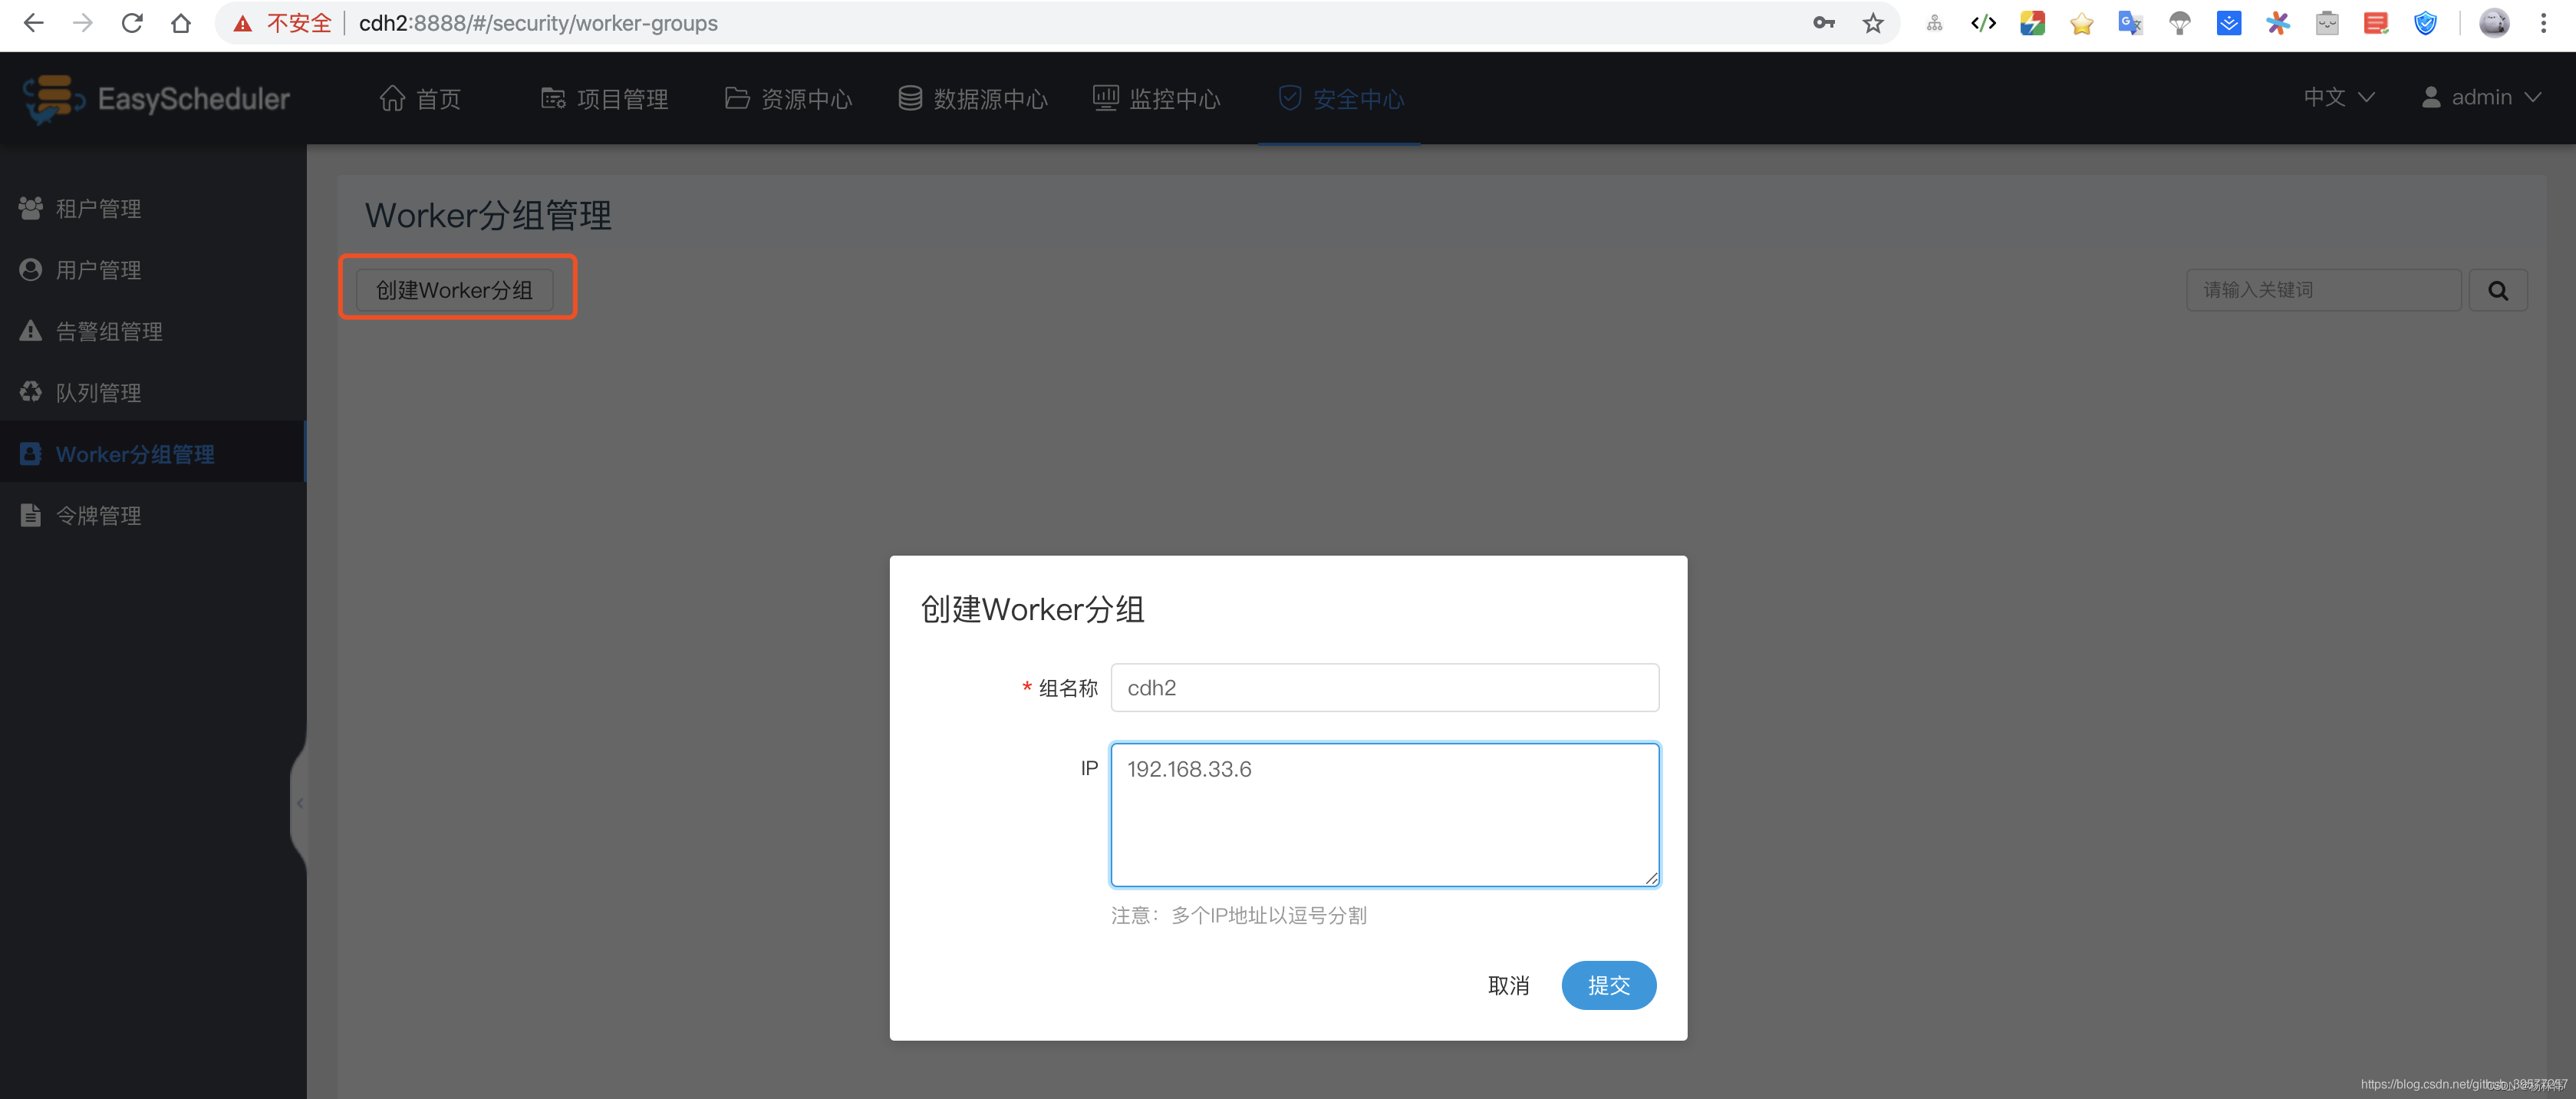
Such as below , We will Worker Of IP Divided into two groups .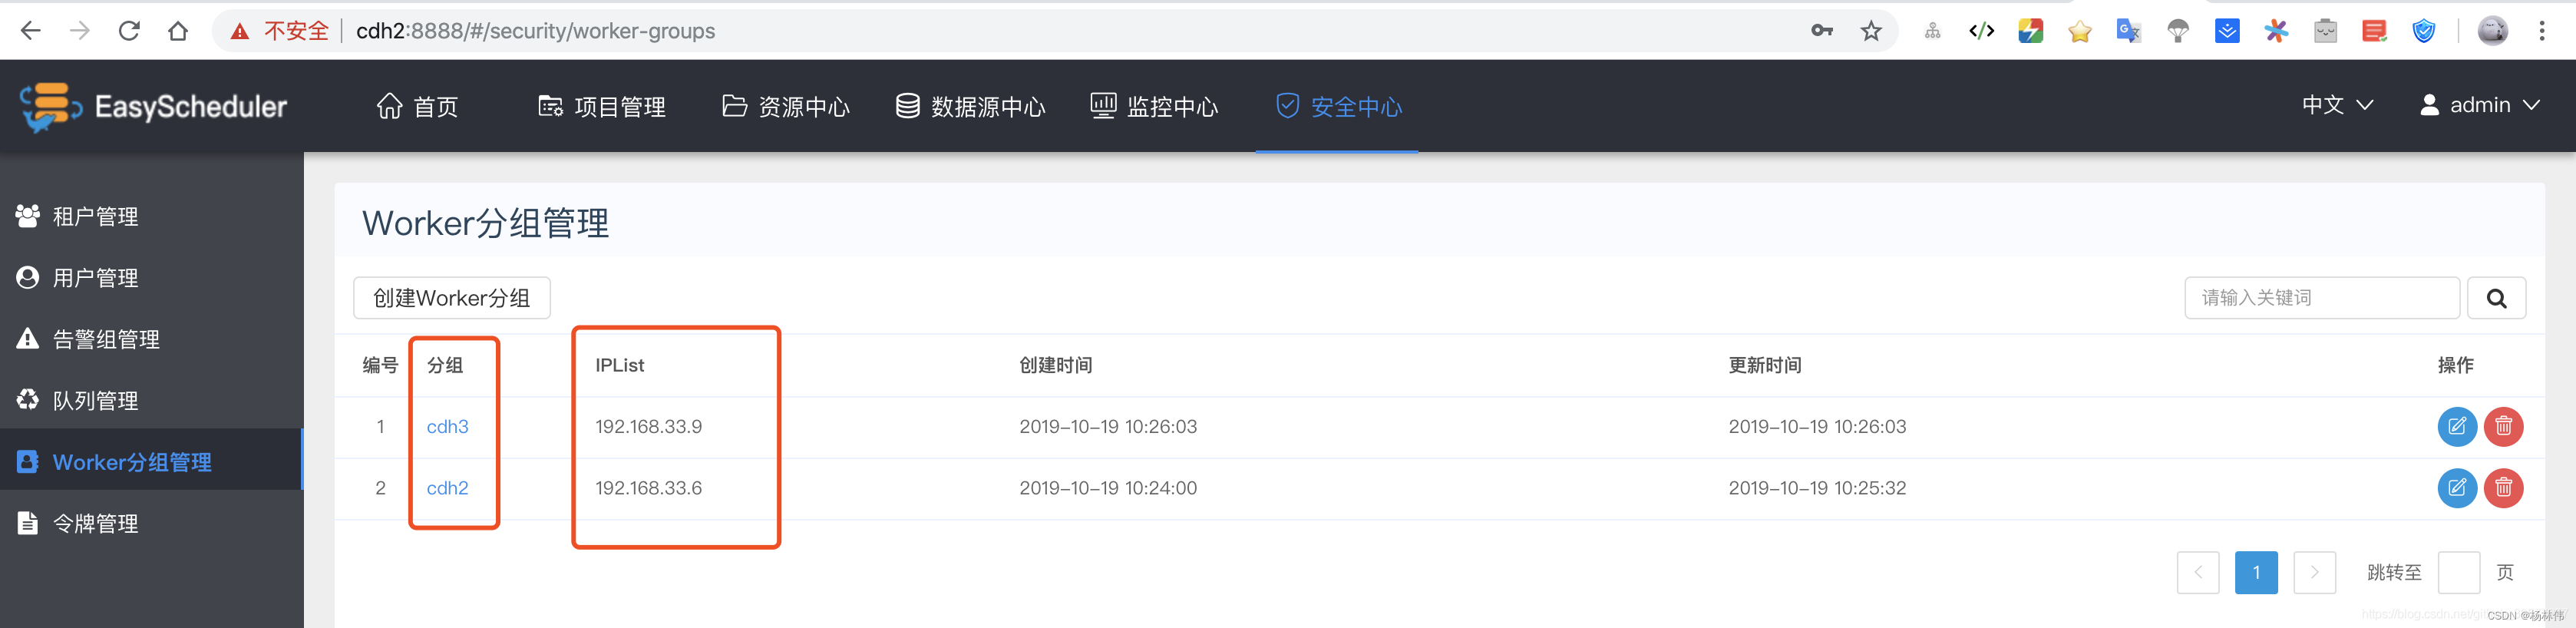
6. Add data sources
Script ( It's usually SQL Script ) Some data sources may be used during execution , for example MySQL、PostgreSQL、Hive、Impala、Spark、ClickHouse、Oracle、SQL Server, By adding data sources in DolphinScheduler Page writing Job Directly select , There is no need to specify the driver 、 Connect 、 User name and password etc , You can quickly create a SQL Workflow of script Job, At the same time, this data source is user isolated , The data sources added by each user are independent (admin Except for users , Administrator users can see all data sources added by users ).
Now let's Impala For example , Select Data source center -> Add data sources , The picture below will pop up Edit data source Popup , Mainly fill in the following items . because Impala No password set , The user is required. You can add any one , stay jdbc Connection parameters must be added {"auth":"noSasl"} Parameters , Otherwise, it will be waiting for confirmation .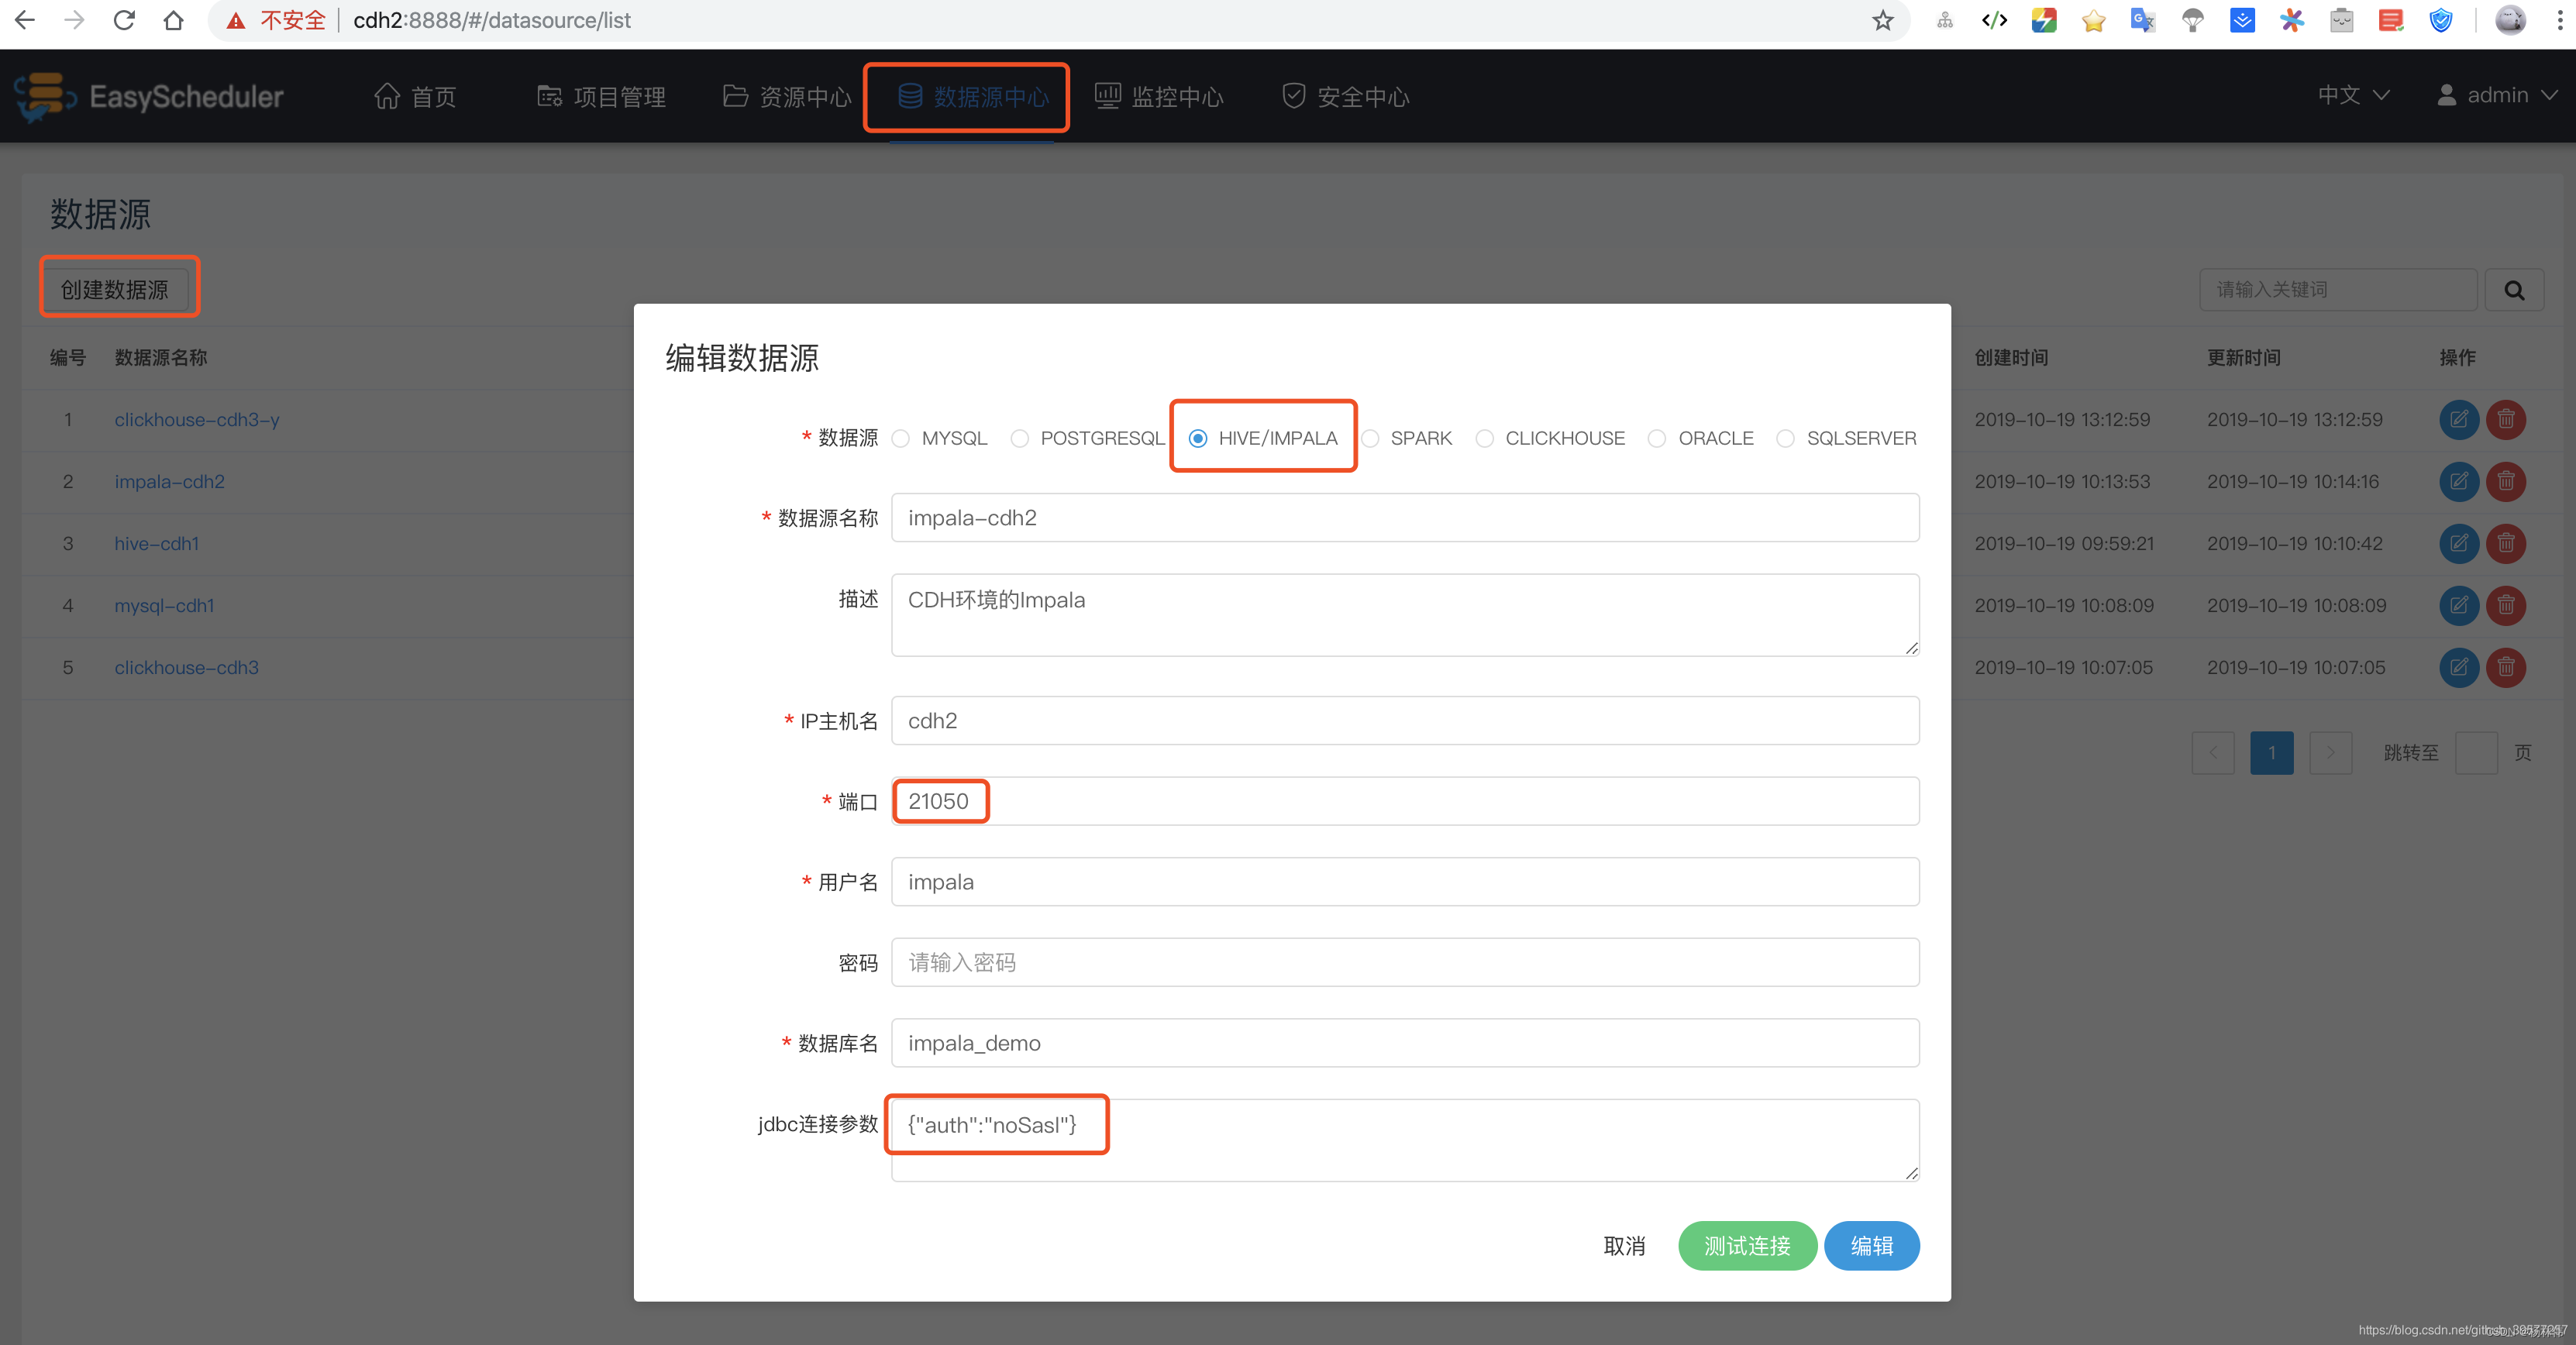
7. example
Under project management , Click workflow definition , Select the last line in the toolbar DEPENDENT Define a workflow with dependencies Job, Drag to the edit panel , Set up task The node name of is cdh2-task1, stay Worker grouping Selected for execution Worker The node is cdh2, After editing this Task Then choose Confirm to add . Choose to execute Worker Group name , Here, choose the one set above cdh2 Group , Confirm to add , As shown in the figure below . Set the second dependency in the same way Task, Put it Worker Grouping is set to cdh3 node , And add dependencies as And .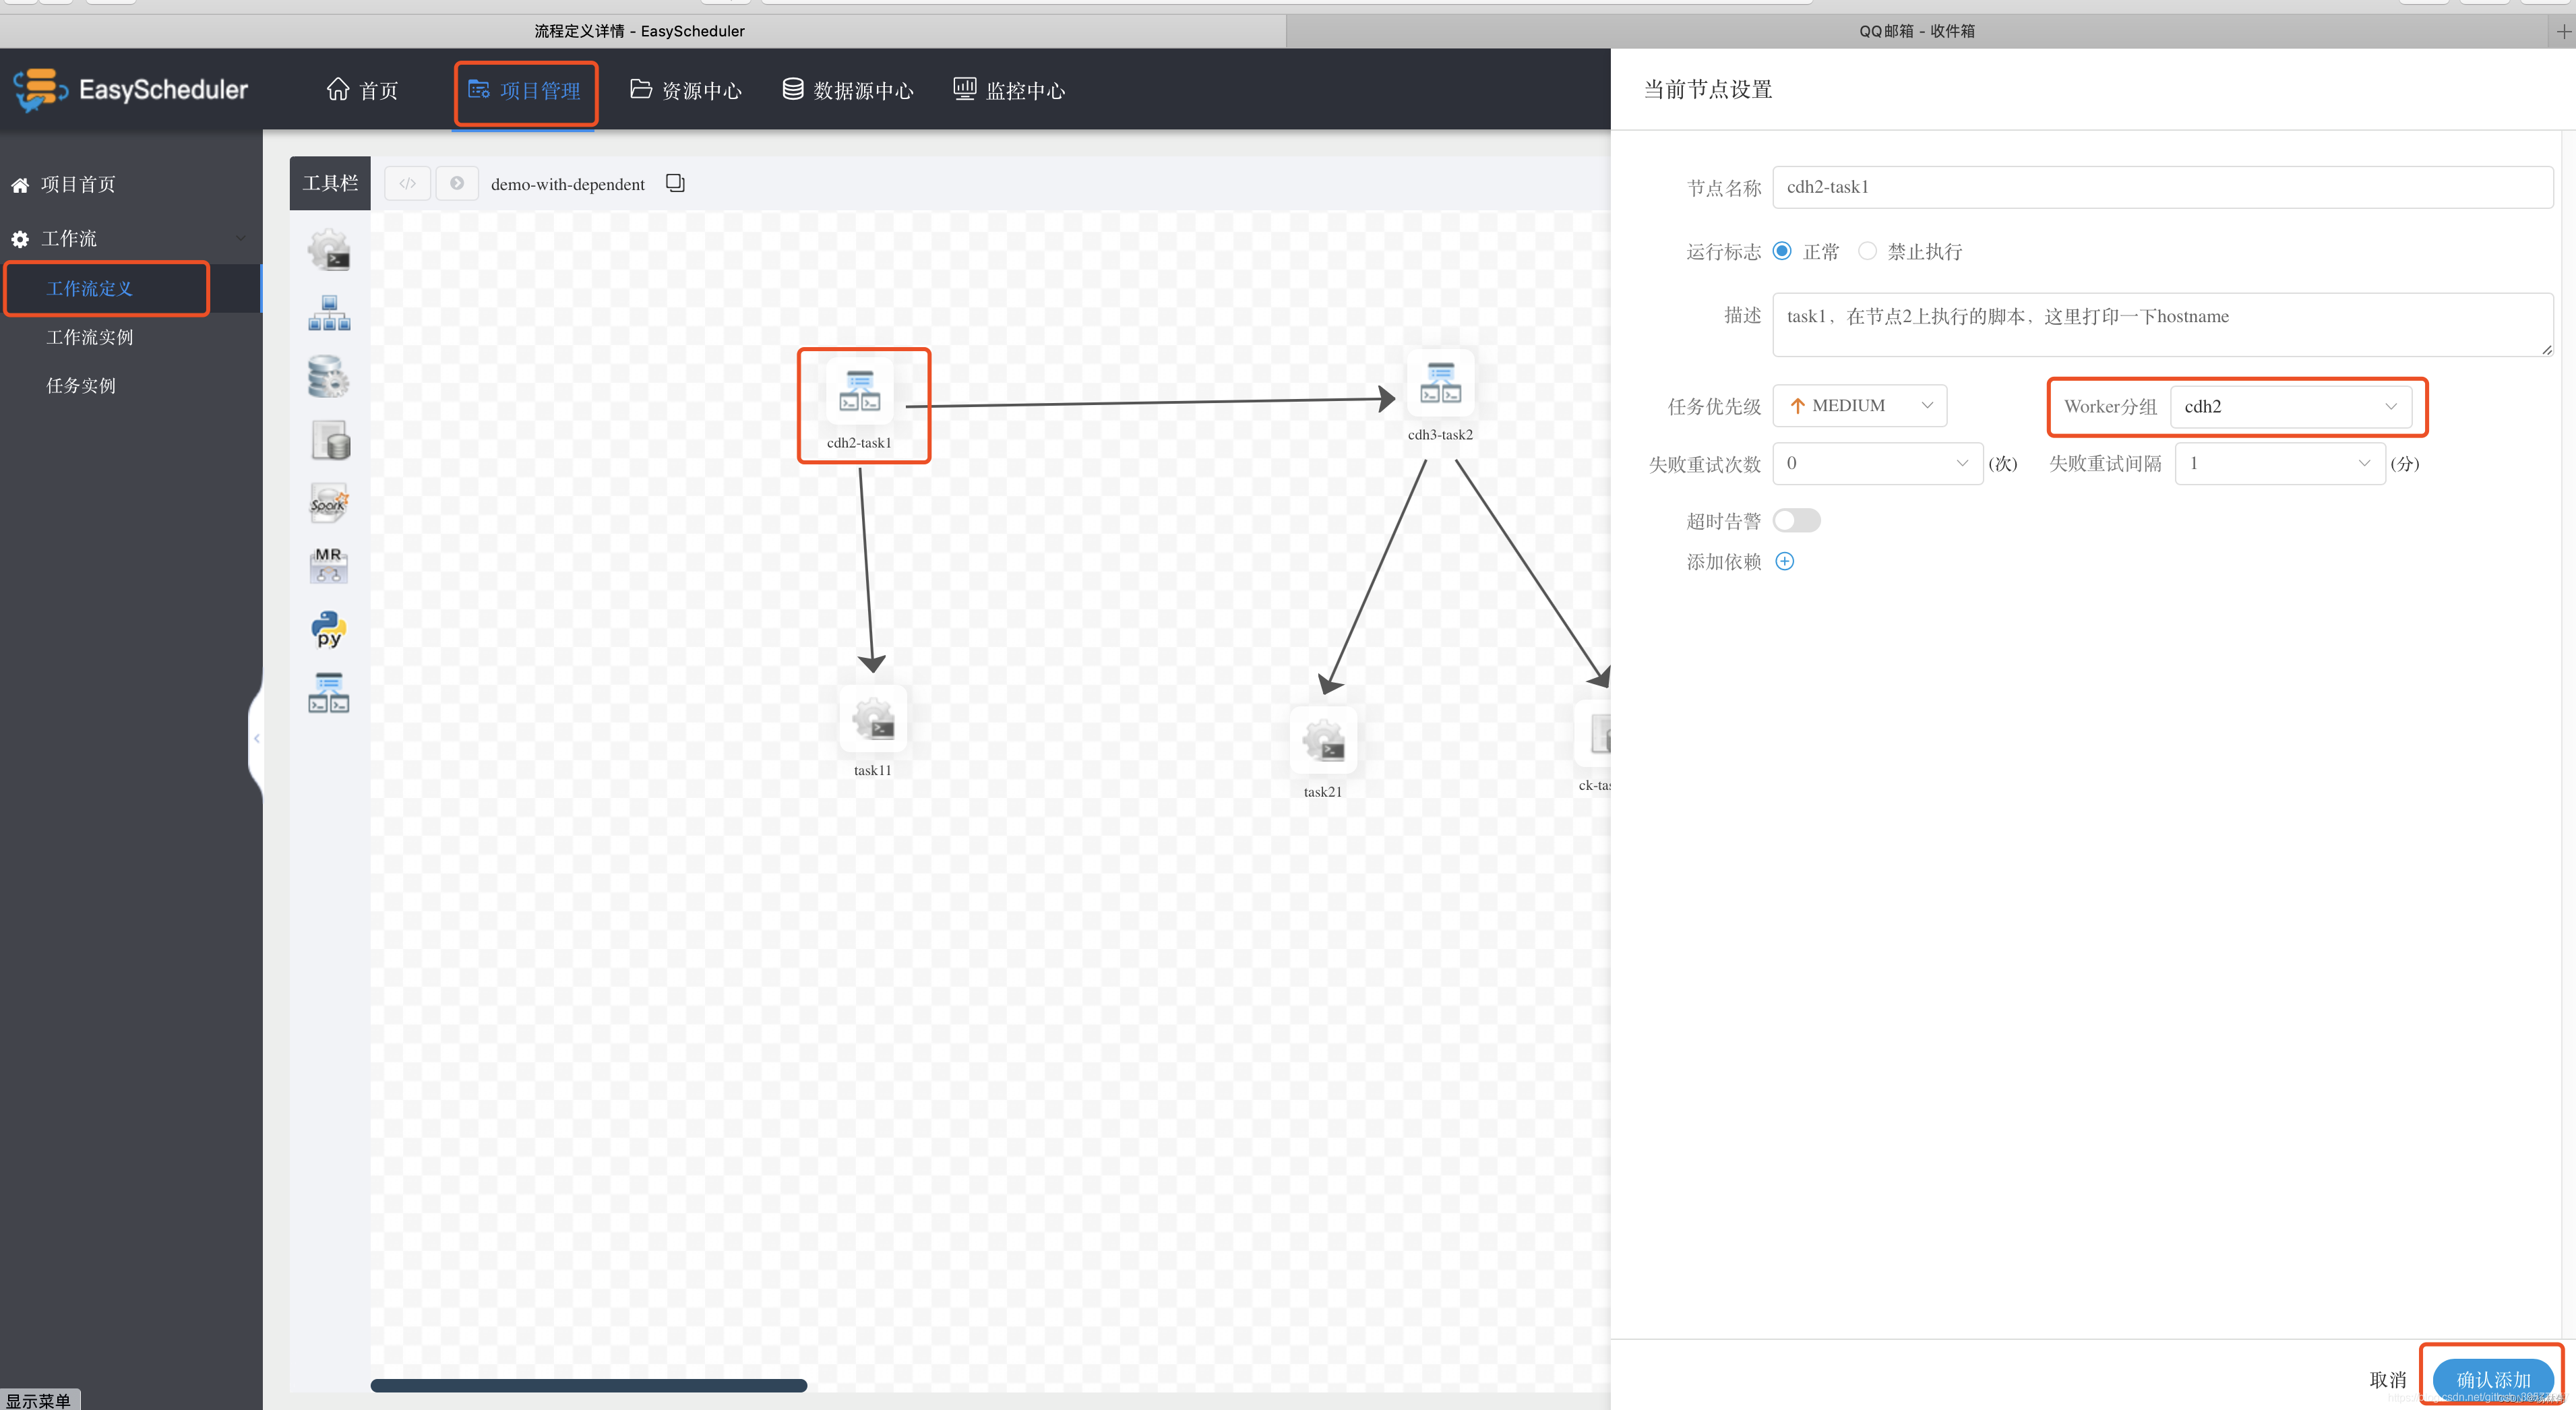
Next set two Shell Execute the script ,cdh2-task11 On the implementation task11, Mainly in the cdh2 Last execution of A hostname command , Print the execution node HostName. Same way , At the dependent node cdh3-task21 Set on cdh3 perform , It's also execution hostname command . Finally, in the dependent node cdh3-task21 Add a SQL Script , Query our Douban movie data , The specific operation is as follows
- Drag and drop on the toolbar to add a SQL Script Task node ;
- The node name can be called :ck-task01, And add description information ;
- Worker grouping :cdh3;
- data source :CLICKHOUSE clickhouse-cdh3;
- sql Type selection query .√ form ;
- Email messages : Fill in the topic . Recipient email 、 CC email ;
- sql sentence :
SELECT m.id,m.movie_name,m.rating_num,m.rating_people,q.rank,q.quote FROM movie m
LEFT JOIN quote q
ON q.id=m.id
ORDER BY m.rating_num DESC,m.rating_people DESC LIMIT 10;
each task After writing , Choose... In the upper right corner Select line connection , After the workflow is compiled, see the following figure , Finally, click save , Input DAG Figure name , And select tenants , Select Add save .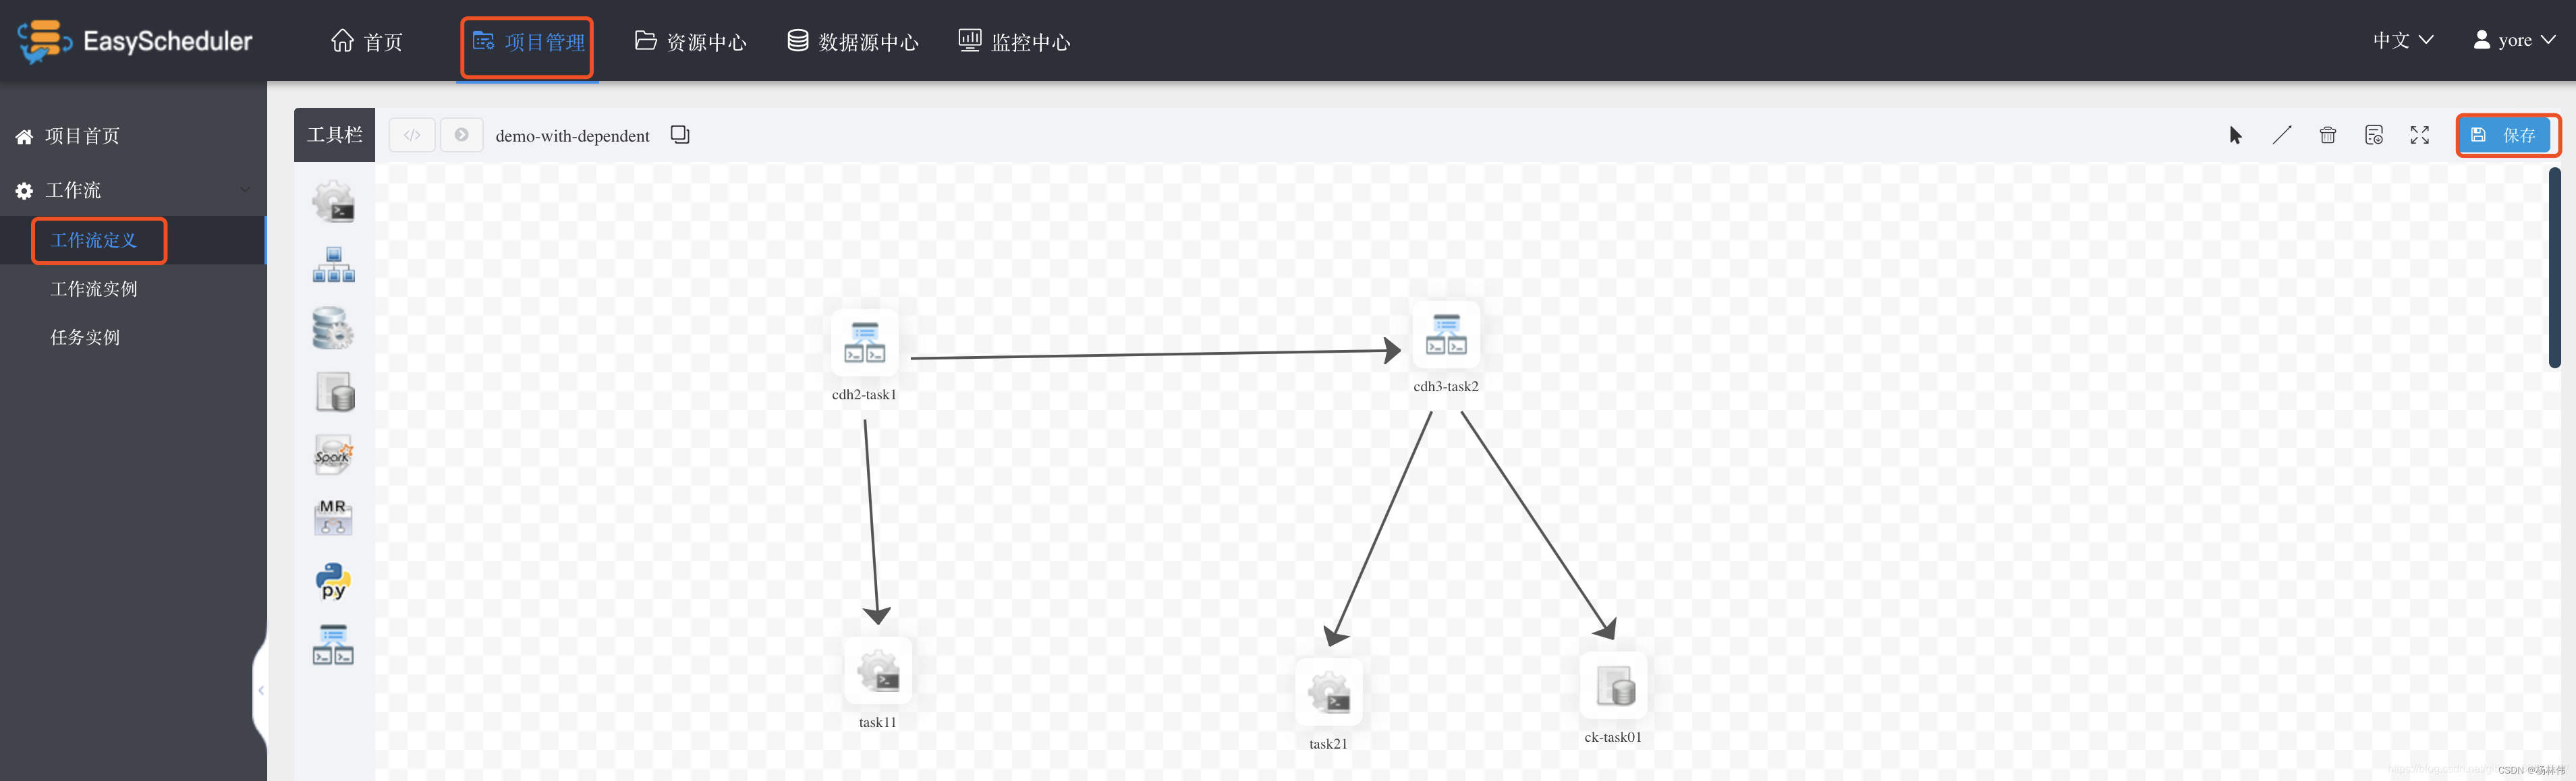
Back to workflow definition , You can see the list of all workflows of the newly added current user , Click... In the operation bar on the right go online , And then click function Execute our workflow . Of course, you can also add timing Dispatch .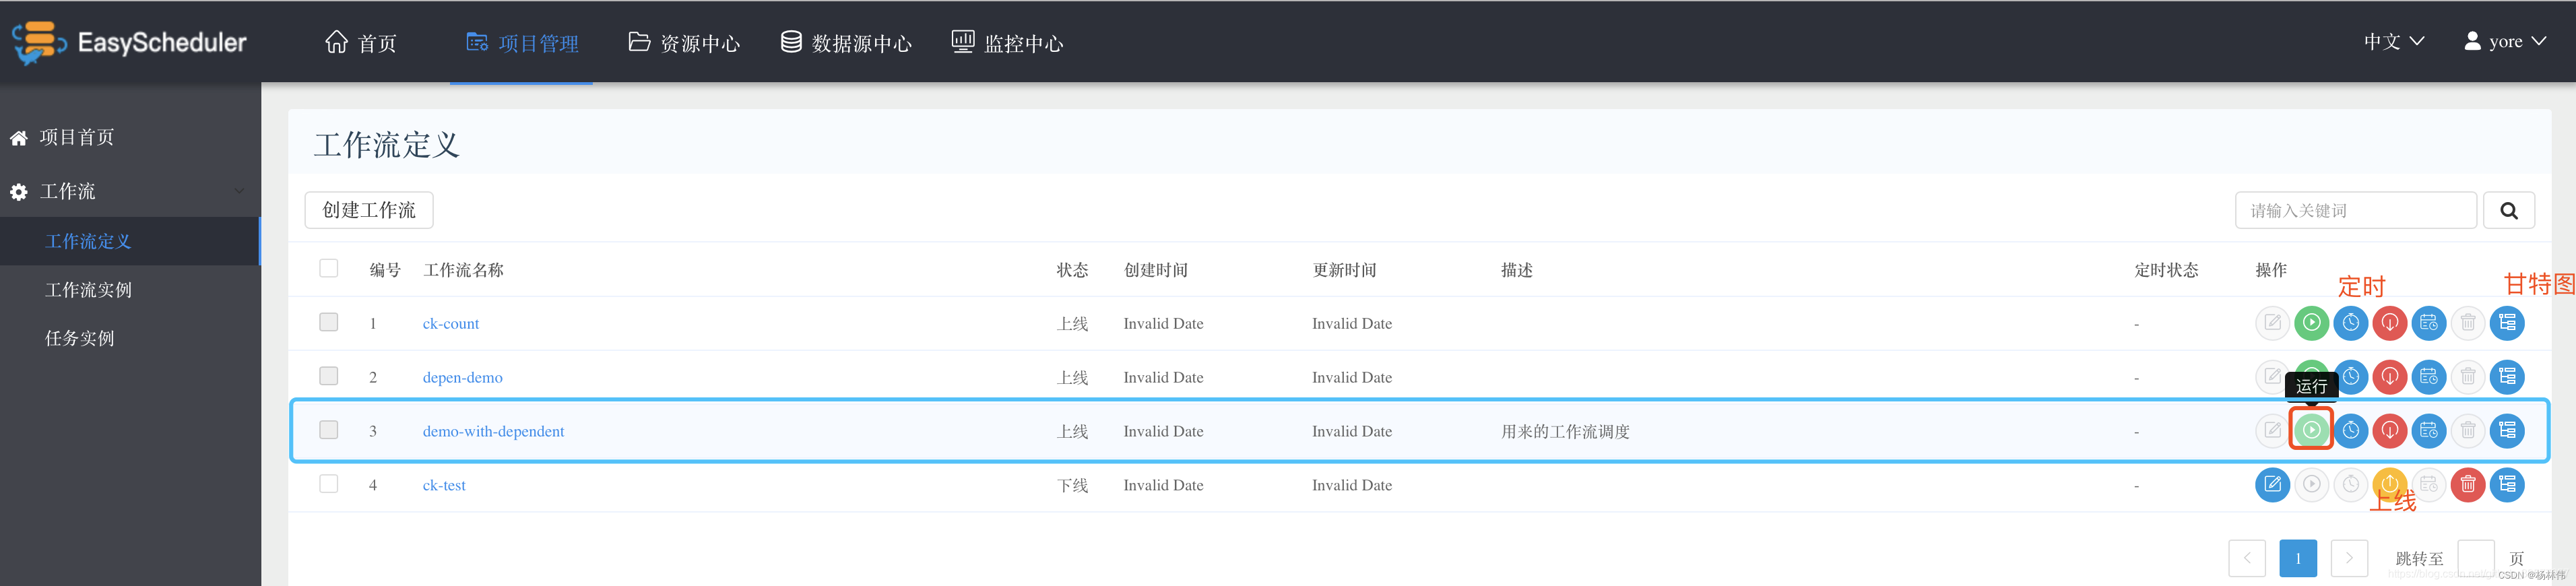
When I hit run , Can be in Workflow instance The page sees the currently running Job Status information . Each job may have multiple Task constitute , see Task The execution information of can be found in Task instance Page view , You can view this in the operation bar task Execution log information of . If the execution is successful , You can select the Gantt chart of the workflow , Check the execution status on the timeline .
You can also view the tree diagram information of workflow execution , Here's the picture .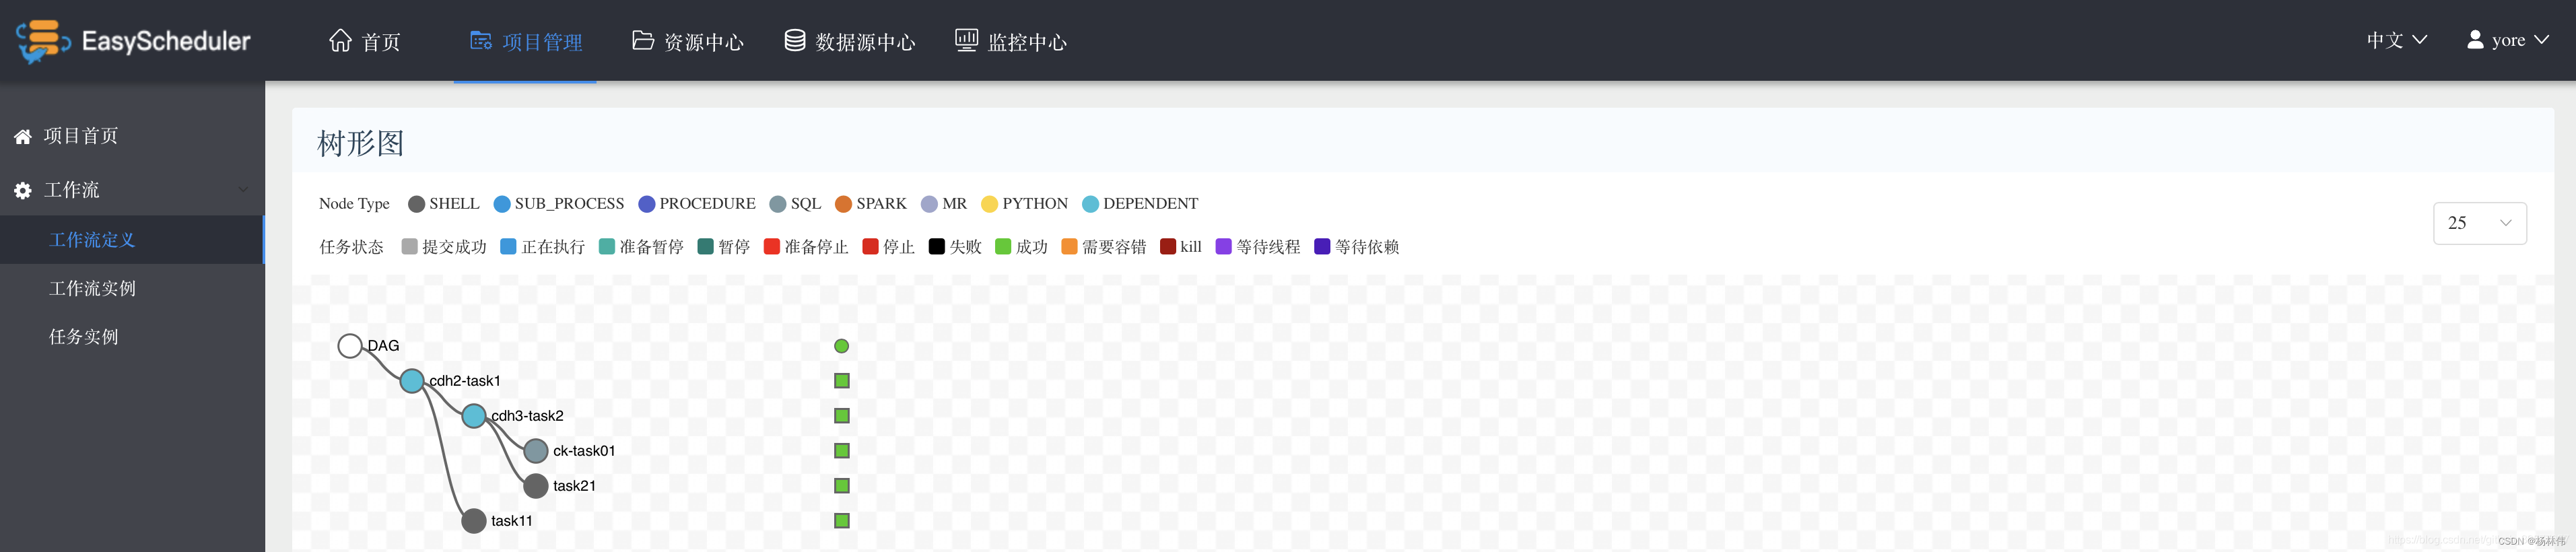
After running successfully, the inbox filled in will receive an email of the execution result , This email contains the results of the script execution .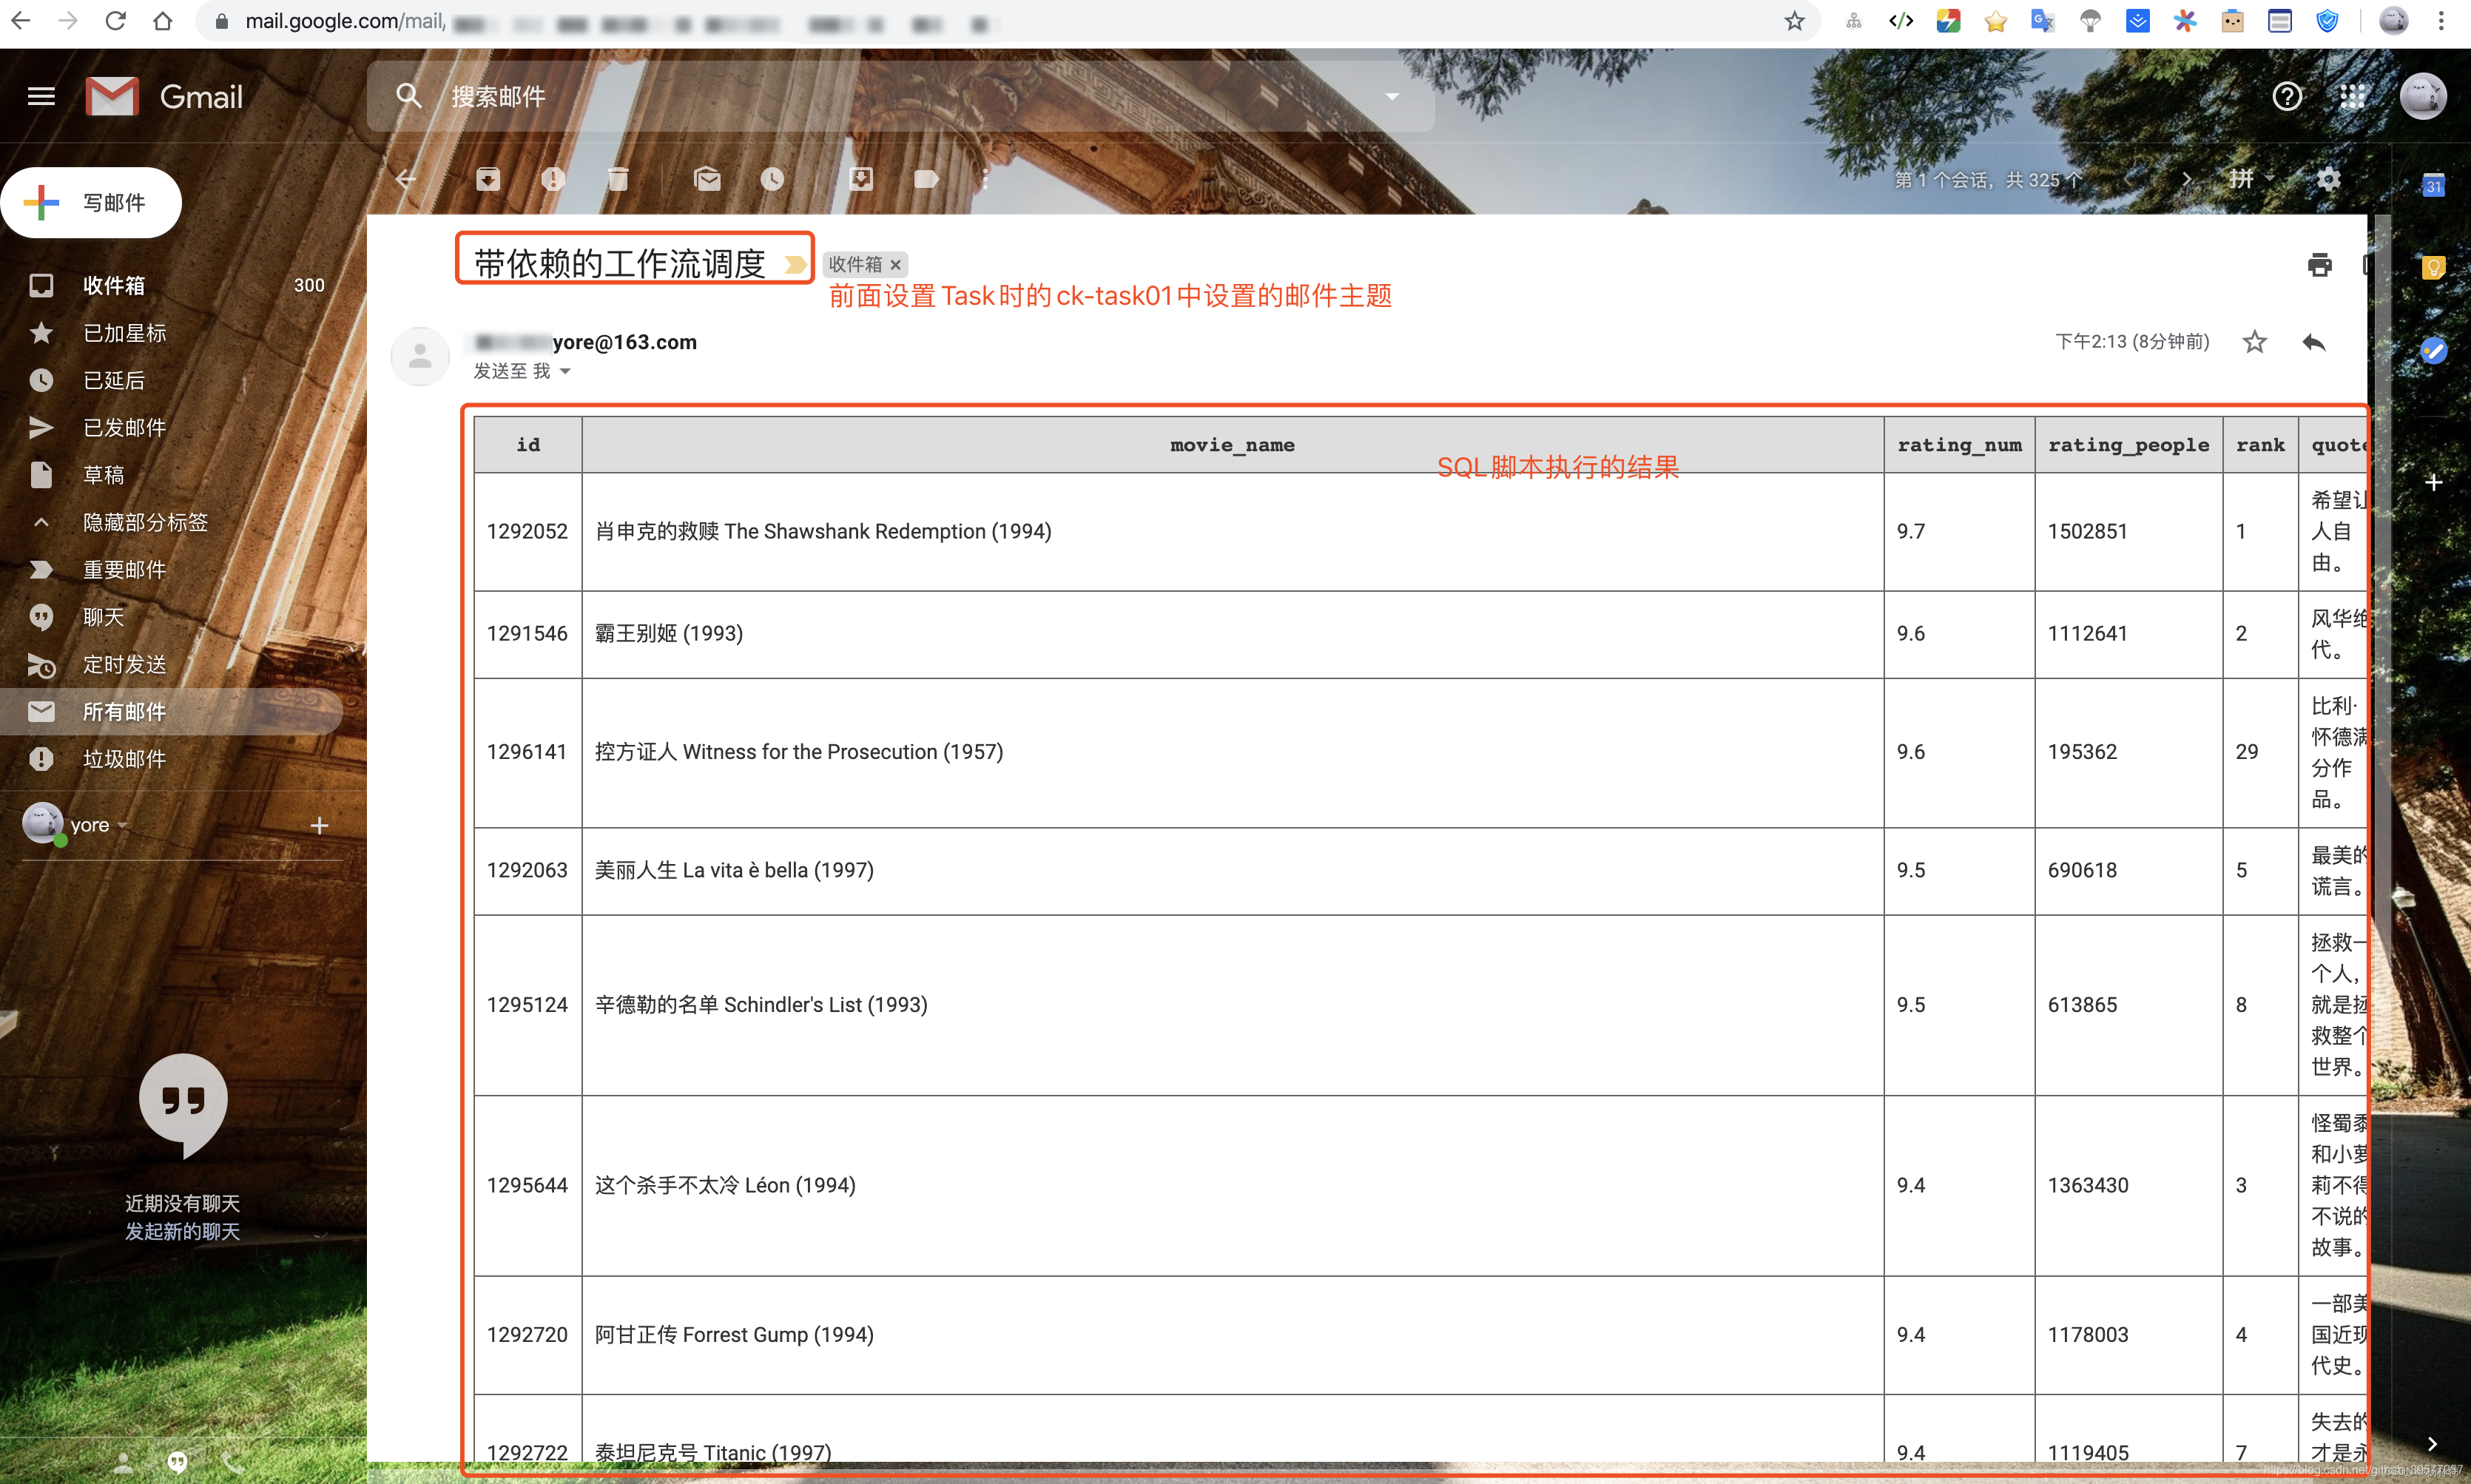
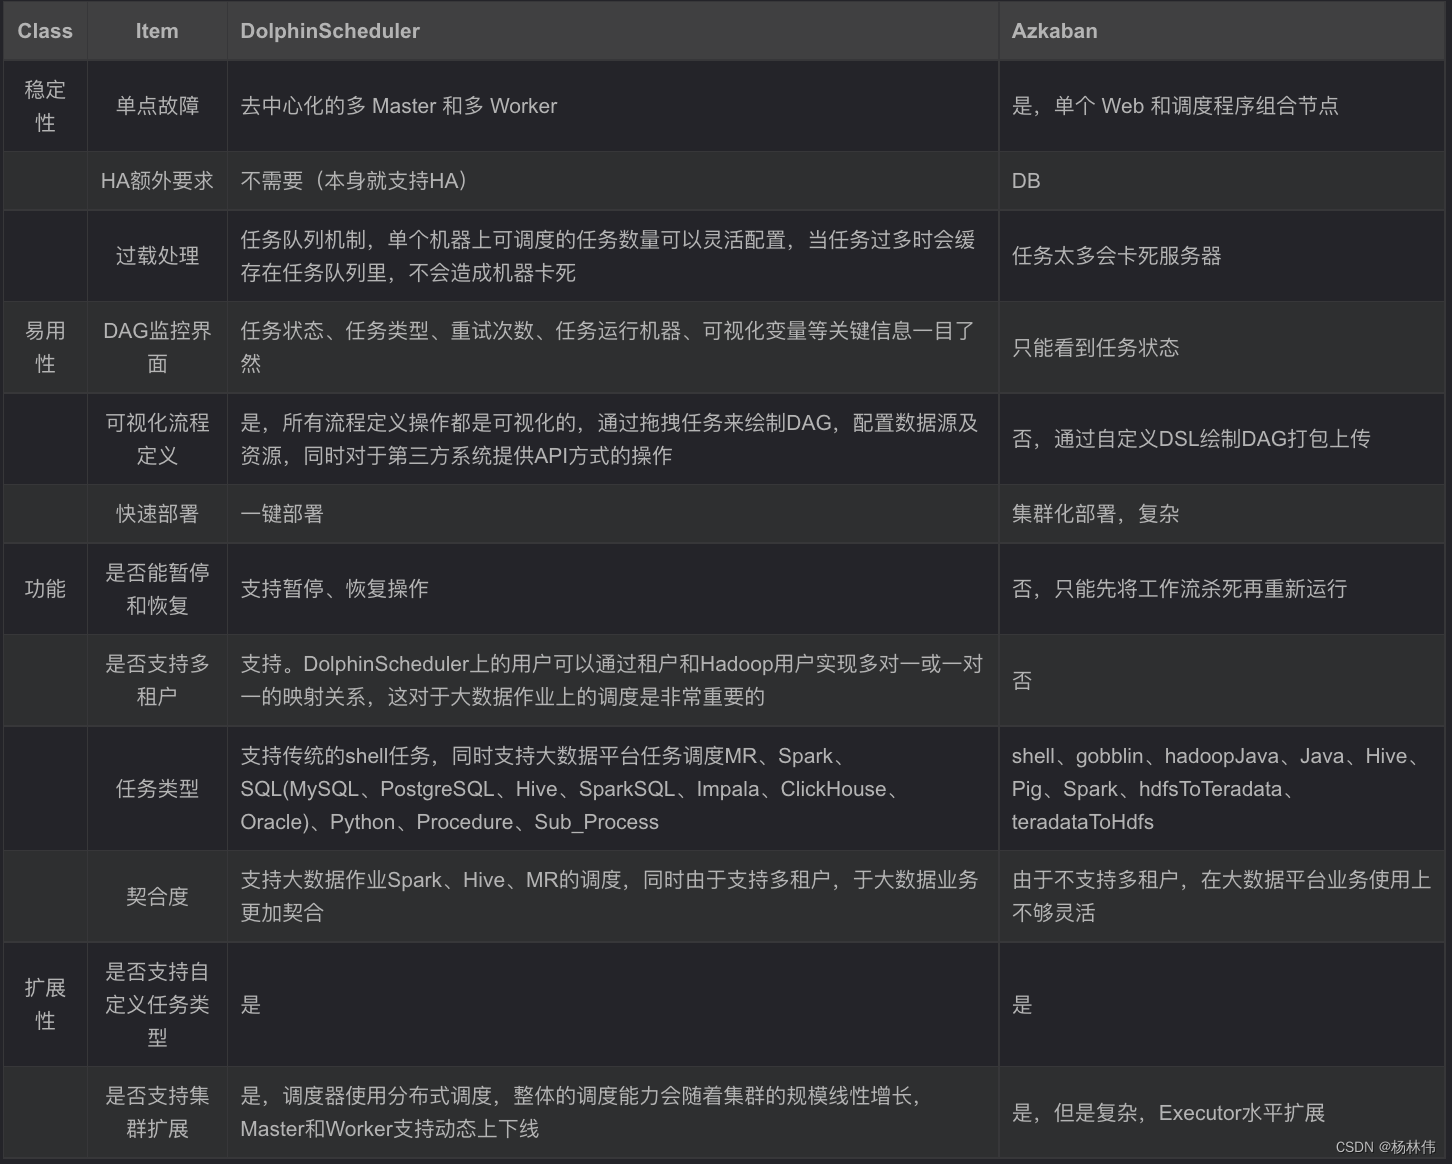
8. And Azkaban Comparison of
9. Summary
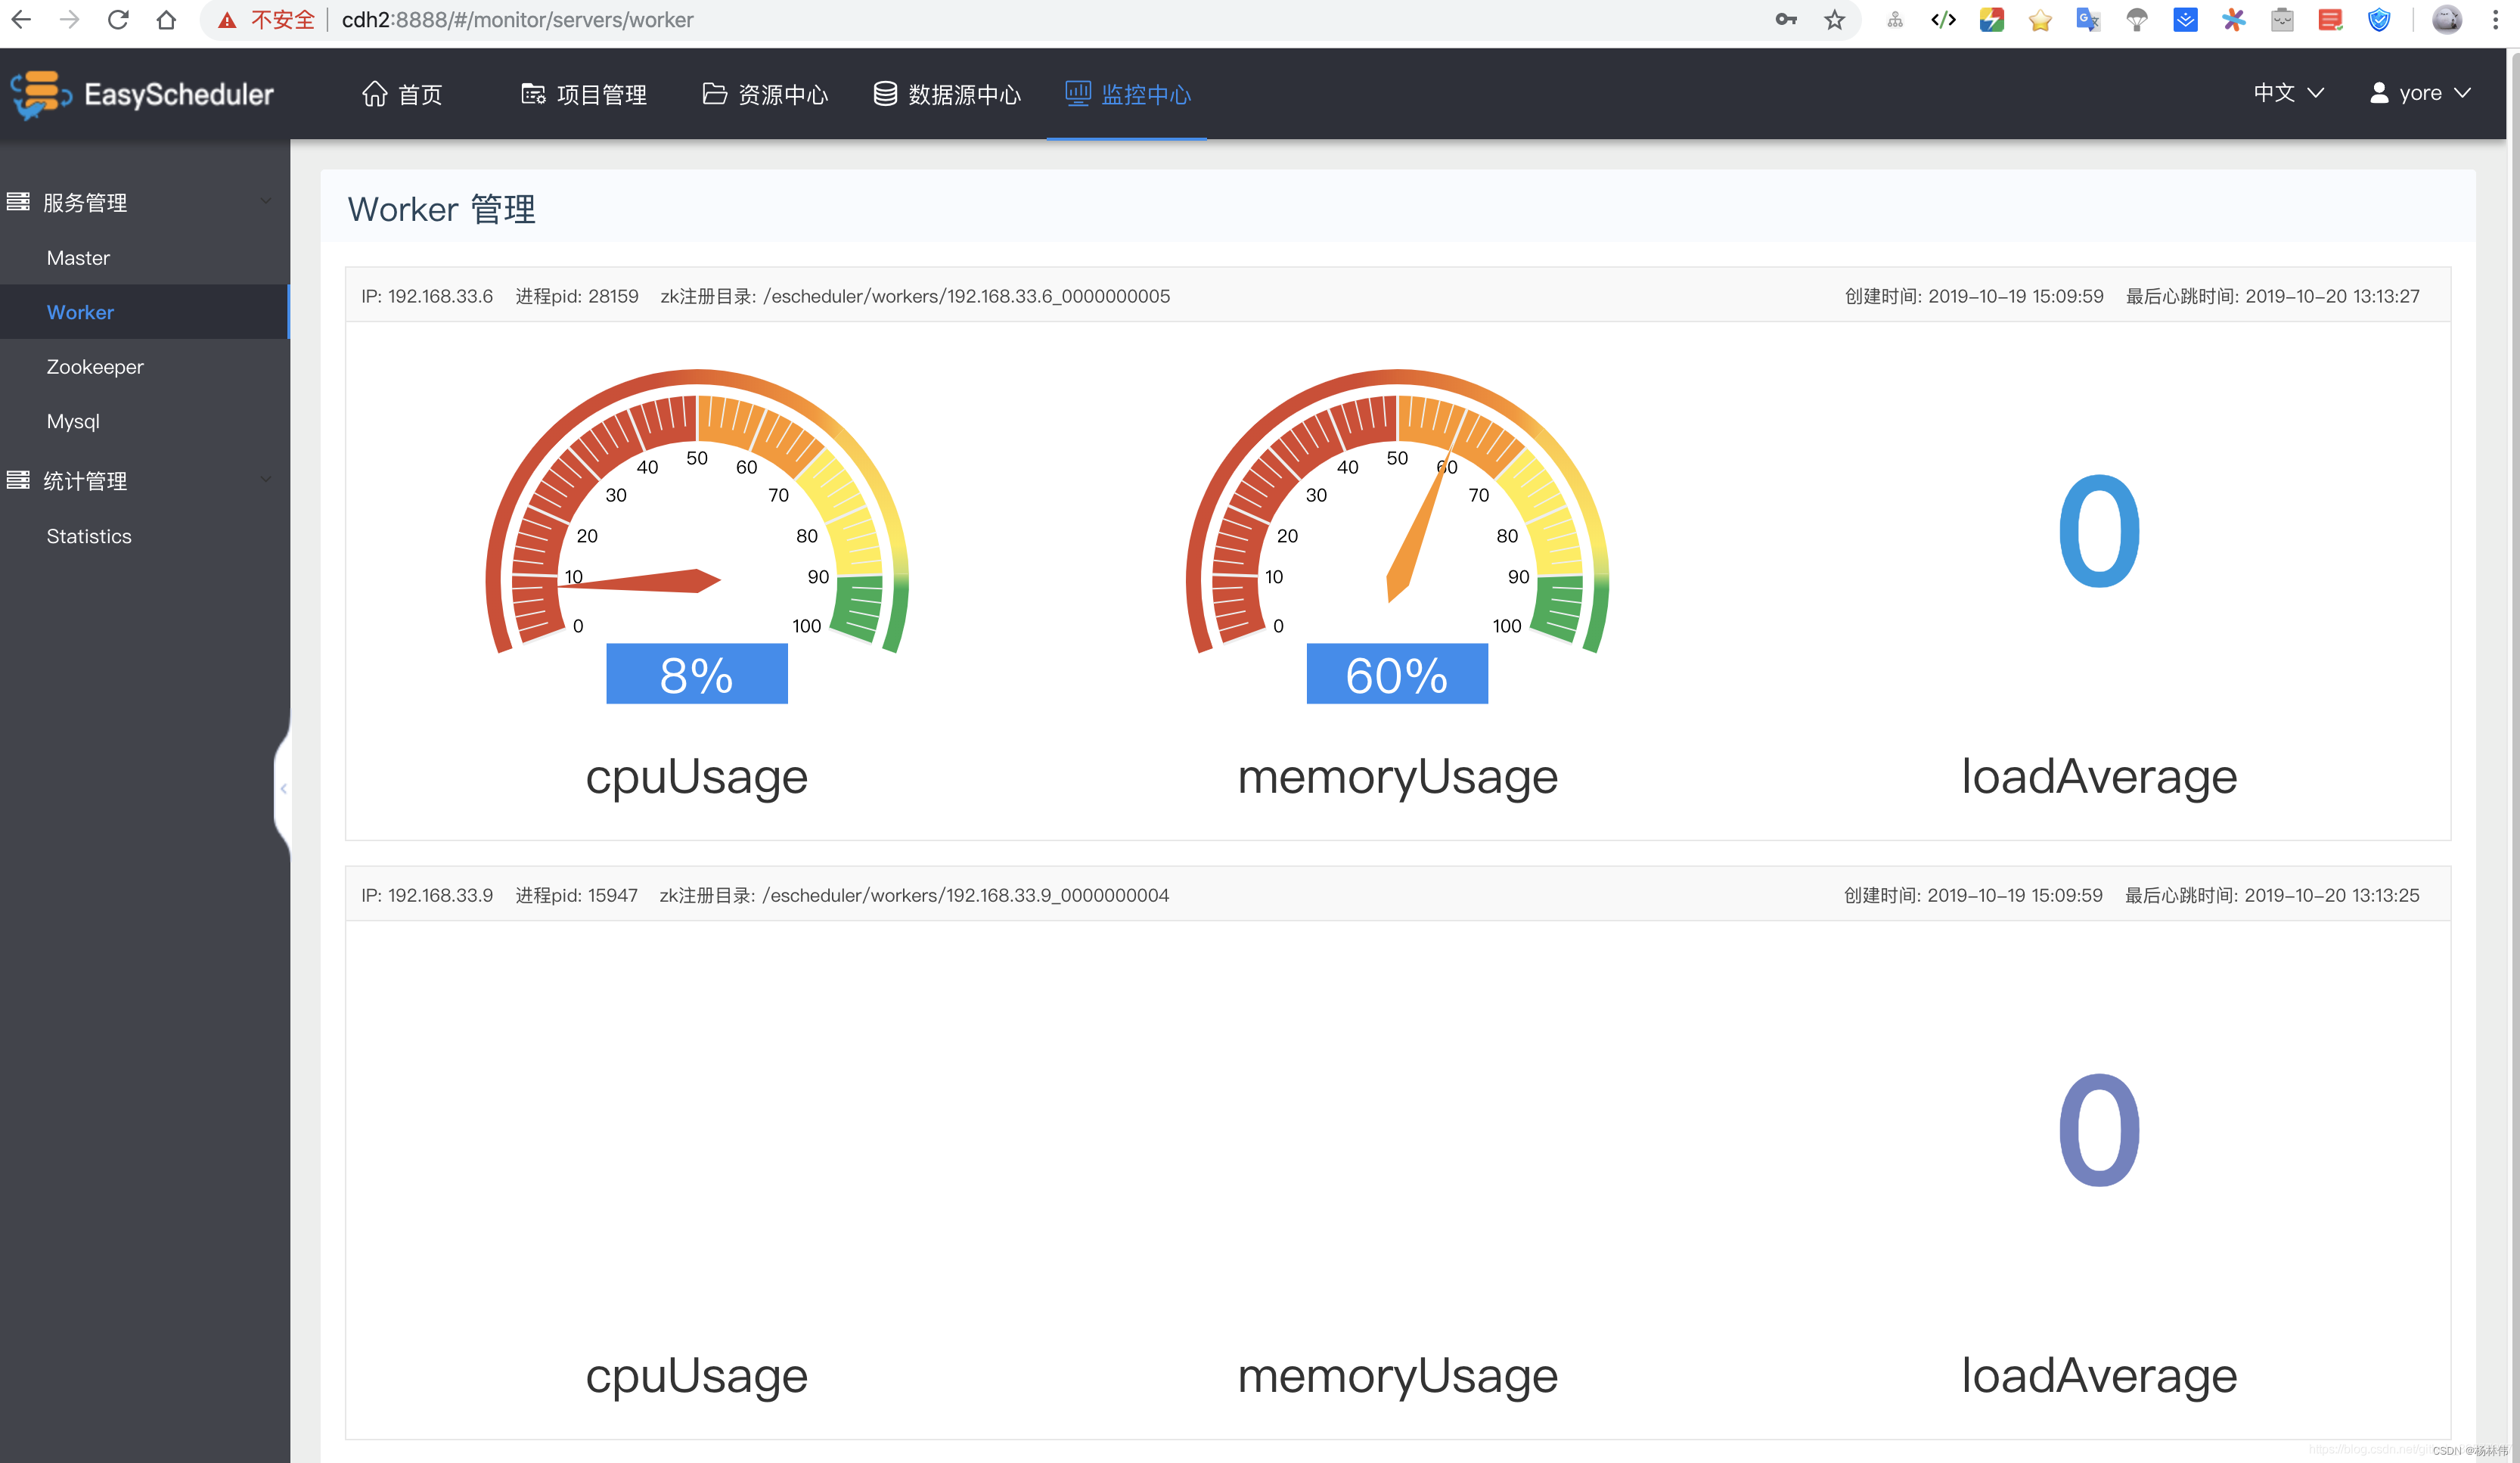
Apache DolphinScheduler It's a distribution 、 De centralization 、 Extensible visualization DAG Workflow task scheduling system , From the installation above, we can see that the scheduling system is integrated ZooKeeper, Decentralization is well realized , The services of each role can play multiple , from znode You can see up here masters and workers Some meta information of is registered on it , Leave it to ZK Go to the election , Of course, it is also a distributed . If a service hangs up ,ZooKeeper Elections will be held at the remaining nodes , For example, when some nodes Worker Service to hang , We don't have to do anything ,DolphinScheduler Can still submit and execute work normally , You can see on the page of its monitoring center , The system automatically elects a new Work node .
# znode Information on
[zk: localhost:2181(CONNECTED) 1] ls /escheduler
[tasks_queue, dead-servers, masters, lock, workers, tasks_kill]
Especially more Worker The function of grouping and adding data sources , You can specify Wroker node , Directly specify the data under the user , perform SQL Script , At the same time, the monitoring center added to the page 、 Task status statistics 、 Process status statistics 、 Process definition and statistics can also help us manage and view the information of task execution and the status of the cluster .
边栏推荐
- [technical live broadcast] how to rewrite tdengine code from 0 to 1 with vscode
- LeetCode 556. Next bigger element III
- 写入速度提升数十倍,TDengine 在拓斯达智能工厂解决方案上的应用
- Tdengine connector goes online Google Data Studio app store
- LeetCode 31. Next spread
- oracle 多行数据合并成一行数据
- On July 2, I invite you to TD Hero online press conference
- Design and exploration of Baidu comment Center
- 【两个对象合并成一个对象】
- SQL learning - case when then else
猜你喜欢
OpenGL - Coordinate Systems
Oracle combines multiple rows of data into one row of data

Community group buying has triggered heated discussion. How does this model work?

What should we pay attention to when developing B2C websites?
【C语言】动态内存开辟的使用『malloc』
Observation cloud and tdengine have reached in-depth cooperation to optimize the cloud experience of enterprises

Deep understanding of C language pointer

Viewpager pageradapter notifydatasetchanged invalid problem
初识结构体

【技术直播】如何用 VSCode 从 0 到 1 改写 TDengine 代码
随机推荐
SQL learning alter add new field
OpenGL - Lighting
The popularity of B2B2C continues to rise. What are the benefits of enterprises doing multi-user mall system?
22-07-04 Xi'an Shanghao housing project experience summary (01)
Tdengine connector goes online Google Data Studio app store
基于宽表的数据建模应用
Are databases more popular as they get older?
idea用debug调试出现com.intellij.rt.debugger.agent.CaptureAgent,导致无法进行调试
Unity skframework framework (24), avatar controller third person control
Design and exploration of Baidu comment Center
如何正确的评测视频画质
单片机原理与接口技术(ESP8266/ESP32)机器人类草稿
卷起来,突破35岁焦虑,动画演示CPU记录函数调用过程
移动端异构运算技术-GPU OpenCL编程(进阶篇)
What should we pay attention to when developing B2C websites?
The most comprehensive promotion strategy: online and offline promotion methods of E-commerce mall
TDengine 已经支持工业英特尔 边缘洞见软件包
A detailed explanation of the general process and the latest research trends of map comparative learning (gnn+cl)
On July 2, I invite you to TD Hero online press conference
Tdengine already supports the industrial Intel edge insight package