当前位置:网站首页>STM32 - switch of relay control lamp
STM32 - switch of relay control lamp
2022-07-03 01:36:00 【Spade fish】
STM32—— The relay controls the switch of the light
List of articles
The principle of relay will not be introduced
The relay controls the switch of the light
Description of project :
Environmental Overview :
Windows10 pro
MDK—Lite 5.25
The beginning of the project :
In the firmware library USER Middle folder
add to XXX Folder Add... To this folder xx.c Files and xx.h file
Then import it in
First step :

The second step :

stay led.c Import in file led.h file , Write the include header file first , To compile , It is automatically imported

1、 To configure GPIOA The clock
To configure GPIOA The clock Want to go RCC Go looking for APB2 Configured clock
How to find it ???
open FWLB file
Find the file in the figure

Keep looking for rcc.h file
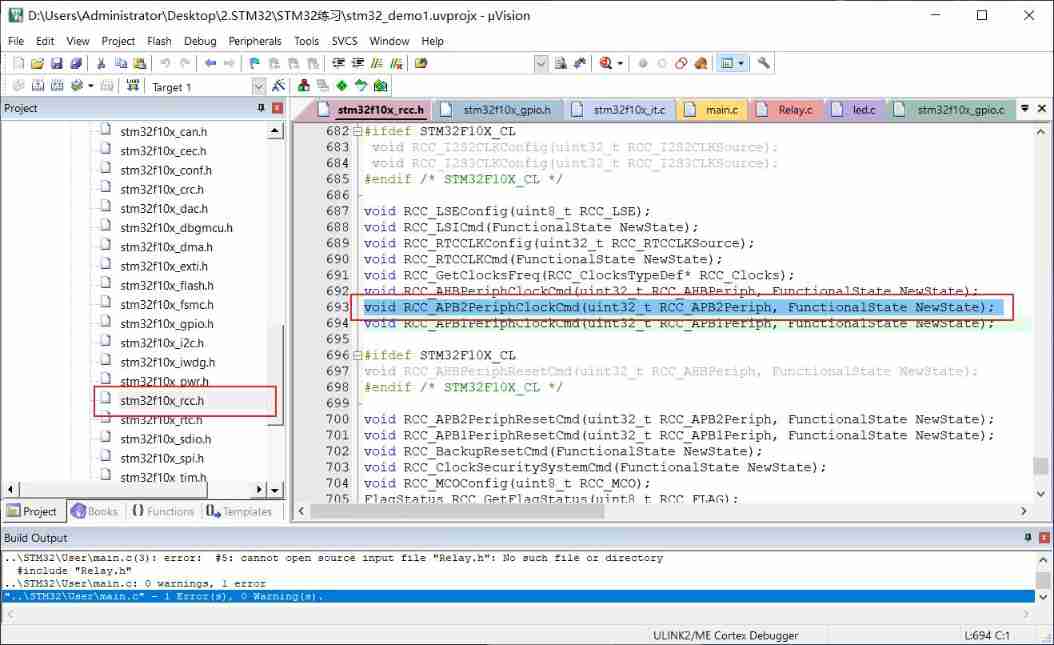
//APB2 The peripheral clock of , There are two parameters , The first parameter is IO mouth  GPIOA, The second parameter   open
RCC_APB2PeriphClockCmd( RCC_APB2Periph_GPIOA,ENABLE);
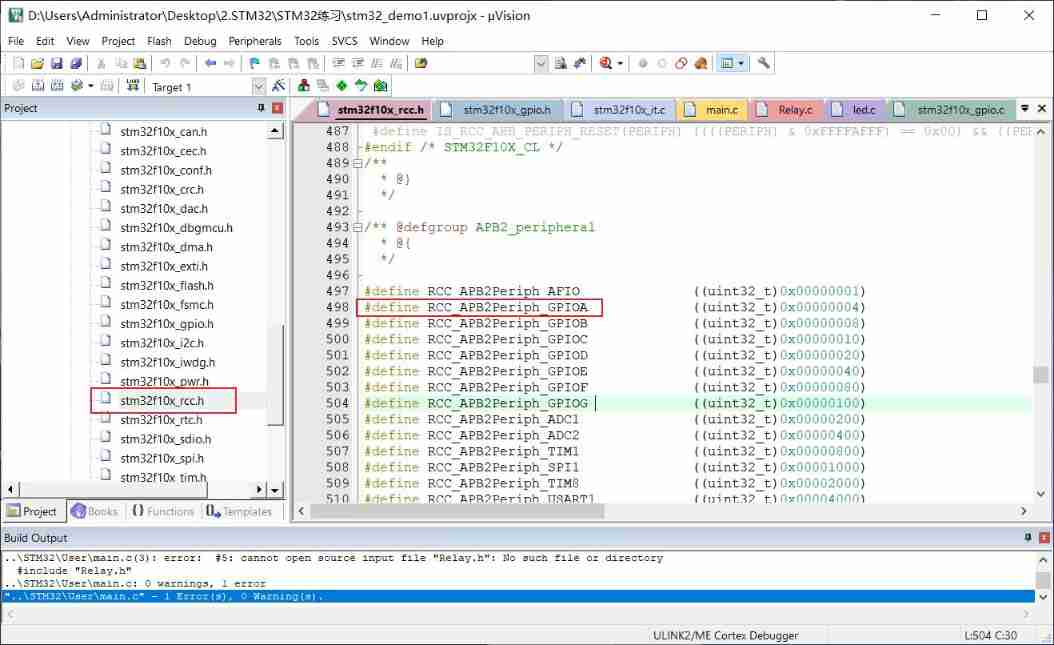
How to find the first parameter ?
Continue to rcc.h Look for this parameter in the file
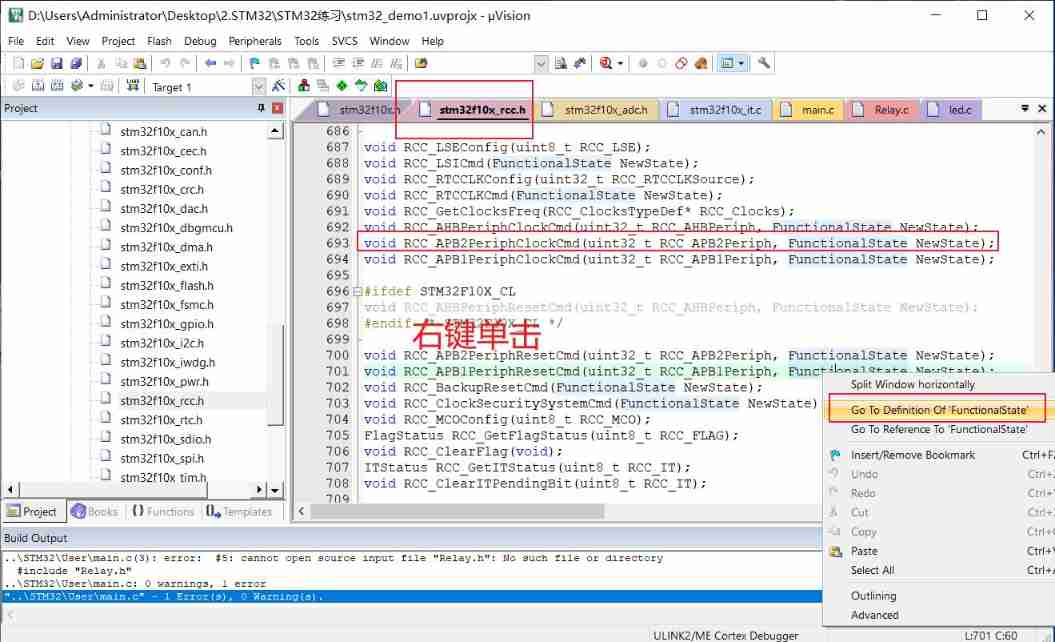
How to find the second parameter ?

2、GPIOA3 Structure configuration of
Let's find out GPIOA Configuration file for
Go find gpio.h file
Pictured :
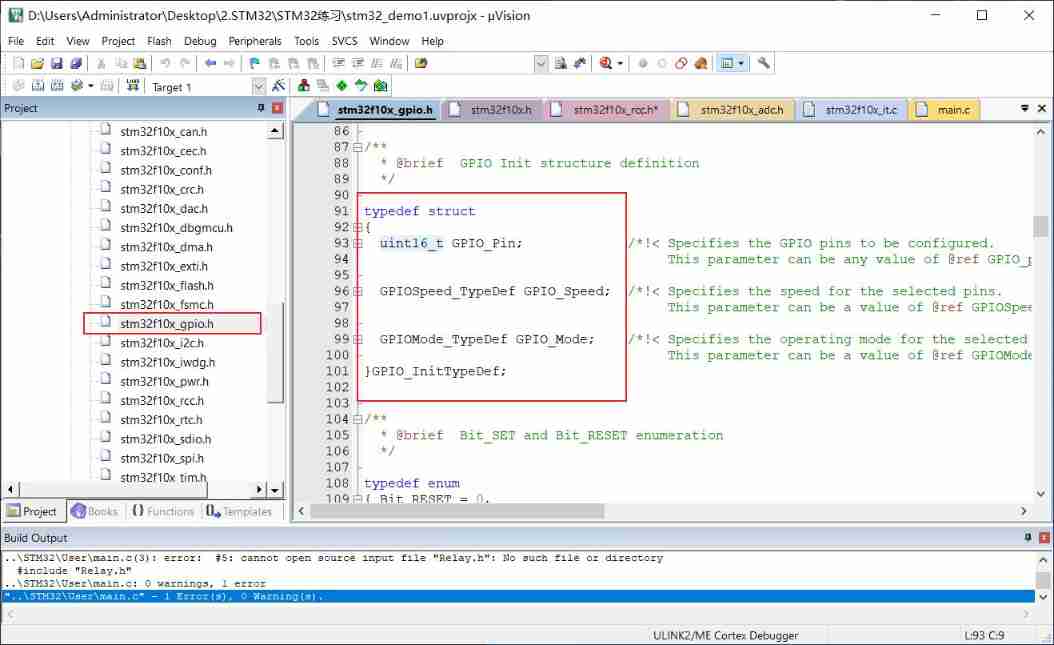
Code :
typedef struct
{

  uint16_t GPIO_Pin;             /*!< Specifies the GPIO pins to be configured. This parameter can be any value of @ref GPIO_pins_define */

  GPIOSpeed_TypeDef GPIO_Speed;  /*!< Specifies the speed for the selected pins. This parameter can be a value of @ref GPIOSpeed_TypeDef */

  GPIOMode_TypeDef GPIO_Mode;    /*!< Specifies the operating mode for the selected pins. This parameter can be a value of @ref GPIOMode_TypeDef */
}GPIO_InitTypeDef;
Code :
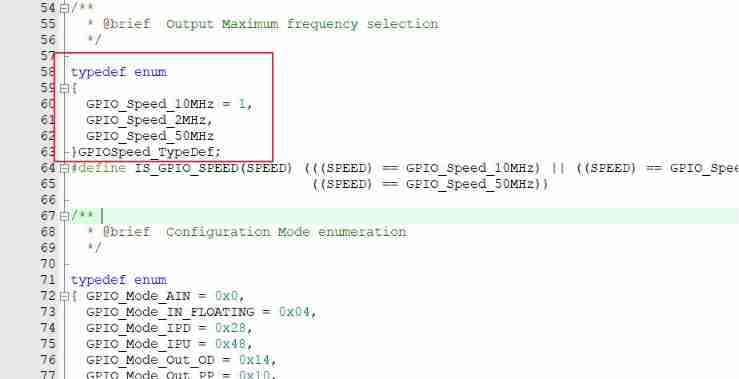
typedef enum
{

  GPIO_Speed_10MHz = 1,
  GPIO_Speed_2MHz,
  GPIO_Speed_50MHz
}GPIOSpeed_TypeDef;

Code :
typedef enum
{
     GPIO_Mode_AIN = 0x0,// Analog input
  GPIO_Mode_IN_FLOATING = 0x04,// Floating input
  GPIO_Mode_IPD = 0x28,// Drop down input
  GPIO_Mode_IPU = 0x48,// Pull up input
  GPIO_Mode_Out_OD = 0x14,// Open drain output
  GPIO_Mode_Out_PP = 0x10,// Push pull output
  GPIO_Mode_AF_OD = 0x1C,// Push pull multiplexing
  GPIO_Mode_AF_PP = 0x18// Open drain multiplexing
}GPIOMode_TypeDef;
GPIO Differences between various port modes
(1)GPIO_Mode_AIN Analog input
(2)GPIO_Mode_IN_FLOATING Floating input
(3)GPIO_Mode_IPD Drop down input
(4)GPIO_Mode_IPU Pull up input
(5)GPIO_Mode_Out_OD Open drain output
(6)GPIO_Mode_Out_PP Push pull output
(7)GPIO_Mode_AF_OD Reuse open drain output
(8)GPIO_Mode_AF_PP Multiplexing push pull output
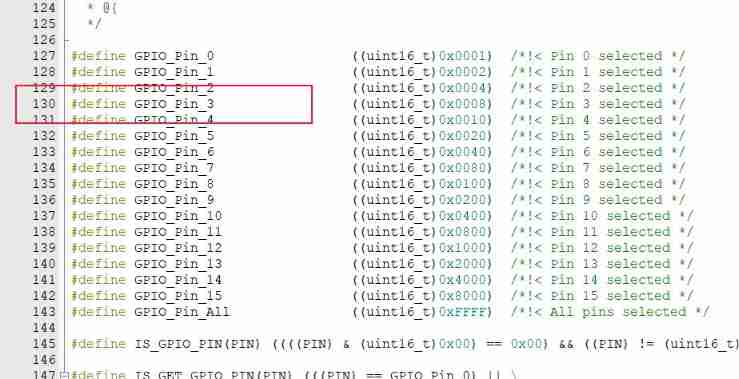
Relevant configurations of pins
Code :
#define GPIO_Pin_0 ((uint16_t)0x0001) /*!< Pin 0 selected */
#define GPIO_Pin_1 ((uint16_t)0x0002) /*!< Pin 1 selected */
#define GPIO_Pin_2 ((uint16_t)0x0004) /*!< Pin 2 selected */
#define GPIO_Pin_3 ((uint16_t)0x0008) /*!< Pin 3 selected */
#define GPIO_Pin_4 ((uint16_t)0x0010) /*!< Pin 4 selected */
#define GPIO_Pin_5 ((uint16_t)0x0020) /*!< Pin 5 selected */
#define GPIO_Pin_6 ((uint16_t)0x0040) /*!< Pin 6 selected */
#define GPIO_Pin_7 ((uint16_t)0x0080) /*!< Pin 7 selected */
#define GPIO_Pin_8 ((uint16_t)0x0100) /*!< Pin 8 selected */
#define GPIO_Pin_9 ((uint16_t)0x0200) /*!< Pin 9 selected */
#define GPIO_Pin_10 ((uint16_t)0x0400) /*!< Pin 10 selected */
#define GPIO_Pin_11 ((uint16_t)0x0800) /*!< Pin 11 selected */
#define GPIO_Pin_12 ((uint16_t)0x1000) /*!< Pin 12 selected */
#define GPIO_Pin_13 ((uint16_t)0x2000) /*!< Pin 13 selected */
#define GPIO_Pin_14 ((uint16_t)0x4000) /*!< Pin 14 selected */
#define GPIO_Pin_15 ((uint16_t)0x8000) /*!< Pin 15 selected */
#define GPIO_Pin_All ((uint16_t)0xFFFF) /*!< All pins selected */
//2、GPIOA3 Structure configuration of
  Relay_GPIOInit.GPIO_Mode = GPIO_Mode_Out_PP;
	Relay_GPIOInit.GPIO_Pin  = GPIO_Pin_3;
	Relay_GPIOInit.GPIO_Speed = GPIO_Speed_10MHz;
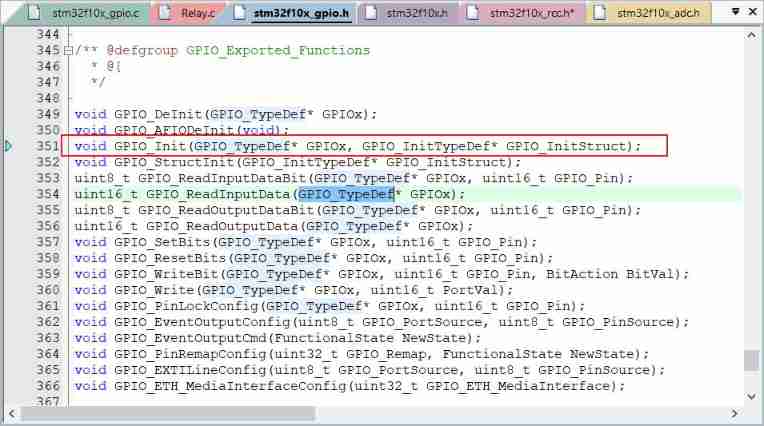
3、 initialization
stay GPIO.h Find the function in the file
Code after configuration :
#include "stm32f10x.h"
#include "Relay.h"

void Relay_Init(void)
{

	/*  Connect that IO Just find the corresponding clock and open it , We connect externally PA3,  So open GPIOA The clock  */
	//1、 Can make GPIOA The clock
  GPIO_InitTypeDef  Relay_GPIOInit;
	//APB2 The peripheral clock of , There are two parameters , The first parameter is IO mouth  GPIOA, The second parameter   open
	RCC_APB2PeriphClockCmd( RCC_APB2Periph_GPIOA,ENABLE);
//2、GPIOA3 Structure configuration of

  Relay_GPIOInit.GPIO_Mode = GPIO_Mode_Out_PP;
	Relay_GPIOInit.GPIO_Pin  = GPIO_Pin_3;
	Relay_GPIOInit.GPIO_Speed = GPIO_Speed_10MHz;
	//3、 initialization
	GPIO_Init(GPIOA,&Relay_GPIOInit );

}
After writing the document , stay main.c Add... To the file The header file And the path
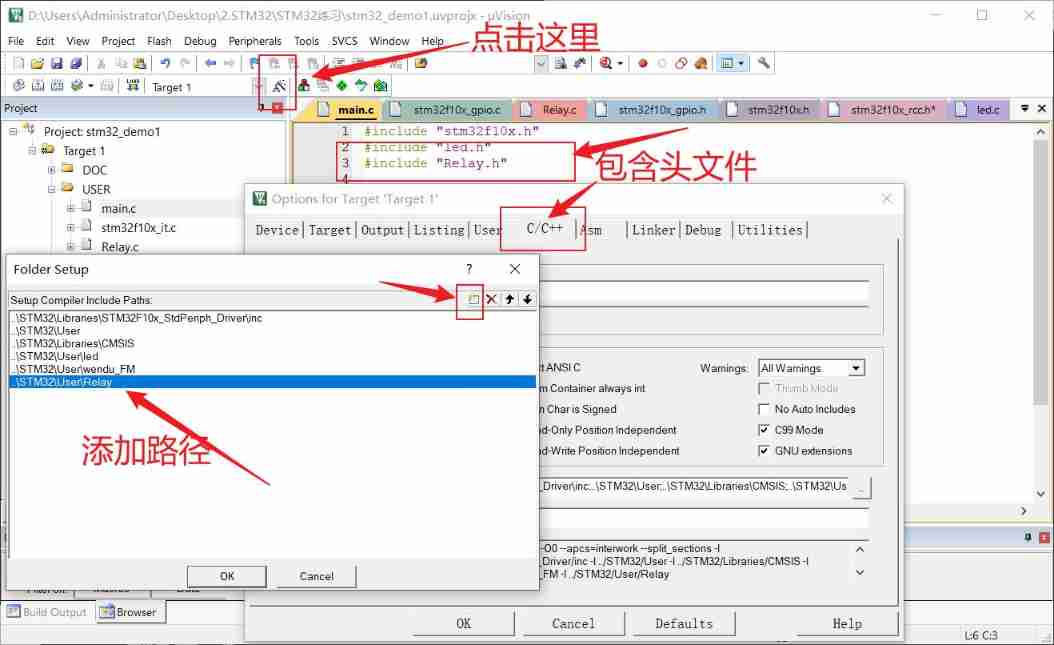
stay main Set low level in function
GPIO_ResetBits(GPIOA, GPIO_3);
Code :
void GPIO_DeInit(GPIO_TypeDef* GPIOx);
void GPIO_AFIODeInit(void);
void GPIO_Init(GPIO_TypeDef* GPIOx, GPIO_InitTypeDef* GPIO_InitStruct);
void GPIO_StructInit(GPIO_InitTypeDef* GPIO_InitStruct);
uint8_t GPIO_ReadInputDataBit(GPIO_TypeDef* GPIOx, uint16_t GPIO_Pin);
uint16_t GPIO_ReadInputData(GPIO_TypeDef* GPIOx);
uint8_t GPIO_ReadOutputDataBit(GPIO_TypeDef* GPIOx, uint16_t GPIO_Pin);
uint16_t GPIO_ReadOutputData(GPIO_TypeDef* GPIOx);
void GPIO_SetBits(GPIO_TypeDef* GPIOx, uint16_t GPIO_Pin);// Pull high
void GPIO_ResetBits(GPIO_TypeDef* GPIOx, uint16_t GPIO_Pin);// Pull low
void GPIO_WriteBit(GPIO_TypeDef* GPIOx, uint16_t GPIO_Pin, BitAction BitVal);
void GPIO_Write(GPIO_TypeDef* GPIOx, uint16_t PortVal);
void GPIO_PinLockConfig(GPIO_TypeDef* GPIOx, uint16_t GPIO_Pin);
void GPIO_EventOutputConfig(uint8_t GPIO_PortSource, uint8_t GPIO_PinSource);
void GPIO_EventOutputCmd(FunctionalState NewState);
void GPIO_PinRemapConfig(uint32_t GPIO_Remap, FunctionalState NewState);
void GPIO_EXTILineConfig(uint8_t GPIO_PortSource, uint8_t GPIO_PinSource);
void GPIO_ETH_MediaInterfaceConfig(uint32_t GPIO_ETH_MediaInterface);
Project code :
main.c File code :
#include "stm32f10x.h"
#include "led.h"
#include "Relay.h"

int main(void)
{

	LED_Init();
	Relay_Init();
	while(1){


		GPIO_ResetBits(GPIOA, GPIO_Pin_3);

	}

}
led.c Code :
#include "led.h"
#include "stm32f10x.h"

void LED_Init(void)
{

	GPIO_InitTypeDef init_led;

	//1、 Can make APB2 The clock of GPIOC
	RCC_APB2PeriphClockCmd(RCC_APB2Periph_GPIOC, ENABLE);

	//2、GPIO_OUT  Set the output pin
	init_led.GPIO_Mode=GPIO_Mode_Out_PP;
	init_led.GPIO_Pin=GPIO_Pin_13;
	init_led.GPIO_Speed=GPIO_Speed_10MHz;

	//3、GPIO_LOW  Set the low-level pin
	GPIO_Init(GPIOC, &init_led);
}

void delayTime(uint16_t time)
{

	uint16_t i=0;
	while(time--)
	{

		i=12000;
		while(i--);
	}
}
/* void main_led() { LED_Init(); while(1) { GPIO_ResetBits(GPIOC, GPIO_Pin_13); delayTime(1000); GPIO_SetBits(GPIOC, GPIO_Pin_13); delayTime(1000); for(int i=0;i<=5;i++){ GPIO_ResetBits(GPIOC, GPIO_Pin_13); delayTime(100); GPIO_SetBits(GPIOC, GPIO_Pin_13); delayTime(100); } GPIO_ResetBits(GPIOC, GPIO_Pin_13); delayTime(1000); GPIO_SetBits(GPIOC, GPIO_Pin_13); delayTime(1000); } } */
led.h Code :
#include "stm32f10x.h"
void LED_Init(void);
void delayTime(uint16_t time);
Relay.c Code :
#include "stm32f10x.h"
#include "Relay.h"

void Relay_Init(void)
{

	/*  Connect that IO Just find the corresponding clock and open it , We connect externally PA3,  So open GPIOA The clock  */
	//1、 Can make GPIOA The clock
  GPIO_InitTypeDef  Relay_GPIOInit;
	//APB2 The peripheral clock of , There are two parameters , The first parameter is IO mouth  GPIOA, The second parameter   open
	RCC_APB2PeriphClockCmd( RCC_APB2Periph_GPIOA,ENABLE);
//2、GPIOA3 Structure configuration of

  Relay_GPIOInit.GPIO_Mode = GPIO_Mode_Out_PP;
	Relay_GPIOInit.GPIO_Pin  = GPIO_Pin_3;
	Relay_GPIOInit.GPIO_Speed = GPIO_Speed_10MHz;
	//3、 initialization
	GPIO_Init(GPIOA,&Relay_GPIOInit );

}
Relay.h Code :
#ifndef _RELAY_H_
#define _RELAY_H_
#include "stm32f10x.h"
void Relay_Init(void);


#endif
summary :
On the way to study , Don't learn too fast , Watching videos is very enjoyable , But pay attention to the actual combat and record the content in any video
And my own experience
边栏推荐
- Uniapp component -uni notice bar notice bar
- GDB 在嵌入式中的相关概念
- Dotconnect for PostgreSQL data provider
- The thread reuse problem of PageHelper using ThreadLocal, did you use it correctly?
- [fh-gfsk] fh-gfsk signal analysis and blind demodulation research
- Soft exam information system project manager_ Real topic over the years_ Wrong question set in the second half of 2019_ Morning comprehensive knowledge question - Senior Information System Project Man
- The difference between tail -f, tail -f and tail
- [system analyst's road] Chapter V double disk software engineering (development model development method)
- Meituan dynamic thread pool practice ideas, open source
- Force buckle 204 Count prime
猜你喜欢

How is the mask effect achieved in the LPL ban/pick selection stage?

JDBC courses
C application interface development foundation - form control (1) - form form
![[FPGA tutorial case 6] design and implementation of dual port RAM based on vivado core](/img/fb/c371ffaa9614c6f2fd581ba89eb2ab.png)
[FPGA tutorial case 6] design and implementation of dual port RAM based on vivado core

MySQL basics 03 introduction to MySQL types
【QT】自定义控件的封装

简易分析fgui依赖关系工具
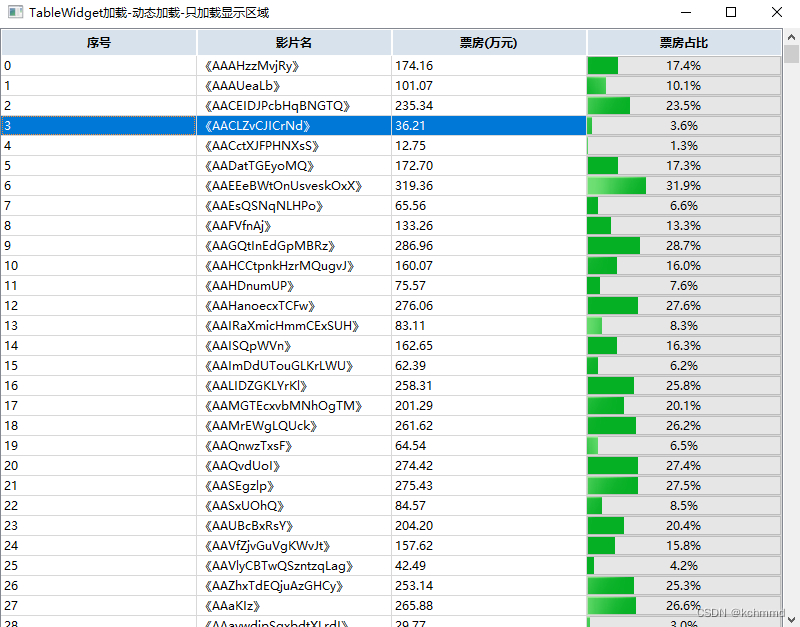
QTableWidget懒加载剩内存,不卡!
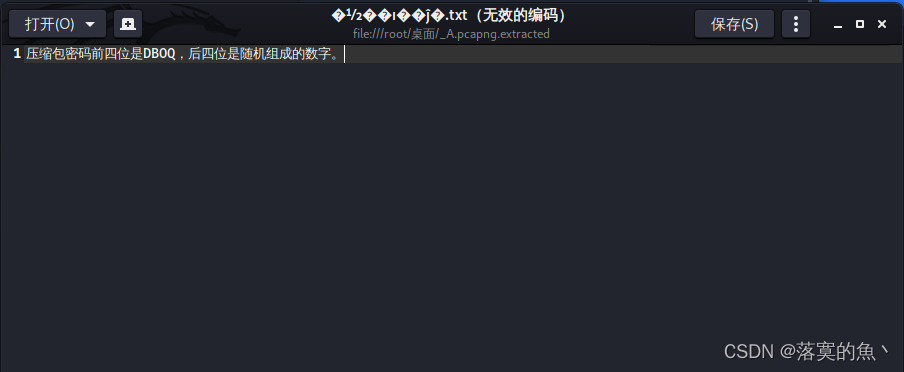
Wireshark data analysis and forensics a.pacapng

High-Resolution Network (篇一):原理刨析
随机推荐
leetcode 2097 — 合法重新排列数对
[day 29] given an integer, please find its factor number
Meituan dynamic thread pool practice ideas, open source
简易分析fgui依赖关系工具
串口抓包/截断工具的安装及使用详解
[self management] time, energy and habit management
【数据挖掘】任务6:DBSCAN聚类
LeetCode 987. Vertical order transverse of a binary tree - Binary Tree Series Question 7
【数据挖掘】任务3:决策树分类
数学知识:能被整除的数—容斥原理
并发编程的三大核心问题 -《深入理解高并发编程》
JDBC courses
[principles of multithreading and high concurrency: 2. Solutions to cache consistency]
Related concepts of GDB in embedded system
Expérience de recherche d'emploi d'un programmeur difficile
看完这篇 教你玩转渗透测试靶机Vulnhub——DriftingBlues-9
Leetcode 2097 - Legal rearrangement of pairs
How is the mask effect achieved in the LPL ban/pick selection stage?
海量数据冷热分离方案与实践
C语言课程信息管理系统