当前位置:网站首页>1.开发社区首页,注册
1.开发社区首页,注册
2022-08-02 14:10:00 【鱼子酱:P】
目录
1.开发社区首页
①首先根据每张表创建相对应的实体类(entity层里的实体类),新建了DiscussPost和User两个实体类,该实体类中的属性与表中的字段名相同;

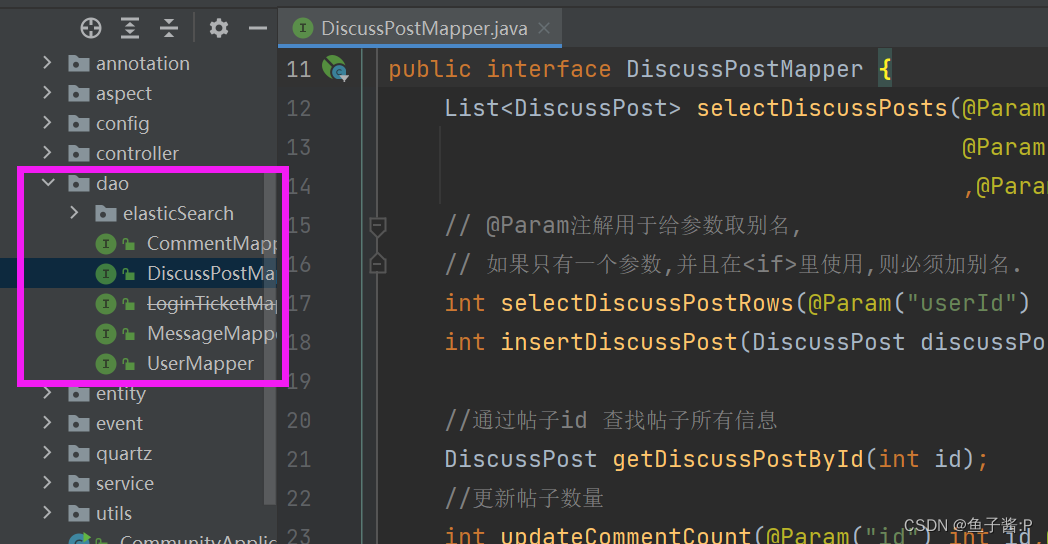
②由于每张表都需要一些增删改查的方法,因此需要创建Mapper接口(每张表各一个,在dao里创建实体类xxxMapper),接口中放有对应表的增删改查方法。(数据访问层,discussPostMapper里定义了两个方法1.返回查到的帖子2.返回帖子的行数)
③由于是接口,只提供了方法名,本身没有具体方法的实现。因此创建对应的XxxMapper.xml文件,在该xml文件中编写相应Mapper接口方法的SQL语句。

④直接去调用Mapper接口中的方法,不方便进行管理。因此为每个Mapper接口再创建对应的Service类(业务逻辑层),通过Service类去调用Mapper接口中相应的增删改查方法,Mapper接口又会去调用相应mapper.xml文件中真正的SQL语句。

⑤控制器Controller用来处理请求,创建一个控制器类HomeController,注入相关的service,并增加一个处理请求的方法,声明方法的访问路径为/index,

⑥接下来就是配置controller中用到的html文件,开头先指定模板引擎,依赖的样式文件和图片的绝对路径不用改,相对路径的修改方式如下 。
<!-- 修改前 -->
<link rel="stylesheet" href="css/global.css" />

<!-- 修改后,去static下寻找资源 -->
<link rel="stylesheet" th:href="@{/css/global.css}" />
⑦社区首页完成后,开发分页组件分页显示其它帖子。封装分页相关的信息在entity下的page实体类里,封装了分页相关的信息,然后去HomeController里增加page的相关内容,利用总数、当前页、下一页、上一页等分页信息来进行分页。
 	@RequestMapping(path = "/index", method = RequestMethod.GET)
    public String getIndexPage(Model model, Page page) {
        // 方法调用栈,SpringMVC会自动实例化Model和Page,并将Page注入Model.
        // 所以,在thymeleaf中可以直接访问Page对象中的数据.
        page.setRows(discussPostService.findDiscussPostRows(0));
        page.setPath("/index");

        List<DiscussPost> list = discussPostService.findDiscussPosts(0, page.getOffset(), page.getLimit());
        List<Map<String, Object>> discussPosts = new ArrayList<>();
        if (list != null) {
            for (DiscussPost post : list) {
                Map<String, Object> map = new HashMap<>();
                map.put("post", post);
                User user = userService.findUserById(post.getUserId());
                map.put("user", user);
                discussPosts.add(map);
            }
        }
        model.addAttribute("discussPosts", discussPosts);
        return "/index";
    }
这便是整个流程。
- 创建项目,添加依赖pom.xml,核心配置文件application.properties来配置数据库连接,mybatis的一些设置
- 创建实体类DisscustPost对应数据库的discuss_post表,User实体类对应User表,Page实体类封装分页相关的信息
package com.nowcoder.mycommunity.entity;
import java.util.Date;

//对应数据库中的discuss_post表
public class DiscussPost {
    private int id;
    private int userId;
    private String title;
    private String content;
    private int type;          //帖子类型
    private int status;        //帖子状态:正常、拉黑
    private Date createTime;
    private int commentCount;  //评论数量
    private double score;      //帖子得分

    //get()、set()
    //toString()
}
User实体类对应User表
package com.nowcoder.mycommunity.entity;

import java.util.Date;

//对应数据库中的user表
public class User {
    private int id;
    private String username;
    private String password;
    private String salt;
    private String email;
    private int type;
    private int statue;
    private String activationCode;
    private String headerUrl;
    private Date createTime;

    //get()、set()
    //toString()
}
Page 该实体类对应于后面的分类功能。
由于分类功能需要进行数据的处理,直接将许多方法、参数封装到此类中。
package com.nowcoder.mycommunity.entity;

// 封装分页相关的信息
public class Page {
    //当前页码
    private int current = 1; //默认为第一页
    //显示上限
    private int limit = 5;

    //数据总数(用于计算总页数)
    private int rows;
    //查询路径(用于复用分页链接)
    private String path;

    public int getCurrent() {
        return current;
    }

    public void setCurrent(int current) {
        //进行一些判断,免得输入一些不合理的数
        if(current >= 1){
            this.current = current;
        }
    }

    public int getLimit() {
        return limit;
    }

    public void setLimit(int limit) {
        if(limit >= 1 && limit <= 100){
            this.limit = limit;
        }
    }

    public int getRows() {
        return rows;
    }

    public void setRows(int rows) {
        if(rows >= 0){
            this.rows = rows;
        }
    }

    public String getPath() {
        return path;
    }

    public void setPath(String path) {
        this.path = path;
    }

    //额外的方法
    //获取当前页的起始行
    public int getoffset(){
        //计算公式为: current * limit - limit
        return (current - 1) * limit;
    }

    //获取总页数
    public int getTotal(){
        if(rows % limit == 0){  //可以整除
            return rows/limit;
        }else {
            return rows/limit + 1;
        }
    }

    //获取展示的起始页码
    public int getFrom(){
        int from = current - 2;  //展示前后两页
        //如果前面没有两页,则展示的起始页码为1,有两页及以上,则展示的起始页码为2
        return from < 1 ? 1 :from;
    }

    //获取展示的终止页码
    public int getTo(){
        int to = current + 2;
        int total = getTotal();
        //展示的终止页大于总页数,则展示到总页数,否则展示到to
        return to > total ? total : to;
    }
}
3.新建DiscussPostMapper和UserMapper两个接口。
Mapper主要是对应于SQL语句的一些增删改查的方法。刚才每个实体类都对应了一张表,我们自然需要对每张表都编写一些增删改查的方法,因此与表对应的每个实体类都需要创建对应的Mapper方法。
......
2.注册
- 注册模块:点击注册,通过控制器方法getRegisterPage(),跳转到register.html界面。
输入账户,密码,邮箱,提交post请求。调用 userService层的register 方法将user进行注册。register 方法首先会进行表单校验:账号密码,邮箱空参直接报异常,其它错误封装在map里,返回map给controller和前端,什么错都没有就返回空的map。验证账号,根据用户名和邮箱查询数据库看该账号是否已经存在,如果存在,返回错误信息。 - 注册用户:如果都没问题开始注册用户,封装用户信息,调用userMapper层的insertUser(user)添加用户,对user的其他属性进行复制,例如设置类型、状态、默认头像、自动生成激活码等,从而得到一个完整的user。然后发送激活邮件,context包含了用户邮件地址、激活路径(包含用户ID、激活码),并将html文件与context封装到content中,之后调用mailClient.sendMail,发送html邮件。到此为止,用户已经注册成功。
- 激活邮件:用户邮箱中会展现activation.html中的内容,里面有个点击此链接激活账号的功能。这个链接就是上一段中【包含用户ID、激活码的激活路径】,我们点击后,会通过控制器方法来判断链接中的激活码和user设定的激活码是否相同,并进行各种判断,封装信息、下一步的访问路径。
为防止重复登录以及伪造激活链接,在user内封装一个随机的UUID作为激活码,将激活码附在URL上,点击激活链接进行激活,比较激活码是否相同,并修改数据库中的用户状态为0->1,涉及到数据的更改,先更新数据库,再删除Redis缓存。激活成功,则跳转回登录页面,失败跳转回首页。
>基于邮件的注册方式
1.开启邮箱的SMTP服务,导入相关依赖:
<!--发邮件-->
<dependency>
    <groupId>org.springframework.boot</groupId>
    <artifactId>spring-boot-starter-mail</artifactId>
    <version>2.5.1</version>
</dependency>
2.配置相关的邮箱参数
#MailProperties
spring:
mail:
  username: [email protected]
  password: zsnnxiaqesjfggjb
  host: smtp.qq.com
  protocol: smtp
3.首先将发送邮件的逻辑封装,以便反复使用,新建一个工具包util,并在包下新建一个工具类MailClient
package com.nowcoder.community.util;

import org.slf4j.Logger;
import org.slf4j.LoggerFactory;
import org.springframework.beans.factory.annotation.Autowired;
import org.springframework.beans.factory.annotation.Value;
import org.springframework.mail.javamail.JavaMailSenderImpl;
import org.springframework.mail.javamail.MimeMessageHelper;
import org.springframework.stereotype.Component;

import javax.mail.MessagingException;
import javax.mail.internet.MimeMessage;

@Component
public class MailClient {
    private static final Logger logger=LoggerFactory.getLogger(MailClient.class);

    @Autowired
    private JavaMailSenderImpl  mailSender;

    @Value("${spring.mail.username}")
    private String from;

    public void sendMail(String to,String subject,String content){
        try {
            MimeMessage message = mailSender.createMimeMessage();
            MimeMessageHelper helper = new MimeMessageHelper(message,true);
            helper.setFrom(from);
            helper.setTo(to);
            helper.setSubject(subject);
            helper.setText(content,true);
            mailSender.send(helper.getMimeMessage());
        } catch (MessagingException e) {
            logger.error("发送邮件失败"+e.getMessage());
        }
    }
}
4.测试使用:
package com.nowcoder.community;

import com.nowcoder.community.util.MailClient;
import org.junit.jupiter.api.Test;
import org.springframework.beans.factory.annotation.Autowired;
import org.springframework.boot.test.context.SpringBootTest;
import org.thymeleaf.TemplateEngine;
import org.thymeleaf.context.Context;

@SpringBootTest
public class MailTests {
    @Autowired
    private MailClient mailClient;
    @Autowired
    private TemplateEngine templateEngine;

    @Test
    public void testThymeleaf(){
        Context context = new Context();
        context.setVariable("username","缑翰驰");

        String content = templateEngine.process("/mail/demo", context);
        mailClient.sendMail("[email protected]","HTML",content);
    }
创建工具类
mycommunity/util下新建工具类:CommunityUtil
目前主要包含两个方法:
- 为密码随机生成一个字符串后缀,用来加强密码;
- 将密码进行MD5加密。
public class CommunityUtil {
    //生成随机字符串
    public static String generateUUID(){
        return UUID.randomUUID().toString().replace("-","");
    }

    //MD5加密
    //hello + 3e4r8 --> abc13huoad34
    public static String md5(String key){
        if(StringUtils.isBlank(key)){
            return null;
        }
        return DigestUtils.md5DigestAsHex(key.getBytes());
    }
}
>基于MD5加盐的密码存储方式
现价段,登录Web系统(各种管理系统,各种论坛,各种博客等等)时通常都采用用户名和密码的形式,如果密码以明码的方式放在数据库中的话无疑会给别有用心的人以可趁之机,所以采取一定的防范措施是必要的。
现在比较安全的方式是用MD5进行加密,利用Apache commons的DigestUtils工具类我们可以迅速做到这一点。
 String password = DigestUtils.md5Hex("123456789");
        System.out.println(password);

输出:
25f9e794323b453885f5181f1b624d0b
使用MD5存在一个问题,相同的password生产的Hash值是相同的,如果两个用户设置了相同的密码,那么数据库当就会存储相同的值,这样是极不安全的
彩虹表
简单说,彩虹表是一个字符串与其哈希值对应的表,我们可以根据哈希值 得到密码明文
关于彩虹表的详细信息请参照 彩虹表的原理简介 彩虹表完全参考手册
现阶段,随着计算机运算能力的提高与分布式系统的出现,彩虹表查找变得十分容易
但是,所有这些彩虹表都有其特定适用的密码长度和字母组合。
太长的密码(如数十位),或者包含表中没有的字符,那么用彩虹表就无法破解。
加盐
加Salt可以一定程度上解决这一问题。所谓加Salt方法,就是加点“佐料”。其基本想法是这样的:当用户首次提供密码时(通常是注册时),由系统自动往这个密码里撒一些“佐料”,然后再散列。而当用户登录时,系统为用户提供的代码撒上同样的“佐料”,然后散列,再比较散列值,已确定密码是否正确。
Student stu1 = new Student("lucy","123456789","asa.qq.com" );
        String password1 = DigestUtils.md5Hex(stu1.name+stu1.password+stu1.email);
        System.out.println(password1);
通过加盐,生产的字符串变得更长,破解也变得更困难。
上面的例子中,当用户注册时,我们把用户名、密码、邮件联合起来,三个特征都相同的用户是不存在的,而且彩虹表一般不包括这么长的字符串对应的Hash值,所有一定程度上,增强了系统的安全性。
而且我么可以反复加盐,例如
Student stu1 = new Student("lucy","123456789","asa.qq.com" );
        String password1 = DigestUtils.md5Hex(stu1.name+stu1.password+stu1.email);
DigestUtils.md5Hex(DigestUtils.md5Hex("774"+password1+"@@__"));边栏推荐
- C语言函数参数传递模式入门详解
- win11一直弹出用户账户控制怎么解决
- Configure clangd for vscode
- Codeforces Round #605 (Div. 3)
- Mysql连接错误解决
- Use libcurl to upload the image of Opencv Mat to the file server, based on two methods of post request and ftp protocol
- win10 system update error code 0x80244022 how to do
- Mapreduce环境详细搭建和案例实现
- Win7 encounters an error and cannot boot into the desktop normally, how to solve it?
- cmake configure libtorch error Failed to compute shorthash for libnvrtc.so
猜你喜欢
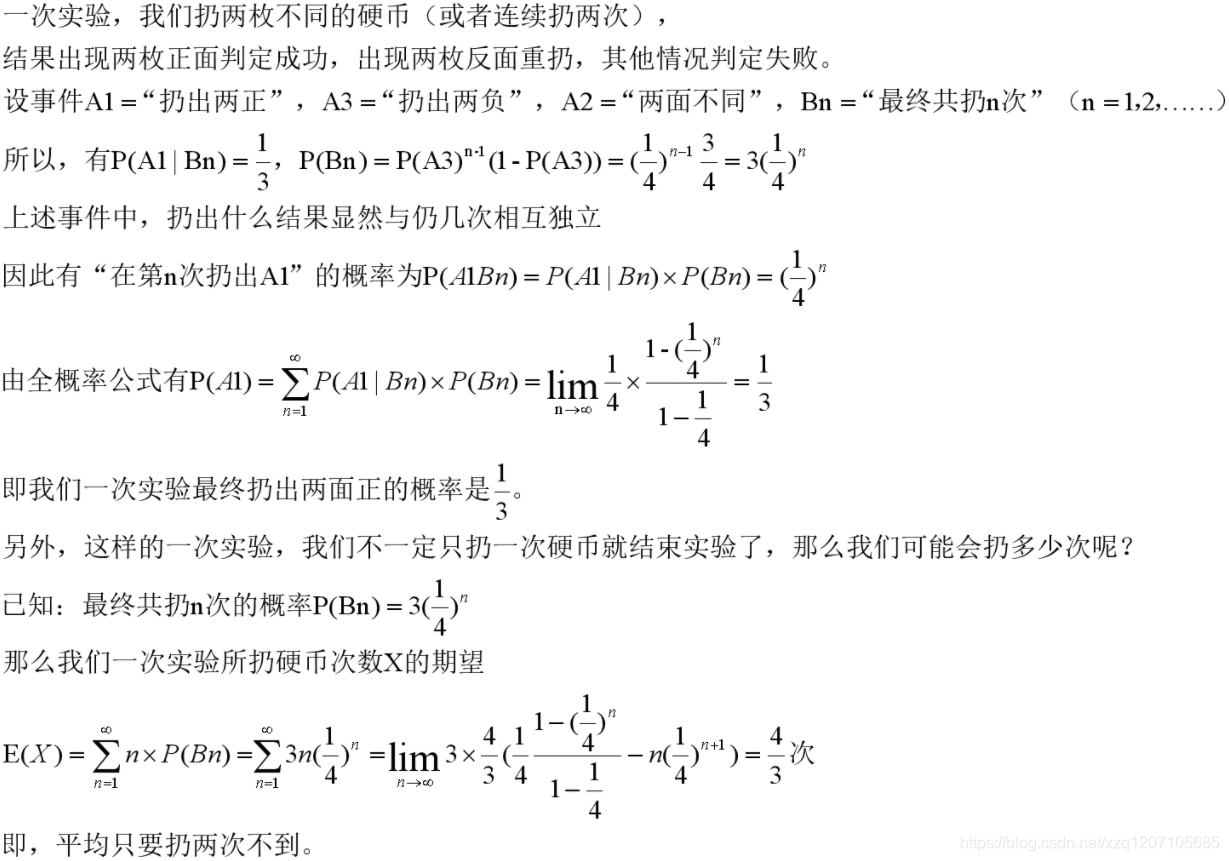
How to simulate 1/3 probability with coins, and arbitrary probability?
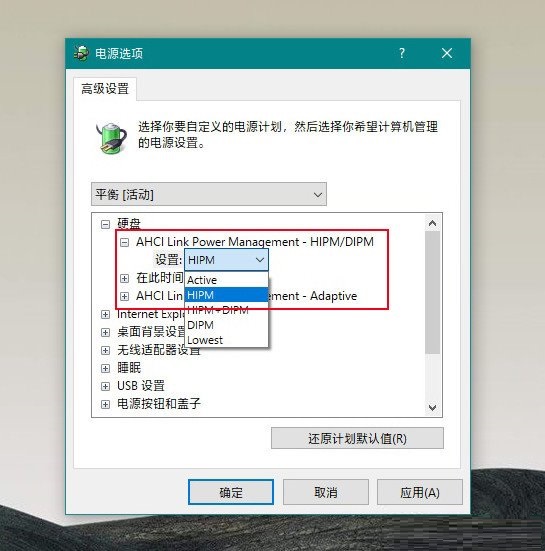
What should I do if I install a solid-state drive in Win10 and still have obvious lags?
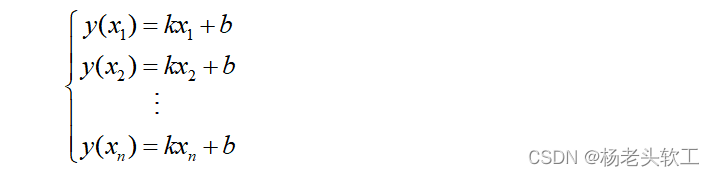
基于最小二乘法的线性回归分析方程中系数的估计
轻量化AlphaPose
13.56MHZ刷卡芯片CI521兼容cv520/ci520支持A卡B卡MIFARE协议

推开机电的大门《电路》(三):说说不一样的电阻与电导

推开机电的大门《电路》(二):功率计算与判断
Summarize computer network super comprehensive test questions
Win11系统找不到dll文件怎么修复
flink+sklearn——使用jpmml实现flink上的机器学习模型部署
随机推荐
Redis常见面试题
Win10 cannot directly use photo viewer to open the picture
Please make sure you have the correct access rights and the repository exists. Problem solved
镜像法求解接地导体空腔电势分布问题
开心一下,9/28名场面合集
Mysql lock
Win7 encounters an error and cannot boot into the desktop normally, how to solve it?
6.统一记录日志
Win10电脑不能读取U盘怎么办?不识别U盘怎么解决?
pytorch模型转libtorch和onnx格式的通用代码
Win11 keeps popping up User Account Control how to fix it
单端K总线收发器DP9637兼容L9637
为vscode配置clangd
13.56MHZ刷卡芯片CI521兼容cv520/ci520支持A卡B卡MIFARE协议
利用plot_surface命令绘制复杂曲面入门详解
Mapreduce环境详细搭建和案例实现
cmake configure libtorch error Failed to compute shorthash for libnvrtc.so
Use libcurl to upload the image of Opencv Mat to the file server, based on two methods of post request and ftp protocol
Mysql的锁
Please make sure you have the correct access rights and the repository exists.问题解决