当前位置:网站首页>手把手实现图片预览插件(三)
手把手实现图片预览插件(三)
2022-07-31 04:10:00 【sleeppingfrog】
因为项目需要,之前封装了一个图片点击预览的全局组件。这次我们尝试将它封装成一个插件。通过命令式的方式来达到点击预览的效果。
在封装插件之前。我们要对vue的插件机制有个基本了解。vue的插件的核心是use方法。
其实就是在Vue类上添加一个use方法,这个方法看传入第一个参数是否是函数,如果是函数则直接执行,如果是对象,就看是否有install方法,然后执行install方法,执行的时候把Vue类传入,同时把用户传入的option也传入
Vue.use = function (plugin) {
    // 忽略已注册插件
    if (plugin.installed) {
      return
    }

    // 集合转数组,并去除第一个参数
    var args = toArray(arguments, 1);

    // 把this(即Vue)添加到数组的第一个参数中
    args.unshift(this);

    // 调用install方法
    if (typeof plugin.install === 'function') {
      plugin.install.apply(plugin, args);
    } else if (typeof plugin === 'function') {
      plugin.apply(null, args);
    }

    // 注册成功
    plugin.installed = true;
    return this;
  };
而在install方法里。vue给我们提供了几种插件注册的方式
(1) 全局minx混入 (2)全局组件注册 (3)给vue对象的原型添加该插件
也就是说。插件调用的方式我们可以选择在全局组件的方式调用,也可以选择在vue原型上调用或者在minx混入里的某个时机去调用。
说了那么多,我们开始自己的图片预览组件的开发
(1) 我们在src下新建一个plugins文件夹。新建两个文件:
prevImg.vue和index.js
<template>
    <div class="prewImg-wrap" v-show="show">
        <div class="mask"></div>
            <div class="action">
                <i class="el-icon-minus ic"></i>
                <i class=" ic el-icon-plus"></i>
                <i class=" ic el-icon-refresh-right"></i>
                <i class=" ic el-icon-close" @click="close"></i>
            </div>
            <div class="img-wrap">
                <span v-if="loading" style="color:#fff">加载中...</span>
                <img v-else ref="img" :src="url" alt="" class="pic"
                    @load="handleImgLoad"
                    @error="handleImgError">
            </div>
    </div>
</template>

<script>
    export default {
        data(){
            return {
                show: false,
                loading:false,
                url:"https://s1.chu0.com/src/img/gif/30/30e530c90d674d26aa5afb35ab7eda84.gif"
            }
        },
        mounted(){
            this.loadImg()
        },
        watch:{
           url(val) {
            this.$nextTick(_ => {
                const $img = this.$refs.img;
                if (!$img.complete) {
                this.loading = true;
                }
            });
            }
        },
        methods:{
            close(){
                this.show=false
            },
            handleImgLoad(){
                this.loading=false
            },
            handleImgError(e){
                console.log("e-rror--",e)
                this.loading=false
            }
        }

    }
</script>
<style scoped>

.prewImg-wrap{
    position:fixed;
    left:0;
    top:0;
    width: 100%;
    height: 100%;;
   overflow: hidden;
   z-index:1;
}
.action{
    width: 200px;
    padding: 20px;
    position: absolute;
    right:10px;
    top:20px;
    color:#fff;
    z-index: 30;
    display: flex;
    justify-content: flex-end;
}
.ic{
    display: inline-block;
    margin-right: 10px;
}
.mask{
    background: rgba(0,0,0,0.6);
    position: absolute;
    top:0;
    left:0;
    z-index: 10;
    width: 100%;
    height: 100%;
}
.img-wrap{
   position: absolute;
    top:0;
    left:0;
    width: 100%;
    height: 100%;
    z-index:20;
    display: flex;
    justify-content: center;
    align-items: center;
}
.pic{
    max-height: 100%;
    max-width: 100%;
}

</style>
prevImg/index.js
import PrevView from "./prewImg.vue"
export default {

    install(Vue,options){
        let PrevVueConstructor= Vue.extend(PrevView)
        let instance= new PrevVueConstructor()
        document.body.appendChild(instance.$mount().$el);

        let prevObj={
            show(opts={text:"",url:""}){
                console.log("instance:",instance)
                instance.show=true
                instance.text=opts.text||""
                instance.url=opts.url||""
            },
            hide(){
                instance.show=false
                instance=null
            }
        }
        if(!Vue.$prevObj){
            Vue.$prevObj=prevObj
        }
        Vue.prototype.$prevImg = prevObj
    }

}
这个文件使我们这个插件的核心。首先我们通过vue.extend构造一个基于vue的构造函数,它类似于vue的实例。具备vue实例的所有属性和方法,和根vue实例不同的是,通过extend构造的子类只其data只能是一个函数。我们创建Vue实例时,都会有一个el选项,来指定实例的根节点,如果不写el选项,那组件就处于未挂载状态。Vue.extend 的作用,就是基于 Vue 构造器,创建一个‘ 子类 ',再配合$mount,就可以渲染组件,并且挂载到任意指定的节点上,比如body(这是单文件组件做不到的)
在show方法中,console.log("instance:",instance)能看到它的具体结构。也正是因为它。所以我们可以直接访问到我们prewImg组件中data定义的数据。比如show,我们就可以通过操作show变量来控制open和hide方法直接让prevImg组件展示或隐藏。
最后我们把这个prevImg对象挂载到vue的原型上。
(2)main.js中引入 prevImg文件夹下的index.js
import Vue from 'vue'
import App from './App.vue'
import "./directives/composImg"
Vue.config.productionTip = false
import ElementUI from 'element-ui';
import 'element-ui/lib/theme-chalk/index.css';
import prewImg from "./plugins/prewImg"

Vue.use(ElementUI);

Vue.use(prewImg)
new Vue({
  render: h => h(App),
}).$mount('#app')
(3)具体使用
    <el-button @click="openPrev">打开预览</el-button>
    <el-button @click="closePrve">关闭预览</el-button>
<script>
export default{

   data(){
    return{
        restaurants: [],
        state1: '',
        url:"https://baj-dabanjiz-conf.oss-cn-hangzhou.aliyuncs.com/intelligent-design/image/20210730/middle/9bbeb6570f7b416b1bcbcc59a1b38635.jpg",
        url2:"https://fuss10.elemecdn.com/8/27/f01c15bb73e1ef3793e64e6b7bbccjpeg.jpeg"

    }
  },
}
    methods:{

        openPrev(){
          this.$prevImg.show({url:this.url2})
        },
        closePrve(){
            this.$prevImg.hide()
        },
    }

</script>

边栏推荐
- [Swift]自定义点击APP图标弹出的快捷方式
- open failed: EACCES (Permission denied)
- Can't load /home/Iot/.rnd into RNG
- addressable in Golang
- Detailed explanation of TCP and UDP
- mysql基础知识(二)
- (Line segment tree) Summary of common problems of basic line segment tree
- type_traits metaprogramming library learning
- Redis 使用 sorted set 做最新评论缓存
- A brief introduction to the showDatePicker method of the basic components of Flutter
猜你喜欢
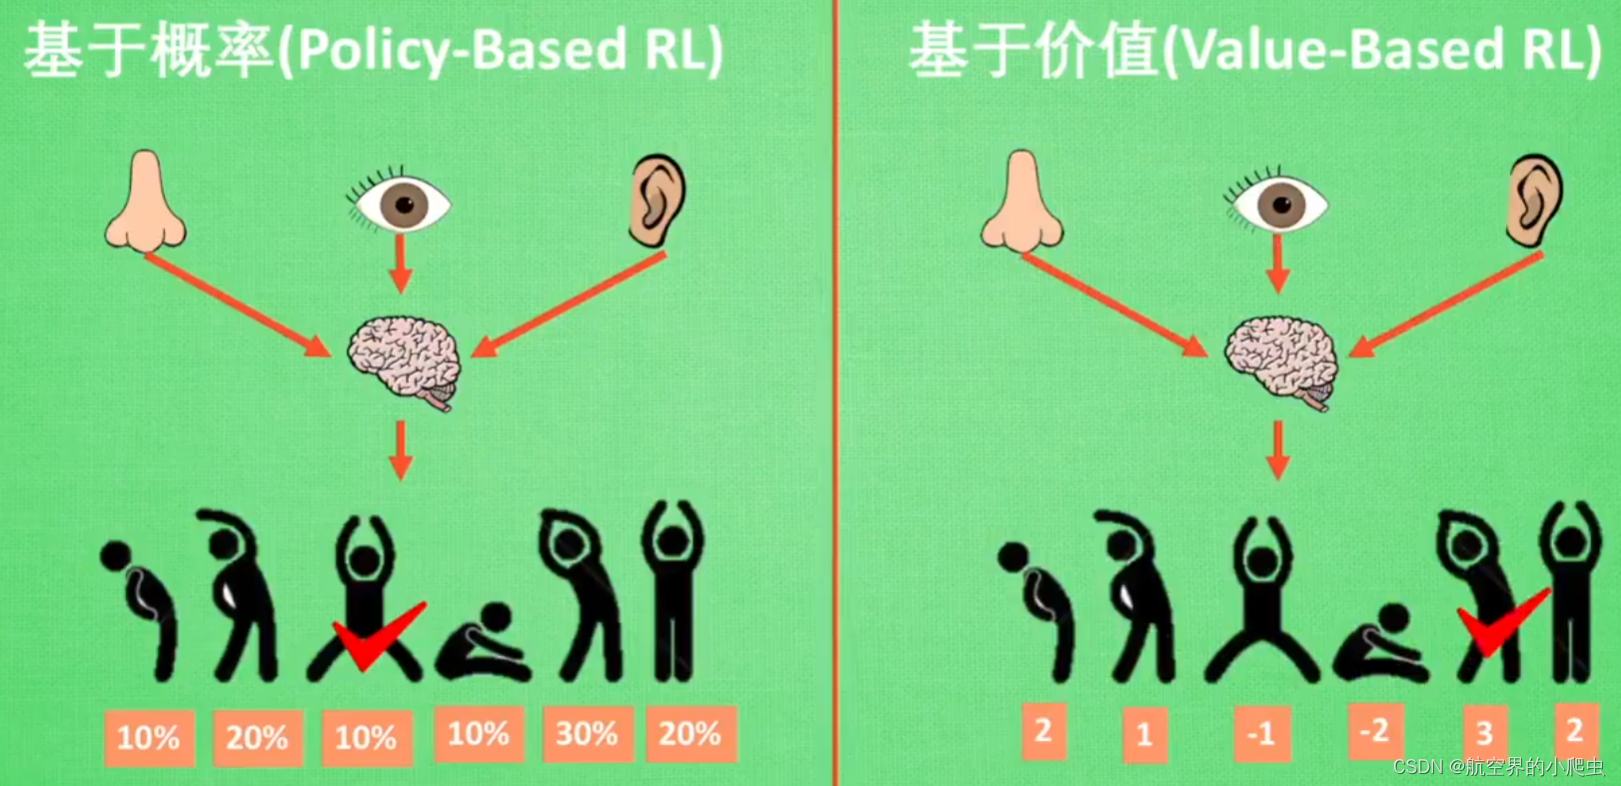
强化学习:从入门到入坑再到拉屎
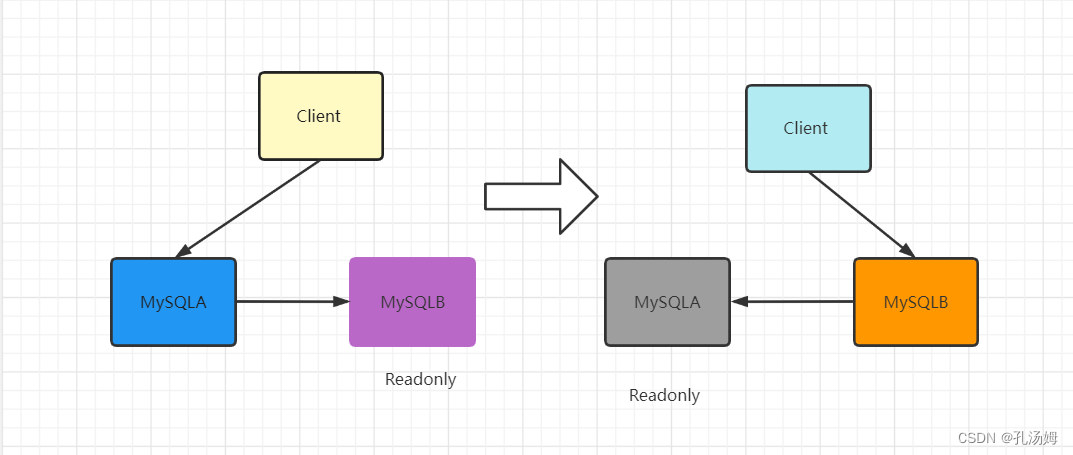
Mysql 45 study notes (twenty-four) MYSQL master-slave consistency
Safety 20220712

Why don't you programmers make a living off your own projects?And have to work for someone else?
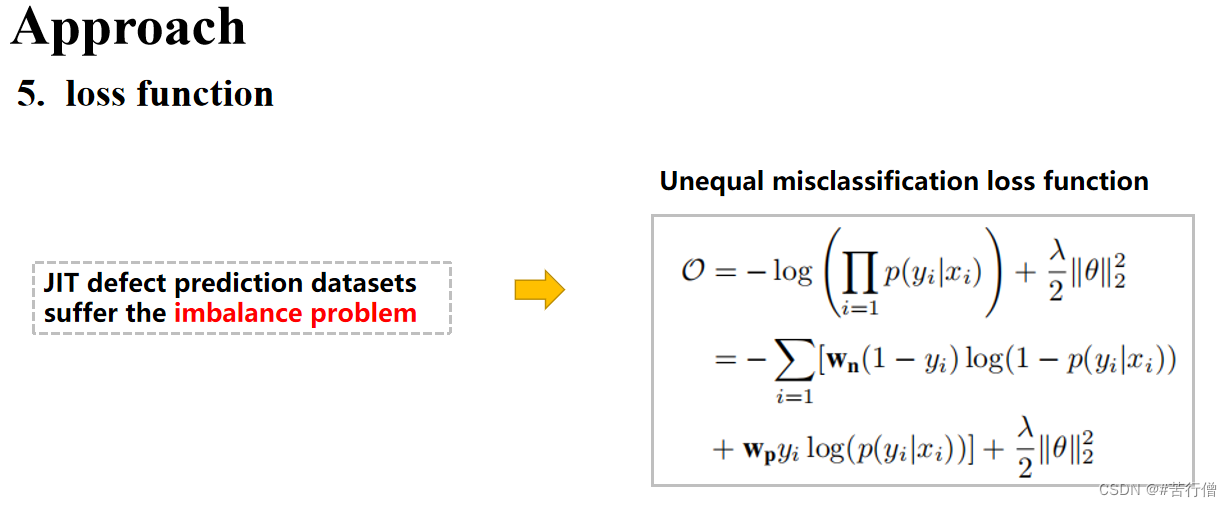
"DeepJIT: An End-To-End Deep Learning Framework for Just-In-Time Defect Prediction" paper notes
With 7 years of experience, how can functional test engineers improve their abilities step by step?
MySQL基础操作
![[Paper reading] Mastering the game of Go with deep neural networks and tree search](/img/4f/899da202e13bd561bbfdbaeebe4d2e.jpg)
[Paper reading] Mastering the game of Go with deep neural networks and tree search
Recursive implementation of the Tower of Hanoi problem

(4) Recursion, variable parameters, access modifiers, understanding main method, code block
随机推荐
Can't load /home/Iot/.rnd into RNG
addressable in Golang
A brief introduction to the showDatePicker method of the basic components of Flutter
Automation strategies for legacy systems
[Swift] Customize the shortcut that pops up by clicking the APP icon
Redis counts new and retained users
BUG definition of SonarQube
MATLAB/Simulink & & STM32CubeMX tool chain completes model-based design development (MBD) (three)
(树) 最近公共祖先(LCA)
浅识Flutter 基本组件之CheckBox组件
What skills do I need to learn to move from manual testing to automated testing?
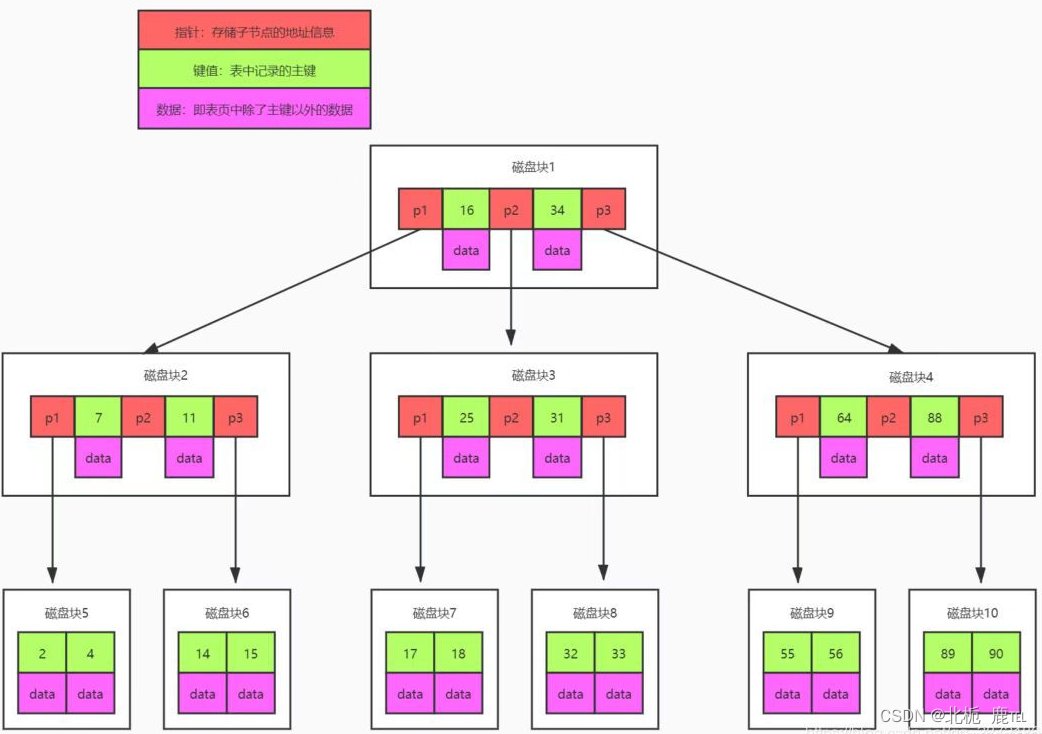
mysql基础知识(二)
Pytest e-commerce project combat (on)
Difference between unallocated blocks and unused blocks in database files
Select the smoke test case, and make the first pass for the product package entering QA
三子棋的代码实现
SIP Protocol Standard and Implementation Mechanism
Learning DAVID Database (1)
Daily practice of LeetCode - 138. Copy a linked list with random pointers
【论文阅读】Mastering the game of Go with deep neural networks and tree search