当前位置:网站首页>Redis cluster creation, capacity expansion and capacity reduction
Redis cluster creation, capacity expansion and capacity reduction
2022-07-03 06:10:00 【vincentwc】
Pull the mirror image
```bash
docker pull redis:6.0.8
```
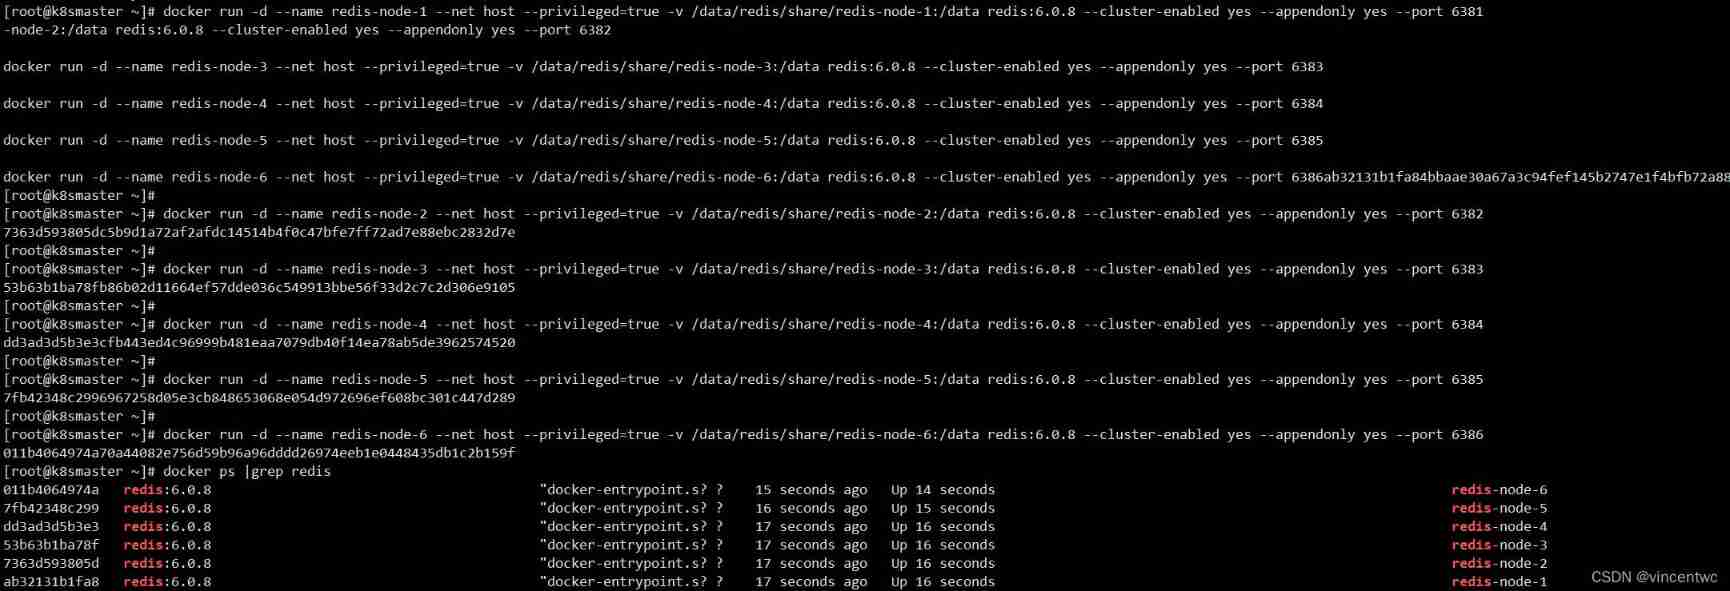
establish redis Cluster container
perform docker command
```bash
docker run -d --name redis-node-1 --net host --privileged=true -v /data/redis/share/redis-node-1:/data redis:6.0.8 --cluster-enabled yes --appendonly yes --port 6381

docker run -d --name redis-node-2 --net host --privileged=true -v /data/redis/share/redis-node-2:/data redis:6.0.8 --cluster-enabled yes --appendonly yes --port 6382

docker run -d --name redis-node-3 --net host --privileged=true -v /data/redis/share/redis-node-3:/data redis:6.0.8 --cluster-enabled yes --appendonly yes --port 6383

docker run -d --name redis-node-4 --net host --privileged=true -v /data/redis/share/redis-node-4:/data redis:6.0.8 --cluster-enabled yes --appendonly yes --port 6384

docker run -d --name redis-node-5 --net host --privileged=true -v /data/redis/share/redis-node-5:/data redis:6.0.8 --cluster-enabled yes --appendonly yes --port 6385

docker run -d --name redis-node-6 --net host --privileged=true -v /data/redis/share/redis-node-6:/data redis:6.0.8 --cluster-enabled yes --appendonly yes --port 6386
```
Into the container
```bash
docker exec -ti redis-node-1 /bin/bash
```
Execute the following command
redis-cli --cluster create 10.255.237.120:6381 10.255.237.120:6382 10.255.237.120:6383 10.255.237.120:6384 10.255.237.120:6385 10.255.237.120:6386 --cluster-replicas 1
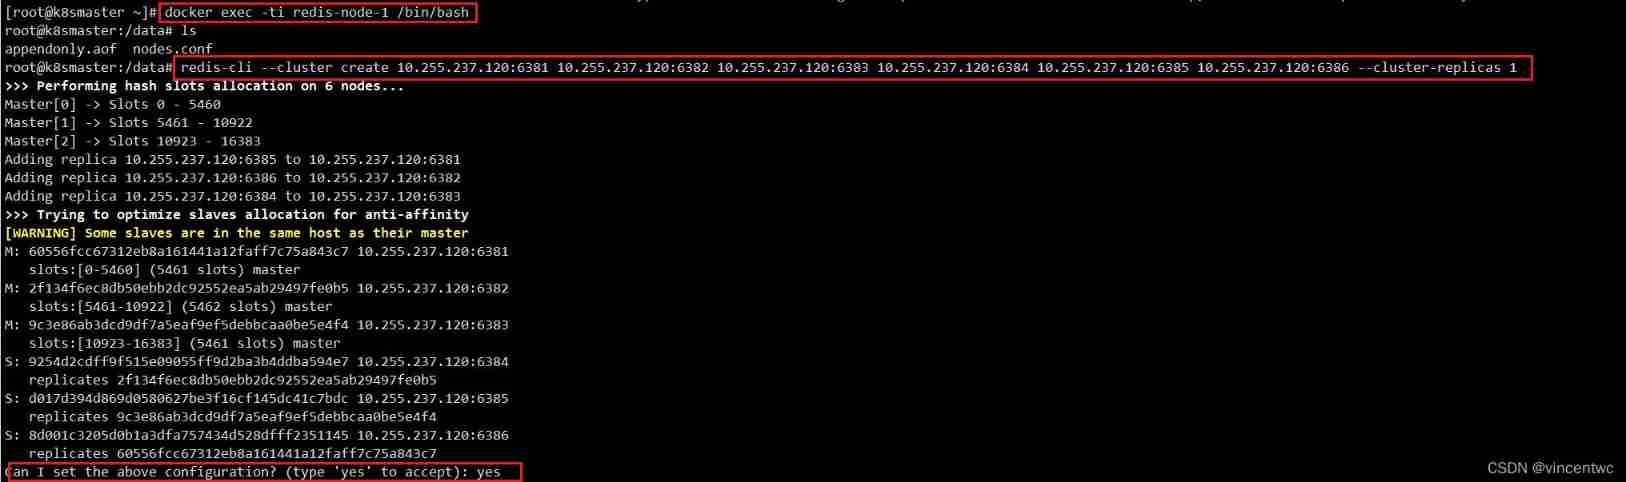
Input yes after

- At this time, the representative has been successfully created
View the cluster
stay redis-node-1 Execute the following commands in the container
redis-cli -p 6381 -c
Check it with the following command redis Cluster situation
```bash
	 cluster info
	 cluster nodes
```
redis Cluster expansion cases 【 Expansion from three masters and three slaves to four masters and four slaves 】
The implementation is as follows docker command
```bash
docker run -d --name redis-node-7 --net host --privileged=true -v /data/redis/share/redis-node-7:/data redis:6.0.8 --cluster-enabled yes --appendonly yes --port 6387
docker run -d --name redis-node-8 --net host --privileged=true -v /data/redis/share/redis-node-8:/data redis:6.0.8 --cluster-enabled yes --appendonly yes --port 6388
```
Get into 6387 Instance internal
Will add 6387 node ( Empty slot number ) As master The node joins the original cluster
```bash
redis-cli --cluster add-node 10.255.237.120:6387 10.255.237.120:6381
```

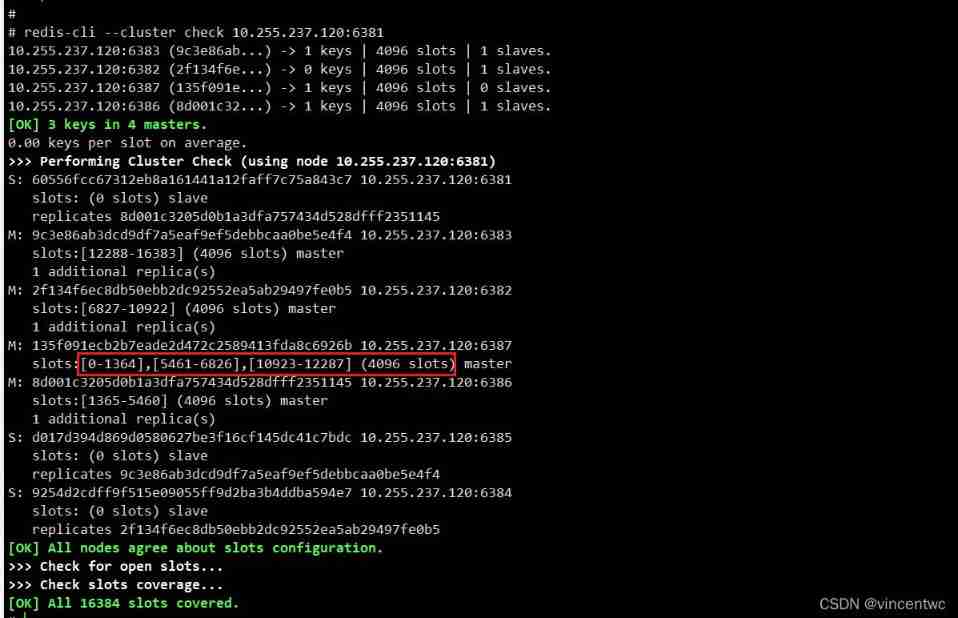
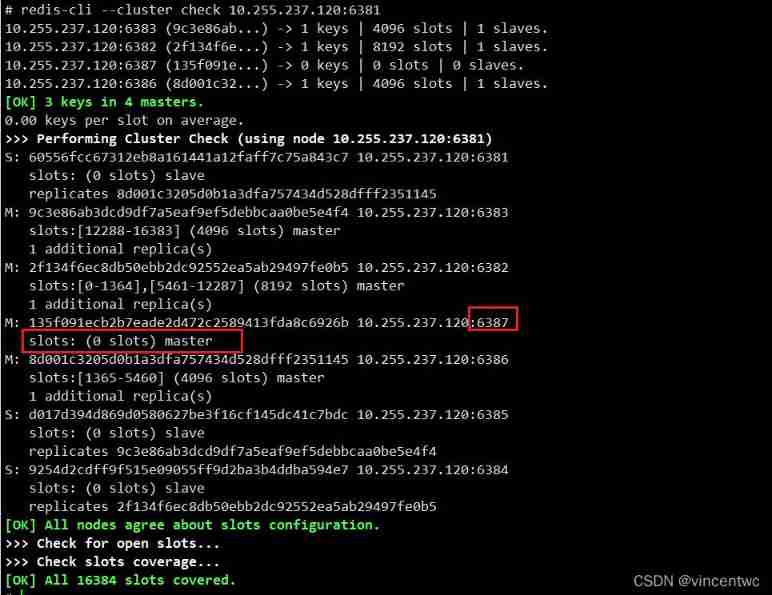
Use the following command to check 6387 The node has joined , However, you can see that no slots are allocated
redis-cli --cluster check 10.255.237.120:6381

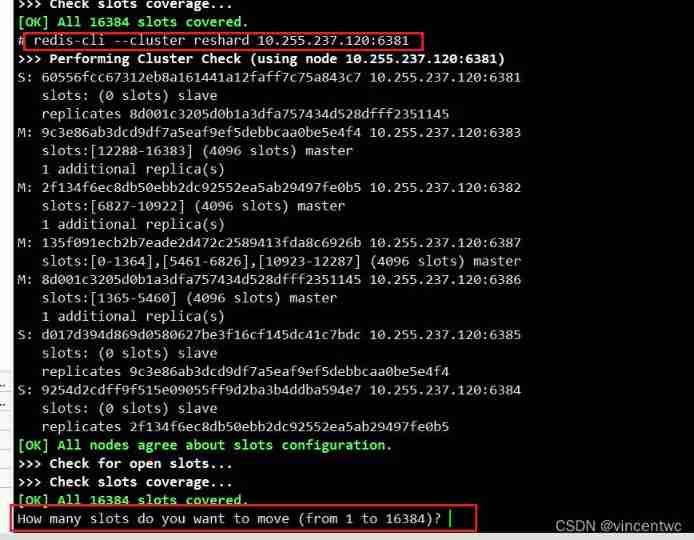
Reassign slot numbers
redis-cli --cluster  reshard 10.255.237.120:6381

0-16383 Number selection of interval
16383/master Number of nodes , This selection is 4096
 choice all
redis-cli --cluster check 10.255.237.120:6381
Perform discovery , The newly added master node is to evenly slot each node of the previous master node to the new master node , Instead of reallocating them all
Master node 6387 Assign slave nodes 6388
cluster-master-id by 6387 The number of
redis-cli --cluster add-node 10.255.237.120:6388 10.255.237.120:6387 --cluster-slave --cluster-master-id 135f091ecb2b7eade2d472c2589413fda8c6926b


thus , Expansion completed
Shrinkage capacity 【 Delete 6387-6388】
When you shrink , You should delete the slave first , Then delete the host
perform redis-cli --cluster check 10.255.237.120:6381 command , obtain 6388 node id, Here's the picture

The command to delete a node is as follows
redis-cli --cluster del-node 10.255.237.120:6388 50acca20c6240f83e81c1a5de2a0c17e3dbda523
Reassign the slot number to the cluster
redis-cli --cluster reshard 10.255.237.120:6381
take 6387 All slot numbers of are assigned to other nodes , Assigned here to 6382 了
As shown in the figure below 6387 The slot of is 0 了
Delete node
6387 The slots of have been allocated , Now you can delete 6387 The node
redis-cli --cluster del-node 10.255.237.120:6387 135f091ecb2b7eade2d472c2589413fda8c6926b
Check the cluster
redis-cli --cluster check 10.255.237.120:6381
thus ,redis Cluster creation , Capacity expansion , The volume reduction operation is finished
边栏推荐
- Merge and migrate data from small data volume, sub database and sub table Mysql to tidb
- Use abp Zero builds a third-party login module (I): Principles
- Core principles and source code analysis of disruptor
- Kubernetes notes (10) kubernetes Monitoring & debugging
- Cesium entity(entities) 实体删除方法
- Cesium 点击获取模型表面经纬度高程坐标(三维坐标)
- Kubesphere - build MySQL master-slave replication structure
- Bio, NiO, AIO details
- [teacher Zhao Yuqiang] index in mongodb (Part 2)
- Synthetic keyword and NBAC mechanism
猜你喜欢

项目总结--2(Jsoup的基本使用)
轻松上手Fluentd,结合 Rainbond 插件市场,日志收集更快捷
![[teacher Zhao Yuqiang] the most detailed introduction to PostgreSQL architecture in history](/img/18/f91d3d21a39743231d01f2e4015ef8.jpg)
[teacher Zhao Yuqiang] the most detailed introduction to PostgreSQL architecture in history
深入解析kubernetes controller-runtime

Oauth2.0 - using JWT to replace token and JWT content enhancement
最大似然估计,散度,交叉熵

Kubernetes notes (10) kubernetes Monitoring & debugging
Tabbar settings

Multithreading and high concurrency (7) -- from reentrantlock to AQS source code (20000 words, one understanding AQS)

Understand expectations (mean / estimate) and variances
随机推荐
Apple submitted the new MAC model to the regulatory database before the spring conference
[teacher Zhao Yuqiang] the most detailed introduction to PostgreSQL architecture in history
Zhiniu stock project -- 04
Oauth2.0 - using JWT to replace token and JWT content enhancement
[teacher Zhao Yuqiang] redis's slow query log
MySQL帶二進制的庫錶導出導入
Oauth2.0 - explanation of simplified mode, password mode and client mode
Kubernetes notes (VIII) kubernetes security
[teacher Zhao Yuqiang] Cassandra foundation of NoSQL database
Zhiniu stock -- 03
Use abp Zero builds a third-party login module (I): Principles
【系统设计】邻近服务
项目总结--01(接口的增删改查;多线程的使用)
Svn branch management
How to create your own repository for software packages on Debian
The most responsible command line beautification tutorial
What's the difference between using the Service Worker Cache API and regular browser cache?
Redhat7 system root user password cracking
Leetcode problem solving summary, constantly updating!
智牛股项目--05