当前位置:网站首页>初始JDBC 编程
初始JDBC 编程
2022-07-02 09:42:00 【菜菜不恰菜】

目录
🥬具体操作
1、打开IDEA,先创建一个新工程

2、引入依赖,JDBC编程需要用到mysql的驱动包。(驱动包就是把mysq|自身的api给转换成jdbc风格的)。下载驱动包,选择与自己mysql版本对应版本的驱动包。

3、将驱动包导入到项目中
1)先在刚刚创建的新工程里面创建一个目录
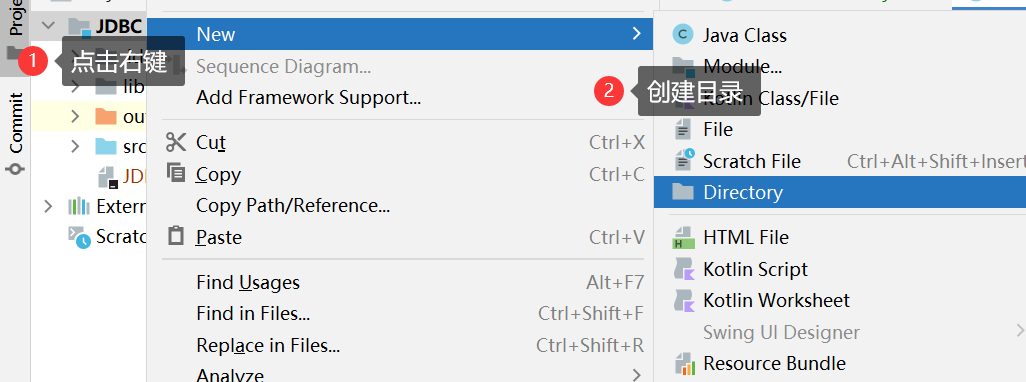
2)把下载的jar文件拷贝到刚刚创建的目录中
3)右键刚才的目录,选择Add as library…

4、编写代码
🥬JDBC的基本编程流程
1、创建DataSource对象,这个对象就描述了数据库服务器在哪。
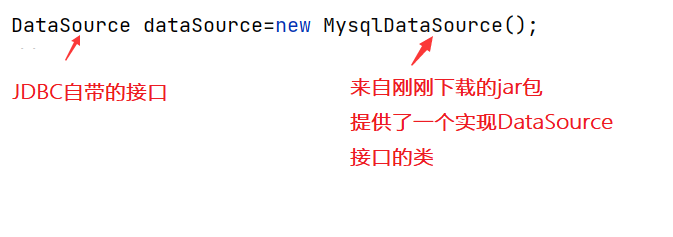
描述服务器在哪
2、让代码和数据库服务器进行连接
Connection connection=dataSource.getConnection();
3、对数据库进行操作
以插入数据为例:
 //关键所在就是构造一个 SQL 语句
  String sql="insert into student values(1,“张三”)";
 // 此处光是一个 String 类型的 sql 还不行, 需要把这个 String 包装成一个 "语句对象"
  PreparedStatement statement=connection.prepareStatement(sql);
4、执行SQL
// SQL 里面如果是 insert, update, delete, 都使用 executeUpdate 方法.
// SQL 里面如果是 select, 则使用 executeQuery 方法.
//返回值就表示这个操作, 影响到了几行。
  int ret= statement.executeUpdate();
  System.out.println(ret);
5、SQL执行完毕后,释放资源
//先创建后释放
 statement.close();
 connection.close();
具体代码如下:
public class TestJDBC {
public static void main(String[] args) throws SQLException {
Scanner scanner=new Scanner(System.in);
//1、创建数据源
DataSource dataSource=new MysqlDataSource();
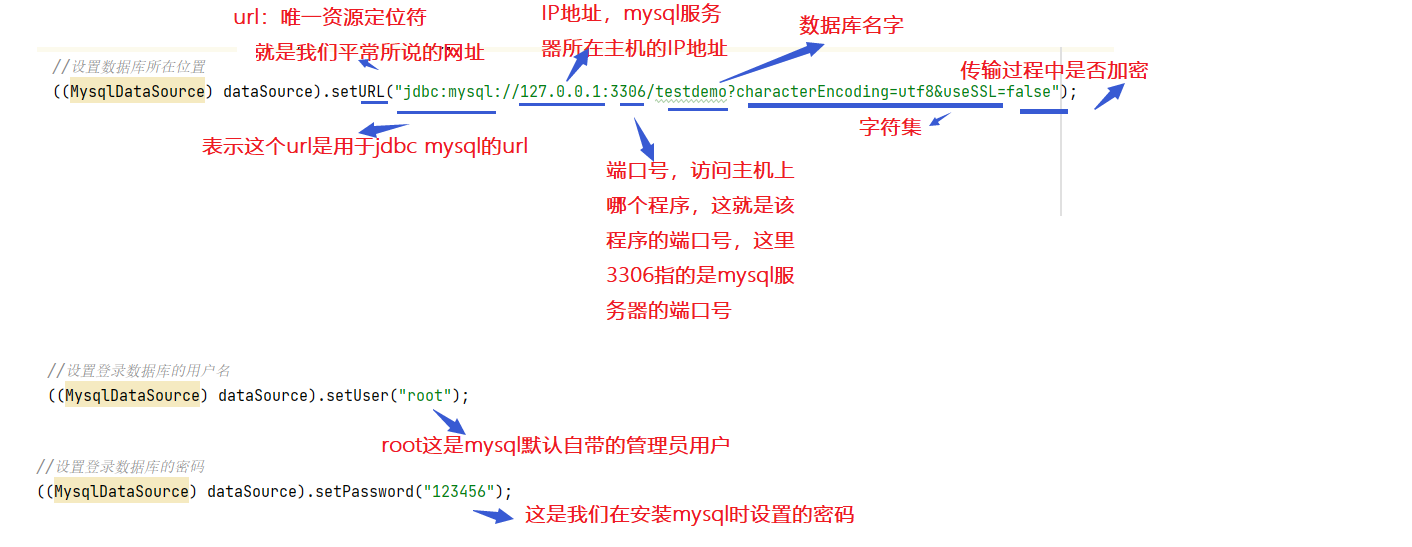
//设置数据库所在位置
((MysqlDataSource) dataSource).setURL("jdbc:mysql://127.0.0.1:3306/testdemo?characterEncoding=utf8&useSSL=false");
//设置登录数据库的用户名
((MysqlDataSource) dataSource).setUser("root");
//设置登录数据库的密码
((MysqlDataSource) dataSource).setPassword("123456");
//2、让代码和数据库服务器建立连接
Connection connection=dataSource.getConnection();
//2.1 从控制台输入数据
System.out.println("请输入学号:");
int id=scanner.nextInt();
System.out.println("请输入姓名");
String name=scanner.next();
//3、操作数据库,以插入数据为例
//关键所在就是构造一个 SQL 语句
String sql="insert into student values(?,?)";
//?相当于占了一个位置,这两个字段的值还不确定,下面用PrepareStatement中的setxxx系列方法进行替换
// 此处光是一个 String 类型的 sql 还不行, 需要把这个 String 包装成一个 "语句对象"
PreparedStatement statement=connection.prepareStatement(sql);
//进行替换操作
statement.setInt(1,id);
statement.setString(2,name);
System.out.println("statement:"+statement);
// 4、执行 SQL
// SQL 里面如果是 insert, update, delete, 都使用 executeUpdate 方法.
// SQL 里面如果是 select, 则使用 executeQuery 方法.
// 返回值就表示这个操作, 影响到了 几行. 就相当于在控制台里输入 sql 之后, 得到的数字
int ret= statement.executeUpdate();
System.out.println(ret);
//5、此时SQL执行完毕,需要释放资源
//先创建后释放
statement.close();
connection.close();
}
}🥬小结
以上就是今天的内容了,有什么问题大家可以在评论区留言

边栏推荐
- CONDA common command summary
- [QT] Qt development environment installation (QT version 5.14.2 | QT download | QT installation)
- Repeat, tile and repeat in pytorch_ The difference between interleave
- (C语言)输入一行字符,分别统计出其中英文字母、空格、数字和其它字符的个数。
- Power Spectral Density Estimates Using FFT---MATLAB
- BEAUTIFUL GGPLOT VENN DIAGRAM WITH R
- Thesis translation: 2022_ PACDNN: A phase-aware composite deep neural network for speech enhancement
- Easyexcel and Lombok annotations and commonly used swagger annotations
- 【C语言】杨辉三角,自定义三角的行数
- How to Visualize Missing Data in R using a Heatmap
猜你喜欢

机械臂速成小指南(七):机械臂位姿的描述方法
CONDA common command summary

Thesis translation: 2022_ PACDNN: A phase-aware composite deep neural network for speech enhancement

基于Arduino和ESP8266的连接手机热点实验(成功)
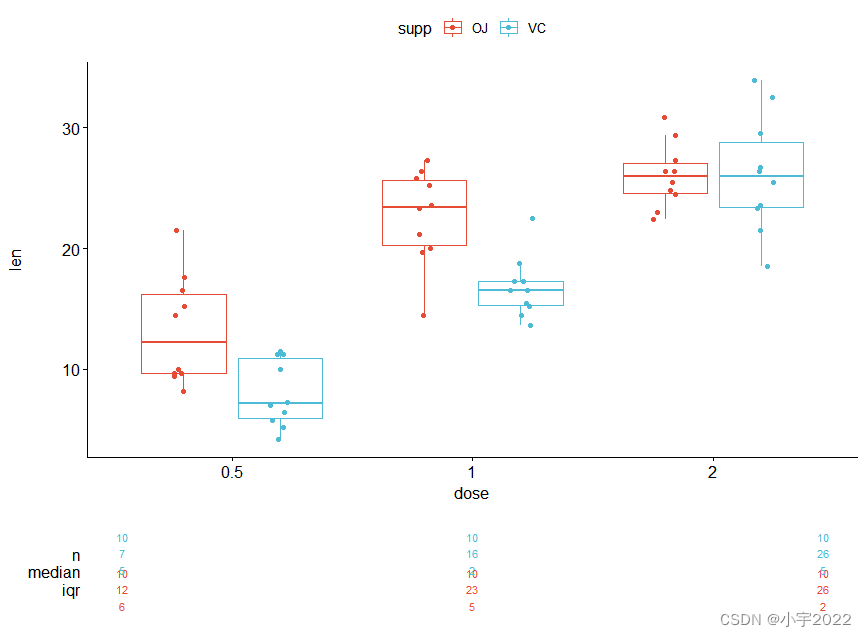
How to Create a Nice Box and Whisker Plot in R
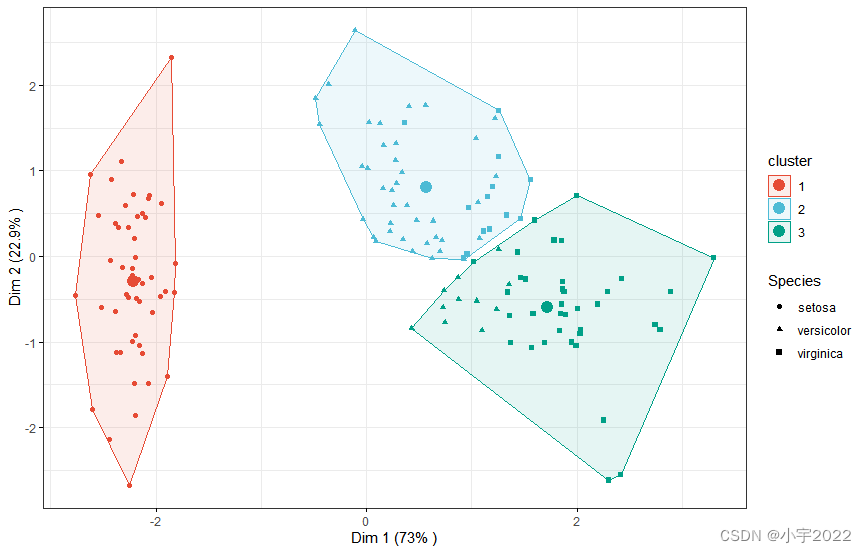
K-Means Clustering Visualization in R: Step By Step Guide
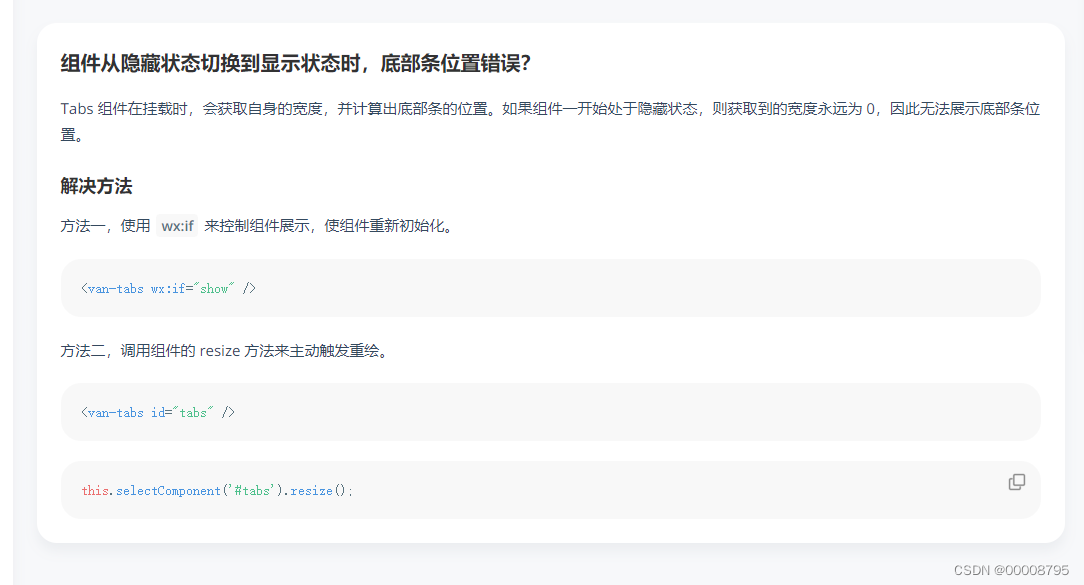
The position of the first underline selected by the vant tabs component is abnormal
Filtre de profondeur de la série svo2

GGPUBR: HOW TO ADD ADJUSTED P-VALUES TO A MULTI-PANEL GGPLOT
H5, add a mask layer to the page, which is similar to clicking the upper right corner to open it in the browser
随机推荐
From scratch, develop a web office suite (3): mouse events
The position of the first underline selected by the vant tabs component is abnormal
小程序链接生成
Natural language processing series (II) -- building character level language model using RNN
K-Means Clustering Visualization in R: Step By Step Guide
[geek challenge 2019] upload
GGPUBR: HOW TO ADD ADJUSTED P-VALUES TO A MULTI-PANEL GGPLOT
conda常用命令汇总
easyExcel和lombok注解以及swagger常用注解
Research on and off the Oracle chain
Flesh-dect (media 2021) -- a viewpoint of material decomposition
GGPLOT: HOW TO DISPLAY THE LAST VALUE OF EACH LINE AS LABEL
GGPLOT: HOW TO DISPLAY THE LAST VALUE OF EACH LINE AS LABEL
输入一个三位的数字,输出它的个位数,十位数、百位数。
Small guide for rapid formation of manipulator (VII): description method of position and posture of manipulator
[untitled] how to mount a hard disk in armbian
HOW TO ADD P-VALUES TO GGPLOT FACETS
Yygh-9-make an appointment to place an order
The most understandable f-string tutorial in history, collecting this one is enough
How to Visualize Missing Data in R using a Heatmap