当前位置:网站首页>CentOS系统下Redis安装和自启动配置的步骤
CentOS系统下Redis安装和自启动配置的步骤
2022-07-07 09:06:00 【全栈程序员站长】
相信大家都知道Redis是一个C实现的基于内存、可持久化的键值对数据库,在分布式服务中常作为缓存服务。所以这篇文章将详细介绍在CentOS系统下如何从零开始安装到配置启动服务。有需要的可以参考借鉴。
一. 安装Redis
Redis的安装其实相当简单,推荐的方式是下载redis的源码,并在本机编译后安装。
首次进入主文件夹的下载目录下,执行wget下载源码
[[email protected] ~]$
cd
下载
[[email protected] 下载]$ wget http:
//download
.redis.io
/redis-stable
.
tar
.gz接下来解压之后,移动到/usr/redis目录下
[[email protected] 下载]$
tar
-zxvf redis-stable.
tar
.gz
[[email protected] 下载]$
su
mv
redis-stable
/usr/redis然后进入redis目录,执行make命令,编译redis源码
[[email protected] 下载]
# cd /usr/redis/
[[email protected] redis]
# make编译完成之后,在src目录下有2个重要程序生成,一个是redis-server,另一个是redis-cli;接着进入src目录,执行make install,这时会把这些可执行程序拷贝到/usr/local/bin目录下,由于/usr/local/bin是在系统的环境变量$PATH下定义的,因此终端在任意位置就可以执行redis-server和redis-cli了。
[[email protected] redis]
# cd src/
[[email protected] src]
# make install至此安装redis的工作就完成了。
我们来看看编译出来的几个程序分别是干什么的:
redis-server:顾名思义,redis服务
redis-cli:redis client,提供一个redis客户端,以供连接到redis服务,进行增删改查等操作
redis-sentinel:redis实例的监控管理、通知和实例失效备援服务
redis-benchmark:redis的性能测试工具
redis-check-aof:若以AOF方式产生日志,当意外发生时用来快速修复
redis-check-rdb:若以RDB方式产生日志,当意外发生时用来快速修复
安装完成之后,启动redis-server,并运行redis-cli进行测试
[[email protected] ~]$ redis-server[[email protected] ~]$ redis-cli
127.0.0.1:6379> PING
PONG
127.0.0.1:6379>如此说明redis服务已经正常工作,如果redis服务未启动,则运行redis-cli时会报Could not connect to Redis at 127.0.0.1:6379: Connection refused的错误。
二. 配置自启动
为了让redis-server能在系统启动时自动运行,需要将redis服务作为守护进程(daemon)来运行,我们回到/usr/redis/目录中找到一个redis.conf的文件,这个文件是redis服务运行时加载的配置,我们先观察一下其中的内容
[[email protected] redis]$
vi
redis.conf此文件内容非常长,但是大部分是注释,我们重点关注其中的几个设置daemonize和pidfile:
其中daemonize默认值是false,pidfile默认值是pidfile /var/run/redis_6379.pid
第一个表示是否daemon化,显然我们要把它改成daemonize yes;
第二个表示当服务以守护进程方式运行时,redis默认会把pid写入/var/run/redis_6379.pid文件,服务运行中该文件就存在,服务一旦停止该文件就自动删除,因而可以用来判断redis是否正在运行。
保存后退出。
有了基本配置,redis还需要有一个管理启动、关闭、重启的一个脚本。redis源码里其实已经提供了一个初始化脚本,位置在/usr/redis/utils/redis_init_script。
我们来看看这个脚本做了些什么:
#!/bin/sh#

REDISPORT=6379
EXEC=
/usr/local/bin/redis-server
CLIEXEC=
/usr/local/bin/redis-cli

PIDFILE=
/var/run/redis_
${REDISPORT}.pid
CONF=
"/etc/redis/${REDISPORT}.conf"

case
"$1"
in

start)

if
[ -f $PIDFILE ]

then

echo
"$PIDFILE exists, process is already running or crashed"

else

echo
"Starting Redis server..."

$EXEC $CONF

fi

;;

stop)

if
[ ! -f $PIDFILE ]

then

echo
"$PIDFILE does not exist, process is not running"

else

PID=$(
cat
$PIDFILE)

echo
"Stopping ..."

$CLIEXEC -p $REDISPORT
shutdown

while
[ -x
/proc/
${PID} ]

do

echo
"Waiting for Redis to shutdown ..."

sleep
1

done

echo
"Redis stopped"

fi

;;

*)

echo
"Please use start or stop as first argument"

;;
esac 脚本中指定了端口、server路径、cli路径、pidfile路径以及conf路径,上述标黄的地方都需要正确配置,多说一句,如果在安装时执行了make install,那么这里的脚本不需要做多大改动,因为make install把server和cli都拷到/usr/local/bin下面了。
另外看到这里conf的路径,我们需要把redis目录下的redis.conf文件拷贝到/etc/redis/6379.conf
[[email protected] utils]
# cd /etc
[[email protected] etc]
# mkdir redis
[[email protected] etc]
# cp /usr/redis/redis.conf /etc/redis/6379.conf接着将redis_init_script脚本拷贝到/etc/init.d/redisd
[[email protected] etc]
# cp /usr/redis/utils/redis_init_script /etc/init.d/redisd在/etc/init.d下的脚本都是可以在系统启动是自动启动的服务,而现在还缺一个系统启动时的配置:
[[email protected] zhxilin]
# chkconfig redisd on然后就会发现报了一个错误:服务 redisd 不支持 chkconfig ?
这是因为我们需要在redis_init_script的开头加一个小改动:
#!/bin/sh
# chkconfig: 2345 90 10
# description: Redis is a persistent key-value database保存完重新拷贝到/etc/init.d/redisd后,再运行chkconfig就完成了。
一切就绪之后,可以执行以下命令检验service是否设置成功:
[[email protected] zhxilin]
# service redisd start
[[email protected] zhxilin]
# service redisd stop等价于
[[email protected] zhxilin]
# /etc/init.d/redisd start
[[email protected] zhxilin]
# /etc/init.d/redisd stop总结
最后重启一下系统吧,进入系统之后直接运行redis-cli检验redis服务是否已经自动运行了。以上就是这篇文章的全部内容,希望本文的内容对大家的学习或者工作能带来一定的帮助,如果有疑问大家可以留言交流。
发布者:全栈程序员栈长,转载请注明出处:https://javaforall.cn/113810.html原文链接:https://javaforall.cn
边栏推荐
- China Southern Airlines pa3.1
- July 10, 2022 "five heart public welfare" activity notice + registration entry (two-dimensional code)
- Rolling puddle Uni_ App (VIII)
- Force buckle 1002 Find common characters
- Some online academic report websites and machine learning videos
- Une fois que l'uniapp a sauté de la page dans onlaunch, cliquez sur Event Failure resolution
- How to successfully pass the senior system architecture designer in the second half of the year?
- Shardingsphere sub database and table examples (logical table, real table, binding table, broadcast table, single table)
- [untitled]
- Go slice comparison
猜你喜欢

The gun startles the dragon, and the crowd "locks" Zhou Zhi
![[pyqt] the cellwidget in tablewidget uses signal and slot mechanism](/img/0e/02265f7195ca0add4155694530822a.png)
[pyqt] the cellwidget in tablewidget uses signal and slot mechanism

2022年7月10日“五心公益”活动通知+报名入口(二维码)
![[untitled]](/img/a0/29975bc0f9832e1640cc39dfce4a71.jpg)
[untitled]
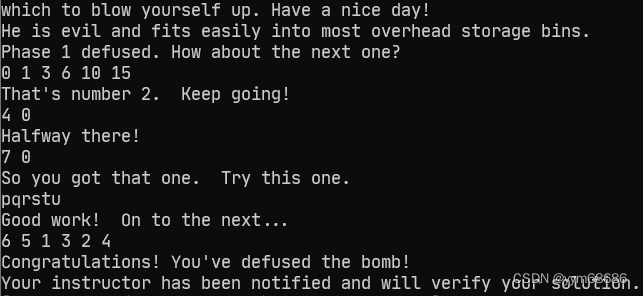
CSAPP bomb lab parsing
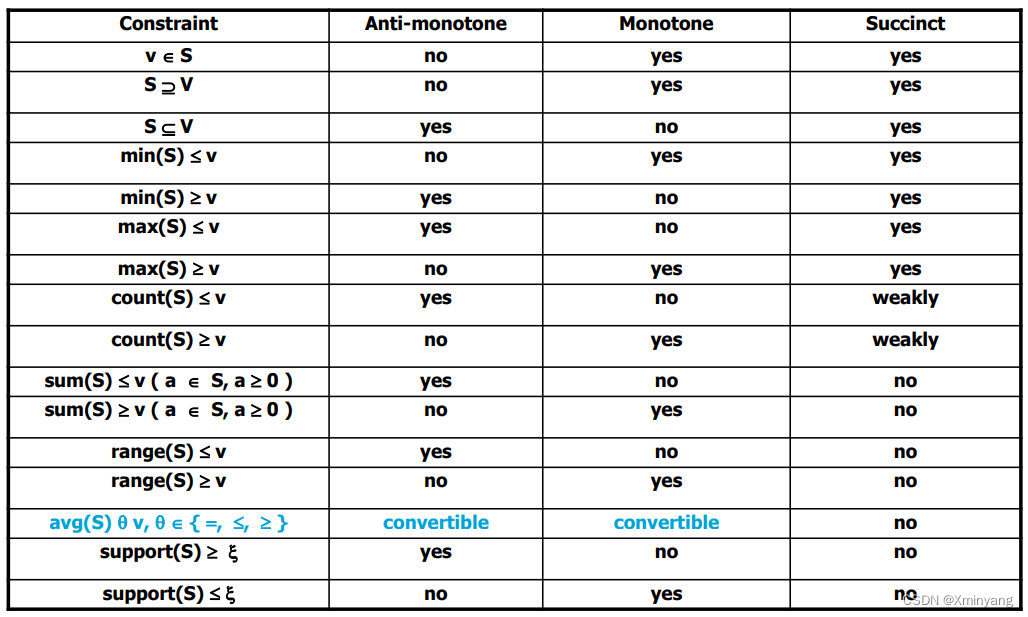
單調性約束與反單調性約束的區別 monotonicity and anti-monotonicity constraint

Unable to open kernel device '\.\vmcidev\vmx': operation completed successfully. Reboot after installing vmware workstation? Module "devicepoweron" failed to start. Failed to start the virtual machine
The difference between monotonicity constraint and anti monotonicity constraint
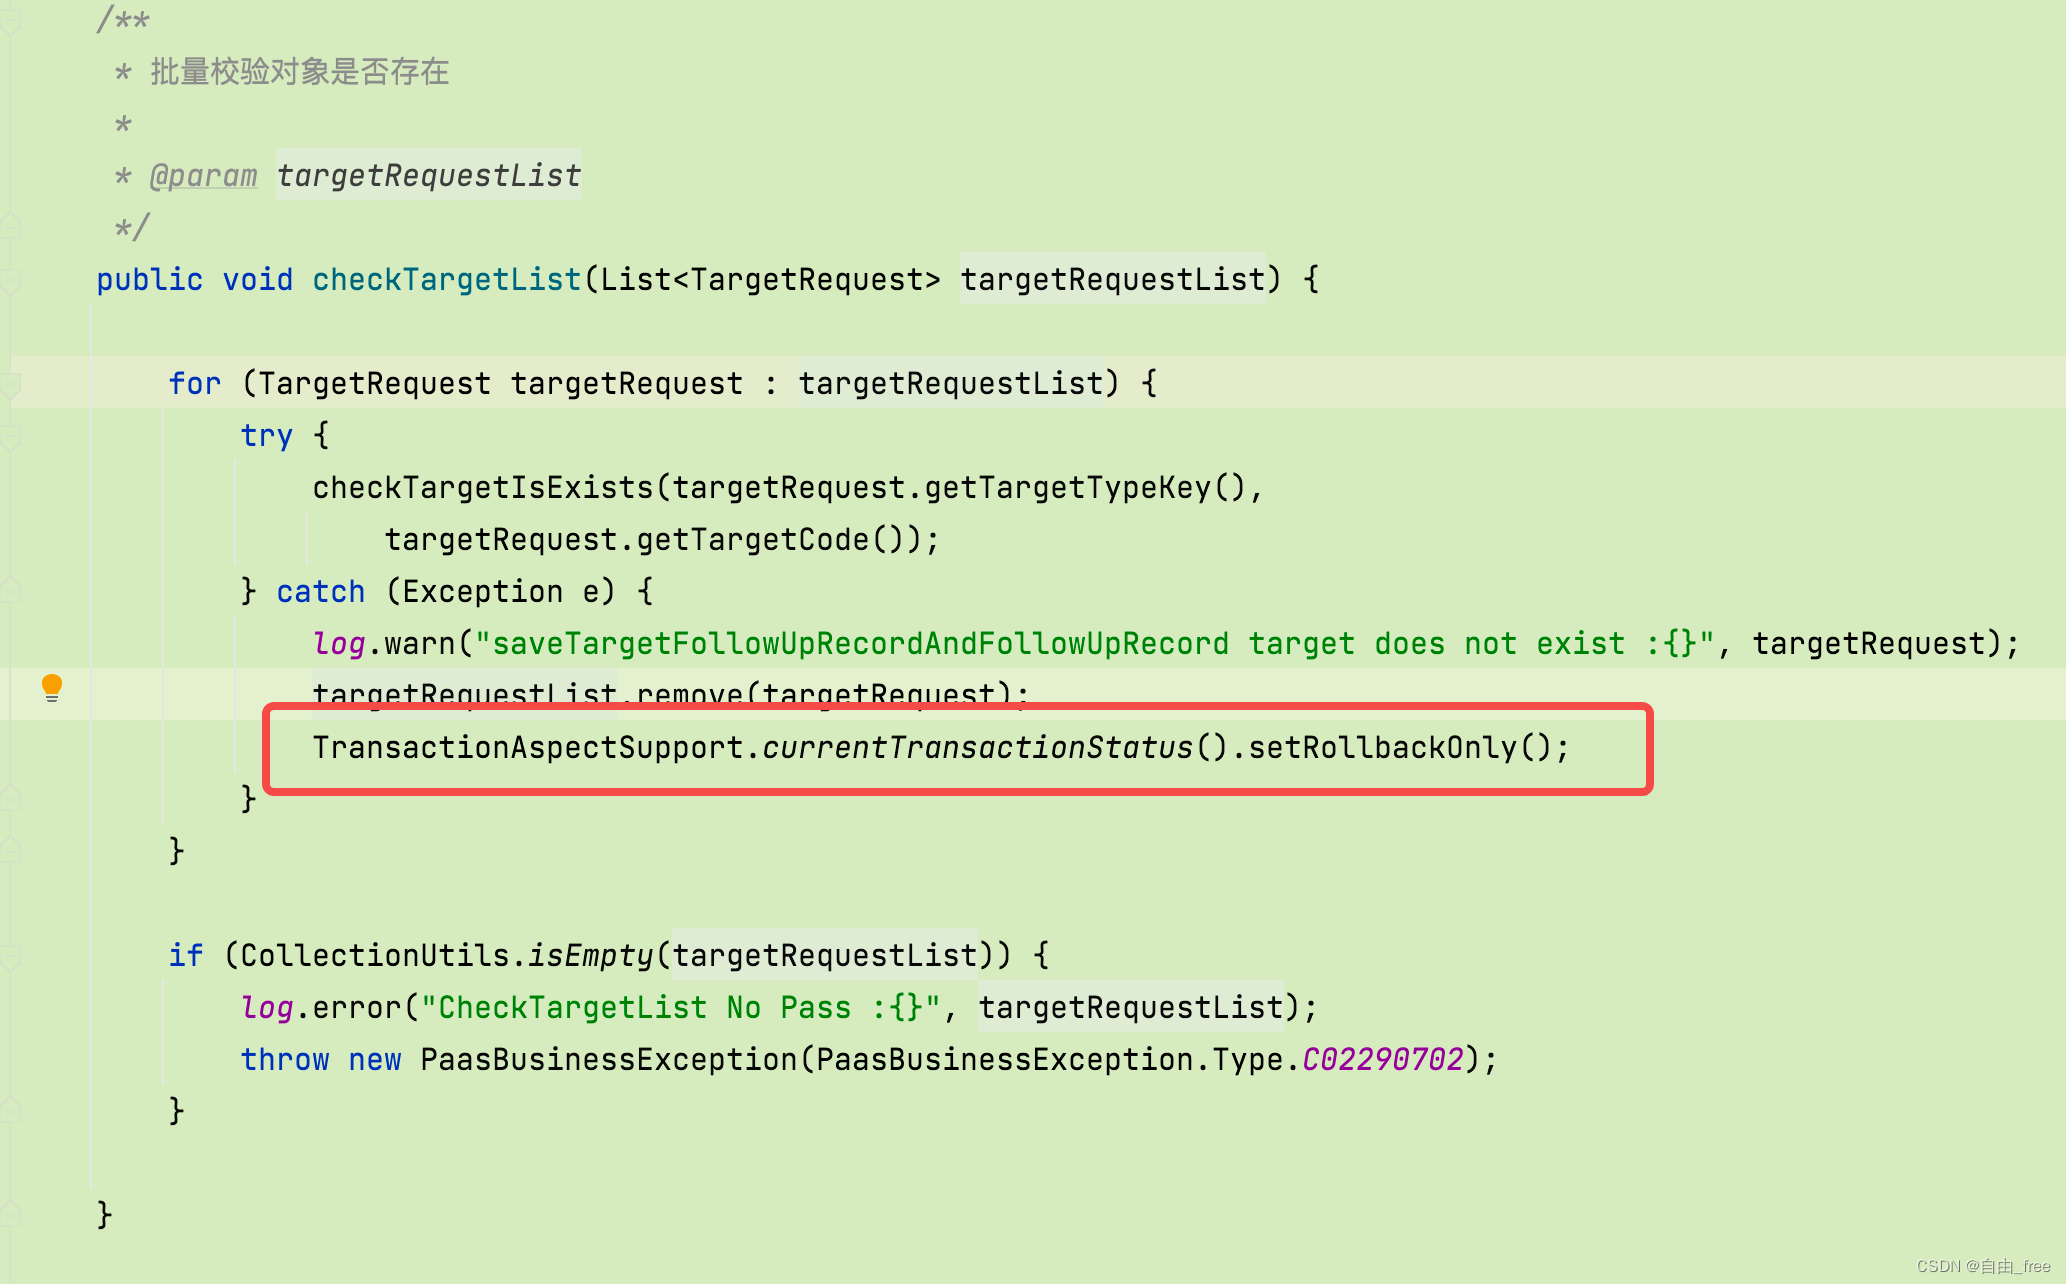
Transaction rolled back because it has been marked as rollback only
![[recommendation system 01] rechub](/img/92/c14c867247d3a042c69b5ed0091fbe.png)
[recommendation system 01] rechub
随机推荐
Typescript interface inheritance
Some online academic report websites and machine learning videos
2021-04-23
uniCloud
The eighth training assignment
Go slice comparison
Transaction rolled back because it has been marked as rollback-only解决
POJ1821 Fence 题解报告
Shardingsphere sub database and table examples (logical table, real table, binding table, broadcast table, single table)
Go redis Middleware
Go Slice 比较
Template initial level template
Deep understanding of Apache Hudi asynchronous indexing mechanism
Poj1821 fence problem solving Report
Galaxy Kirin desktop operating system installation postgresql13 (source code installation)
The opacity value becomes 1%
【STM32】实战3.1—用STM32与TB6600驱动器驱动42步进电机(一)
[recommendation system 02] deepfm, youtubednn, DSSM, MMOE
Deconstruction and assignment of variables
QT document